2012 KIA Soul torque
[x] Cancel search: torquePage 113 of 393

Features of your vehicle
34
4
Electric power steering (EPS)
The power steering uses a motor to
assist you in steering the vehicle. If
the engine is off or if the power steer-
ing system becomes inoperative, the
vehicle may still be steered, but it will
require increased steering effort.
The motor driven power steering is
controlled by a power steering con-
trol unit which senses the steering
wheel torque and vehicle speed to
command the motor.
The steering becomes heavier as
the vehicle’s speed increases and
becomes lighter as the vehicle’s
speed decreases for optimum steer-
ing control.
Should you notice any change in the
effort required to steer during normal
vehicle operation, have the power
steering checked by an authorized
Kia dealer.
✽ ✽
NOTICE
The following symptoms may occur
during normal vehicle operation:
• The steering effort is high immedi-
ately after turning the ignition
switch on. This happens as the sys-
tem performs the EPS system
diagnostics. When the diagnostics
is completed, the steering wheel
will return to its normal condition.
• A click noise may be heard from the EPS relay after the ignition
switch is turned to the ON or
LOCK position.
• Motor noise may be heard when the vehicle is at a stop or at a low
driving speed.
• The steering effort increases if the steering wheel is rotated continu-
ously when the vehicle is not in
motion. However, after a few min-
utes, it will return to its normal
conditions.
• When you operate the steering wheel in low temperature, abnor-
mal noise could occur. If tempera-
ture rises, the noise will disappear.
This is a normal condition. (Continued)(Continued)
• When the vehicle is stationary, if
you turn the steering wheel all the
way to the left or right continuous-
ly, the steering wheel becomes
heavier from the end. But this is
for your safety, not system mal-
function. As time passes, the steer-
ing wheel return to its normal con-
dition.
If the Electric Power Steering System
does not operate normally, the warn-
ing light will illuminate on the instru-
ment cluster. The steering wheel may
become difficult to control or operate
abnormally. Take your vehicle to an
authorized Kia dealer and have the
vehicle checked as soon as possible.
STEERING WHEEL
Page 263 of 393

541
Driving your vehicle
Active ECO operation
Active ECO helps improve fuel effi-
ciency by controlling certain engine
and transaxle system operating
parameters. Fuel efficiency depends
on the driver's driving habit and road
condition. When the Active ECO button is
pressed the ECO indicator (green)
will illuminate to show that the
Active ECO is operating.
When the Active ECO is activated, it will remain on until the Active
ECO button is pressed again.
Active ECO does not turn off when
the engine is restarted. To turn off
Active ECO, press the Active ECO
button again.
If Active ECO is turned off, the sys- tem will return to the normal mode.
Limitation of Active ECO oper-
ation:
If the following conditions occur while
Active ECO is operating, the system
operation is limited even though
there is no change in the ECO indi-
cator.
When the coolant temperature islow: The system will be limited until
engine performance becomes nor-
mal.
When driving up a hill: The system will be limited to gain power when
driving uphill because the engine
torque is restricted.
When using sports mode: The sys- tem will be limited according to the
shift location.
When the accelerator pedal is deeply pressed for a few seconds:
The system will be limited, judging
that the driver wants to speed up.
ACTIVE ECO SYSTEM (IF EQUIPPED)
OAM052062
OAM052061L
■ Type A
■Type B
Page 296 of 393

617
What to do in an emergency
Wheels may have sharp edges.
Handle them carefully to avoid possi-
ble injury. Before putting the wheel
into place, be sure that there is noth-
ing on the hub or wheel (such as
mud, tar, gravel, etc.) that prevents
with the wheel from fitting solidly
against the hub.10. To install the wheel, hold it on the
studs, put the wheel nuts on the
studs and tighten them finger
tight. Jiggle the tire to be sure it is
completely seated, then tighten
the nuts as much as possible
with your fingers again.
11. Lower the vehicle to the ground by turning the wheel nut wrench
counterclockwise.
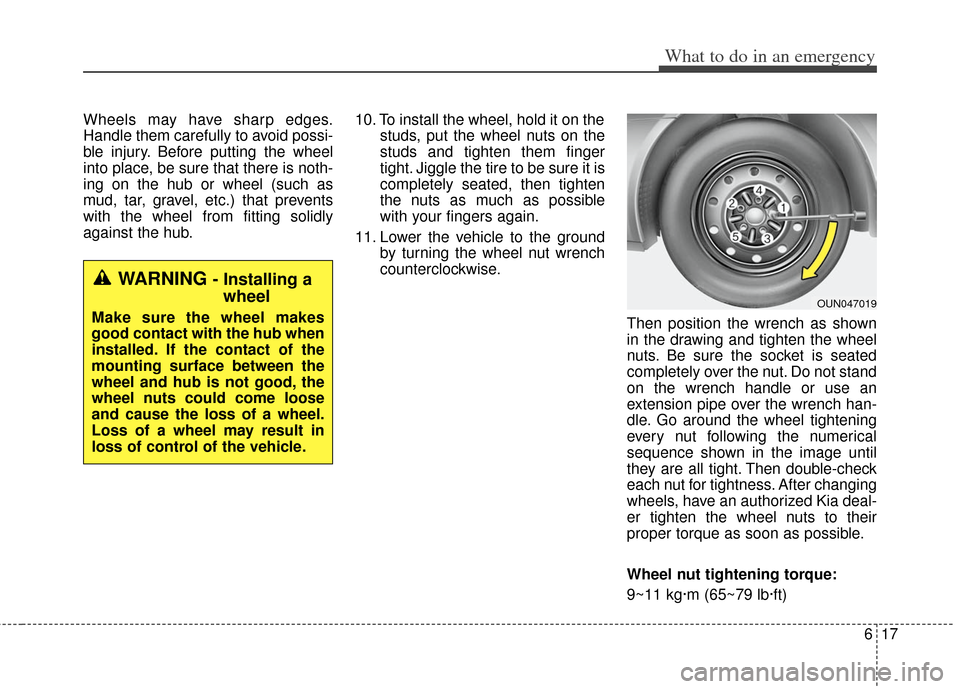
Then position the wrench as shown
in the drawing and tighten the wheel
nuts. Be sure the socket is seated
completely over the nut. Do not stand
on the wrench handle or use an
extension pipe over the wrench han-
dle. Go around the wheel tightening
every nut following the numerical
sequence shown in the image until
they are all tight. Then double-check
each nut for tightness. After changing
wheels, have an authorized Kia deal-
er tighten the wheel nuts to their
proper torque as soon as possible.
Wheel nut tightening torque:
9~11 kg·m (65~79 lb·ft)
OUN047019
WARNING - Installing awheel
Make sure the wheel makes
good contact with the hub when
installed. If the contact of the
mounting surface between the
wheel and hub is not good, the
wheel nuts could come loose
and cause the loss of a wheel.
Loss of a wheel may result in
loss of control of the vehicle.
Page 334 of 393

Maintenance
24
7
✽
✽
NOTICE
Automatic transaxle fluid color is
basically red.
As the vehicle is driven, the auto-
matic transaxle fluid will begin to
look darker.
It is normal condition and you
should not judge the need to replace
the fluid based upon the changed
color.
The use of a non-specified fluid
could result in transaxle malfunction
and failure.
Use only specified automatic
transaxle fluid. (Refer to
“Recommended lubricants and
capacities” in section 8.)
Brake hoses and lines
Visually check for proper installation,
chafing, cracks, deterioration and
any leakage. Replace any deteriorat-
ed or damaged parts immediately.
Brake/Clutch (if equipped)
fluid
Check the brake fluid level in the
brake fluid reservoir. The level should
be between “MIN” and “MAX” marks
on the side of the reservoir. Use only
hydraulic brake fluid conforming to
DOT 3 or DOT 4 specification.
Parking brake
Inspect the parking brake system
including the parking brake pedal
and cables.
Brake discs, pads, calipers
and rotors
Check the pads for excessive wear,
discs for run out and wear, and
calipers for fluid leakage.
Rear brake drums and linings
(if equipped)
Check the rear brake drums and lin-
ings for scoring, burning, leaking
fluid, broken parts, and excessive
wear.
Exhaust pipe and muffler
Visually inspect the exhaust pipes,
muffler and hangers for cracks, dete-
rioration, or damage. Start the
engine and listen carefully for any
exhaust gas leakage. Tighten con-
nections or replace parts as neces-
sary.
Suspension mounting bolts
Check the suspension connections
for looseness or damage. Retighten
to the specified torque.
Page 388 of 393

83
Specifications, Consumer information, Reporting safety defects
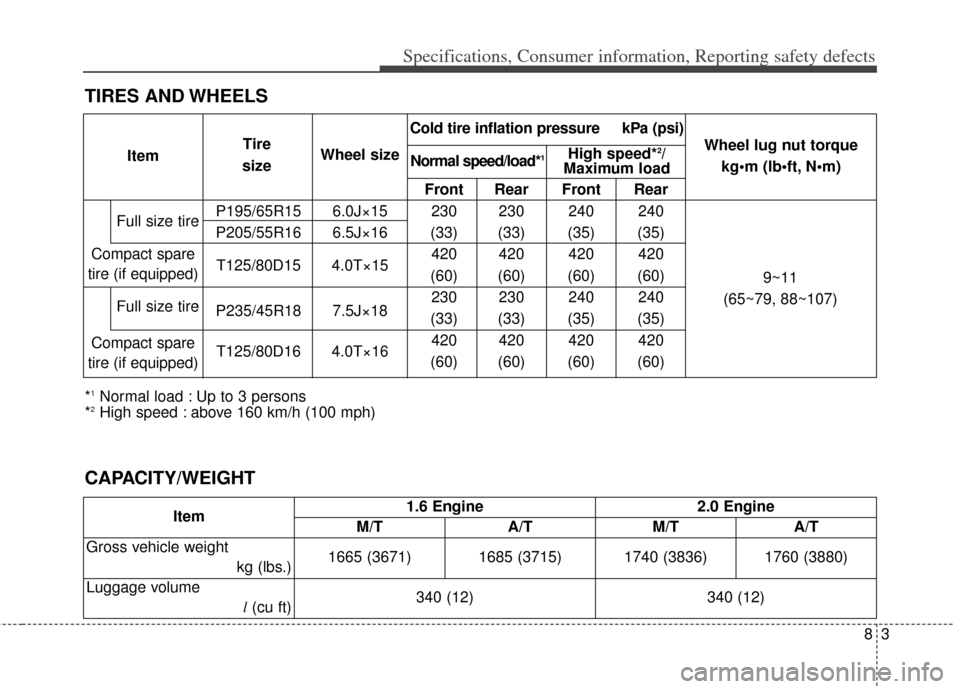
TIRES AND WHEELS
*1Normal load : Up to 3 persons
*2High speed : above 160 km/h (100 mph)
Front Rear Front Rear
P195/65R15 6.0J×15 230 230 240 240
P205/55R16 6.5J×16 (33) (33) (35) (35) 420 420 420 420
T125/80D15 4.0T×15 (60) (60) (60) (60)
P235/45R18 7.5J×18 230 230 240 240
(33) (33) (35) (35) 420 420 420 420
T125/80D16 4.0T×16 (60) (60) (60) (60)
Full size tire
Compact spare
tire (if equipped)
Compact spare
tire (if equipped) Wheel lug nut torque
kg•m (lb N
9~11
(65~79, 88~107)
Item
Tire
size Wheel size
Full size tire
Normal speed/load*1High speed*2/
Maximum load
Cold tire inflation pressure kPa (psi)
CAPACITY/WEIGHT
Item
1.6 Engine 2.0 Engine
M/T A/T M/T A/T
Gross vehicle weight kg (lbs.)1665 (3671) 1685 (3715) 1740 (3836) 1760 (3880)
Luggage volume l(cu ft) 340 (12) 340 (12)