Page 97 of 558
▫Headlights With Wipers (Available With
Automatic Headlights Only) ............ 160
▫ Headlight Time Delay — If Equipped ...... 160
▫ Daytime Running Lights — If Equipped .... 161
▫ Lights-On Reminder .................. 161
▫ Fog Lights — If Equipped .............. 161
▫ Turn Signals ........................ 162
▫ High/Low Beam Switch ............... 162
▫ Flash-To-Pass ....................... 162
▫ Instrument Panel Dimmer .............. 163
▫ Map/Reading Lights .................. 163
▫ Cargo Light ........................ 164
▫ Battery Saver Feature ................. 164 �
Windshield Wipers And Washers .......... 164
▫ Windshield Wiper Operation ............ 165
▫ Intermittent Wiper System .............. 166
▫ Windshield Washers .................. 167
▫ Mist Feature ........................ 167
▫ Rain Sensing Wipers — If Equipped ....... 168
▫ Headlights With Wipers (Available With
Automatic Headlights Only) ............ 170
� Tilt Steering Column ................... 171
� Tilt/Telescoping Steering Column .......... 172
� Electronic Speed Control — If Equipped ..... 173
▫ To Activate ......................... 173
▫ To Set A Desired Speed ................ 174
3
UNDERSTANDING THE FEATURES OF YOUR VEHICLE 95
Page 121 of 558
The Uconnect™ Phone will then send the corresponding
phone number associated with the phonebook entry, as
tones over the phone.
NOTE:
•You may not hear all of the tones due to mobile phone
network configurations. This is normal.
•Some paging and voice mail systems have system time
out settings that are too short and may not allow the
use of this feature.
Barge In — Overriding Prompts
The “Voice Command” button can be used when you
wish to skip part of a prompt and issue your voice
command immediately. For example, if a prompt is
asking “Would you like to pair a phone, clear a...,” you
could press the
button and say, “Pair a Phone” to
select that option without having to listen to the rest of
the voice prompt.
Turning Confirmation Prompts ON/OFF
Turning confirmation prompts off will stop the system
from confirming your choices (e.g., the Uconnect™
Phone will not repeat a phone number before you dial it).
•Press thebutton to begin.
•After the “Ready” prompt and the following beep, say
one of the following:
�“Setup Confirmation Prompts On”
�“Setup Confirmation Prompts Off”
Phone And Network Status Indicators
If available on the radio and/or on a premium display
such as the instrument panel cluster, and supported by
your mobile phone, the Uconnect™ Phone will provide
notification to inform you of your phone and network
status when you are attempting to make a phone call
using Uconnect™ Phone. The status is given for network
signal strength, phone battery strength, etc.
3
UNDERSTANDING THE FEATURES OF YOUR VEHICLE 119
Page 160 of 558
LIGHTS
Multifunction Lever
The multifunction lever on the left side of the steering
column controls the operation of the headlights, parking
lights, turn signal lights, instrument panel lights, instru-
ment panel light dimming, interior lights and fog lights
(if equipped).
Headlights And Parking Lights
Turn the end of the multifunction lever to the first detent
for parking light operation. Turn the end of the lever to
the second detent for headlight operation.
Multifunction Lever
Headlight Switch
158 UNDERSTANDING THE FEATURES OF YOUR VEHICLE
Page 164 of 558
Turn Signals
Move the multifunction lever up or down and the arrows
on each side of the instrument cluster flash to show
proper operation of the front and rear turn signal lights.NOTE:
If either light remains on and does not flash, or
there is a very fast flash rate, check for a defective outside
light bulb. If an indicator fails to light when the lever is
moved, it would suggest that the indicator bulb is
defective.
Lane Change Assist
Tap the lever up or down once, without moving beyond
the detent, and the turn signal (right or left) will flash
three times then automatically turn off.
High/Low Beam Switch
Push the multifunction lever away from you to switch
the headlights to high beam. Pull the multifunction lever
toward you, to switch the headlights back to low beam.
Flash-To-Pass
You can signal another vehicle with your headlights by
lightly pulling the multifunction lever toward you. This
will turn on the high beam headlights until the lever is
released.Turn Signal Control
162 UNDERSTANDING THE FEATURES OF YOUR VEHICLE
Page 189 of 558
1. Turn the ignition switch to the ON/RUN position.
2. Place the hand-held transmitter 1 to 3 in (3 to 8 cm)
away from the HomeLink�button you wish to program
while keeping the HomeLink� indicator light in view.3. Simultaneously press and hold both the Homelink�
button you want to program and the hand-held transmit-
ter button.
4. Continue to hold both buttons and observe the indi-
cator light. The Homelink�
indicator will flash slowly
and then rapidly after Homelink� has received the fre-
quency signal from the hand-held transmitter. Release
both buttons after the indicator light changes from slow
to rapid.
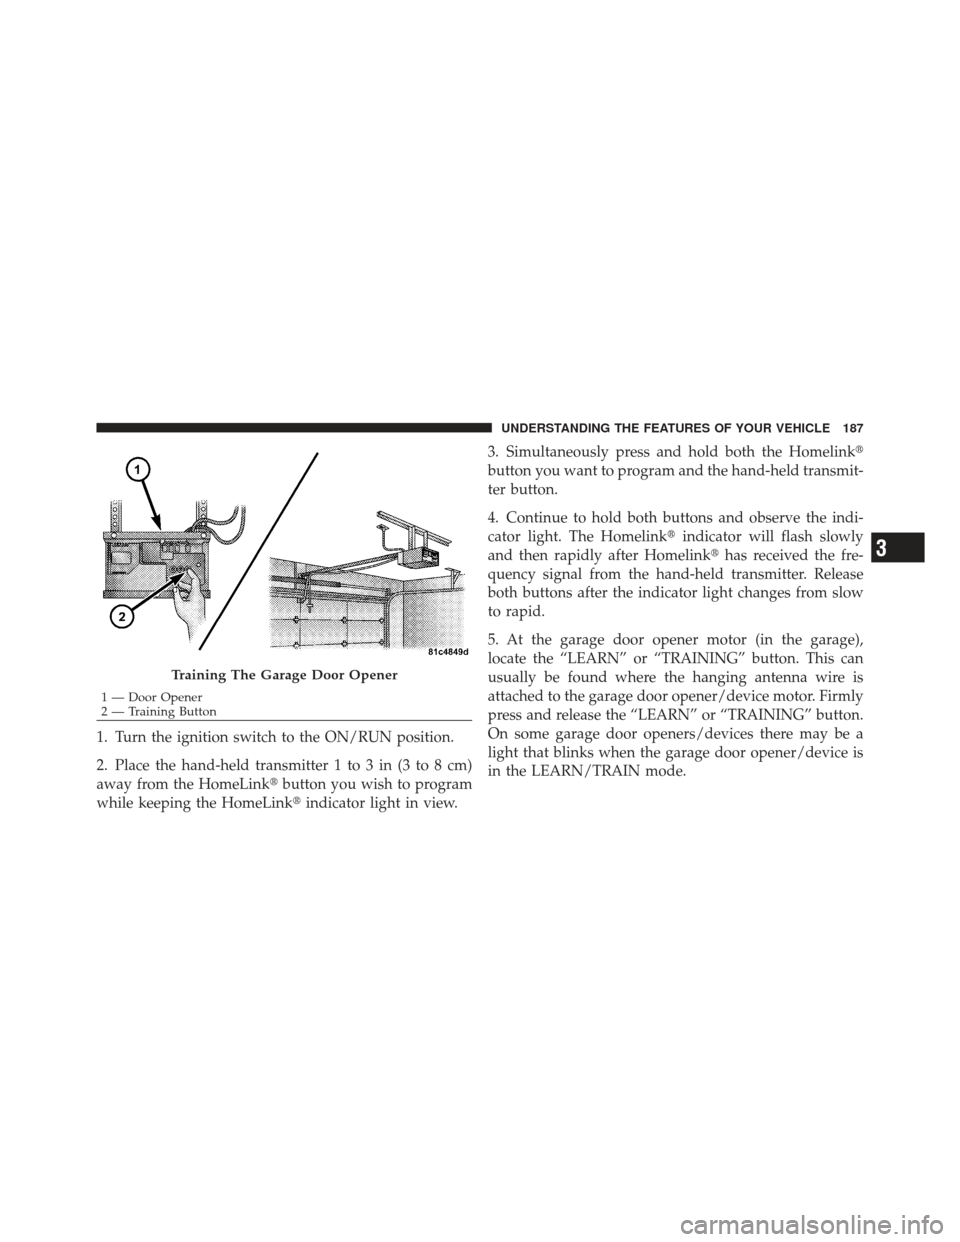
5. At the garage door opener motor (in the garage),
locate the “LEARN” or “TRAINING” button. This can
usually be found where the hanging antenna wire is
attached to the garage door opener/device motor. Firmly
press and release the “LEARN” or “TRAINING” button.
On some garage door openers/devices there may be a
light that blinks when the garage door opener/device is
in the LEARN/TRAIN mode.
Training The Garage Door Opener
1 — Door Opener
2 — Training Button
3
UNDERSTANDING THE FEATURES OF YOUR VEHICLE 187
Page 191 of 558
4. Continue to hold both buttons and observe the indi-
cator light. The Homelink�indicator will flash slowly
and then rapidly after Homelink� has received the fre-
quency signal from the hand-held transmitter. Release
both buttons after the indicator light changes from slow
to rapid.
5. Press and hold the programmed HomeLink� button
and observe the indicator light.
•If the indicator light stays on constantly, program-
ming is complete and the garage door/device
should activate when the HomeLink� button is
pressed.
•To program the two remaining HomeLink� buttons,
repeat each step for each remaining button. DO
NOT erase the channels.
Reprogramming A Single HomeLink �Button
To reprogram a channel that has been previously trained,
follow these steps:
1. Turn the ignition switch to the ON/RUN position.
2. Press and hold the desired HomeLink� button until
the indicator light begins to flash after 20 seconds. Do not
release the button.
3. Without releasing the button proceed with “Program-
ming A Non-Rolling Code” Step 2 and follow all remain-
ing steps.
Canadian/Gate Operator Programming
For programming transmitters in Canada/United States
that require the transmitter signals to “time-out” after
several seconds of transmission.
Canadian radio frequency laws require transmitter sig-
nals to time-out (or quit) after several seconds of trans-
mission – which may not be long enough for HomeLink �
3
UNDERSTANDING THE FEATURES OF YOUR VEHICLE 189
Page 192 of 558
to pick up the signal during programming. Similar to this
Canadian law, some U.S. gate operators are designed to
time-out in the same manner.
It may be helpful to unplug the device during the cycling
process to prevent possible overheating of the garage
door or gate motor.
1. Turn the ignition switch to the ON/RUN position.
2. Place the hand-held transmitter 1 to 3 in (3 to 8 cm)
away from the HomeLink�button you wish to program
while keeping the HomeLink� indicator light in view.
3. Continue to press and hold the HomeLink� button,
while you press and release (“cycle”), your hand-held
transmitter every two seconds until HomeLink �has
successfully accepted the frequency signal. The indicator
light will flash slowly and then rapidly when fully
trained. 4. Watch for the HomeLink�
indicator to change flash
rates. When it changes, it is programmed. It may take up
to 30 seconds or longer in rare cases. The garage door
may open and close while you are programming.
5. Press and hold the programmed HomeLink� button
and observe the indicator light.
•If the indicator light stays on constantly, program-
ming is complete and the garage door/device
should activate when the HomeLink� button is
pressed.
•To program the two remaining HomeLink� buttons,
repeat each step for each remaining button. DO
NOT erase the channels.
If you unplugged the garage door opener/device for
programming, plug it back in at this time.
190 UNDERSTANDING THE FEATURES OF YOUR VEHICLE
Page 229 of 558
CAUTION!
Prolonged driving with the MIL on could cause
damage to the engine control system. It also could
affect fuel economy and drivability. If the MIL is
flashing, severe catalytic converter damage and
power loss will soon occur. Immediate service is
required.
WARNING!
A malfunctioning catalytic converter, as referenced
above, can reach higher temperatures than in normal
operating conditions. This can cause a fire if you
drive slowly or park over flammable substances such
as dry plants, wood, cardboard, etc. This could result
in death or serious injury to the driver, occupants or
others.7. High Beam Indicator
This indicator shows that the high beam head-
lights are on. Pull the multifunction control lever
on the left side of the steering column toward you to
switch to low beam.
8. Front Fog Light Indicator — If Equipped This indicator will illuminate when the front fog
lights are on.
9. Speedometer
Shows the vehicle speed in Miles Per Hour (MPH) or
kilometers per hour (km/h).
10. Turn Signal Indicators The arrow will flash with the exterior turn signal
when the turn signal lever is operated.
4
UNDERSTANDING YOUR INSTRUMENT PANEL 227