2012 HYUNDAI VELOSTER navigation
[x] Cancel search: navigationPage 182 of 385
4103
Features of your vehicle
Temperature conversion
This allows you to set the unit of the dis-
tance and the temperature to the celsius
and the fahrenheit on your navigation
system.
- Units: Change the unit between the
“km” and “mls”.
- Temperature: Change the temperature
between the “C” and “F”.
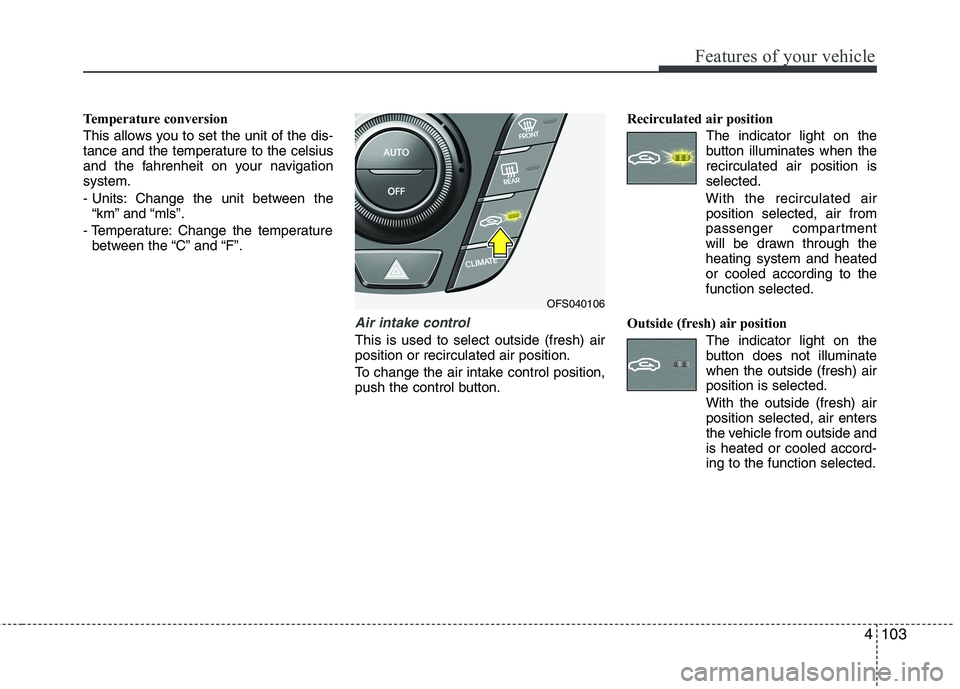
Air intake control
This is used to select outside (fresh) air
position or recirculated air position.
To change the air intake control position,
push the control button.Recirculated air position
The indicator light on the
button illuminates when the
recirculated air position is
selected.
With the recirculated air
position selected, air from
passenger compartment
will be drawn through the
heating system and heated
or cooled according to the
function selected.
Outside (fresh) air position
The indicator light on the
button does not illuminate
when the outside (fresh) air
position is selected.
With the outside (fresh) air
position selected, air enters
the vehicle from outside and
is heated or cooled accord-
ing to the function selected.
OFS040106
Page 195 of 385
Features of your vehicle
116 4
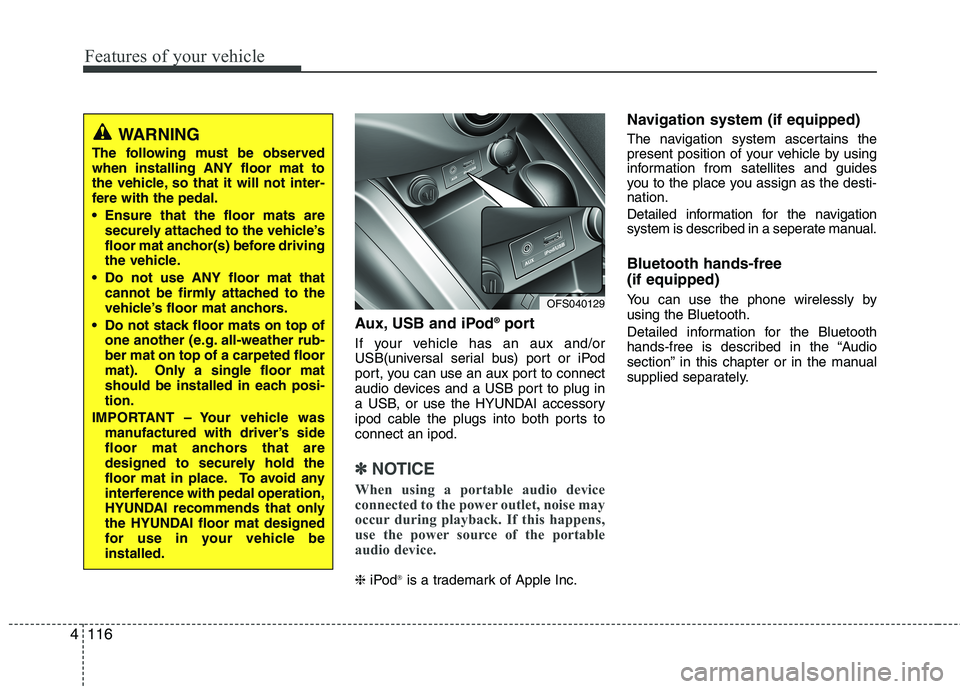
Aux, USB and iPod®port
If your vehicle has an aux and/or
USB(universal serial bus) port or iPod
port, you can use an aux port to connect
audio devices and a USB port to plug in
a USB, or use the HYUNDAI accessory
ipod cable the plugs into both ports to
connect an ipod.
✽ ✽
NOTICE
When using a portable audio device
connected to the power outlet, noise may
occur during playback. If this happens,
use the power source of the portable
audio device.
❈iPod®is a trademark of Apple Inc.
Navigation system (if equipped)
The navigation system ascertains the
present position of your vehicle by using
information from satellites and guides
you to the place you assign as the desti-
nation.
Detailed information for the navigation
system is described in a seperate manual.
Bluetooth hands-free
(if equipped)
You can use the phone wirelessly by
using the Bluetooth.
Detailed information for the Bluetooth
hands-free is described in the “Audio
section” in this chapter or in the manual
supplied separately.OFS040129
WARNING
The following must be observed
when installing ANY floor mat to
the vehicle, so that it will not inter-
fere with the pedal.
Ensure that the floor mats are
securely attached to the vehicle’s
floor mat anchor(s) before driving
the vehicle.
Do not use ANY floor mat that
cannot be firmly attached to the
vehicle’s floor mat anchors.
Do not stack floor mats on top of
one another (e.g. all-weather rub-
ber mat on top of a carpeted floor
mat). Only a single floor mat
should be installed in each posi-
tion.
IMPORTANT – Your vehicle was
manufactured with driver’s side
floor mat anchors that are
designed to securely hold the
floor mat in place. To avoid any
interference with pedal operation,
HYUNDAI recommends that only
the HYUNDAI floor mat designed
for use in your vehicle be
installed.
Page 203 of 385
Features of your vehicle
124 4
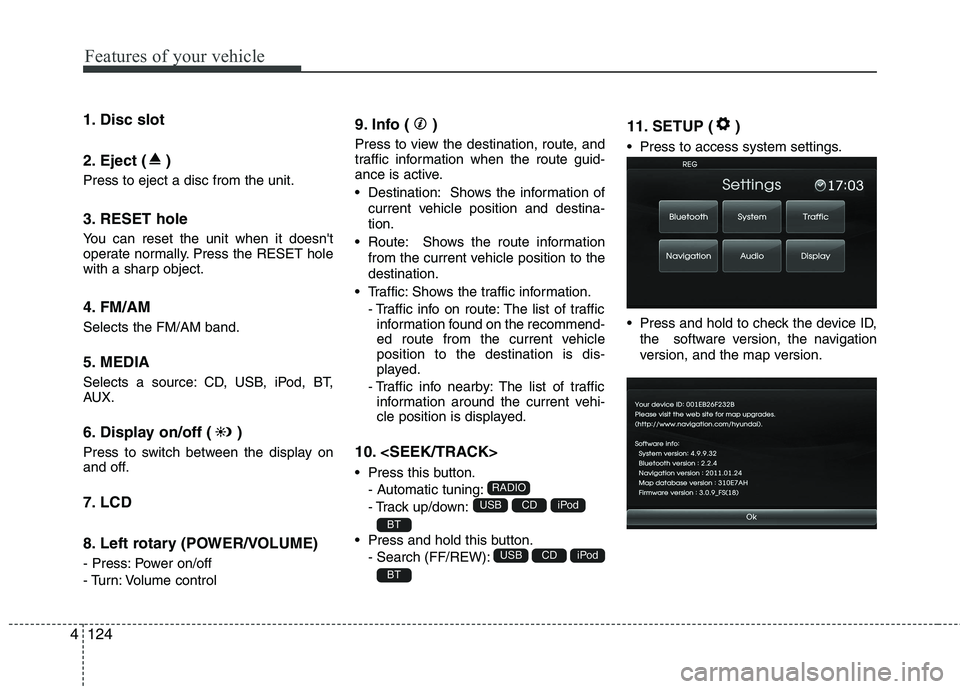
1. Disc slot
2. Eject ( )
Press to eject a disc from the unit.
3. RESET hole
You can reset the unit when it doesn't
operate normally. Press the RESET hole
with a sharp object.
4. FM/AM
Selects the FM/AM band.
5. MEDIA
Selects a source: CD, USB, iPod, BT,
AUX.
6. Display on/off ( )
Press to switch between the display on
and off.
7. LCD
8. Left rotary (POWER/VOLUME)
- Press: Power on/off
- Turn: Volume control
9. Info ( )
Press to view the destination, route, and
traffic information when the route guid-
ance is active.
• Destination: Shows the information of
current vehicle position and destina-
tion.
Route: Shows the route information
from the current vehicle position to the
destination.
Traffic: Shows the traffic information.
- Traffic info on route: The list of traffic
information found on the recommend-
ed route from the current vehicle
position to the destination is dis-
played.
- Traffic info nearby: The list of traffic
information around the current vehi-
cle position is displayed.
10.
Press this button.
- Automatic tuning:
- Track up/down:
Press and hold this button.
- Search (FF/REW):
11. SETUP ( )
Press to access system settings.
Press and hold to check the device ID,
the software version, the navigation
version, and the map version.
BT
iPodCDUSB
BT
iPodCDUSB
RADIO
Page 205 of 385
Features of your vehicle
126 4
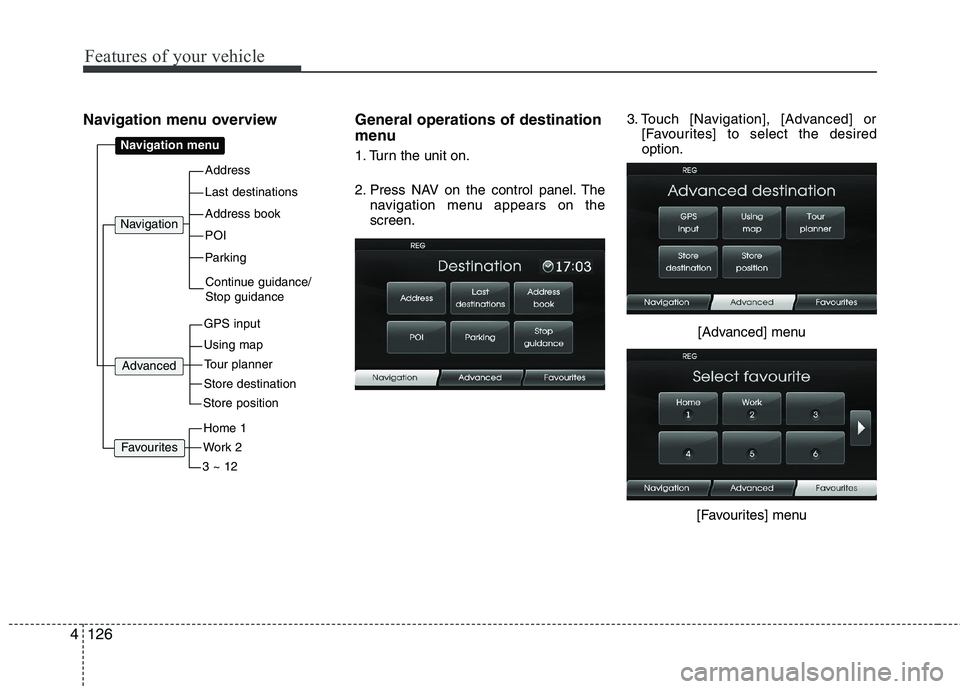
Navigation menu overview General operations of destination
menu
1. Turn the unit on.
2. Press NAV on the control panel. The
navigation menu appears on the
screen.3. Touch [Navigation], [Advanced] or
[Favourites] to select the desired
option.
[Advanced] menu
[Favourites] menuAddress
Last destinations
POI
Address book
Parking
Navigation menu
GPS input
Using map
Navigation
Continue guidance/
Stop guidance
Advanced
Store destination
Tour planner
Store position
Work 2
Home 1
3 ~ 12
Favourites
Page 207 of 385
![HYUNDAI VELOSTER 2012 Owners Manual Features of your vehicle
128 4
[Route] menu
[Traffic] menu
5. Touch the preferred setting method.
Understanding Bluetooth wire-
less technology
Bluetooth wireless technology establish-
es a wireless HYUNDAI VELOSTER 2012 Owners Manual Features of your vehicle
128 4
[Route] menu
[Traffic] menu
5. Touch the preferred setting method.
Understanding Bluetooth wire-
less technology
Bluetooth wireless technology establish-
es a wireless](/manual-img/35/56215/w960_56215-206.png)
Features of your vehicle
128 4
[Route] menu
[Traffic] menu
5. Touch the preferred setting method.
Understanding Bluetooth wire-
less technology
Bluetooth wireless technology establish-
es a wireless link between two devices,
such as your phone and the unit. The first
time you use two devices together you
must connect them by establishing a
relationship using a PIN code. After the
initial connecting, the two devices can
connect automatically each time you turn
them on.
NOTE:
• There may be restrictions on using
Bluetooth technology in some loca-
tions.
Due to the variety of Bluetooth
phones and their firmware version,
your device may respond differently
when performing over Bluetooth.
As difference in functional opera-
tion by model is mainly resulted
from feature of a hands-free phone,
consult manufacturer of a phone if
you have any question.
You can check the Bluetooth phone
compatibility list on the web-site
(http://www.navigation.com/hyundai
).
Connecting your unit and blue-
tooth phone
To connect using the unit settings (1)
1. Press on the control panel.
2. Touch [Bluetooth].
3. Touch [Search for Bluetooth devices].
If you want to cancel, touch [Cancel].
Page 212 of 385
4133
Features of your vehicle
NOTE:
When a station is preset on the preset
station button number on which
another station of the same band has
already been preset, the previously
preset station is automatically erased.
Voice recognition
Voice recognition allows hands-free
operation of the AV system (RADIO, CD,
USB, iPod), navigation and other sys-
tems equipped on this vehicle, such as
the phone.
NOTE:
To get the best recognition perform-
ance out of voice recognition, observe
the following:
Keep the interior of the vehicle as
quiet as possible. Close the win-
dows to eliminate the surrounding
noises (traffic noises, vibration
sounds, etc.), which may prevent
the system from recognizing the
voice commands correctly.
Wait until a beep sounds before
speaking a command. Otherwise,
the command will not be recognized
properly.
Speak in a natural voice without
pausing between words.
Giving voice commands
1. Press ( ) on the steering wheel
remote control.
2. After the beep sounds, say "Help". All
commands shall be listed which are
presented in active fields.
NOTE:
If the command is not recognized,
the system announces, 1st time
"Pardon?", 2nd time "Please,
repeat", and 3rd time "Command is
not recognized".
If you want to cancel the voice
recognition, press () one more time
or press the any button or touch
screen say "Cancel".
If you want to adjust the volume of
the system feedback, press VOL+ or
VOL-on the steering wheel remote
control or use the volume knob
(VOLUME) on the control while the
voice recognition is active.
Page 347 of 385
753
Maintenance
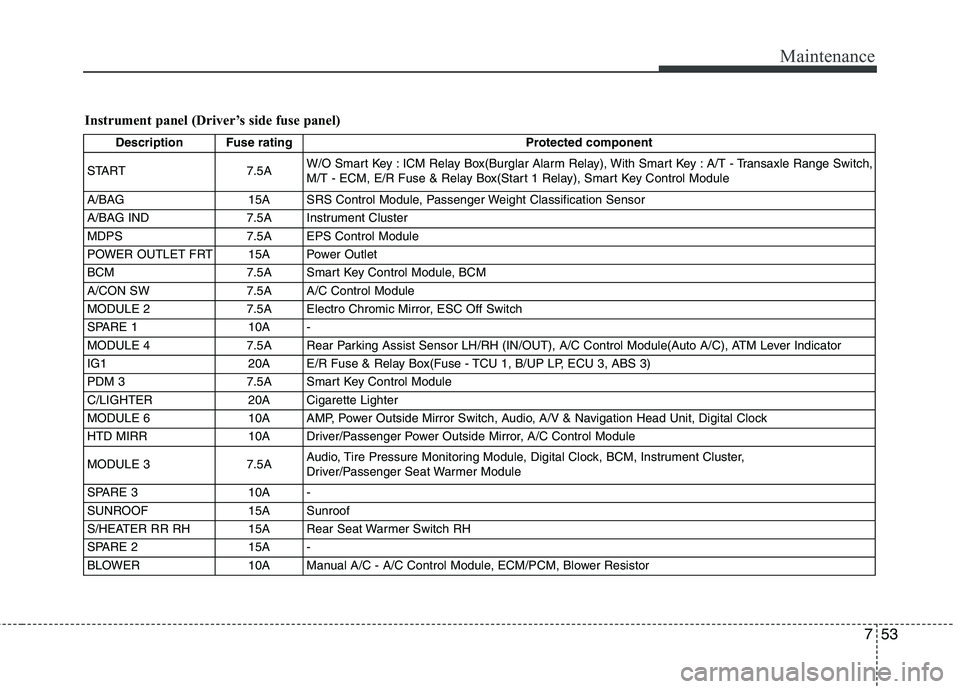
Instrument panel (Driver’s side fuse panel)
Description Fuse rating Protected component
START 7.5AW/O Smart Key : ICM Relay Box(Burglar Alarm Relay), With Smart Key : A/T - Transaxle Range Switch,
M/T - ECM, E/R Fuse & Relay Box(Start 1 Relay), Smart Key Control Module
A/BAG 15A SRS Control Module, Passenger Weight Classification Sensor
A/BAG IND 7.5A Instrument Cluster
MDPS 7.5A EPS Control Module
POWER OUTLET FRT 15A Power Outlet
BCM 7.5A Smart Key Control Module, BCM
A/CON SW 7.5A A/C Control Module
MODULE 2 7.5A Electro Chromic Mirror, ESC Off Switch
SPARE 1 10A -
MODULE 4 7.5A Rear Parking Assist Sensor LH/RH (IN/OUT), A/C Control Module(Auto A/C), ATM Lever Indicator
IG1 20A E/R Fuse & Relay Box(Fuse - TCU 1, B/UP LP, ECU 3, ABS 3)
PDM 3 7.5A Smart Key Control Module
C/LIGHTER 20A Cigarette Lighter
MODULE 6 10A AMP, Power Outside Mirror Switch, Audio, A/V & Navigation Head Unit, Digital Clock
HTD MIRR 10A Driver/Passenger Power Outside Mirror, A/C Control Module
MODULE 3 7.5AAudio, Tire Pressure Monitoring Module, Digital Clock, BCM, Instrument Cluster,
Driver/Passenger Seat Warmer Module
SPARE 3 10A -
SUNROOF 15A Sunroof
S/HEATER RR RH 15A Rear Seat Warmer Switch RH
SPARE 2 15A -
BLOWER 10A Manual A/C - A/C Control Module, ECM/PCM, Blower Resistor
Page 348 of 385
Maintenance
54 7
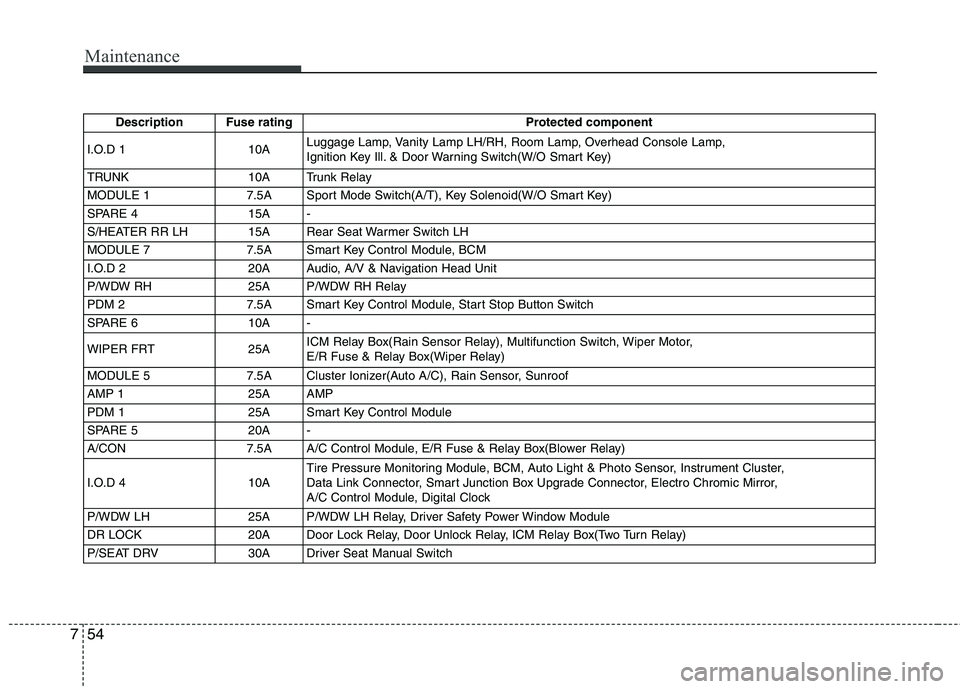
Description Fuse rating Protected component
I.O.D 1 10ALuggage Lamp, Vanity Lamp LH/RH, Room Lamp, Overhead Console Lamp,
Ignition Key Ill. & Door Warning Switch(W/O Smart Key)
TRUNK 10A Trunk Relay
MODULE 1 7.5A Sport Mode Switch(A/T), Key Solenoid(W/O Smart Key)
SPARE 4 15A -
S/HEATER RR LH 15A Rear Seat Warmer Switch LH
MODULE 7 7.5A Smart Key Control Module, BCM
I.O.D 2 20A Audio, A/V & Navigation Head Unit
P/WDW RH 25A P/WDW RH Relay
PDM 2 7.5A Smart Key Control Module, Start Stop Button Switch
SPARE 6 10A -
WIPER FRT 25AICM Relay Box(Rain Sensor Relay), Multifunction Switch, Wiper Motor,
E/R Fuse & Relay Box(Wiper Relay)
MODULE 5 7.5A Cluster Ionizer(Auto A/C), Rain Sensor, Sunroof
AMP 1 25A AMP
PDM 1 25A Smart Key Control Module
SPARE 5 20A -
A/CON 7.5A A/C Control Module, E/R Fuse & Relay Box(Blower Relay)
I.O.D 4 10ATire Pressure Monitoring Module, BCM, Auto Light & Photo Sensor, Instrument Cluster,
Data Link Connector, Smart Junction Box Upgrade Connector, Electro Chromic Mirror,
A/C Control Module, Digital Clock
P/WDW LH 25A P/WDW LH Relay, Driver Safety Power Window Module
DR LOCK 20A Door Lock Relay, Door Unlock Relay, ICM Relay Box(Two Turn Relay)
P/SEAT DRV 30A Driver Seat Manual Switch