2012 HYUNDAI IX35 ECU
[x] Cancel search: ECUPage 368 of 560

Maintenance
48
7
Engine compartment sub fuse panel (Disel Engine)
No.Fuse ratingFuse SymbolCircuit ProtectedRelay SymbolRelay Type
150APTC Heater Relay #1 MICRO PLUG
250APTC Heater Relay #2MICRO PLUG
350APTC Heater Relay #3 MICRO PLUG
430AFuel Filter Heater Relay MICRO PLUG
580AGlow Relay Unit--
No.Fuse ratingSymbolFuse Name Circuit Protected
FUSE
1415ADEICERRLY. 10 (Front Wiper Deicer Relay)
1510ASTOP LAMPStop Lamp Switch, ICM Relay Box (DBC Relay)
1610AB+ SENSORBattery Sensor
1710A4WD4WD ECM
187.5AECU 2RLY. 11 (ATM P/N Relay), G4KD - PCM,
Multifrnction Switch (Remote Control), D4HA - ECM, Mass Air Flow Sensor
197.5AABSESP Control Module, ABS Control Module, Multipurpose Check Connector,
Fuel Filter Warning Sensor (D4HA), Glow Relay Unit (D4HA),
Diesel Box (RLY. 4 - Fuel Filter Heater Relay)
207.5ATCU 2Transaxle Range Switch, TCM (D4HA), Vehicle Speed Sensor
EL UK 7.QXP 1/25/2010 10:05 AM Page 48
Page 375 of 560
755
Maintenance
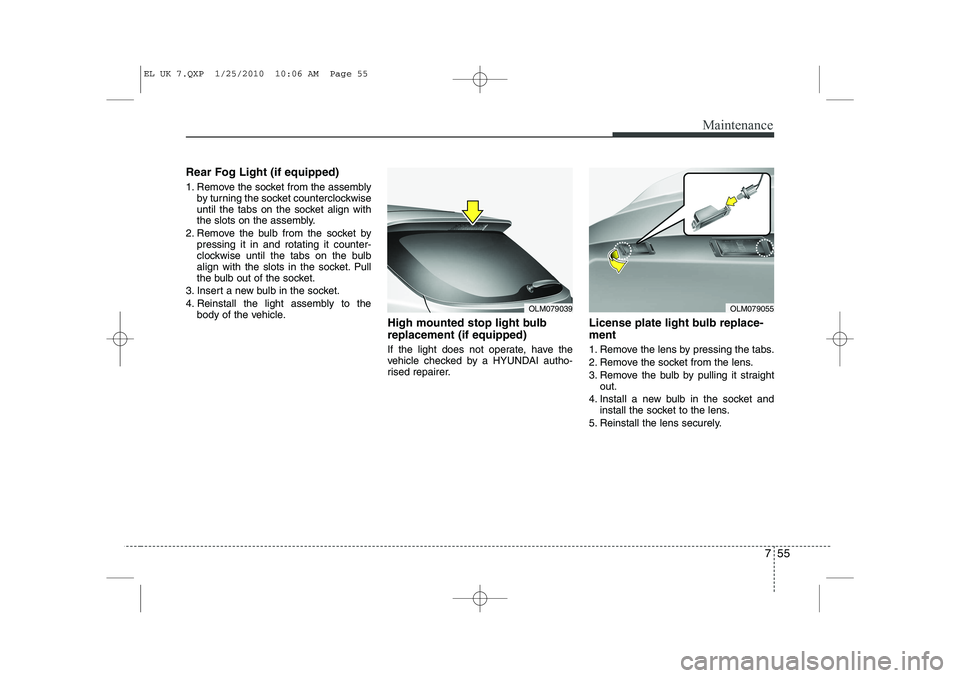
Rear Fog Light (if equipped)
1. Remove the socket from the assemblyby turning the socket counterclockwise
until the tabs on the socket align with
the slots on the assembly.
2. Remove the bulb from the socket by pressing it in and rotating it counter-
clockwise until the tabs on the bulb
align with the slots in the socket. Pull
the bulb out of the socket.
3. Insert a new bulb in the socket.
4. Reinstall the light assembly to the body of the vehicle. High mounted stop light bulb replacement (if equipped)
If the light does not operate, have the
vehicle checked by a HYUNDAI autho-
rised repairer. License plate light bulb replace- ment
1. Remove the lens by pressing the tabs.
2. Remove the socket from the lens.
3. Remove the bulb by pulling it straight
out.
4. Install a new bulb in the socket and install the socket to the lens.
5. Reinstall the lens securely.
OLM079039OLM079055
EL UK 7.QXP 1/25/2010 10:06 AM Page 55
Page 404 of 560
I3
Index
Interior light bulb replacement··································7-56
License plate light bulb replacement ························7-55
Position light bulb replacement ································7-52
Rear combination light bulb replacement ·················7-53
Rear fog light bulb replacement································7-55Side repeater light bulb replacement·························7-52
Turn signal light bulb replacement ···························7-51
Bulb wattage ·····································································8-2
Button start/stop, see engine start/stop button ··················5-8
Capacities (Lubricants) ·····················································8-4 Care Exterior care ······························································7-57
Interior care ·······························································7-62
Tyre care····································································7-29
Cargo security screen····················································4-113
Central door lock switch ·················································4-14
Centre console storage ··················································4-106
Changing tyres ································································6-14Chains Tyre chains ································································5-55
Checking tyre inflation pressure ·····································7-31
Child restraint system ·····················································3-29 Tether anchor system ················································3-33
ISOFIX system ·························································3-35
Child-protector rear door lock ·······································4-16 Cigarette lighter ····························································4-108
Climate control air filter ·················································7-21
Climate control system (Automatic) ·····························4-96
Air conditioning ·····················································4-102Automatic heating and air conditioning ···················4-97
Manual heating and air conditioning ·······················4-98
Climate control system (Manual) ··································4-87 Air conditioning ·······················································4-92
Climate control air filter ··········································4-94
Heating and air conditioning·····································4-88
Clock (Digital) ······························································4-111
Combined instrument, see instrument cluster ················4-42Compass mirror, see the Electric chromic mirror (ECM) with compass ······································4-36
Cool box········································································4-107Coolant ···········································································7-13
Cooling fluid, see engine coolant ··································7-13
Crankcase emission control system ·······························7-63
Cruise control system ····················································5-43
Cup holder ···································································4-109
Curtain air bag ·······························································3-54
C
EL UK INDEX.QXP 1/12/2010 3:27 PM Page 3
Page 407 of 560
Index
6
I
Ignition key interlock system ········································5-21
ISOFIX system ······························································3-35
Immobiliser system ··························································4-3
Indicators and warnings ·················································4-49Indicator symbols on the instrument cluster ····················1-6
Instrument cluster ··························································4-42
ECO ON/OFF mode··················································4-49
Engine temperature gauge ········································4-44
Fuel gauge ································································4-45
Instrument panel illumination ··································4-43Odometer ··································································4-46
Outside thermometer ·················································4-45Speedometer ·····························································4-43Tachometer ·······························································4-43
Tripmeter ···································································4-47
Trip computer ···························································4-46
Warning and indicators ············································4-49
Instrument panel illumination ········································4-43
Instrument panel overview ··············································2-3
Interior care ····································································7-62
Interior features ····························································4-108 Ashtray ···································································4-108
Cigarette lighter ······················································4-108
Cargo security screen ·············································4-113
Cup holder ······························································4-109
Digital clock ···························································4-111 Aux, USB and iPod ················································4-111
Floor mat anchor(s) ················································4-112
Luggage net (holder) ··············································4-112
Power outlet ···························································4-110Sunvisor ··································································4-109
Interior light ···································································4-82 Glove box lamp ·························································4-84
Luggage room lamp ··················································4-83
Map lamp ··································································4-82
Room lamp ································································4-83
Vanity mirror lamp····················································4-83
Interior light bulb replacement ······································7-56
Interior overview ·····························································2-2
Interlock system ·····························································5-21
Jack and tools ·································································6-13
Jump starting ····································································6-5
Key positions ···································································5-4 Keys ·················································································4-2
K
J
I
EL UK INDEX.QXP 1/12/2010 3:27 PM Page 6
Page 425 of 560
413
Features of your vehicle
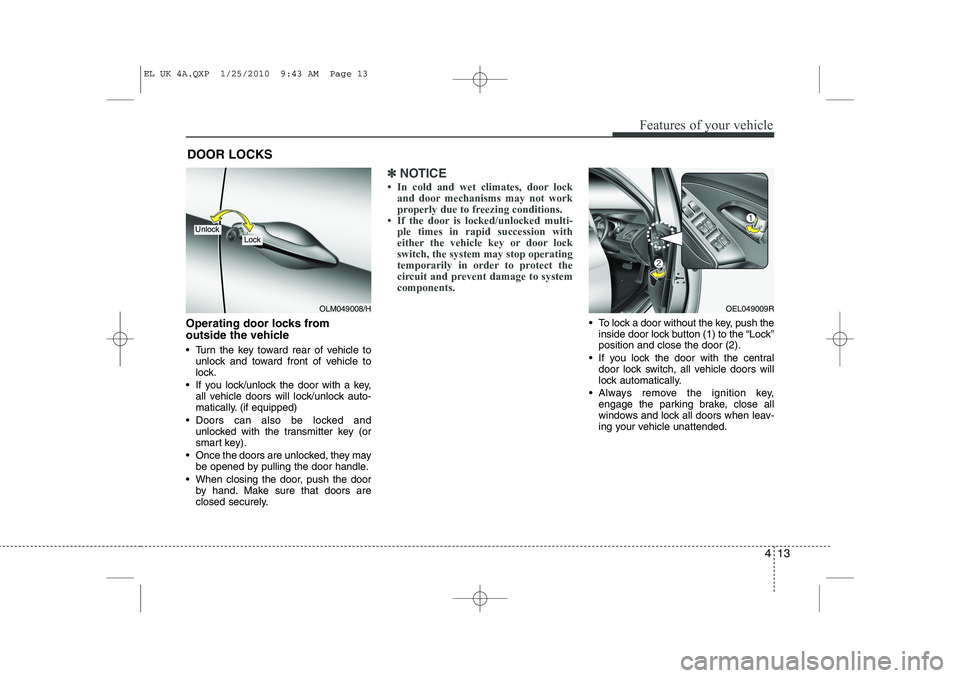
Operating door locks from
outside the vehicle
Turn the key toward rear of vehicle tounlock and toward front of vehicle to
lock.
If you lock/unlock the door with a key, all vehicle doors will lock/unlock auto-
matically. (if equipped)
Doors can also be locked and unlocked with the transmitter key (or
smart key).
Once the doors are unlocked, they may be opened by pulling the door handle.
When closing the door, push the door by hand. Make sure that doors are
closed securely.
✽✽ NOTICE
Page 427 of 560
415
Features of your vehicle
Deadlocks (if equipped)
Some vehicles are equipped with a
deadlocking system. Deadlocks preventopening of a door from either inside or
outside the vehicle once the deadlocks
have been activated providing an addi-
tional measure of vehicle security.
To lock the vehicle using the deadlock
function, the doors must be locked using
the (Smart) key or the Remote Keyless
Entry transmitter. To unlock the vehicle,
the (Smart) key or the transmitter mustagain be used.
WARNING - Doors
The doors should always be fully closed and locked whilst the
vehicle is in motion to prevent
accidental opening of the door.
Locked doors will also discour-
age potential intruders when the
vehicle stops or slows.
Be careful when opening doors and watch for vehicles, motorcy-
cles, bicycles or pedestrians
approaching the vehicle in the
path of the door. Opening a door
when something is approaching
can cause damage or injury.
WARNING
Do not lock the doors with the
(smart) key or the transmitter with
anybody left in the vehicle. The pas-
senger in the vehicle cannot unlock
the doors with the door lock button.
For example, if the door is locked
with the transmitter, the passenger
in the vehicle cannot unlock the
door without the transmitter.
WARNING - Unlocked
vehicles
Leaving your vehicle unlocked can
invite theft or possible harm to you
or others from someone hiding in
your vehicle whilst you are gone.
Always remove the ignition key,
engage the parking brake, close all
windows and lock all doors when
leaving your vehicle unattended.
WARNING - Unattended
children
An enclosed vehicle can become
extremely hot, causing death or
severe injury to unattended chil-dren or animals who cannot escape
the vehicle. Furthermore, children
might operate features of the vehi-
cle that could injure them, or they
could encounter other harm, possi-
bly from someone gaining entry to
the vehicle. Never leave children or
animals unattended in your vehicle.
EL UK 4A.QXP 1/25/2010 9:43 AM Page 15
Page 429 of 560
417
Features of your vehicle
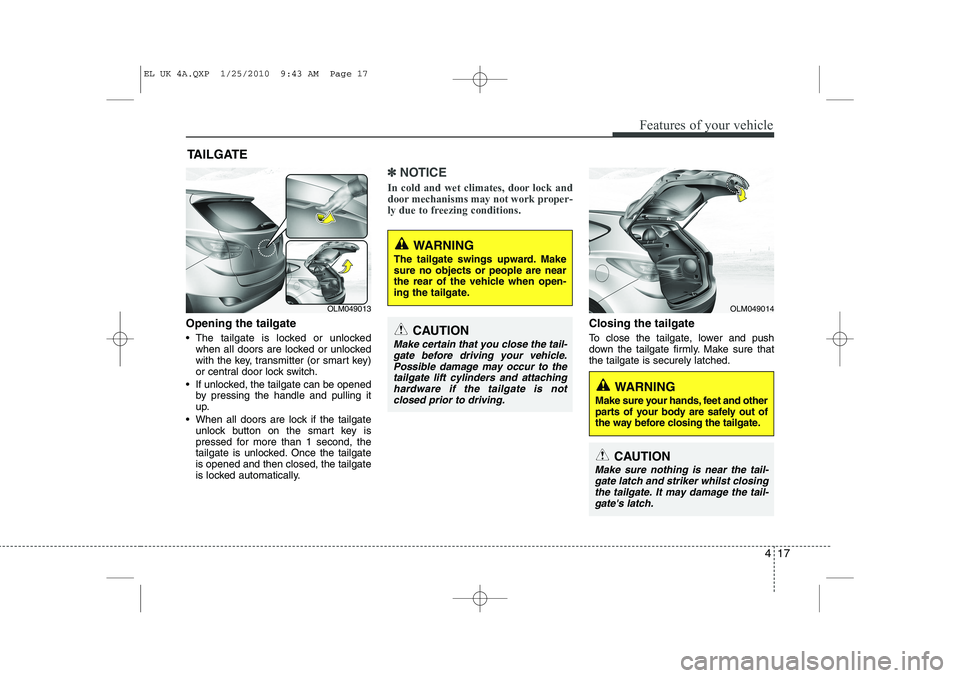
Opening the tailgate
The tailgate is locked or unlockedwhen all doors are locked or unlocked
with the key, transmitter (or smart key)
or central door lock switch.
If unlocked, the tailgate can be opened by pressing the handle and pulling it
up.
When all doors are lock if the tailgate unlock button on the smart key is
pressed for more than 1 second, the
tailgate is unlocked. Once the tailgateis opened and then closed, the tailgate
is locked automatically.
✽✽ NOTICE
In cold and wet climates, door lock and
door mechanisms may not work proper-
ly due to freezing conditions.
Closing the tailgate
To close the tailgate, lower and push
down the tailgate firmly. Make sure thatthe tailgate is securely latched.
TAILGATE
OLM049013
WARNING
The tailgate swings upward. Make sure no objects or people are near
the rear of the vehicle when open-
ing the tailgate.
CAUTION
Make certain that you close the tail- gate before driving your vehicle.
Possible damage may occur to thetailgate lift cylinders and attaching hardware if the tailgate is not
closed prior to driving.
OLM049014
WARNING
Make sure your hands, feet and other
parts of your body are safely out of
the way before closing the tailgate.
CAUTION
Make sure nothing is near the tail- gate latch and striker whilst closing
the tailgate. It may damage the tail-gate's latch.
EL UK 4A.QXP 1/25/2010 9:43 AM Page 17
Page 438 of 560
Features of your vehicle
26
4
Opening the fuel filler lid
The fuel-filler lid must be opened from
inside the vehicle by pulling up the fuel-
filler lid opener.
✽✽
NOTICE
If the fuel-filler lid does not open
because ice has formed around it, tap
lightly or push on the lid to break the ice
and release the lid. Do not pry on the lid.
If necessary, spray around the lid with
an approved de-icer fluid (do not use
radiator anti-freeze) or move the vehicleto a warm place and allow the ice tomelt.
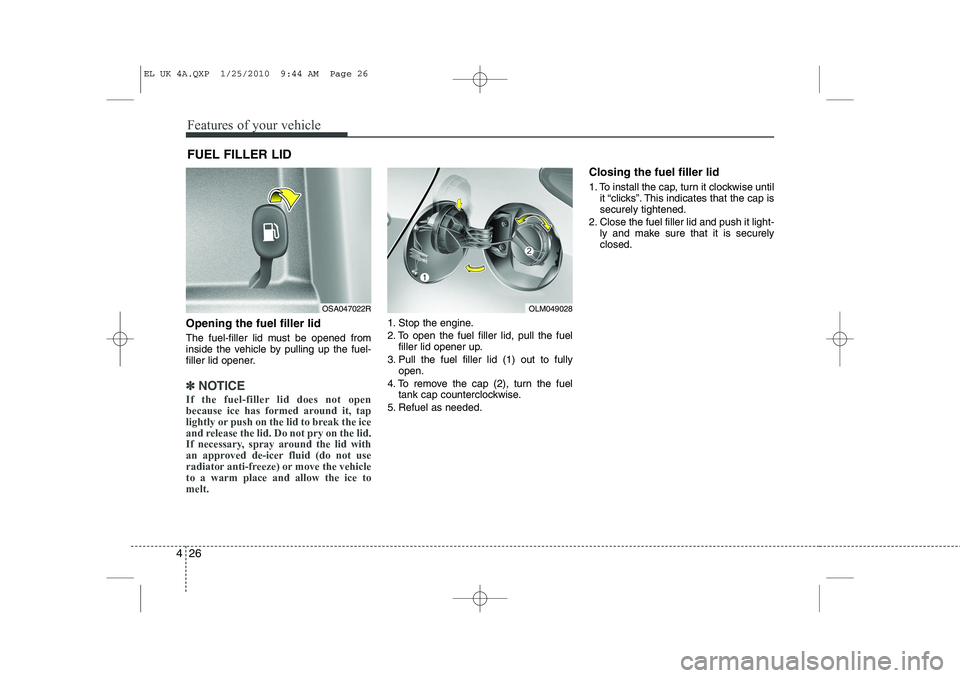
1. Stop the engine.
2. To open the fuel filler lid, pull the fuel filler lid opener up.
3. Pull the fuel filler lid (1) out to fully open.
4. To remove the cap (2), turn the fuel tank cap counterclockwise.
5. Refuel as needed. Closing the fuel filler lid
1. To install the cap, turn it clockwise until
it “clicks”. This indicates that the cap is securely tightened.
2. Close the fuel filler lid and push it light- ly and make sure that it is securelyclosed.
FUEL FILLER LID
OSA047022ROLM049028
EL UK 4A.QXP 1/25/2010 9:44 AM Page 26