Page 125 of 217

3 WHAT TO DO IN AN EMERGENCY
10
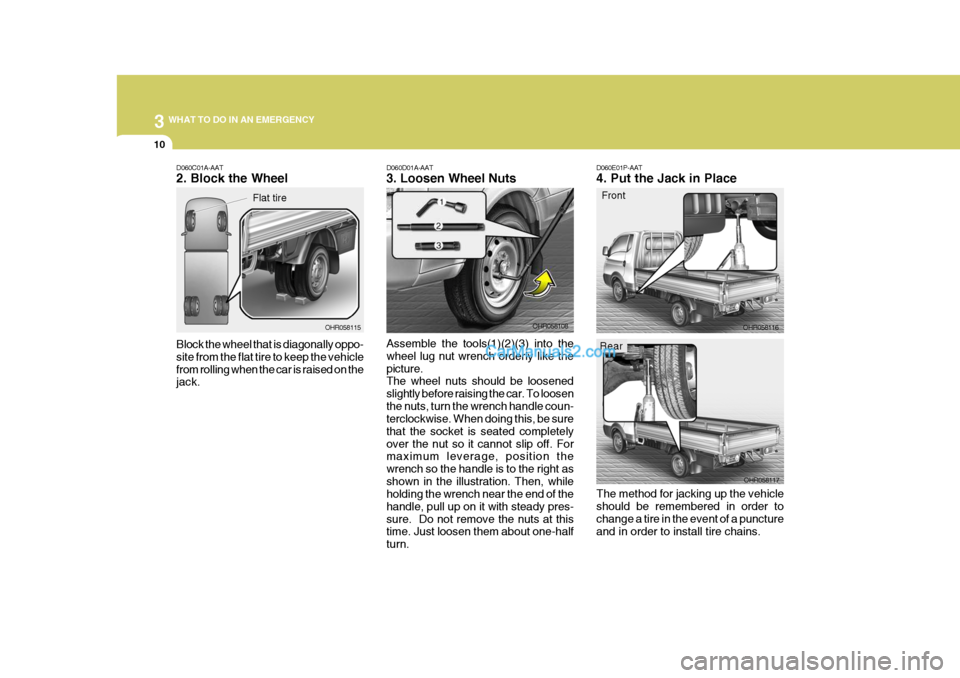
D060E01P-AAT 4. Put the Jack in Place
Front
The method for jacking up the vehicle should be remembered in order to change a tire in the event of a puncture and in order to install tire chains. OHR058116
OHR058117D060D01A-AAT 3. Loosen Wheel Nuts Assemble the tools(1)(2)(3) into the wheel lug nut wrench orderly like thepicture. The wheel nuts should be loosened slightly before raising the car. To loosenthe nuts, turn the wrench handle coun- terclockwise. When doing this, be sure that the socket is seated completelyover the nut so it cannot slip off. For maximum leverage, position the wrench so the handle is to the right asshown in the illustration. Then, while holding the wrench near the end of the handle, pull up on it with steady pres-sure. Do not remove the nuts at this time. Just loosen them about one-half turn. OHR058108D060C01A-AAT 2. Block the Wheel Block the wheel that is diagonally oppo- site from the flat tire to keep the vehiclefrom rolling when the car is raised on the jack.
OHR058115
Flat tire
Rear
Page 127 of 217

3 WHAT TO DO IN AN EMERGENCY
12
D060F03HR
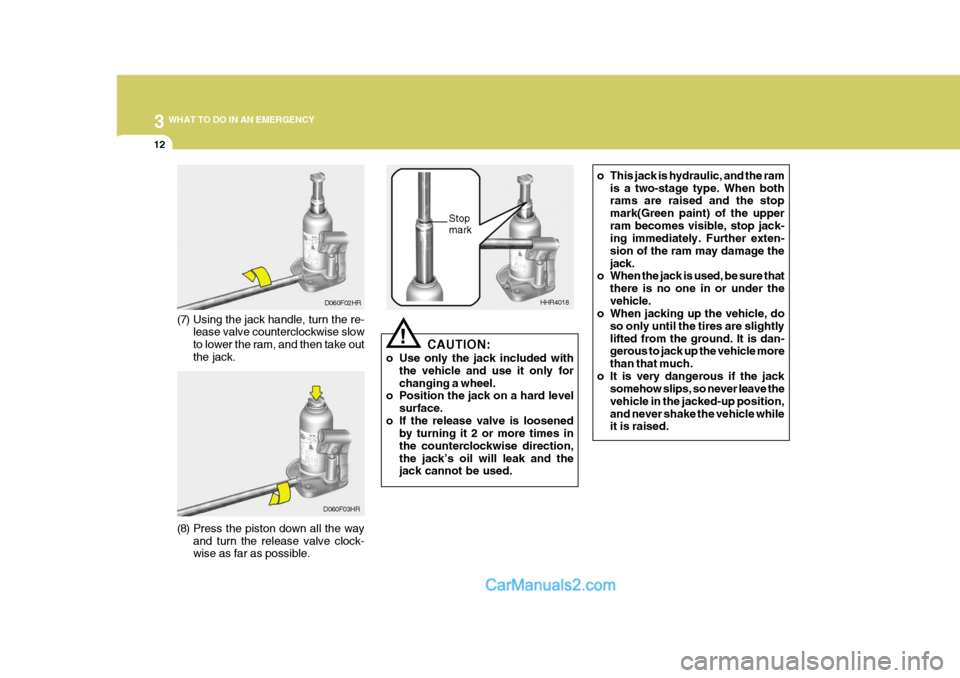
(8) Press the piston down all the way and turn the release valve clock- wise as far as possible. HHR4018
Stop mark
CAUTION:
o Use only the jack included with the vehicle and use it only for changing a wheel.
o Position the jack on a hard level
surface.
o If the release valve is loosened by turning it 2 or more times inthe counterclockwise direction,the jack’s oil will leak and the jack cannot be used.!
D060F02HR
(7) Using the jack handle, turn the re- lease valve counterclockwise slow to lower the ram, and then take outthe jack. o This jack is hydraulic, and the ram
is a two-stage type. When both rams are raised and the stop mark(Green paint) of the upperram becomes visible, stop jack- ing immediately. Further exten- sion of the ram may damage thejack.
o When the jack is used, be sure that
there is no one in or under thevehicle.
o When jacking up the vehicle, do
so only until the tires are slightlylifted from the ground. It is dan- gerous to jack up the vehicle more than that much.
o It is very dangerous if the jack somehow slips, so never leave thevehicle in the jacked-up position,and never shake the vehicle while it is raised.
Page 128 of 217

3
WHAT TO DO IN AN EMERGENCY
13
!
!
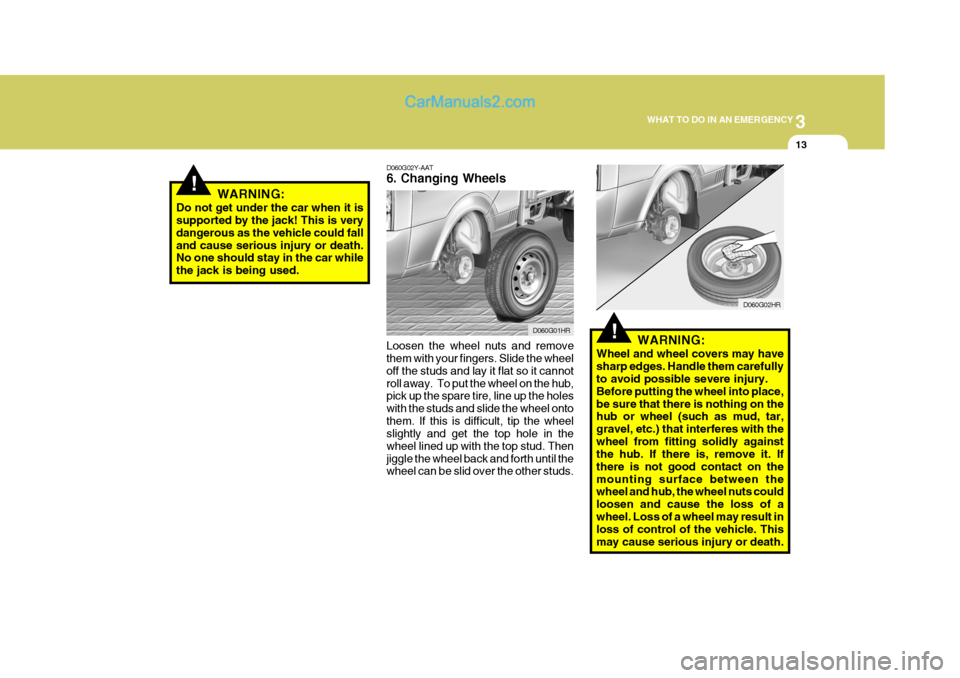
D060G02Y-AAT 6. Changing Wheels Loosen the wheel nuts and remove them with your fingers. Slide the wheel off the studs and lay it flat so it cannotroll away. To put the wheel on the hub, pick up the spare tire, line up the holes with the studs and slide the wheel ontothem. If this is difficult, tip the wheel slightly and get the top hole in the wheel lined up with the top stud. Thenjiggle the wheel back and forth until the wheel can be slid over the other studs. D060G02HR
WARNING:
Wheel and wheel covers may have sharp edges. Handle them carefully to avoid possible severe injury. Before putting the wheel into place,be sure that there is nothing on the hub or wheel (such as mud, tar, gravel, etc.) that interferes with thewheel from fitting solidly against the hub. If there is, remove it. If there is not good contact on themounting surface between the wheel and hub, the wheel nuts could loosen and cause the loss of awheel. Loss of a wheel may result in loss of control of the vehicle. This may cause serious injury or death.
D060G01HR
WARNING:
Do not get under the car when it is supported by the jack! This is very dangerous as the vehicle could falland cause serious injury or death. No one should stay in the car while the jack is being used.
Page 153 of 217

Front Open Service Panel ............................................ 6-2
Engine Compartment .................................................... 6-3
General Checks ........................................................... 6-5
Checking the Engine Oil ............................................... 6-6
Changing the Oil and Filter ........................................... 6-8
Checking and Changing the Engine Coolant ...............6-10
Changing the Air Cleaner Filte r ....................................6-13
Checking the Transmission Oil (Manual) ....................6-16
Checking the Rear Axle Oil......................................... 6-17
Checking the B rakes ................................................... 6-18
Air Conditioning Care ................................................... 6-19
Checking the Climate Control Air Filter
(For Evaporator and Blower U nit) .............................6-20
Checking Drive Belts................................................... 6-22
Checking and Replacing Fuses .................................. 6-22
Checking the Battery ................................................... 6-25
Power Steering Fluid Level .......................................... 6-27
Fuel Fil ter ..................................................................... 6-28
Replacement of Light Bulbs ......................................... 6-31
Bulb Wattages ............................................................. 6-38
Fuse Panel Description ............................................... 6-39
DO-IT-YOURSELF MAINTENANCE
6
6
Page 157 of 217

6
DO-IT-YOURSELF MAINTENANCE
5
G020A01HR-GAT Engine Compartment The following should be checked regu- larly:
o Engine oil level and condition
o Transmission fluid level and condi-
tion
o Brake fluid level
o Engine coolant level
o Windshield washer fluid level
o Accessory drive belt condition
o Engine coolant hose condition
o Fluid leaks (on or below compo- nents)
o Power steering fluid level
o Battery condition
o Air filter condition G020C01HR-GAT Vehicle Interior The following should be checked each time when the vehicle is driven:
o Lights operation
o Windshield wiper operation
o Horn operation
o Defroster, heater system operation
(and air conditioning, if installed)
o Steering operation and condition
o Mirror condition and operation
o Turn signal operation
o Accelerator pedal operation
o Brake operation, including parking
brake
o Manual transmission operation, in- cluding clutch operation
o Seat control condition and operation
o Seat belt condition and operation
o Sunvisor operation If you notice anything that does not operate correctly or appears to be functioning incorrectly, inspect it care-fully and seek assistance from your Hyundai dealer if service is needed.
G020B01A-AAT Vehicle Exterior The following should be checked monthly:
o Overall appearance and condition
o Wheel condition and wheel nut torque
o Exhaust system condition
o Light condition and operation
o Windshield glass condition
o Wiper blade condition
o Paint condition and body corrosion
o Fluid leaks
o Door and hood lock condition
o Tire pressure and condition
(including spare tire)
GENERAL CHECKS
Page 166 of 217
6 DO-IT-YOURSELF MAINTENANCE
14
To install the wiper blade
HHR5050
1. Put a new wiper blade onto the wiper arm and lower the wiper blade at the level of the wiper arm as shown in thedrawing.
2. Raise the wiper blade lightly and pull
up it. HHR5049
CAUTION:
o Do not operate the wipers on dry glass. This can result in more rapid wear of the wiper blades and may scratch the glass.
o Keep the blade rubber out of con- tact with petroleum products suchas engine oil, gasoline, etc.! G080B01HR-GAT Replacing the Wiper Blades To replace the wiper blades, raise the wiper to the vertical. To remove the wiper blade
1. Push down the wiper blade with the
locking clip (1) pressed to detach it from the wiper arm. HHR5048
(1)
Page 173 of 217

6
DO-IT-YOURSELF MAINTENANCE
21
G160A01A-GAT CLUTCH PEDAL
G160A01HR
6 ~ 13 mm (0.24 ~ 0.51 in.)
With the engine off, press lightly on the clutch pedal until you feel a change inresistance. This is the clutch pedal free-play. The free-play should be within the limits specified in the illustration. Ifit is not, have it inspected by your Hyundai dealer and adjusted or re- paired if necessary.
CHECKING THE FREE-PLAY
G150A01A-GAT STEERING WHEEL To check the steering wheel free-play, stop the car with the wheels pointed straight ahead and gently move thesteering wheel back and forth. Use very light finger pressure and be sen- sitive to changes in resistance thatmark the limits of the freeplay. If the free-play is greater than specified, have it inspected by your Hyundai dealerand adjusted or repaired if necessary. HHR5023
30 mm (1.18 in.)
G170A01A-GAT BRAKE PEDAL
G160A01HR
3 ~ 8 mm (0.12 ~ 0.31 in.)
With the engine off, press down on the brake pedal several times to reduce thevacuum in the brake booster. Then, using your hand, press down slowly on the brake pedal until you feela change in resistance. This is the brake pedal free-play. The free-play should be within the limitsspecified in the illustration. If it is not, have it inspected by your Hyundai dealer and adjusted or repaired if nec-essary.
Page 175 of 217

6
DO-IT-YOURSELF MAINTENANCE
23
CAUTION:
When replacing a fusible link, never use anything but a new fusible link with the same or lower amperagerating. Never use a piece of wire or a higher-rated fusible link. This could result in serious damage andcreate a fire hazard.!
!WARNING:
Never install a wire or aluminum foil instead of the proper fuse - even as a temporary repair. It may cause ex- tensive wiring damage and a pos-sible fire.NOTE:
o To replace a fusible link, first tilt the driver's seatback forward. (Re- fer to "To Inspect the Engine Com-partment Under the Driver's Seat" on page 1-12.)
o To open the fuse box cover, press the hook of the cover and pull upthe cover. G200A02HR
G200B01HR-GAT Replacing Accessory Fuse The fuse box for the lights and other electrical accessories will be found lowon the dashboard on the driver's side. Inside the box you will find a list show- ing the circuits protected by each fuse.If any of your car's lights or other electrical accessories stop working, a blown fuse could be the reason. If thefuse has burned out, you will see that the metal strip inside the fuse has burned through. If you suspect a blownfuse, follow this procedure:
1. Turn off the ignition and all other
switches. HHR4003