Page 11 of 429

�Î�Î�Î
�Î
�Î
�Î
�Î �Î
�Î
�Î �Î
�Î �Û
�Ý
�Π����ΠOnly on vehicles equipped with navigation system. Ref er to the navigati
on system manual.
To use the horn, press the center pad of the steering wheel.
If equipped
On models with navigation system.
On models without navigation system.
1:2:3:4:5:
Your Vehicle at a Glance
4
Vehicle with navigation system is shown. (P.31)
REMOTE AUDIO CONTROLS
HEADLIGHT CONTROL DIAL
STEERING WHEEL
ADJUSTMENTSEAT HEATERSPASSENGER AIRBAG OFF
INDICATOR
SEL/RESET BUTTON
INFO ( ) BUTTON
SELECT BUTTON
INTERIOR LIGHT CONTROL
SWITCH
CRUISE CONTROLS
HAZARD WARNING BUTTON
MULTI-CONTROL LEVER
(WINDSHIELD WIPERS/
WASHERS/TURN SIGNALS/
HEADLIGHT HIGH BEAMS)
(P.94)
(P.95) MOONROOF SWITCH
(P.131)
FOG LIGHTS
BED LIGHT SWITCH (P.99)
(P.126)
(P.99)
(P.76)
(P.76)
(P.76)
(P.76)
TRIP/RESET BUTTON
(P.76)
(P.97) INFO ( ) BUTTON
(P.203) (P.210)
INSTRUMENT PANEL
BRIGHTNESS
(P.98)
VTM-4 LOCK
SHIFT LEVER
VOICE CONTROL BUTTONS HORN
(P.144)
(P.221) (P.142)
(P.273)
(P.278)
BLUETOOTH
HANDSFREELINK
SYSTEM VOICE
CONTROL BUTTONS
VEHICLE STABILITY ASSIST (VSA)
OFF SWITCH
(P.294) 2
24
4
5
2
2 5
4
3 1
4
Main Menu
Page 100 of 429

�Î�Î �Î
�Î
�Î
�Î
�Î �Î
�Î
�Î �Î
�Î �Û �Ý
�Î �Î�Î�Î�Î
Only on vehicles equipped with navigation system. Ref er to the navigati
on system manual.
To use the horn, press the center pad of the steering wheel.
If equipped
On models with navigation system.
On models without navigation system.
1:2:3:4:5:
Controls Near the Steering Wheel
Inst rument s and Cont rols
93
MOONROOF SWITCH
REMOTE AUDIO CONTROLS HEADLIGHT CONTROL DIAL
STEERING WHEEL
ADJUSTMENTSEL/RESET BUTTON
INFO ( ) BUTTON
SELECT BUTTON
TRIP/RESET BUTTON
Vehicle with navigation system is shown. CRUISE CONTROLS
HAZARD WARNING BUTTON
MULTI-CONTROL LEVER
(WINDSHIELD WIPERS/
WASHERS/TURN SIGNALS/
HEADLIGHT HIGH BEAMS)
(P.131)
(P.94)(P.95)
FOG LIGHTS (P.99)
(P.76)
(P.76)
(P.76)
(P.76)
(P.76)
(P.203)
(P.221)
INSTRUMENT PANEL
BRIGHTNESS (P.98)
SHIFT LEVER
VTM-4 LOCK
BED LIGHT SWITCH (P.144)
(P.97)
(P.210)
(P.142)
SEAT HEATERS
INTERIOR LIGHT CONTROL
SWITCH
(P.126)
HORN
(P.99)
VOICE CONTROL BUTTONS INFO ( ) BUTTON
(P.273)
(P.278)
BLUETOOTH
HANDSFREELINK
SYSTEM VOICE CONTROL
BUTTONS
VEHICLE STABILITY ASSIST (VSA)
OFF SWITCH
(P.294)2
2 4
4
5
5
2 2
1
3 4
4
Main MenuTable of Contents
Page 102 of 429

�µ�µ
OFF
Parking and indicator lights
Headlights
Push down on the
multi-control lever to signal a lef t
turn and up to signal a right turn. To
signal a lane change, push lightly on
the lever and hold it. The lever will
return to center when you release it
or complete a turn.
To turn on the high
beams, push the multi-control lever
f orward until you hear a click. The
blue high beam indicator will come
on (see page ). Pull the lever back
to return to the low beams.
To f lash the high beams, pull the
lever back lightly, then release it.
The high beams will stay on as long
as you hold the lever back.
Your vehicle has heating wires at the
bottom of the windshield to help
heat the wiper blades and the
windshield. If the outside
temperature is near f reezing, the
heater turns on automatically when
you turn the ignition switch to the
ON (II) position. The heater turns
of f automatically when the outside
temperature is above f reezing.
This f unction helps to increase wiper
perf ormance when the wiper arms
sit in the parked position in snowy or
icy conditions.
1.2.3.
67
CONT INUED
Headlight Control Dial
Turn Signal
High BeamsAutomatic Heated Wiper Zone
Multi-Control L ever, Headlights
Inst rument s and Cont rols
95
Main MenuTable of Contents
Page 152 of 429

The heating and air conditioning
system in your vehicle provides a
comf ortable driving environment in
all weather conditions.
The standard audio system has
many f eatures. This section
describes those f eatures and how to
use them.
Your vehicle has an anti-theft audio
system that requires a code number
to enable it.
The security system helps to dis-
courage vandalism and thef t of your
vehicle.
Theclimatecontrolsystemandthe
audio system have a voice control
feature. Refer to the navigation
system manual f or more inf ormation..............
Vents, Heating, and A/C . 146
...............
Climate Control System . 152
..........
Playing the AM/FM Radio . 159
............
AM/FM Radio Reception . 165
................
Playing the XM
Radio . 167
...................................
Playing CDs . 174
.......................................
CD Player . 175
CD Changer
(Models without navigation
..................................
system) . 181
CD Changer (Models with navigation
..................................
system) . 189
....................
Protecting Your CDs . 198
CD Player/Changer Error
...................................
Messages . 202
................
Remote Audio Controls . 203
......................
Auxiliary Input Jack . 205
.................
Radio Thef t Protection . 205
..........................
Setting the Clock . 207
............................
Security System . 208
...............................
Cruise Control . 210
.........................................
Compass . 213
HomeLink
Universal
................................
Transceiver . 217
........
HandsFreeLink. 221 ...
Rearview Camera and Monitor . 246Bluetooth
On models with navigation system
On RTS, RTL, and Touring models
Features
Features
145
Main MenuINDEX
Page 220 of 429

position. The system then begins to
check the vehicle direction and
illuminates the appropriate icon(s")
The direction and center position
icons come on when you turn the
ignition switch to the ON (II)
position. The system then begins to
check the vehicle direction and
illuminates the appropriate icon(s).The compass can be af f ected by
driving near power lines or stations,
across bridges, through tunnels,
over railroad crossings, past large
vehicles, or driving near large
objects that cause magnetic
interference. It can also be affected
by accessories such as antennas and
roof racks that are mounted by
magnets.
Your vehicle has a compass in the
rearview mirror. The compass
indicates the vehicle direction with
illuminated letters: N (north), S
(south), W (west), and E (east). The
center blue icon in the compass is
always on. It serves as a ref erence
point.
To turn the compass on or of f , press
the compass button on the back of
the rearview mirror.
If equipped
CONT INUED
Compass Function
Compass
Features
213
COMPASS
BUTTON
CENTER ICON
REARVIEW MIRROR
Main MenuTable of Contents
Page 221 of 429
Drive the vehicle slowly in circles
at less than 5 mph (8 km/h) until
the center icon turns blue. This
icon also turns blue by continuing
to drive the vehicle under normal
driving conditions. When you see
an actual heading on the compass,
calibration is completed.
The compass may need to be
manually calibrated af ter exposure to
a strong magnetic field. If the
compassseemstocontinuallyshow
the wrong direction, do this.
Do this procedure in an open
area, away f rom buildings, power
lines, and other vehicles.
With the blue center icon
displayed,pressandholdthe
compass button for about 6
seconds. When the center icon
turns red, release the button.
The compass mirror has a light
sensor behind the right side of the
rearview mirror. Make sure the
extended sun visor or an accessory is
not covering the sensor.
2.
1.
Compass
Compass Calibration
214
NOTE:
Main MenuTable of Contents
Page 222 of 429
CONT INUED
In most areas, there is a variation
between magnetic north and true
north. Zone selection is required so
the compass can compensate f or this
variation. To check and select the
zone, do this:Find the zone f or your area on the
zone map (see page ). Each
zone number (1 through 15)
corresponds to a compass zone on
the table (see page ). Press and hold the compass
button f or about 3 seconds. When
all of the direction icons begin to
blink, release the button.
The blue direction icon(s) blink
and show the current zone.
If the zone is incorrect, press and
release the compass button
repeatedly to get to the correct
number.
The compass will return to the
normal display about 4 seconds
af ter you stop adjusting a zone
number.
2. 3. 4.
1. 5.
216
216
Compass
Compass Zone Selection
Features
215
Main MenuTable of Contents
Page 228 of 429
�µ�µ
Bluetooth
handsf reelink.honda.
com
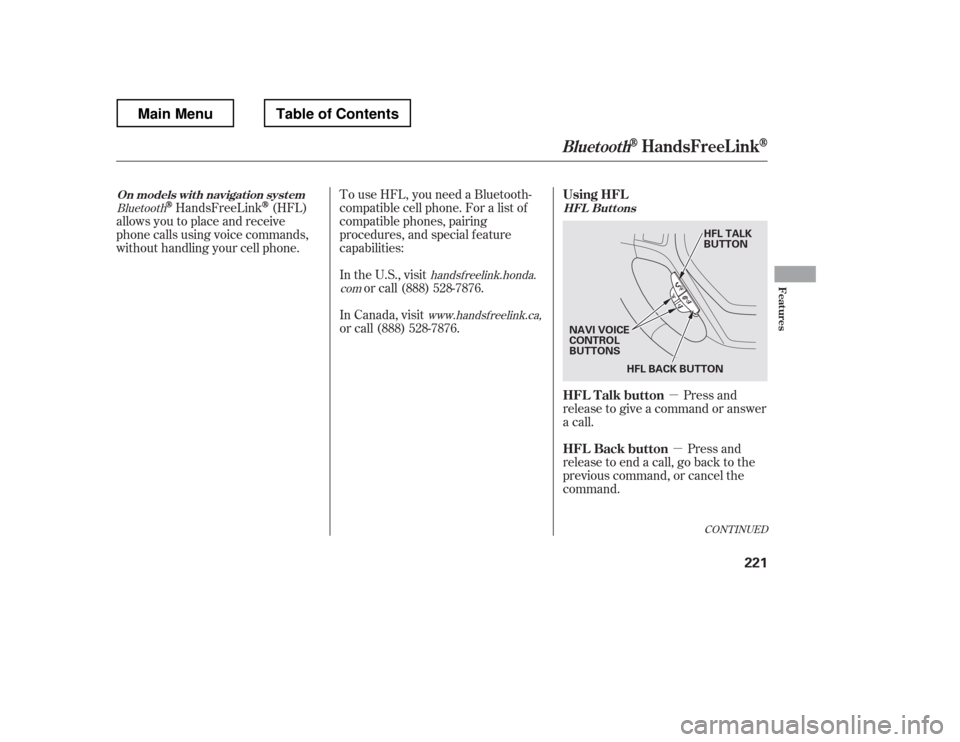
www.handsfreelink.ca,HandsFreeLink(HFL)
allows you to place and receive
phone calls using voice commands,
without handling your cell phone.
Press and
release to give a command or answer
a call.
Press and
release to end a call, go back to the
previous command, or cancel the
command.
To use HFL, you need a Bluetooth-
compatible cell phone. For a list of
compatible phones, pairing
procedures, and special f eature
capabilities:
In the U.S., visit
or call (888) 528-7876.
In Canada, visit
or call (888) 528-7876.
CONT INUED
On models wit h navigat ion syst em HFL Buttons
BluetoothHandsFreeL ink
Using HFL
HFL Talk button
HFL Back button
Features
221
HFL BACK BUTTON
NAVI VOICE
CONTROL
BUTTONS HFL TALK
BUTTON
Main MenuTable of Contents
 until
the center icon turns blue. This
icon also turns blue by continuing
to drive the vehicle under normal
driving conditions. When yo")