Page 133 of 681
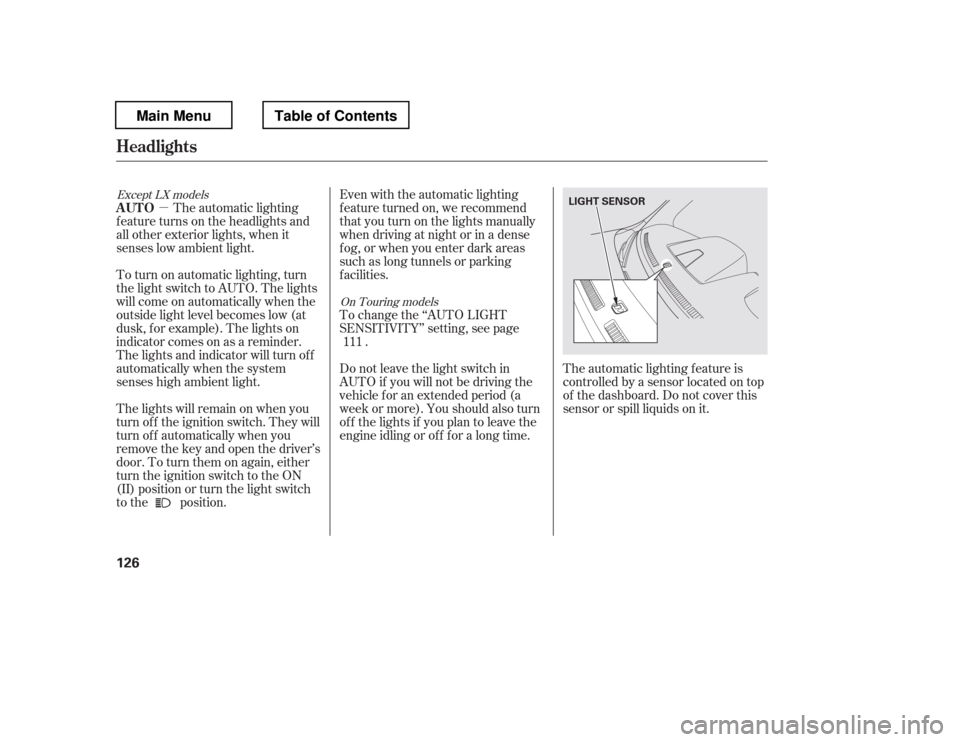
�µEven with the automatic lighting
f eature turned on, we recommend
thatyouturnonthelightsmanually
when driving at night or in a dense
f og, or when you enter dark areas
such as long tunnels or parking
f acilities.
To change the ‘‘AUTO LIGHT
SENSITIVITY
Page 134 of 681
Turn the f og lights on and of f by
turning the switch next to the
headlight switch.
You can use the f og lights only when
the headlights are on low beam.
With the light switch in the AUTO
position, you can also use the f og
lights when the headlights turn on
automatically. They will go of f when
the headlights turn of f .With the headlight switch off, the
daytime running lights come on
when you turn the ignition switch to
the ON (II) position and release the
parkingbrake.Theyremainonuntil
you turn the ignition switch of f , even
if you set the parking brake.
When the headlights are on, the
daytime running lights are of f .
If you see a ‘‘CHECK DRL
SYSTEM
Page 135 of 681
This f eature turns of f the headlights,
all other exterior lights, and the
instrument panel lights within 15
seconds after you remove the key
and close the driver
Page 136 of 681

Make sure the rear window is clear
and you have good visibility bef ore
starting to drive.
The rear window def ogger will clear
fog, frost, and thin ice from the
window. Push the def ogger button to
turn it on and off. The indicator in
the button lights to show the
def ogger is on. If you do not turn it
of f , the def ogger will shut itself of f
af ter about 15 minutes. It also shuts
of f when you turn of f the ignition.
You have to turn it on again when
you restart the vehicle. The def ogger wires on the inside of
the rear window can be accidentally
damaged. When cleaning the glass,
always wipe side-to-side.
Pushing this button also turns the
mirror heaters on or of f . For more
inf ormation, see page .
Pushthebuttontoturnonthe
hazard warning lights (f our-way
flashers). This causes all four
outside turn signals and both turn
indicators in the instrument panel to
f lash. Use the hazard warning lights
if you need to park in a dangerous
area near heavy traffic, or if your
vehicle is disabled. 173
If equipped
Rear Window Def ogger
Hazard Warning Button
Hazard Warning Button, Rear Window Def ogger
Inst rument s and Cont rols
129
Main MenuTable of Contents
Page 137 of 681
The select/reset knob on the
instrument panel controls the
brightness of the instrument panel
lights. Turn the knob to adjust the
brightness.The level of brightness is shown on
the inf ormation display while you
adjust it. It goes out about 5 seconds
af ter you f inish adjusting.
You will hear a beep when maximum
or minimum brightness is reached.
You will also hear a beep when the
maximum level is canceled by
turning the knob a click to the lef t.
To reduce glare at night, the
instrument panel illumination dims
when you turn the light switch to
or . Turning the select/
reset knob to the right until you hear
a beep will cancel the reduced
brightness.Except Touring models
Instrument Panel Brightness
130
U.S. model is shown.
Main MenuTable of Contents
Page 140 of 681
These keys contain electronic
circuits that are activated by the
immobilizer system. They will not
work to start the engine if the
circuits are damaged.Protect the keys f rom direct
sunlight, high temperature, and
high humidity.
Donotdropthekeysorsetheavy
objects on them.
Keep the keys away f rom liquids.
If they get wet, dry them
immediately with a sof t cloth.
The master key fits all the locks on
your vehicle. The valet key works
only in the ignition and the driver
Page 143 of 681
�µ�µ
�µ
�µ
The ignition switch has f our
positions: LOCK (0), ACCESSORY
(I), ON (II), and START (III).
You can insert or
remove the key only in this position.
To turn the key to the LOCK (0)
position, the shif t lever must be in
Park, and you must push the key in
slightly. If the f ront wheels are turned, the
anti-theft lock may make it difficult
to turn the key. Firmly turn the
steering wheel to the lef t or right as
you turn the key.
You can
operate the audio system and the
accessory power sockets in this
position.
This is the normal key
position when driving. Several of the
indicators on the instrument panel
come on as a test when you turn the
ignition switch f rom the
ACCESSORY (I) to the ON (II)
position.
Use this position
only to start the engine. The switch
returns to the ON (II) position when
you let go of the key. You will hear a reminder beeper if
you leave the key in the ignition
switch in the LOCK (0) or the
ACCESSORY (I) position and open
the driver
Page 158 of 681

�µ
�µ
�µ Press and hold this
button for about 1 second to attract
attention; the horn will sound, and
the exterior lights will f lash f or about
30 seconds. To cancel panic mode,
press any other button on the remote
transmitter, or turn the ignition
switch to the ON (II) position. Panic
mode does not work when the key is
in the ignition switch.
Avoid dropping or throwing the
transmitter.
Do not immerse the transmitter in
any liquid.
If you lose a transmitter, the
replacement needs to be
reprogrammed by your dealer.
When you press the UNLOCK
button, the f ront and rear individual
map lights and the cargo area light,
depending on their switch positions,
will come on (see page ). If you
do not open any door or the tailgate,
the lights stay on for about 30
seconds, then go out. If you relock
thedoorsandthetailgatewiththe
remote transmitter before 30
seconds have elapsed, the lights will
go of f immediately.
If you push the same button again
while the tailgate is opening or
closing, three beeps sound, the
tailgate stops moving, reverses
direction and stops in the f ully
opened or f ully closed position.Pressandholdthe
TAILGATE button to open or close
the power tailgate. When the tailgate
begins to move, you will hear a beep,
and some f ront and rear lights will
flash.
Press this button f or about 1 second
to open the glass hatch. Even if the
glass hatch is open, the tailgate can
be locked with the remote
transmitter. Protect the transmitter from
extreme temperatures.
176
Except EX-L and Touring models On EX-L and Touring models
Remote Transmitter
PA NIC
TAILGATE
GLASS HATCH RELEASE
Remote Transmitter Care
Inst rument s and Cont rols
151
Main MenuTable of Contents