Page 170 of 441

169
Continued
Controls
Interior Lights/Interior Convenience ItemsInterior Lights
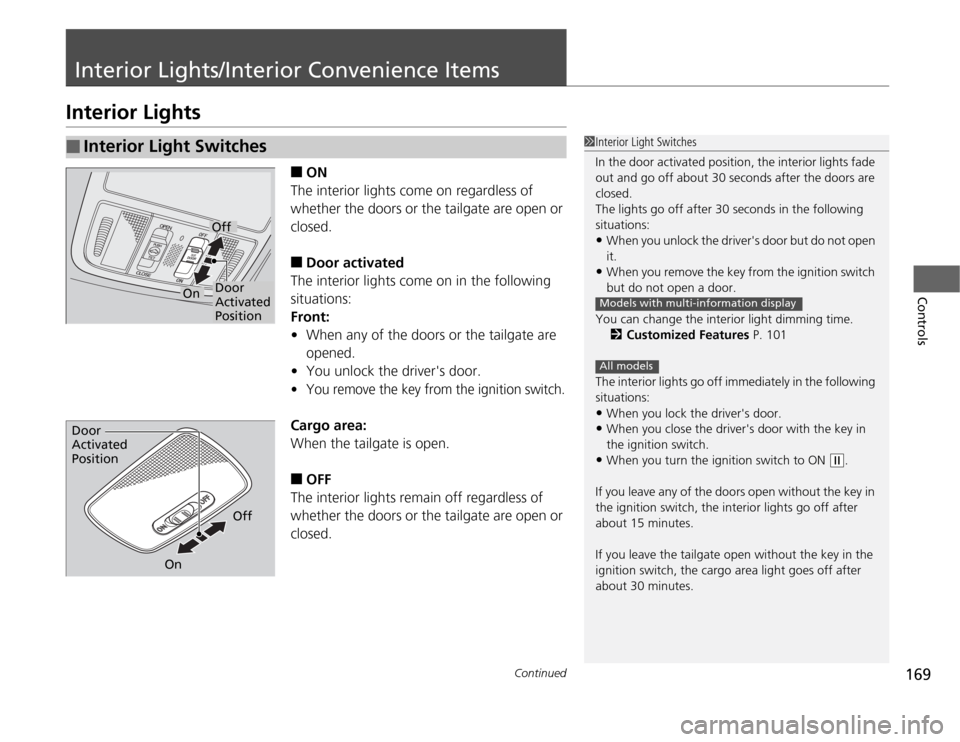
■
ON
The interior lights come on regardless of
whether the doors or the tailgate are open or
closed.
■
Door activated
The interior lights come on in the following
situations:
Front:
•When any of the doors or the tailgate are
opened.
•You unlock the driver's door.
•
You remove the key from the ignition switch.
Cargo area:
When the tailgate is open.■
OFF
The interior lights remain off regardless of
whether the doors or the tailgate are open or
closed.
■
Interior Light Switches
1Interior Light Switches
In the door activated position, the interior lights fade
out and go off about 30 seconds after the doors are
closed.
The lights go off after 30 seconds in the following
situations:•When you unlock the driver's door but do not open
it.•When you remove the key from the ignition switch
but do not open a door.
You can change the interior light dimming time.
2Customized Features P. 101
The interior lights go off immediately in the following
situations:•When you lock the driver's door.•When you close the driver's door with the key in
the ignition switch.•When you turn the ignition switch to ON
(w
.
If you leave any of the doors open without the key in
the ignition switch, the interior lights go off after
about 15 minutes.
If you leave the tailgate open without the key in the
ignition switch, the cargo area light goes off after
about 30 minutes.
Models with multi-information displayAll models
Door
Activated
PositionOff
On
Door
Activated
Position
Off
On
Page 176 of 441
175
uuInterior Lights/Interior Convenience ItemsuInterior Convenience Items
Continued
Controls
■
Second row seat beverage holders
*
To use the beverage holder, fold the seat-
back.
2Using the Second and Third Row Seat
Armrest
* P. 168
■
Third row seat beverage holders
* Not available on all models
Page 183 of 441
uuInterior Lights/Interior Convenience ItemsuInterior Convenience Items
182Controls
■
Second row sunshades
Pull the tab and roll up the sunshade all the
way. Use the hooks to hang it.
■
Third row sunshades
Pull the tab and roll up the sunshade all the
way. Attach the tab to the hook.
■
Integrated Sunshades
*
1Integrated Sunshades
Use the sunshades only when the windows are fully
closed. Using the shade while a window is open can
unhook and blow off the shade, hitting and hurting
anyone sitting near the window.
Second
RowHooks
TabThird Row
Hook
Tab* Not available on all models
Page 191 of 441
190
uuClimate Control System
*uRear Climate Control System
Controls
Rear Climate Control SystemUse the system when the engine is running.
1.Press the REARLOCK button.
uLOCK appears on the front control panel. The rear system changes to AUTO
mode.
2.The system automatically adjusts the fan speed and airflow levels to maintain the
set rear temperature.
uChange the temperature if necessary.
3.To turn off the rear climate control system, press and hold the REARLOCK button
for a few seconds.■
Using the Rear Climate Control System From the Front Panel
1Rear Climate Control System
AUTO LOCK appears on the rear control panel while
the rear lock is on.
If the rear lock is on while in SYNC mode, the rear
control panel is disabled. AUTO LOCK SYNC appears
on the rear control panel.
Rear Temperature
Control Button Rear Temperature
Control Button
Page 194 of 441

193
Features
This chapter describes how to operate technology features on models without the navigation system.
Audio System
About Your Audio System ................ 194
USB Adapter Cable
*........................ 195
Auxiliary Input Jack .......................... 195
Audio System Theft Protection
*....... 196
Audio System Basic Operation....... 197
Adjusting the Sound ........................ 197
Playing the AM/FM Radio ................. 198
Playing a CD .................................... 200
Models without audio/information screen
Audio System Basic Operation...... 202
Audio Remote Controls.................... 203
Adjusting the Sound ........................ 204
Playing the AM/FM Radio ................. 205
Playing the XM
® Radio ..................... 209
Playing a CD .................................... 212
Playing CD Library ............................ 216
Playing an iPod®............................... 222
Playing a USB Flash Drive ................. 226
Playing Bluetooth® Audio................. 230
Audio Error Messages
CD Player ......................................... 235
Models with audio/information screen
iPod
®/USB Flash Drive
*..................... 236
General Information on the Audio
System
XM
® Radio Service
*......................... 237
Recommended CDs ......................... 238
Compatible iPod
®* and USB Flash Drives
*........ 240
Rear Entertainment System
*........... 241
HomeLink
® Universal Transceiver
*.. 257
Bluetooth
® HandsFreeLink
®*
Using HFL ........................................ 259
HFL Menus ...................................... 261
Compass
*.......................................... 282
* Not available on all models
Page 196 of 441

195
uuAudio SystemuUSB Adapter Cable
*
Features
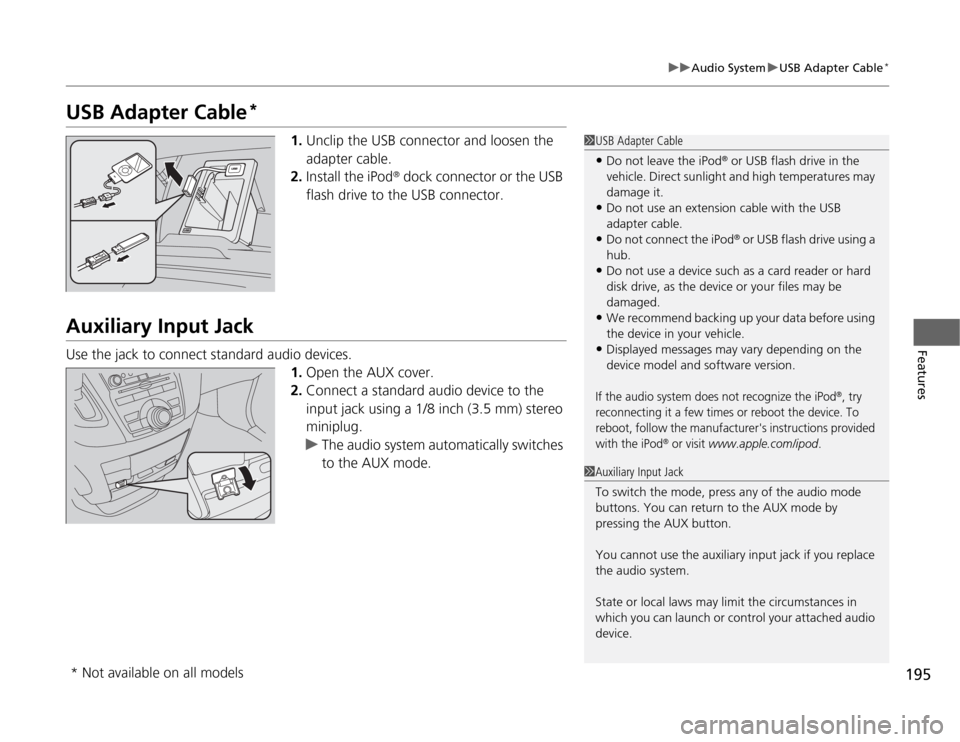
USB Adapter Cable
*
1.Unclip the USB connector and loosen the
adapter cable.
2.Install the iPod
® dock connector or the USB
flash drive to the USB connector.
Auxiliary Input JackUse the jack to connect standard audio devices.
1.Open the AUX cover.
2.Connect a standard audio device to the
input jack using a 1/8 inch (3.5 mm) stereo
miniplug.
uThe audio system automatically switches
to the AUX mode.
1USB Adapter Cable•Do not leave the iPod
® or USB flash drive in the
vehicle. Direct sunlight and high temperatures may
damage it.
•Do not use an extension cable with the USB
adapter cable.•Do not connect the iPod
® or USB flash drive using a
hub.
•Do not use a device such as a card reader or hard
disk drive, as the device or your files may be
damaged.•We recommend backing up your data before using
the device in your vehicle.•Displayed messages may vary depending on the
device model and software version.If the audio system does not recognize the iPod
®, try
reconnecting it a few times or reboot the device. To
reboot, follow the manufacturer's instructions provided
with the iPod
® or visit
www.apple.com/ipod
.
1Auxiliary Input Jack
To switch the mode, press any of the audio mode
buttons. You can return to the AUX mode by
pressing the AUX button.
You cannot use the auxiliary input jack if you replace
the audio system.
State or local laws may limit the circumstances in
which you can launch or control your attached audio
device.
* Not available on all models
Page 197 of 441

196
uuAudio SystemuAudio System Theft Protection
*
Features
Audio System Theft Protection
*
The audio system is disabled when it is disconnected from the power source, such as
when the battery is disconnected or goes dead.■
Reactivating the audio system
1.Turn the ignition switch to ON
(w
, and turn on the audio system.
uIf you turn the ignition switch to ACCESSORY
(q
, you will be requested to
enter the audio security code. See step 3.
2.Press and hold the power volume knob again for more than two seconds.
uThe audio system is reactivated when the system’s control unit recognizes that
the system is in your vehicle.
If the control unit fails to recognize, ENTER CODE appears on the audio/
information screen.
3.Enter the audio security code using the preset buttons. If you enter an incorrect
digit, continue to the last digit, then try again. If you do not enter the code
correctly after 10 tries, leave the system for one hour before trying again, or visit
a dealer to have the system reset.
1Audio System Theft Protection
Find the audio system's security code and serial
number label in your owner’s manual kit.
We recommend that you write down the serial
number in this owner’s manual.
Do not store the label in your vehicle. If you lose the
label, you must first retrieve the serial number, and
then obtain the code.
You can find out about your serial number and
security code from a dealer.
You can register the security code at Owner Link
(owners.honda.com.), and find information on how
to retrieve the serial number and obtain the code at
radio-navicode.honda.com.
U.S. models
* Not available on all models
Page 202 of 441
201
uuAudio System Basic OperationuPlaying a CD
Features
1Playing a CD
NOTICEDo not use CDs with adhesive labels. The label can
cause the CD to jam in the unit.
WMA files protected by digital rights management
(DRM) cannot be played.
The audio system displays UNSUPPORTED, then
skips to the next file.
Text data appears on the display under the following
circumstances:•When you select a new folder, file, or track.•When you change the audio mode to CD.•When you insert a CD.
The display shows up to 14 characters of text data.
If you eject the CD but do not remove it from the slot,
the system reloads the CD automatically after several
seconds.