Page 99 of 286
uuOperating the Switches Around the Steering WheeluWipers and Washers
98Controls
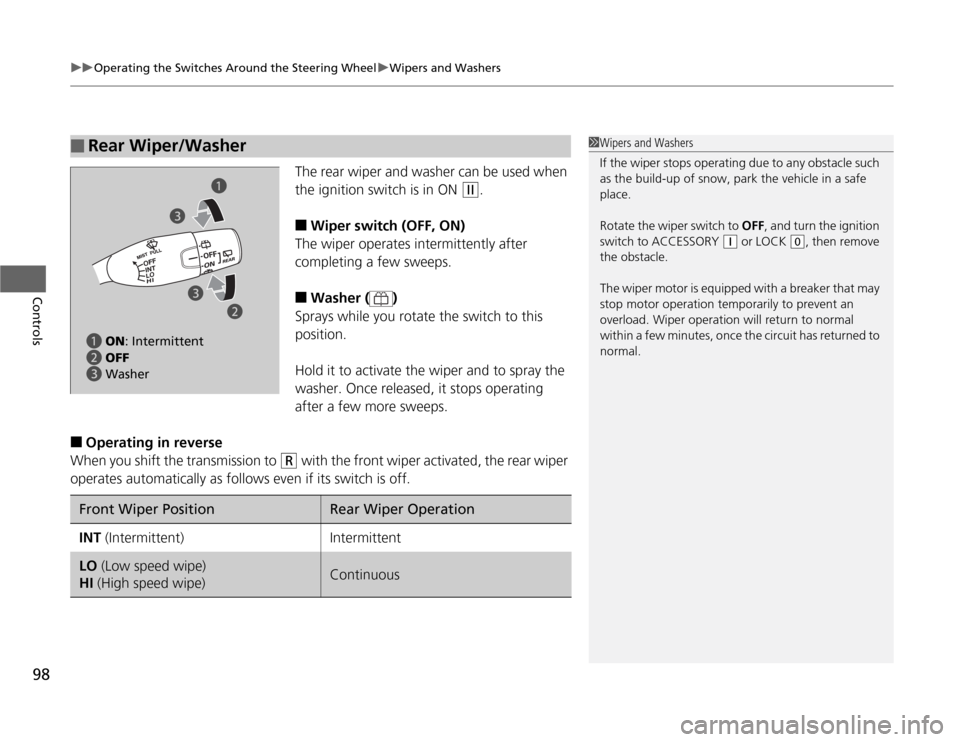
The rear wiper and washer can be used when
the ignition switch is in ON
(w
.
■
Wiper switch (OFF, ON)
The wiper operates intermittently after
completing a few sweeps.
■
Washer ( )
Sprays while you rotate the switch to this
position.
Hold it to activate the wiper and to spray the
washer. Once released, it stops operating
after a few more sweeps.
■
Operating in reverse
When you shift the transmission to
(R
with the front wiper activated, the rear wiper
operates automatically as follows even if its switch is off.
■
Rear Wiper/Washer
1Wipers and Washers
If the wiper stops operating due to any obstacle such
as the build-up of snow, park the vehicle in a safe
place.
Rotate the wiper switch to OFF, and turn the ignition
switch to ACCESSORY
(q
or LOCK
(0
, then remove
the obstacle.
The wiper motor is equipped with a breaker that may
stop motor operation temporarily to prevent an
overload. Wiper operation will return to normal
within a few minutes, once the circuit has returned to
normal.
a ON: Intermittent
b OFF
c Washera
b c
cFront Wiper Position
Rear Wiper Operation
INT (Intermittent)
Intermittent
LO (Low speed wipe)
HI (High speed wipe)
Continuous
Page 102 of 286
101
uuOperating the Switches Around the Steering WheeluAdjusting the Steering Wheel
Controls
Adjusting the Steering WheelThe steering wheel height and distance from your body can be adjusted so that you
can comfortably grip the steering wheel in an appropriate driving posture.
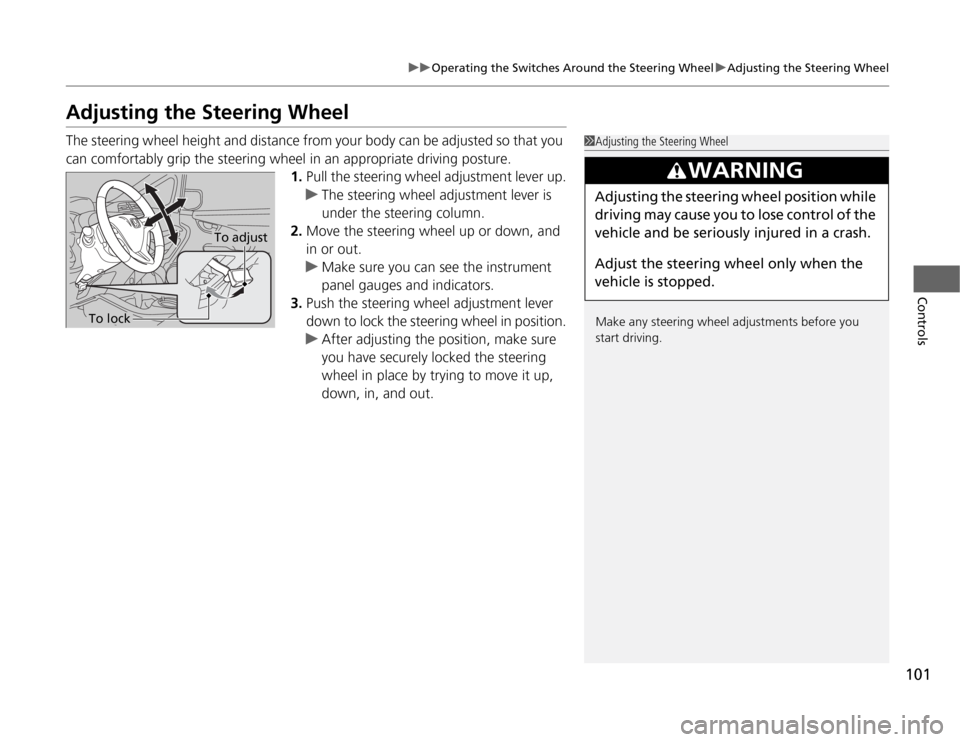
1.Pull the steering wheel adjustment lever up.
uThe steering wheel adjustment lever is
under the steering column.
2.Move the steering wheel up or down, and
in or out.
uMake sure you can see the instrument
panel gauges and indicators.
3.Push the steering wheel adjustment lever
down to lock the steering wheel in position.
uAfter adjusting the position, make sure
you have securely locked the steering
wheel in place by trying to move it up,
down, in, and out.
1Adjusting the Steering Wheel
Make any steering wheel adjustments before you
start driving.
3
WARNING
Adjusting the steering wheel position while
driving may cause you to lose control of the
vehicle and be seriously injured in a crash.
Adjust the steering wheel only when the
vehicle is stopped.
To adjust
To lock
Page 104 of 286
103
Continued
Controls
Adjusting the SeatsAdjusting the Seat Positions
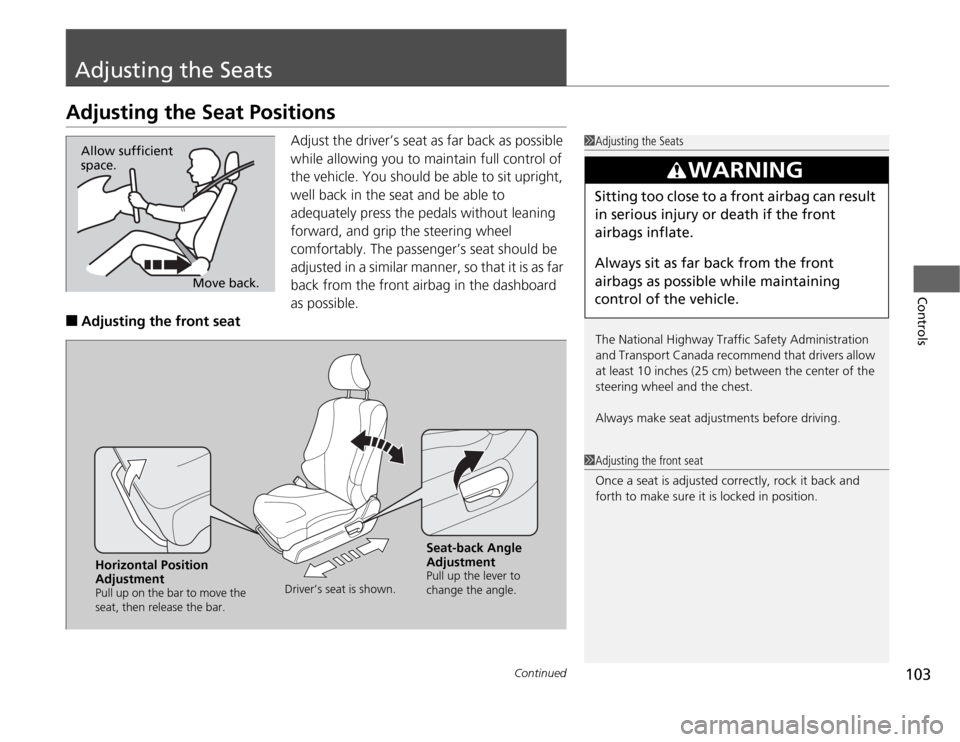
Adjust the driver’s seat as far back as possible
while allowing you to maintain full control of
the vehicle. You should be able to sit upright,
well back in the seat and be able to
adequately press the pedals without leaning
forward, and grip the steering wheel
comfortably. The passenger’s seat should be
adjusted in a similar manner, so that it is as far
back from the front airbag in the dashboard
as possible.
■
Adjusting the front seat
1Adjusting the Seats
The National Highway Traffic Safety Administration
and Transport Canada recommend that drivers allow
at least 10 inches (25 cm) between the center of the
steering wheel and the chest.
Always make seat adjustments before driving.
3
WARNING
Sitting too close to a front airbag can result
in serious injury or death if the front
airbags inflate.
Always sit as far back from the front
airbags as possible while maintaining
control of the vehicle.
Move back. Allow sufficient
space.
1Adjusting the front seat
Once a seat is adjusted correctly, rock it back and
forth to make sure it is locked in position.
Horizontal Position
AdjustmentPull up on the bar to move the
seat, then release the bar.Driver’s seat is shown.
Seat-back Angle
AdjustmentPull up the lever to
change the angle.
Page 107 of 286

uuAdjusting the SeatsuAdjusting the Seat Positions
106Controls
A passenger sitting in a back seating position
should adjust the height of their head restraint
to an appropriate position before the vehicle
begins moving.
To raise the head restraint:
Pull it upward.
To lower the head restraint:
Push it down while pressing the release
button.
Head restraints can be removed for cleaning or repair.
To remove a head restraint:
Pull the restraint up as far as it will go. Then push the release button, and pull the
restraint up and out.
To reinstall a head restraint:
Insert the legs back in place, then adjust the head restraint to an appropriate height
while pressing the release button. Pull up on the restraint to make sure it is locked
in position.
■
Changing the Rear Seat Head Restraint Positions
■
Removing and Reinstalling the Head Restraints
1Removing and Reinstalling the Head Restraints
3
WARNING
Failure to reinstall, or correctly reinstall, the
head restraints can result in severe injury
during a crash.
Always replace the head restraints before
driving.
Page 109 of 286

108
uuAdjusting the SeatsuRear Seats
Controls
Rear Seats
Pull the lever on the right to change the angle
of the right half of the seat-back, and left for
the left half.
1.Unlatch the detachable anchor from the
anchor buckle and store the detachable
anchor in the retractor housing.
2.Pull the release lever and fold down the
seat-back.
■
Adjusting the Rear Seat-BacksRelease Lever■
Folding Down the Rear Seats
1Folding Down the Rear Seats
The rear seat-backs can be folded down to
accommodate bulkier items in the cargo area.
Never drive with a seat-back folded down and the
tailgate open.
2Exhaust Gas Hazard P. 61
To lock a seat-back upright, push it backwards until it
locks. When returning a seat-back to it’s original
position, push it firmly back. Also, make sure all rear
shoulder belts are positioned in front of the seatback,
and the center shoulder belt is re-positioned in the
guide.
Make sure that the folded seat-back does not press
against the front passenger seat, as this can cause the
front passenger seat weight sensor to work
improperly.
2Side Airbag Off Indicator P. 47
Anchor
Buckle
Latch Plate
Release Lever
Page 110 of 286
109
uuAdjusting the SeatsuRear Seats
Controls
Separately lift up the left and right halves of
the rear seat cushions to make room for cargo
area.■
Lifting up the seat cushion
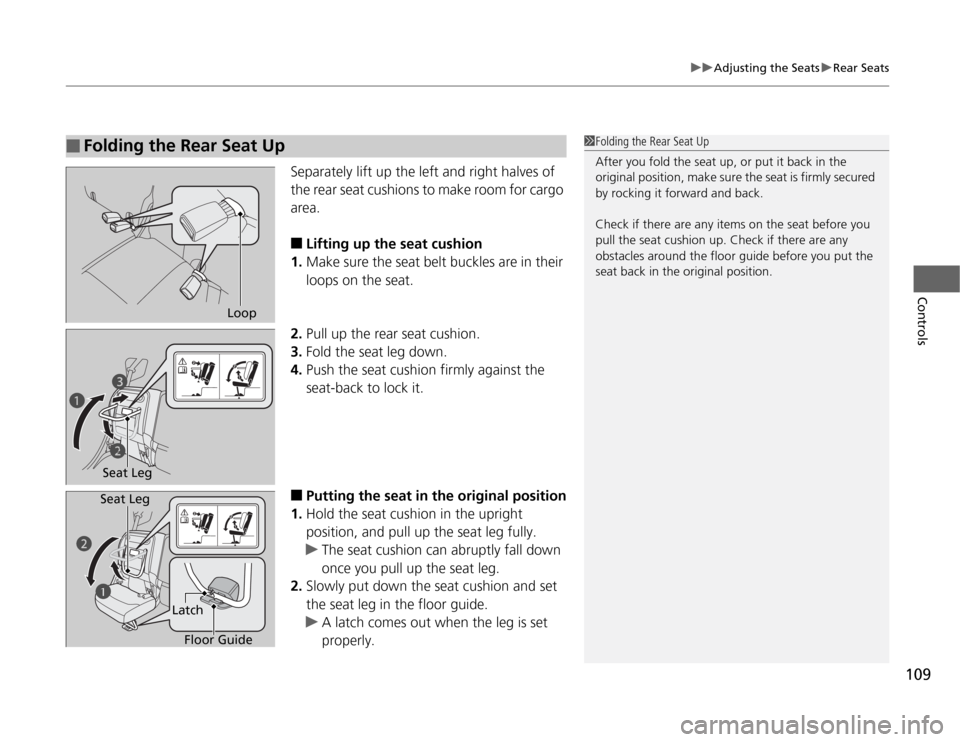
1.Make sure the seat belt buckles are in their
loops on the seat.
2.Pull up the rear seat cushion.
3.Fold the seat leg down.
4.Push the seat cushion firmly against the
seat-back to lock it.
■
Putting the seat in the original position
1.Hold the seat cushion in the upright
position, and pull up the seat leg fully.
uThe seat cushion can abruptly fall down
once you pull up the seat leg.
2.Slowly put down the seat cushion and set
the seat leg in the floor guide.
uA latch comes out when the leg is set
properly.
■
Folding the Rear Seat Up
1Folding the Rear Seat Up
After you fold the seat up, or put it back in the
original position, make sure the seat is firmly secured
by rocking it forward and back.
Check if there are any items on the seat before you
pull the seat cushion up. Check if there are any
obstacles around the floor guide before you put the
seat back in the original position.
Loop
Seat Legc
b a
b
a
Floor Guide Latch Seat Leg
Page 112 of 286
111
Continued
Controls
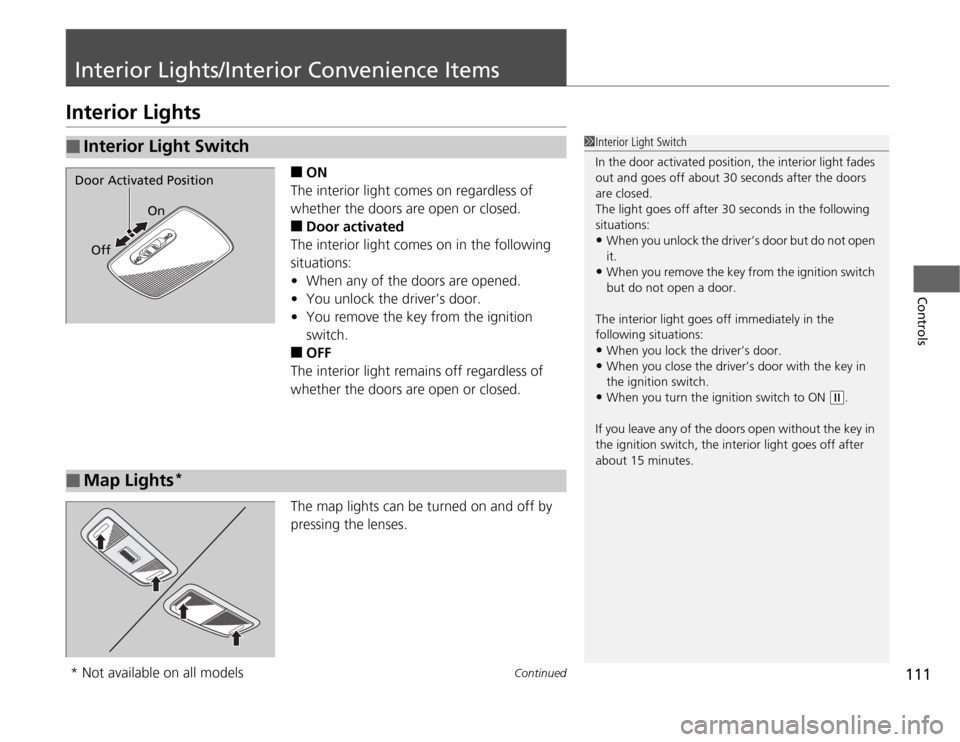
Interior Lights/Interior Convenience ItemsInterior Lights
■
ON
The interior light comes on regardless of
whether the doors are open or closed.
■
Door activated
The interior light comes on in the following
situations:
•When any of the doors are opened.
•You unlock the driver’s door.
•You remove the key from the ignition
switch.
■
OFF
The interior light remains off regardless of
whether the doors are open or closed.
The map lights can be turned on and off by
pressing the lenses.
■
Interior Light Switch
1Interior Light Switch
In the door activated position, the interior light fades
out and goes off about 30 seconds after the doors
are closed.
The light goes off after 30 seconds in the following
situations:•When you unlock the driver’s door but do not open
it.•When you remove the key from the ignition switch
but do not open a door.
The interior light goes off immediately in the
following situations:•When you lock the driver’s door.•When you close the driver’s door with the key in
the ignition switch.•When you turn the ignition switch to ON
(w
.
If you leave any of the doors open without the key in
the ignition switch, the interior light goes off after
about 15 minutes.
Door Activated Position
On
Off■
Map Lights
*
* Not available on all models
Page 140 of 286
139
uuGeneral Information on the Audio SystemuCompatible iPod® and USB Flash Drives
*
Features
Compatible iPod® and USB Flash Drives
*
•Use a recommended USB flash drive of 256 MB or higher.
•Some digital audio players may not be compatible.
•Some USB flash drives (e.g., a device with security lockout) may not work.
•Some software files may not allow for audio play or text data display.
•Some versions of MP3, WMA, or AAC formats may be unsupported.■
iPod® Model Compatibility
Model
iPod classic® 80GB/160GB
iPod classic® 120GB
iPod classic® 160GB (launch in 2009)
iPod® (5th generation)
iPod nano®iPod touch®
■
USB Flash Drives
1iPod® Model Compatibility
This system may not work with all software versions
of these devices.1USB Flash Drives
Files on the USB flash drive are played in their stored
order. This order may be different from the order
displayed on your PC or device.
* Not available on all models