Page 65 of 286

64Instrument Panel
IndicatorsIndicator
Name
On/Blinking
Explanation
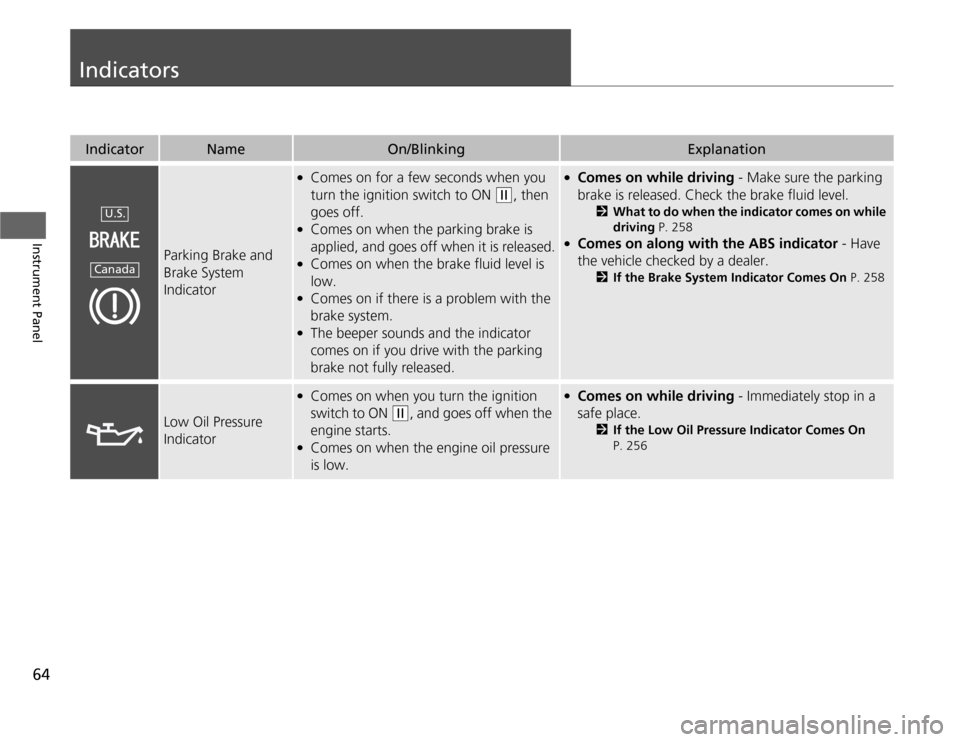
Parking Brake and
Brake System
Indicator
●
Comes on for a few seconds when you
turn the ignition switch to ON
(w
, then
goes off.
●
Comes on when the parking brake is
applied, and goes off when it is released.
●
Comes on when the brake fluid level is
low.
●
Comes on if there is a problem with the
brake system.
●
The beeper sounds and the indicator
comes on if you drive with the parking
brake not fully released.
●
Comes on while driving - Make sure the parking
brake is released. Check the brake fluid level.
2What to do when the indicator comes on while
driving P. 258
●
Comes on along with the ABS indicator - Have
the vehicle checked by a dealer.
2If the Brake System Indicator Comes On P. 258
Low Oil Pressure
Indicator
●
Comes on when you turn the ignition
switch to ON
(w
, and goes off when the
engine starts.
●
Comes on when the engine oil pressure
is low.
●
Comes on while driving - Immediately stop in a
safe place.
2If the Low Oil Pressure Indicator Comes On
P. 256
U.S.Canada
Page 66 of 286

65
uuIndicatorsu
Continued
Instrument Panel
Indicator
Name
On/Blinking
Explanation
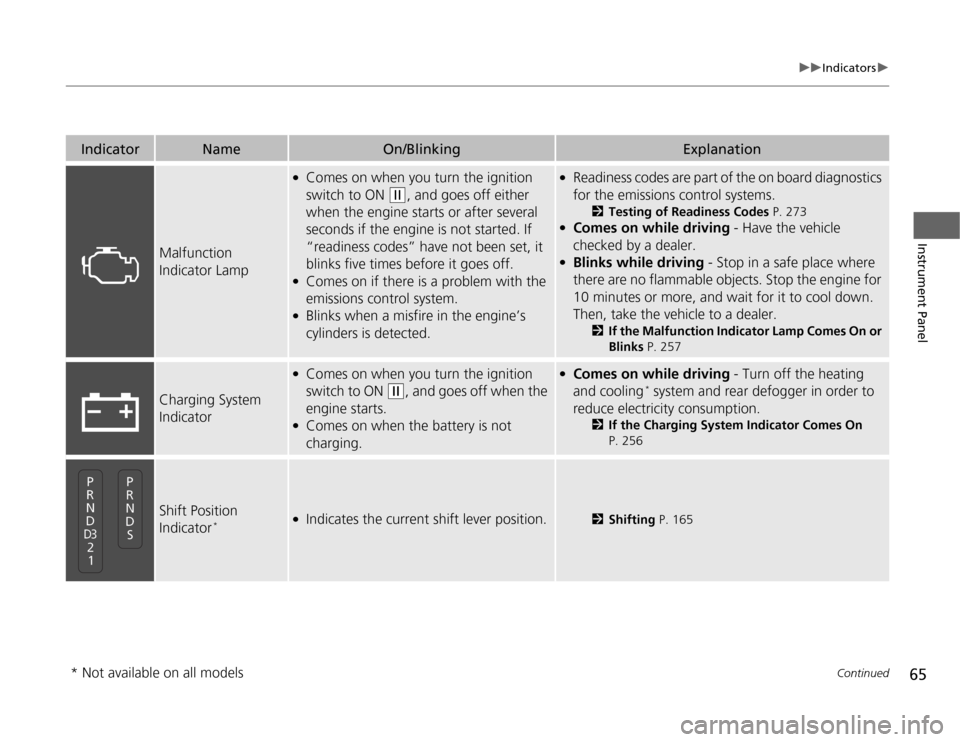
Malfunction
Indicator Lamp
●
Comes on when you turn the ignition
switch to ON
(w
, and goes off either
when the engine starts or after several
seconds if the engine is not started. If
“readiness codes” have not been set, it
blinks five times before it goes off.
●
Comes on if there is a problem with the
emissions control system.
●
Blinks when a misfire in the engine’s
cylinders is detected.
●
Readiness codes are part of the on board diagnostics
for the emissions control systems.
2Testing of Readiness Codes P. 273
●
Comes on while driving - Have the vehicle
checked by a dealer.
●
Blinks while driving - Stop in a safe place where
there are no flammable objects. Stop the engine for
10 minutes or more, and wait for it to cool down.
Then, take the vehicle to a dealer.
2If the Malfunction Indicator Lamp Comes On or
Blinks P. 257
Charging System
Indicator
●
Comes on when you turn the ignition
switch to ON
(w
, and goes off when the
engine starts.
●
Comes on when the battery is not
charging.
●
Comes on while driving - Turn off the heating
and cooling
* system and rear defogger in order to
reduce electricity consumption.
2If the Charging System Indicator Comes On
P. 256
Shift Position
Indicator
*
●
Indicates the current shift lever position.
2Shifting P. 165
* Not available on all models
Page 67 of 286

66
uuIndicatorsu
Instrument Panel
Indicator
Name
On/Blinking
Explanation
Transmission
Indicator
*
●
Comes on for a few seconds when you
turn the ignition switch to ON
(w
, then
goes off.
●
Blinks if the transmission system has a
problem.
●
Blinks while driving - Avoid sudden starts and
acceleration and have the vehicle checked by a
dealer immediately.
M (sequential shift
mode) Indicator/
Gear Position
Indicator
*
●
Comes on when the manual sequential
shift mode is applied.
●
Blinks if the transmission system has a
problem.
2Sequential Shift Mode P. 169
Seat Belt Reminder
Indicator
●
Comes on and the beeper sounds if you
are not wearing a seat belt when you
turn the ignition switch to ON
(w
. If the
front passenger is not wearing a seat
belt, the indicator comes on about a few
seconds later.
●
Blinks while driving if either you or the
front passenger has not fastened a seat
belt. The beeper sounds and the
indicator blinks at regular intervals.
●
The beeper stops and the indicator goes off when
you and the front passenger fasten their seat belts.
●
Stays on after you or the front passenger has
fastened the seat belt - A detection error may
have occurred in the sensor. Have the vehicle
checked by a dealer.
2Seat Belt Reminder P. 27
Low Fuel Indicator
●
Comes on when the fuel reserve is
running low (approximately 1.64 U.S.
gal./6.2 Liter left).
●
Blinks if there is a problem with the fuel
gauge.
●
Comes on - Refuel your vehicle as soon as possible.
●
Blinks - Have the vehicle checked by a dealer.
* Not available on all models
Page 78 of 286

77
Continued
Controls
Locking and Unlocking the DoorsKey Types and FunctionsThis vehicle comes with the following keys:
Use the keys to start and stop the engine, and
to lock and unlock all the doors, and tailgate.
You can also use the remote transmitter
* to
lock and unlock the doors, and tailgate.
There is a PANIC button in the remote
transmitter.
■
Master Keys
1Key Types and Functions
All of the keys have an immobilizer system. The
immobilizer system helps to protect against vehicle
theft.
2Immobilizer System P. 90
The keys contain precision electronics.
Adhere to the following advice to prevent damage to
the electronics:•Do not leave the keys in direct sunlight, or in
locations with high temperature or high humidity.•Do not drop the keys or set heavy objects on them.•Keep the keys away from liquids.•Do not take the keys apart except for replacing the
battery.
If the circuits in the keys are damaged, the engine
may not start, and the remote transmitter may not
work.
If the keys do not work properly, have them
inspected by a dealer.
Ignition Keys
*
Ignition Keys with
Remote Transmitter
*
* Not available on all models
Page 102 of 286

101
uuOperating the Switches Around the Steering WheeluAdjusting the Steering Wheel
Controls
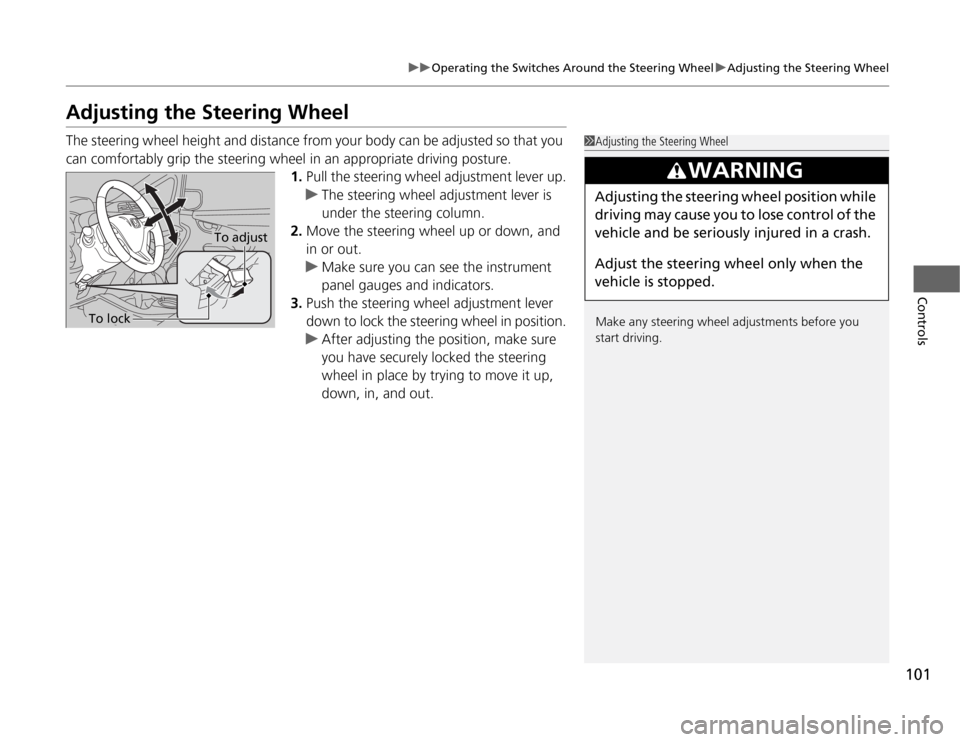
Adjusting the Steering WheelThe steering wheel height and distance from your body can be adjusted so that you
can comfortably grip the steering wheel in an appropriate driving posture.
1.Pull the steering wheel adjustment lever up.
uThe steering wheel adjustment lever is
under the steering column.
2.Move the steering wheel up or down, and
in or out.
uMake sure you can see the instrument
panel gauges and indicators.
3.Push the steering wheel adjustment lever
down to lock the steering wheel in position.
uAfter adjusting the position, make sure
you have securely locked the steering
wheel in place by trying to move it up,
down, in, and out.
1Adjusting the Steering Wheel
Make any steering wheel adjustments before you
start driving.
3
WARNING
Adjusting the steering wheel position while
driving may cause you to lose control of the
vehicle and be seriously injured in a crash.
Adjust the steering wheel only when the
vehicle is stopped.
To adjust
To lock
Page 154 of 286

153
Driving
This chapter discusses driving, refueling, and information on items such as accessories.
Before Driving
Driving Preparation .......................... 154
Maximum Load Limit........................ 157
Towing a Trailer
Towing Your Vehicle ........................ 159
When Driving
Starting the Engine .......................... 161
Precautions While Driving................. 163
Automatic Transmission ................... 164
Shifting ............................................ 165
Shifting ............................................ 167
Models with 7 positions ATModels with 5 positions AT
Shifting ............................................ 171
Cruise Control
*............................... 173
VSA
® (Vehicle Stability Assist), aka ESC
(Electronic Stability Control), System ...... 176
TPMS (Tire Pressure Monitoring System) .. 178Tire Pressure Monitoring System (TPMS) -
Required Federal Explanation ......... 179
Braking
Brake System ................................... 181
ABS (Anti-lock Brake System) ........... 183
Brake Assist System.......................... 184Manual transmission models
Parking Your Vehicle
When Stopped ................................ 185
Parking ............................................ 185
Refueling
Fuel Information .............................. 186
How to Refuel ................................. 187
Fuel Economy.................................... 189
Improving Fuel Economy .................. 189
Accessories and Modifications
Accessories ...................................... 190
Modifications................................... 190
* Not available on all models
Page 163 of 286

uuWhen DrivinguStarting the Engine
162Driving
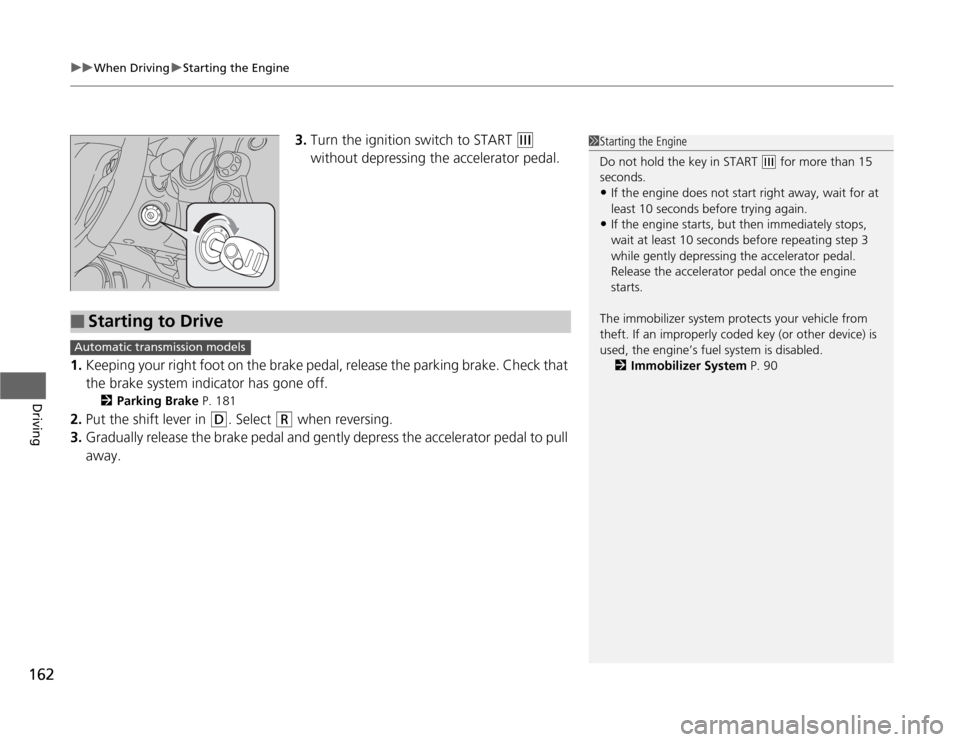
3.Turn the ignition switch to START
(e
without depressing the accelerator pedal.
1.Keeping your right foot on the brake pedal, release the parking brake. Check that
the brake system indicator has gone off.
2Parking Brake P. 181
2.Put the shift lever in
(D
. Select
(R
when reversing.
3.Gradually release the brake pedal and gently depress the accelerator pedal to pull
away.
1Starting the Engine
Do not hold the key in START
(e
for more than 15
seconds.
•If the engine does not start right away, wait for at
least 10 seconds before trying again.•If the engine starts, but then immediately stops,
wait at least 10 seconds before repeating step 3
while gently depressing the accelerator pedal.
Release the accelerator pedal once the engine
starts.
The immobilizer system protects your vehicle from
theft. If an improperly coded key (or other device) is
used, the engine’s fuel system is disabled.
2Immobilizer System P. 90
■
Starting to Drive
Automatic transmission models
Page 165 of 286
164
uuWhen DrivinguAutomatic Transmission
Driving
Automatic TransmissionThe following conditions cause the engine to run at high revolutions, and increase
creeping:
•Immediately after the engine starts.
•When the heating and cooling
* system is in use.
Keep the brake pedal firmly depressed when stopped.
Quickly depressing the accelerator pedal while driving uphill may cause the
transmission to drop to a lower gear, unexpectedly increasing vehicle speed. Depress
the accelerator pedal carefully, especially on slippery roads and curves.
■
Creeping
■
Kickdown
* Not available on all models