Page 6 of 435

A convenient ref erence to the
sections in this manual.
A quick ref erence to the main
controls in your vehicle.
Explains the purpose of each
instrument panel indicator and gauge,
and how to use the controls on the
dashboard and steering column.ID numbers, dimensions, capacities,
and technical information.
How to order manuals and other
technical literature.
A summary of the inf ormation you
need when you pull up to the f uel
pump. A summary of the warranties
covering your new vehicle, and how
to contact us for any reason. Refer to
your warranty manual f or detailed
inf ormation.
Important inf ormation about the
proper use and care of your vehicle’s
seat belts, an overview of the
supplemental restraint system, and
valuable inf ormation on how to
protect children with child restraints.
How to operate the climate control
system, the audio system, and other
convenience f eatures. What gasoline to use, how to break-
in your new vehicle, and how to load
luggage and other cargo.
The proper way to start the engine,
shif t the transmission, and park; plus
what you need to know if you’re
planning to tow a trailer.
The Maintenance Minder shows
you when you need to take your
vehicle to the dealer for maintenance
service. There is also a list of things
to check and instructions on how to
check them.
This section covers several problems
motorists sometimes experience,
and details how to handle them.
Contents
Your Vehicle at a Glance
Driver and Passenger Saf ety
Instruments and Controls
Features T echnical Inf ormation
Warranty and Customer
Relations
(U.S. and Canada only)
Authorized Manuals
(U.S. only)
Index
Service Inf ormation Summary
Bef ore Driving
Driving
Maintenance
T aking Care of the Unexpected
Overview of Contents
2
TM
2012 Crosstour
Page 63 of 435

position. If it comes on while driving,
it indicates that one or more of your
vehicle’s tires ar")
This indicator normally comes on f or
a f ew seconds when you turn the
ignition switch to the ON (II)
position. If it comes on while driving,
it indicates that one or more of your
vehicle’s tires are signif icantly low
on pressure.
If this happens, pull to the side of the
road when it is saf e, check which tire
has lost pressure, and determine the
cause. If it is because of a f lat tire,
replace the flat tire with the compact
spare (see page ), and have the
f lat tire repaired as soon as possible.
If two or more tires are underinf lated,
call a prof essional towing service
(see page ). For more
inf ormation, see page .This indicator normally comes on f or
a f ew seconds when you turn the
ignition switch to the ON (II)
position.
If this indicator comes on and stays
on at any other time, or if it does not
come on when you turn the ignition
switch to the ON (II) position, there
is a problem with the TPMS. With
this indicator on, the low tire
pressure indicator will not come on
when a tire loses pressure. Take the
vehicle to your dealer to have the
system checked. For more
inf ormation, see page .
While the engine is operating in its
most economical range, this
indicator may come on and stay on.
373
397 313 313
Tire Pressure Monitoring
System (T PMS) Indicator
Low Tire Pressure
Indicator Fuel Economy Indicator
Instrument Panel Indicators
59
Inst rument s and Cont rols
ECO
2012 Crosstour
Page 72 of 435
�µ
�µ
�µ �µ
�µ �µ
�µ
�µ �µ
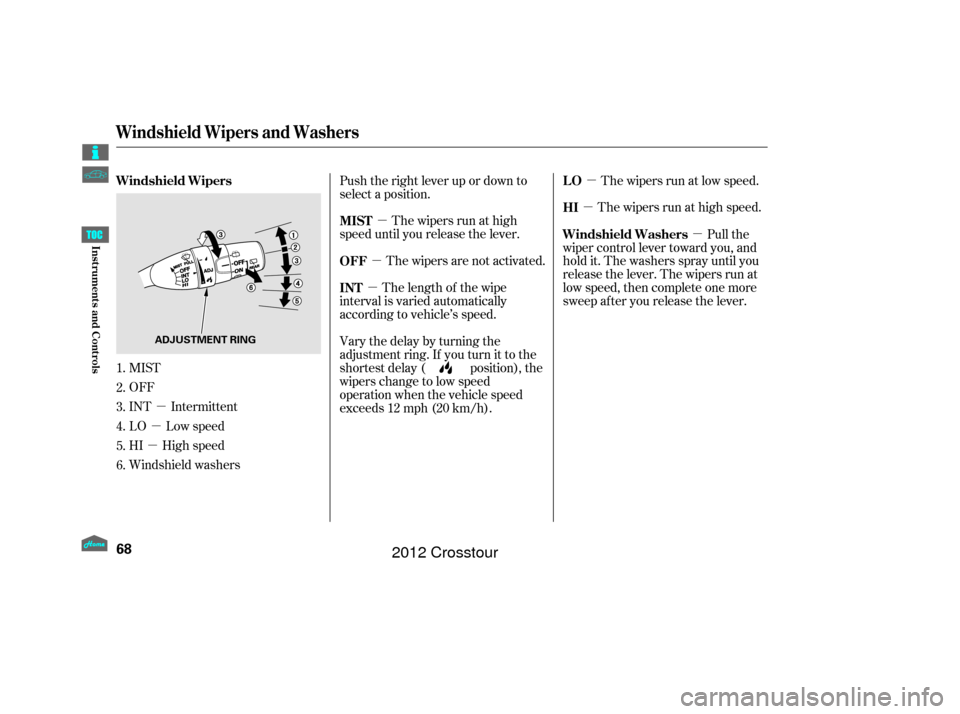
MIST
OFF
INT Intermittent
LO Low speed
HI High speed
Windshield washers Push the right lever up or down to
select a position.
The wipers run at high
speed until you release the lever.
The wipers are not activated. The wipers run at low speed.
The wipers run at high speed.
Vary the delay by turning the
adjustment ring. If you turn it to the
shortest delay ( position), the
wipers change to low speed
operation when the vehicle speed
exceeds 12 mph (20 km/h). The length of the wipe
interval is varied automatically
according to vehicle’s speed. Pull the
wiper control lever toward you, and
hold it. The washers spray until you
release the lever. The wipers run at
low speed, then complete one more
sweep after you release the lever.
1.
2.
3.
4.
5.
6. MIST
OFF
LO
HI
INT
Windshield Wipers
Windshield Washers
Windshield Wipers and Washers
68
ADJUSTMENT RING
Inst rument s and Cont rols
2012 Crosstour
Page 80 of 435
Move the steering wheel up or
down, and in or out, so it points
toward your chest, not toward
your f ace. Make sure you can see
the instrument panel gauges and
indicators.Push the lever up to lock the
steering wheel in position.
Make sure you have securely
locked the steering wheel in place
by trying to move it up, down, in,
and out.
Push the lever under the steering
column all the way down.
Make any steering wheel
adjustments before you start driving.
1.
2.3.
4.
Steering Wheel A djustments
76
Adjusting the steering wheel
position while driving may
cause you to lose control of the
vehicle and be seriously injured
inacrash.
Adjust the steering wheel only
when the vehicle is stopped.
Inst rument s and Cont rols
2012 Crosstour
Page 286 of 435
.
During this period:Avoid full-throttle starts and r")
Help assure your vehicle’s f uture
reliability and perf ormance by paying
extra attention to how you drive
during the f irst 600 miles (1,000 km).
During this period:Avoid full-throttle starts and rapid
acceleration.
Do not change the oil until the
scheduled maintenance time.
Avoidhardbrakingforthefirst
200 miles (300 km).
Do not tow a trailer.
You should also f ollow these
recommendations with an
overhauled or exchanged engine, or
when the brakes are replaced. Your vehicle is designed to operate
on unleaded gasoline with a pump
octane number of 87 or higher. Use
of a lower octane gasoline can cause
a persistent, heavy, metallic rapping
noise that can lead to engine damage.
Break-in Period, Fuel Recommendation
Break-in Period
Fuel Recommendation
282
T o help prevent harmf ul f uel system
and engine deposits, use high quality
f uel containing detergent and additives.
In addition, in order to maintain good
perf ormance, f uel economy, and
emissions control, we strongly
recommend the use of gasoline that
does NOT contain harmf ul manganese-
based f uel additives such as MMT , if
such gasoline is available.
Bef ore Driving
2012 Crosstour
Page 292 of 435
Wait a f ew minutes af ter turning the
engine of f bef ore you check the oil.Remove the dipstick again, and
check the level. It should be
between the upper and lower
marks.
If it is near or below the lower mark,
see on page .
Remove the dipstick (orange loop).
Wipe of f the dipstick with a clean
cloth or paper towel.
Insert the dipstick all the way back
into its hole. Look at the coolant level in the
radiator reserve tank. Make sure it is
between the MAX and MIN lines. If
it is below the MIN line, see
on page f or
inf ormation on adding the proper
coolant.
Refer to on page f or inf ormation
about checking other items on your
vehicle.
1.
2.
3. 4.
333330337
Oil Check
A dding Engine OilEngine Coolant Check
A dding
Engine Coolant
Owner’s Maintenance
Checks
Service Station Procedures
288
LOWER MARK UPPER MARK
MIN
MAX
RESERVE TANK
DIPSTICK
(orange loop)
Bef ore Driving
2012 Crosstour
Page 299 of 435
.
Label Example See Tire And Loading Inf ormation
label attached to the driver’s
doorjamb.
This f igure includes the total weight
of a")
�µ�µ�·
The maximum load f or your vehicle
is 850 lbs (385 kg).
Label Example See Tire And Loading Inf ormation
label attached to the driver’s
doorjamb.
This f igure includes the total weight
of all occupants, cargo, and
accessories, and the tongue load if
you are towing a trailer. Steps for Determining
Correct Load Limit
Locate the statement ‘‘The
combined weight of occupants and
cargo should never exceed XXX
kg or XXX lbs.’’ on your vehicle’s
placard.
Determine the combined weight
of the driver and passengers that
will be riding in your vehicle.
Subtract the combined weight of
the driver and passengers f rom
XXX kg or XXX lbs. The resulting f igure equals the
available amount of cargo and
luggage load capacity. For
example, if the ‘‘XXX’’ amount
equals 1,400 lbs. and there will be
f ive 150 lb. passengers in your
vehicle, the amount of available
cargo and luggage load capacity is
650 lbs.
(1,400 750 (5 150) = 650 lbs.)
Determine the combined weight
of luggage and cargo being loaded
on the vehicle. That weight may
not saf ely exceed the available
cargo and luggage load capacity
calculated in Step 4.
If your vehicle will be towing a
trailer, load f rom your trailer will
be transf erred to your vehicle.
Consult this manual to determine
how this reduces the available
cargo and luggage load capacity of
your vehicle.
(1)
(2)
(3) (4)
(5)
(6)
CONT INUED
Load Limits
Carrying Cargo
295
Overloading or improper
loading can affect handling and
stability and cause a crash in
which you can be hurt or killed.
Follow all load limits and other
loading guidelines in this
manual.
Bef ore Driving
2012 Crosstour
Page 303 of 435
........................
Preparing to Drive .300
.......................
Starting the Engine .301
..............
Automatic Transmission . 302
...........................................
Parking .307
.............................
Braking System .308
...............
Anti-lock Brakes (ABS) . 309
Vehicle Stability Assist (VSA
),
aka Electronic Stability Control .......................
(ESC), System .311
Tire Pressure Monitoring ........................
System (TPMS) .313
...........................
Towing a Trailer .316
This section gives you tips on
starting the engine under various
conditions, and how to operate the
automatic transmission. It also
includes important inf ormation on
parking your vehicle, the braking
system, the vehicle stability assist
(VSA
) system, the tire pressure
monitoring system (TPMS), and
f acts you need if you are planning to
tow a trailer.
Driving
Driving
299
2012 Crosstour