2012 GMC SIERRA 1500 navigation
[x] Cancel search: navigationPage 7 of 556

Black plate (1,1)GMC Sierra Owner Manual - 2012 - CRC - 11/15/11
In Brief 1-1
In Brief
Instrument Panel
Instrument Panel (Base/UplevelVersion) . . . . . . . . . . . . . . . . . . . . . 1-2
Instrument Panel (Premium Version) . . . . . . . . . . . . . . . . . . . . . 1-6
Initial Drive Information
Initial Drive Information . . . . . . . . 1-8
Remote Keyless Entry (RKE)System . . . . . . . . . . . . . . . . . . . . . . 1-8
Remote Vehicle Start . . . . . . . . . 1-9
Door Locks . . . . . . . . . . . . . . . . . . . 1-9
Windows . . . . . . . . . . . . . . . . . . . . . 1-10
Seat Adjustment . . . . . . . . . . . . . 1-11
Memory Features . . . . . . . . . . . . 1-14
Heated and Ventilated Seats . . . . . . . . . . . . . . . . . . . . . . . 1-15
Head Restraint Adjustment . . . . . . . . . . . . . . . . . 1-15 Safety Belts . . . . . . . . . . . . . . . . . . 1-16
Passenger Sensing
System . . . . . . . . . . . . . . . . . . . . . 1-16
Mirror Adjustment . . . . . . . . . . . . 1-16
Steering Wheel Adjustment . . . . . . . . . . . . . . . . . 1-19
Throttle and Brake Pedal Adjustment . . . . . . . . . . . . . . . . . 1-19
Interior Lighting . . . . . . . . . . . . . . 1-20
Exterior Lighting . . . . . . . . . . . . . 1-21
Windshield Wiper/Washer . . . . 1-21
Climate Controls . . . . . . . . . . . . . 1-22
Transmission . . . . . . . . . . . . . . . . 1-24
Four-Wheel Drive . . . . . . . . . . . . 1-25
Vehicle Features
Radio(s) . . . . . . . . . . . . . . . . . . . . . 1-27
Satellite Radio . . . . . . . . . . . . . . . 1-28
Portable Audio Devices . . . . . . 1-28
Bluetooth
®. . . . . . . . . . . . . . . . . . . 1-29
Steering Wheel Controls . . . . . 1-29
Cruise Control . . . . . . . . . . . . . . . 1-30 Navigation System . . . . . . . . . . . 1-30
Driver Information
Center (DIC) . . . . . . . . . . . . . . . 1-30
Rear Vision Camera (RVC) . . . . . . . . . . . . . 1-31
Ultrasonic Parking Assist . . . . 1-31
Power Outlets . . . . . . . . . . . . . . . 1-32
Universal Remote System . . . 1-32
Sunroof . . . . . . . . . . . . . . . . . . . . . . 1-33
Performance and Maintenance
StabiliTrak®System . . . . . . . . . 1-35
Tire Pressure Monitor . . . . . . . . 1-35
Engine Oil Life System . . . . . . 1-35
Fuel E85 (85% Ethanol) . . . . . 1-36
Driving for Better Fuel Economy . . . . . . . . . . . . . . . . . . . 1-36
Roadside Assistance Program . . . . . . . . . . . . . . . . . . . . 1-36
OnStar
®. . . . . . . . . . . . . . . . . . . . . 1-37
Page 36 of 556
Black plate (30,1)GMC Sierra Owner Manual - 2012 - CRC - 11/15/11
1-30 In Brief
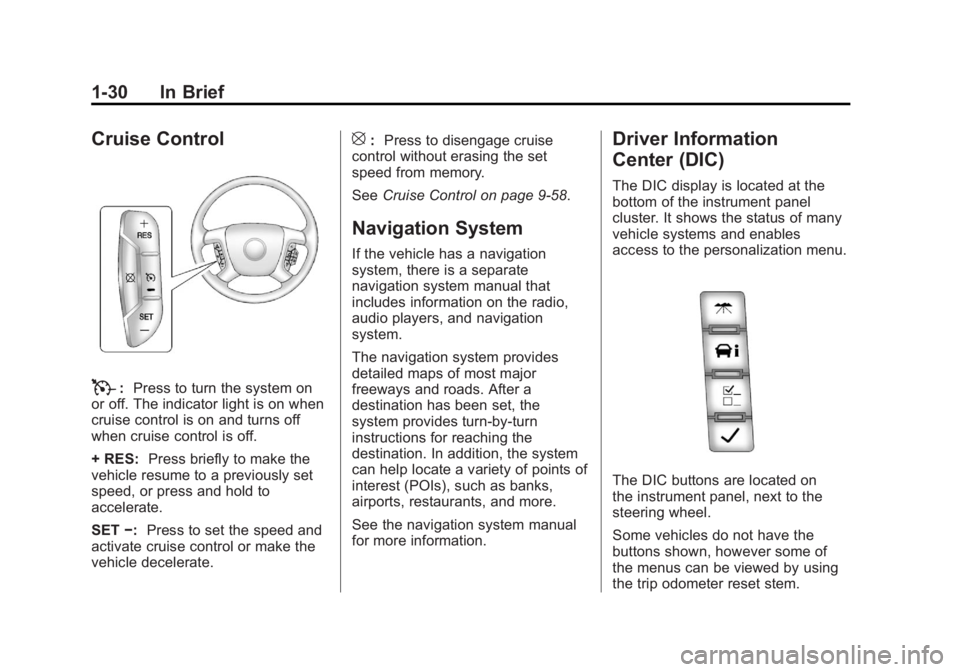
Cruise Control
T:Press to turn the system on
or off. The indicator light is on when
cruise control is on and turns off
when cruise control is off.
+ RES: Press briefly to make the
vehicle resume to a previously set
speed, or press and hold to
accelerate.
SET −:Press to set the speed and
activate cruise control or make the
vehicle decelerate.
[: Press to disengage cruise
control without erasing the set
speed from memory.
See Cruise Control on page 9‑58.
Navigation System
If the vehicle has a navigation
system, there is a separate
navigation system manual that
includes information on the radio,
audio players, and navigation
system.
The navigation system provides
detailed maps of most major
freeways and roads. After a
destination has been set, the
system provides turn-by-turn
instructions for reaching the
destination. In addition, the system
can help locate a variety of points of
interest (POIs), such as banks,
airports, restaurants, and more.
See the navigation system manual
for more information.
Driver Information
Center (DIC)
The DIC display is located at the
bottom of the instrument panel
cluster. It shows the status of many
vehicle systems and enables
access to the personalization menu.
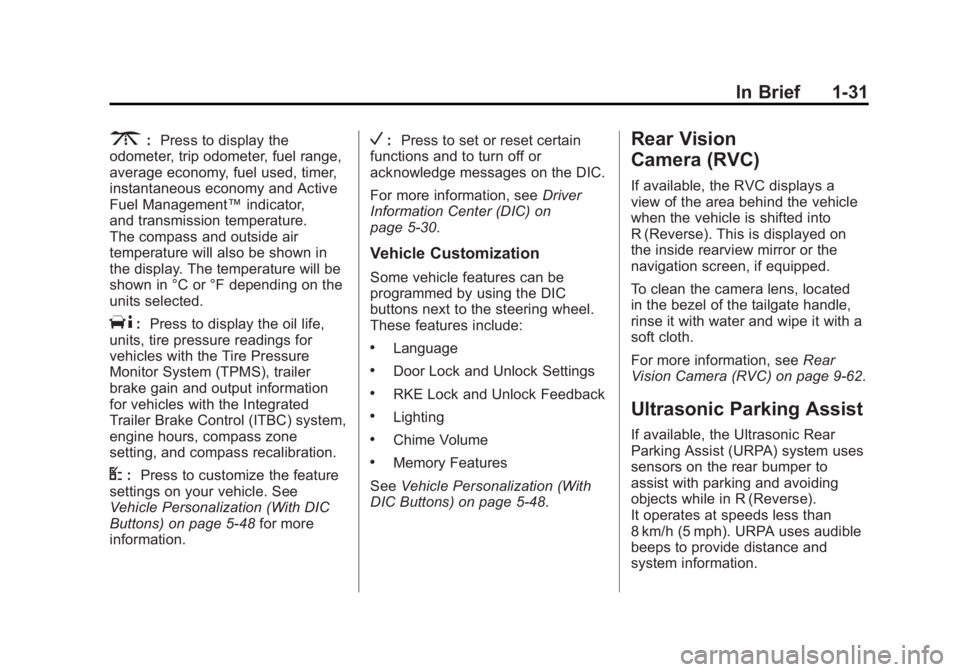
The DIC buttons are located on
the instrument panel, next to the
steering wheel.
Some vehicles do not have the
buttons shown, however some of
the menus can be viewed by using
the trip odometer reset stem.
Page 37 of 556
Black plate (31,1)GMC Sierra Owner Manual - 2012 - CRC - 11/15/11
In Brief 1-31
3:Press to display the
odometer, trip odometer, fuel range,
average economy, fuel used, timer,
instantaneous economy and Active
Fuel Management™ indicator,
and transmission temperature.
The compass and outside air
temperature will also be shown in
the display. The temperature will be
shown in °C or °F depending on the
units selected.
T: Press to display the oil life,
units, tire pressure readings for
vehicles with the Tire Pressure
Monitor System (TPMS), trailer
brake gain and output information
for vehicles with the Integrated
Trailer Brake Control (ITBC) system,
engine hours, compass zone
setting, and compass recalibration.
U: Press to customize the feature
settings on your vehicle. See
Vehicle Personalization (With DIC
Buttons) on page 5‑48 for more
information.
V: Press to set or reset certain
functions and to turn off or
acknowledge messages on the DIC.
For more information, see Driver
Information Center (DIC) on
page 5‑30.
Vehicle Customization
Some vehicle features can be
programmed by using the DIC
buttons next to the steering wheel.
These features include:
.Language
.Door Lock and Unlock Settings
.RKE Lock and Unlock Feedback
.Lighting
.Chime Volume
.Memory Features
See Vehicle Personalization (With
DIC Buttons) on page 5‑48.
Rear Vision
Camera (RVC)
If available, the RVC displays a
view of the area behind the vehicle
when the vehicle is shifted into
R (Reverse). This is displayed on
the inside rearview mirror or the
navigation screen, if equipped.
To clean the camera lens, located
in the bezel of the tailgate handle,
rinse it with water and wipe it with a
soft cloth.
For more information, see Rear
Vision Camera (RVC) on page 9‑62.
Ultrasonic Parking Assist
If available, the Ultrasonic Rear
Parking Assist (URPA) system uses
sensors on the rear bumper to
assist with parking and avoiding
objects while in R (Reverse).
It operates at speeds less than
8 km/h (5 mph). URPA uses audible
beeps to provide distance and
system information.
Page 43 of 556
Black plate (37,1)GMC Sierra Owner Manual - 2012 - CRC - 11/15/11
In Brief 1-37
As the owner of a new GMC, you
are automatically enrolled in the
Roadside Assistance program.
SeeRoadside Assistance Program
(U.S. and Canada) on page 13‑7 or
Roadside Assistance Program
(Mexico) on page 13‑9.
Roadside Assistance and OnStar
(U.S. and Canada)
If you have an active OnStar
subscription, press the
Qbutton
and the current GPS location will
be sent to an OnStar advisor who
will assess your problem, contact
Roadside Assistance, and relay
your exact location to get the help
you need. Online Owner Center (U.S. and
Canada)
The Online Owner Center is a
complimentary service that includes
online service reminders, vehicle
maintenance tips, online owner
manual, special privileges,
and more.
Sign up today at:
U.S.: gmc.com (click on
“Owners,”
then“Manage My
GMC/Owners Login”)
Canada: gmcowner.ca
OnStar®
If equipped, this vehicle has a
comprehensive, in-vehicle system
that can connect to a live Advisor
for Emergency, Security, Navigation,
Connection, and Diagnostic
Services. See OnStar Overview on
page 14‑1.
Page 141 of 556
Black plate (3,1)GMC Sierra Owner Manual - 2012 - CRC - 11/15/11
Instruments and Controls 5-3
c/x(Previous/End):Press to
go to the previous favorite radio
station, track on a CD, or folder on
an iPod
®or USB device. Press to
reject an incoming call, or end a
current call.
Radio
To select preset or favorite radio
stations:
Press and release
worc/xto
go to the next or previous radio
station stored as a preset or
favorite.
CD/DVD
To select tracks on a CD/DVD:
Press and release
worc/xto
go to the next or previous track.
Selecting Tracks on an iPod or
USB Device (Vehicles without a
Navigation System)
1. Press and hold
worc/x
while listening to a song until the
contents of the current folder
display on the radio display. 2. Press and release
worc/x
to scroll up or down the list, then
press and hold
w, or press¨to
play the highlighted track.
Navigating Folders on an iPod or
USB Device (Vehicles without a
Navigation System):
1. Press and hold
worc/x
while listening to a song until the
contents of the current folder
display on the radio display.
2. Press and hold
c/xto go
back to the previous folder list.
3. Press and release
worc/x
to scroll up or down the list.
.To select a folder,
press and hold
w, or press
¨when the
folder is highlighted.
.To go back further in the
folder list, press and
hold
c/x. Navigating an iPod or USB Device
on the Main Audio Screen
(Vehicles with a Navigation
System)
1. Press and release
worc/x
to select the next or previous
track within the selected
category.
2. Press and hold
worc/xto
move quickly through the tracks.
3. Press and release
¨to move up
one track within the selected
category.
Navigating an iPod or USB Device
on the Music Navigator Screen
(Vehicles with a Navigation
System)
1. Press and release
worc/x
to select the next or previous
track within the selected
category.
2. Press and hold
worc/xto
move quickly through the tracks
within the selected category.
Page 142 of 556
Black plate (4,1)GMC Sierra Owner Manual - 2012 - CRC - 11/15/11
5-4 Instruments and Controls
3. Press and release¨to move up
one track within the selected
category.
b/g(Mute/Push to Talk): Press
to silence the vehicle speakers only.
Press again to turn the sound on.
For vehicles with Bluetooth or
OnStar systems, press and hold for
longer than two seconds to interact
with those systems. See Bluetooth
on page 7‑48 andOnStar Overview
on page 14‑1 for more information.
SRCE (Source/Voice
Recognition): Press to switch
between the radio and CD, and for
equipped vehicles, the DVD, front
auxiliary, and rear auxiliary.
For vehicles with the navigation
system, press and hold this button
for longer than one second to
initiate voice recognition. See “Voice
Recognition” in the Navigation
System manual for more
information.
¨(Seek): Press to go to the
next radio station while in AM,
FM, or XM™.
For vehicles with or without a
navigation system:
Press
¨to go to the next track or
chapter while sourced to the CD or
DVD slot.
Press
¨to select a track or a folder
when navigating folders on an iPod
or USB device.
For vehicles with a navigation
system:
1. Press and hold
¨until a beep is
heard, to place the radio into
SCAN mode. A station will play
for five seconds before moving
to the next station.
2. To stop the SCAN function, press
¨again. While listening to a CD/DVD, press
and hold
¨to quickly move forward
through the tracks. Release to stop
on the desired track.
+
e: Press to increase volume.
−
e: Press to decrease volume.
Horn
To sound the horn, press the center
pad on the steering wheel.
Windshield Wiper/Washer
The front wiper control is located on
the turn and lane‐change lever.
The windshield wipers are controlled
by turning the band with
zon it.
Page 212 of 556
Black plate (2,1)GMC Sierra Owner Manual - 2012 - CRC - 11/15/11
7-2 Infotainment System
To minimize taking your eyes off the
road while driving, do the following
while the vehicle is parked:
.Become familiar with the
operation and controls of the
audio system.
.Set up the tone, speaker
adjustments, and preset radio
stations.
For more information, see Defensive
Driving on page 9‑3. Notice:
Contact your dealer
before adding any equipment.
Adding audio or communication
equipment could interfere with
the operation of the engine, radio,
or other systems, and could
damage them. Follow federal
rules covering mobile radio and
telephone equipment.
The vehicle has Retained
Accessory Power (RAP). With RAP,
the audio system can be played
even after the ignition is turned off.
See Retained Accessory Power
(RAP) on page 9‑29 for more
information.
Navigation/Radio System
For vehicles with a navigation radio
system, see the separate Navigation
System Manual.
Theft-Deterrent Feature
TheftLock®is designed to
discourage theft of the vehicle's
radio by learning a portion of the
Vehicle Identification Number (VIN).
The radio does not operate if it is
stolen or moved to a different
vehicle.
Page 238 of 556
Black plate (28,1)GMC Sierra Owner Manual - 2012 - CRC - 11/15/11
7-28 Infotainment System
To exit music navigator mode, press
the softkey below the Back tab to
return to normal MP3 playback.
Using the DVD Player
The DVD player can be controlled
by the buttons on the remote
control, the RSA system, or by the
buttons on the radio faceplate. See
“Remote Control”underRear Seat
Entertainment (RSE) System on
page 7‑37 andRear Seat Audio
(RSA) System on page 7‑46 for
more information.
The DVD player is only compatible
with DVDs of the appropriate region
code printed on the jacket of
most DVDs.
The DVD slot of the radio is
compatible with most audio CDs
and CD-R/RW, DVD-Video,
DVD-Audio, DVD-R/RW, and DVD
+R/RW media, along with MP3 and
WMA formats.
If an error message displays on the
video screen or the radio, see “DVD
Display Error Messages” underRear Seat Entertainment (RSE)
System on page 7‑37, and
“CD/DVD
Player Messages” later in this
section for more information.Inserting a Disc
Insert a disc partway into the top
slot, label side up. The player pulls
it in and the disc should begin
playing. “Loading Disc” shows
on the radio display. At the same
time, the radio displays a softkey
menu of option(s). Some discs
automatically play the movie while
others default to the softkey menu
display, which requires the Play,
Enter, or Navigation softkeys to be
pressed, either by softkey or by the
rear seat passenger using the
remote control.
Loading a disc into the system,
depending on media type and
format, ranges from 5 to 20 seconds
for a CD, and up to 30 seconds for
a DVD.
Ejecting a Disc
ZDVD (Eject): Press and
release to eject the disc currently
playing in the top slot. A beep
sounds and Ejecting Disc displays.
If loading and reading of a disc
cannot be completed, due to
unknown format, etc., and the disc
fails to eject, press and hold for
more than five seconds to force the
disc to eject.
Playing a DVD
DVD/CD AUX (Auxiliary): Press to
cycle through DVD, CD, or Auxiliary
when listening to the radio. The
DVD/CD text tab and a message
showing the track or chapter
number will display when a disc
is in either slot. Press the DVD/
CD AUX button again and the
system automatically searches for
an auxiliary input device; see
Auxiliary Devices on page 7‑32 for
more information. If a portable audio
player is not connected, “No Aux
Input Device” displays. If a disc is in
both the DVD slot and the CD slot,