2012 FORD SUPER DUTY hood open
[x] Cancel search: hood openPage 92 of 454
Vertical aim adjustment
The headlamps on your vehicle can only be vertically adjusted. Your
vehicle does not require horizontal aim adjustments.
To adjust the headlamps:
1. Park the vehicle directly in front of a wall or screen on a level surface,
approximately 25 feet (7.6 meters) away.
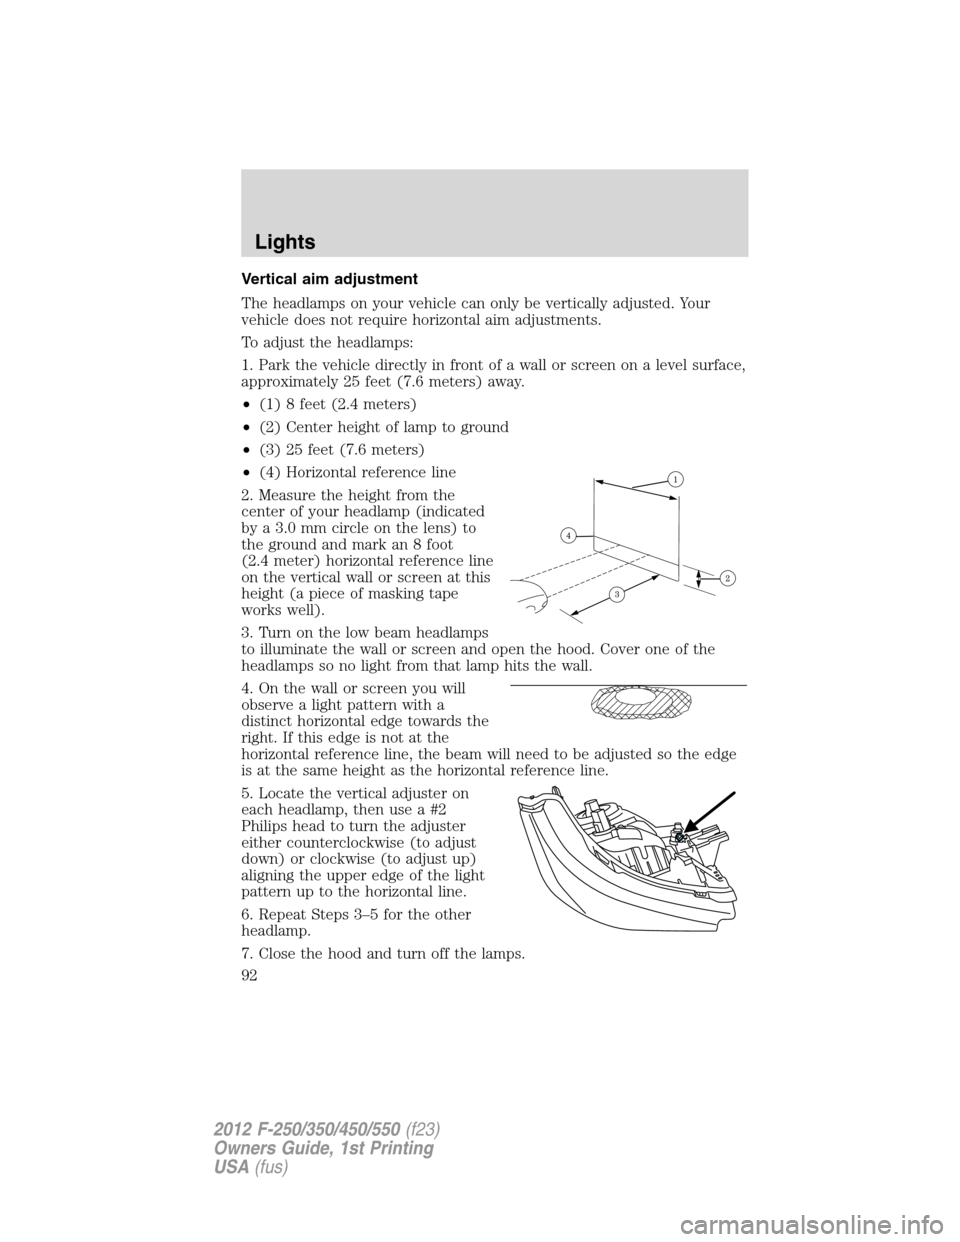
•(1) 8 feet (2.4 meters)
•(2) Center height of lamp to ground
•(3) 25 feet (7.6 meters)
•(4) Horizontal reference line
2. Measure the height from the
center of your headlamp (indicated
by a 3.0 mm circle on the lens) to
the ground and mark an 8 foot
(2.4 meter) horizontal reference line
on the vertical wall or screen at this
height (a piece of masking tape
works well).
3. Turn on the low beam headlamps
to illuminate the wall or screen and open the hood. Cover one of the
headlamps so no light from that lamp hits the wall.
4. On the wall or screen you will
observe a light pattern with a
distinct horizontal edge towards the
right. If this edge is not at the
horizontal reference line, the beam will need to be adjusted so the edge
is at the same height as the horizontal reference line.
5. Locate the vertical adjuster on
each headlamp, then use a #2
Philips head to turn the adjuster
either counterclockwise (to adjust
down) or clockwise (to adjust up)
aligning the upper edge of the light
pattern up to the horizontal line.
6. Repeat Steps 3–5 for the other
headlamp.
7. Close the hood and turn off the lamps.
Lights
92
2012 F-250/350/450/550(f23)
Owners Guide, 1st Printing
USA(fus)
Page 95 of 454
Replacing exterior bulbs
Check the operation of all the bulbs frequently.
Function Number
of bulbsTrade number
Headlamps 2 H13/9008
Park/Turn lamp 2 3157NA
Sidemarker 2 W5W
Tail/stop/turn/sidemarker (pick-up only) 2 3157
Tail/stop/turn/sidemarker (chassis cabs
only; if equipped)2 3157
Back-up (pick-ups only) 2 921
Back-up (chassis cabs only) 2 3157
High-mount brake lamp 1 922
Fog lamp 2 9145
License plate lamp 2 194
Cargo lamp 2 906
Map lamp 2 12V6W
Dome/reading lamps 3 578
Interior visor lamp (if equipped) 4 194
Mirror turn signal 2 2825
Mirror clearance lamp 2 2825
*Front clearance lamps (2) and front
identification lamps (3)5 194
*Rear fender clearance 4 LED**
*Rear identification 3 193**
To replace all instrument panel lights - see your authorized dealer
* Dual rear wheels, or if equipped.
** See your authorized dealer to replace the lamp assembly.
Replacing headlamps, park lamps, turn lamps
1. Make sure that the exterior lamps are off, then open the hood.
Lights
95
2012 F-250/350/450/550(f23)
Owners Guide, 1st Printing
USA(fus)
Page 150 of 454
The illuminated entry system will turn off the lights if:
•the ignition switch is turned to the on position, or
•the remote transmitter lock control is pressed, or
•the 7•8 and the 9•0 controls on the keyless entry keypad are
pressed, or
•after 25 seconds of illumination.
The dome lamp control (if equipped) mustnotbe set to the off position
for the illuminated entry system to operate.
The lights will not turn off if:
•they have been turned on with the dimmer control, or
•any door is open.
The battery saver will shut off the interior lamps 30 minutes after the
ignition has been turned to the off position, 10 minutes after if the dome
lamp is off, and 30 minutes after if the dome lamp switch is left on.
Remote start (if equipped)
Your vehicle may be equipped with the remote start feature which allows
you to start the engine from outside the vehicle. If your integrated
keyhead transmitter (IKT) has a
icon, you have remote start. The
remote start feature has an extended operating range which allows you
to remote start your vehicle from a farther distance from your vehicle.
All the buttons have this increased range performance capability when
equipped with remote start.
Many states and provinces have restrictions for the use of remote start.
Check your local and state or provincial laws for specific requirements
regarding remote start systems.
Note:Do not use remote start if your vehicle is low on fuel.
WARNING:To avoid exhaust fumes, do not use remote start if
your vehicle is parked indoors or areas that are not well
ventilated.
The remote start system will not work if:
•The ignition is in the on position.
•The alarm system is triggered.
•The feature has been disabled.
•The hood is not closed.
Locks and Security
150
2012 F-250/350/450/550(f23)
Owners Guide, 1st Printing
USA(fus)
Page 156 of 454
Arming the system
When armed, this system will respond if unauthorized entry is
attempted. When unauthorized entry occurs, the system will flash the
park/turn lamps and will sound the horn.
The system is ready to arm whenever the key is removed from the
ignition. Either of the following actions will prearm the alarm system:
•Press the
control on the remote entry transmitter.
•Open a door and press the power door lock control to lock all the
doors, and then close the door.
•Press and hold the 7•8 and 9•0 controls on the keyless entry pad
at the same time to lock the doors (driver’s door must be closed).
There is a 20 second countdown when any of the above actions occur
before the vehicle becomes armed.
Each door and the hood is armed individually, and if any are open, they
must be closed before the open entry point can enter the 20 second
countdown.
The turn signal lamps will flash once when all doors and the hood are
closed indicating the vehicle is locked and entering the 20 second
countdown.
Disarming the system
You can disarm the system by any of the following actions:
•Unlock the doors by pressing the
control on your remote entry
transmitter.
•Turn the ignition to the on position with a programmed coded ignition
key.
•Unlock the doors by using your keyless entry pad.
•If using a key in the driver’s door to unlock the vehicle, a chime will
sound when you open the door and you will have 12 seconds to
disarm the alarm system using any of the actions above, otherwise the
alarm will trigger.
Pressing the power door unlock control within the 20 second prearmed
mode will return the vehicle to a disarmed state.
Triggering the anti-theft system
The armed system will be triggered if any door or hood is opened
without using the key or the remote entry transmitter.
Locks and Security
156
2012 F-250/350/450/550(f23)
Owners Guide, 1st Printing
USA(fus)
Page 192 of 454
•Two crash sensors located on the C-pillar (one on each side)
(SuperCab and Crew Cab only).
•Crash sensors located on the front doors.
•Rollover sensor in the restraints control module (RCM).
The Safety Canopy system, in combination with safety belts, can help
reduce the risk of severe injuries in the event of a significant side impact
collision or rollover event.
Children 12 years old and under should always be properly restrained in
the second row seats. The Safety Canopy will not interfere with children
restrained using a properly installed child or booster seat because it is
designed to inflate downward from the headliner above the doors along
the side window opening.
The Safety Canopy system is designed to activate when the vehicle
sustains lateral deceleration sufficient to cause the RCM to initiate Safety
Canopy inflation or when a certain likelihood of a rollover event is
detected by the rollover sensor.
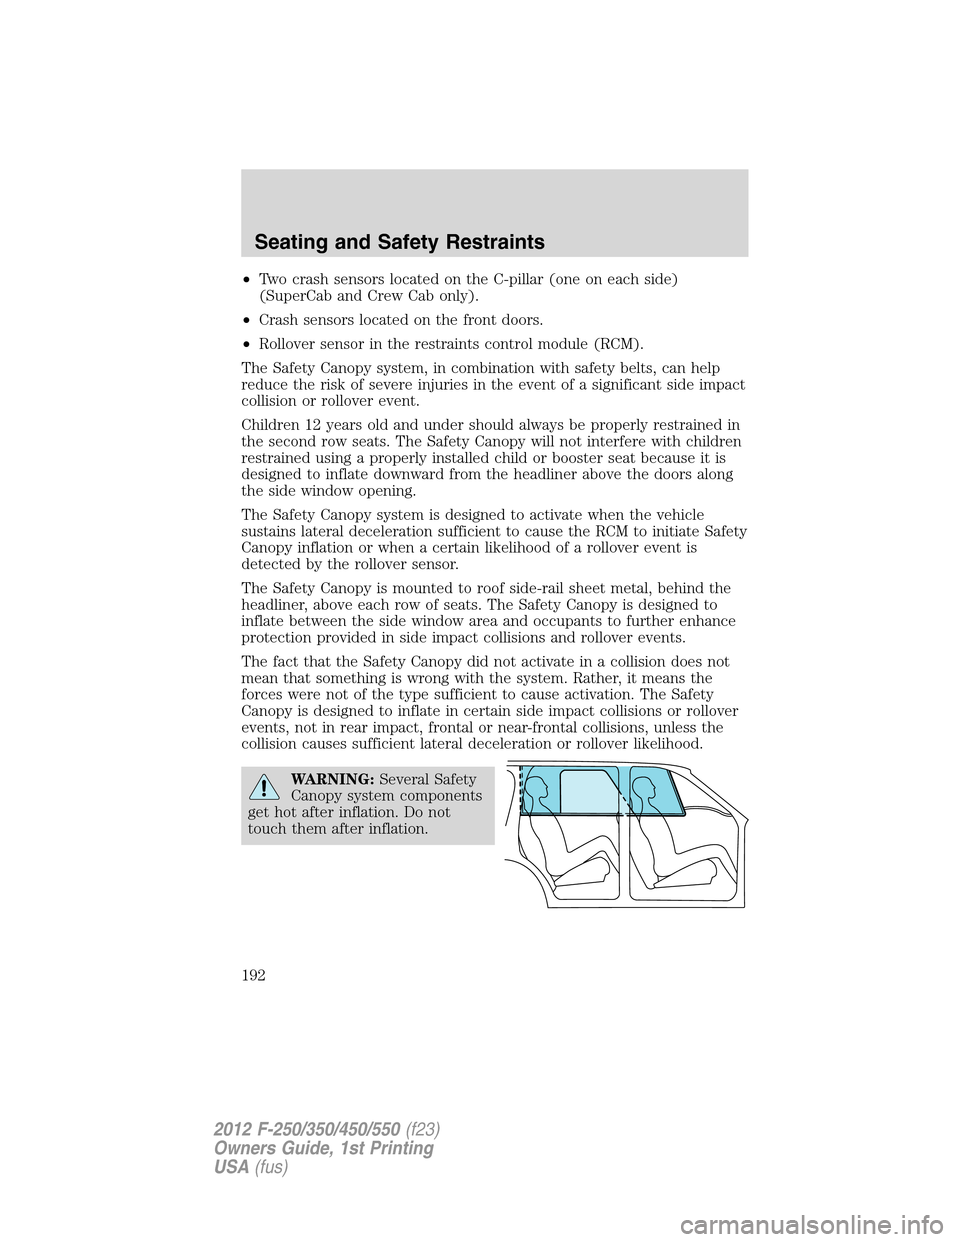
The Safety Canopy is mounted to roof side-rail sheet metal, behind the
headliner, above each row of seats. The Safety Canopy is designed to
inflate between the side window area and occupants to further enhance
protection provided in side impact collisions and rollover events.
The fact that the Safety Canopy did not activate in a collision does not
mean that something is wrong with the system. Rather, it means the
forces were not of the type sufficient to cause activation. The Safety
Canopy is designed to inflate in certain side impact collisions or rollover
events, not in rear impact, frontal or near-frontal collisions, unless the
collision causes sufficient lateral deceleration or rollover likelihood.
WARNING:Several Safety
Canopy system components
get hot after inflation. Do not
touch them after inflation.
Seating and Safety Restraints
192
2012 F-250/350/450/550(f23)
Owners Guide, 1st Printing
USA(fus)
Page 375 of 454
Working with the engine on
WARNING:To reduce the risk of vehicle damage and/or
personal burn injuries, do not start your engine with the air
cleaner removed and do not remove it while the engine is running.
1. Set the parking brake and shift to P (Park).
2. Block the wheels.
OPENING THE HOOD
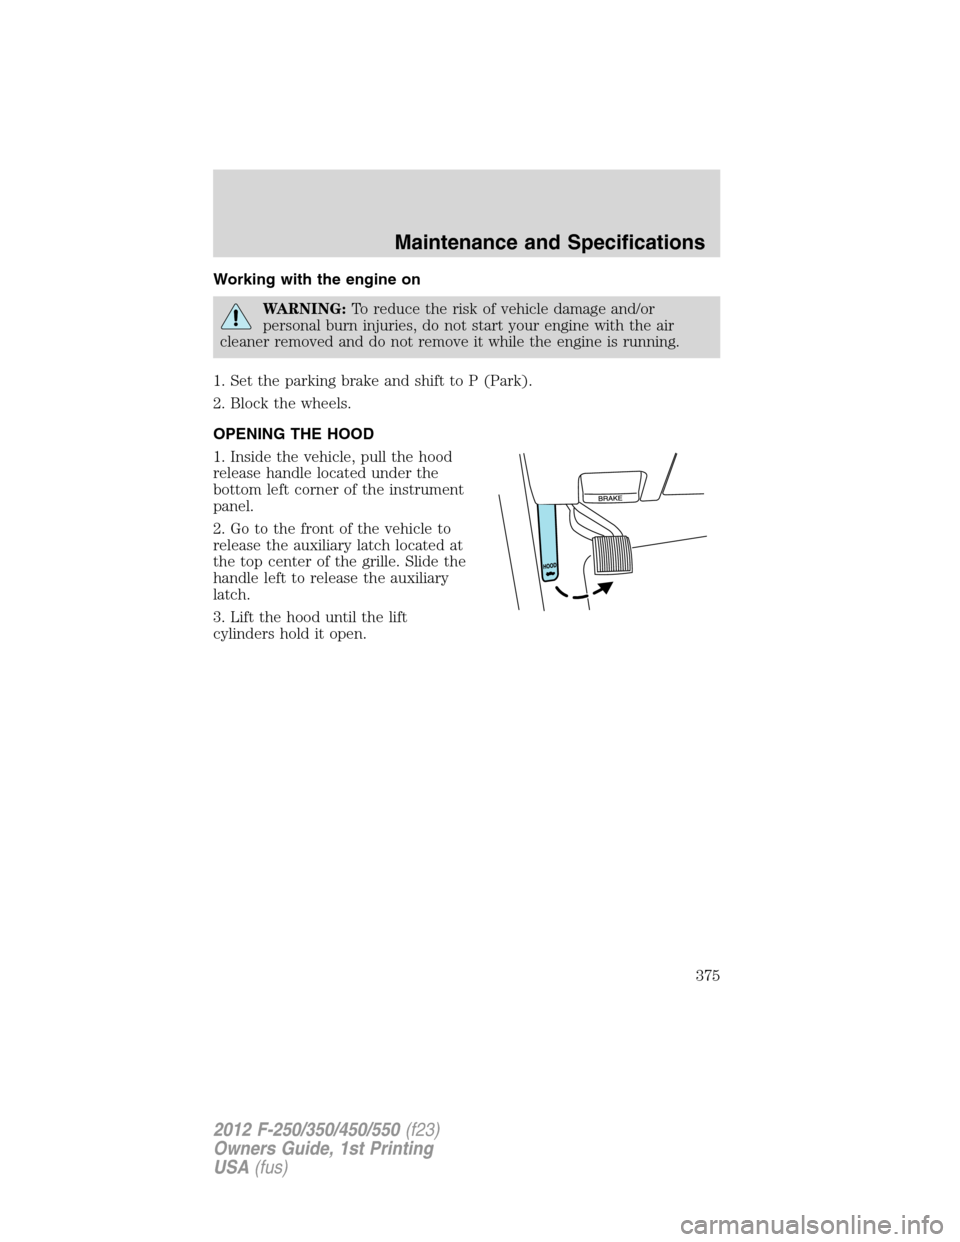
1. Inside the vehicle, pull the hood
release handle located under the
bottom left corner of the instrument
panel.
2. Go to the front of the vehicle to
release the auxiliary latch located at
the top center of the grille. Slide the
handle left to release the auxiliary
latch.
3. Lift the hood until the lift
cylinders hold it open.
Maintenance and Specifications
375
2012 F-250/350/450/550(f23)
Owners Guide, 1st Printing
USA(fus)
Page 379 of 454
To prolong the life of the wiper blades, it is highly recommended to
scrape off the ice on the windshield before turning on the wipers. The
layer of ice has many sharp edges and can damage the micro edge of the
wiper rubber element.
ENGINE OIL
Checking the engine oil
Refer to thescheduled maintenance informationfor the appropriate
intervals for checking the engine oil.
1. Make sure the vehicle is on level ground.
2. Turn the engine off and wait 15 minutes for the oil to drain into the
oil pan.
3. Set the parking brake and ensure the gearshift is securely latched in P
(Park).
4. Open the hood. Protect yourself from engine heat.
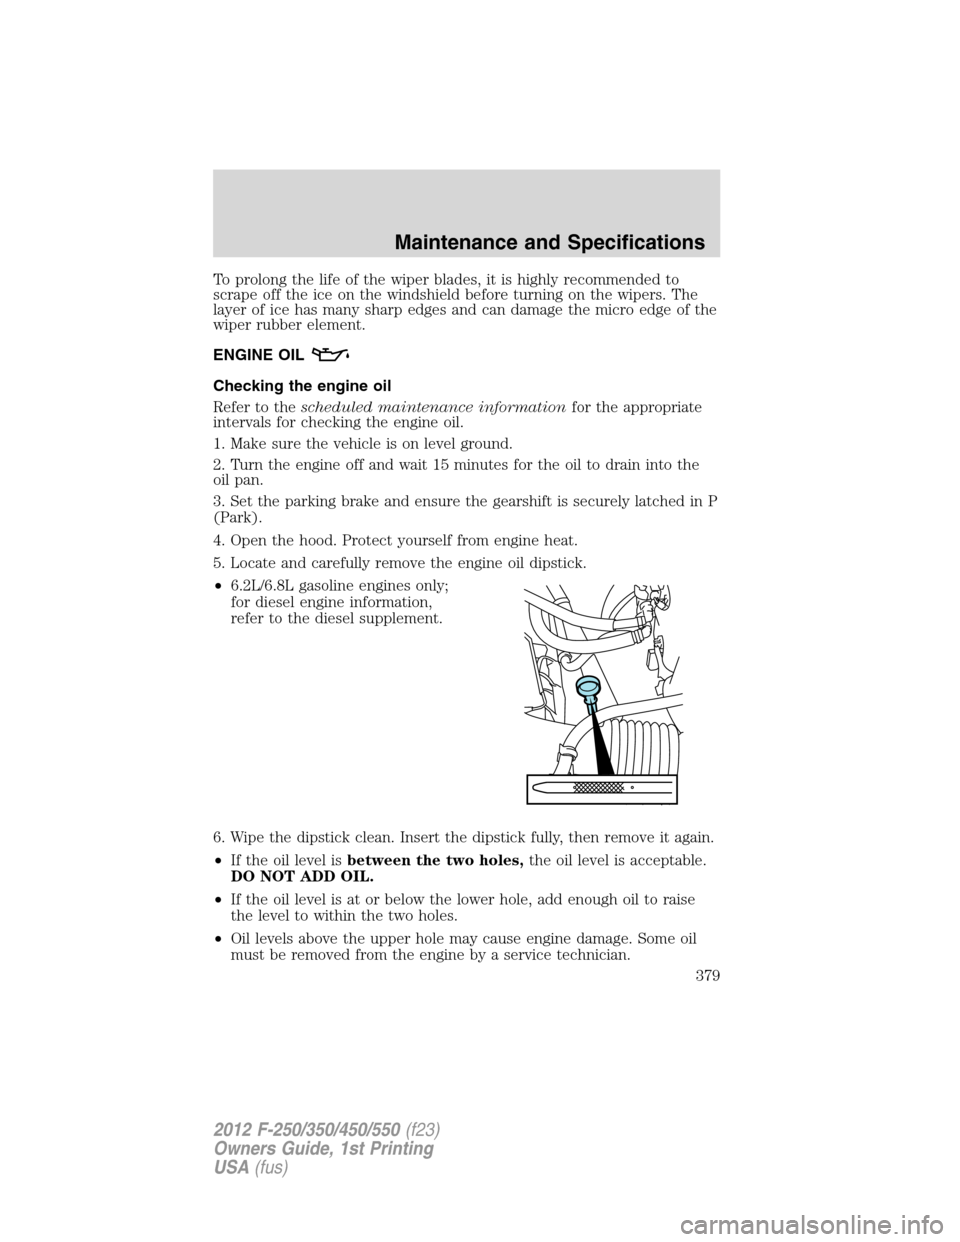
5. Locate and carefully remove the engine oil dipstick.
•6.2L/6.8L gasoline engines only;
for diesel engine information,
refer to the diesel supplement.
6. Wipe the dipstick clean. Insert the dipstick fully, then remove it again.
•If the oil level isbetween the two holes,the oil level is acceptable.
DO NOT ADD OIL.
•If the oil level is at or below the lower hole, add enough oil to raise
the level to within the two holes.
•Oil levels above the upper hole may cause engine damage. Some oil
must be removed from the engine by a service technician.
Maintenance and Specifications
379
2012 F-250/350/450/550(f23)
Owners Guide, 1st Printing
USA(fus)
Page 450 of 454
checking and adding ..............379
dipstick ....................................379
filter, specifications ........380, 413
recommendations ...................380
refill capacities ........................414
Event data recording ....................8
Exhaust fumes ..........................273
F
Fail safe cooling ........................387
Fleet MyKey programming ......133
Flexible Fuel Vehicle (FFV) ....390
Floor mats .........................126–127
Fluid capacities .........................414
Fog lamps ....................................90
Four-Wheel Drive vehicles .......304
driving off road .......................311
electronic shift ................305, 309
indicator light .........................306
lever operated shift ................306
manual locking hubs ..............305
preparing to drive your
vehicle .....................................289
Fuel ............................................390
calculating fuel
economy ............................25, 396
cap ...........................................393
capacity ...................................414
choosing the right fuel ...........394
detergent in fuel .....................396
filling your vehicle with
fuel ...........................390, 393, 397
filter, specifications ........390, 413
fuel pump shut-off ..................324
improving fuel economy ........396
octane rating ...........394–395, 418
quality ......................................395
running out of fuel .................396safety information relating to
automotive fuels .....................390
Fuel - flex fuel vehicle
(FFV) .........................390, 394–395
Fuses ..................................324–325
G
Garage door opener ..................120
Gas cap (see Fuel cap) ............393
Gas mileage
(see Fuel economy) .................396
Gauges .........................................21
H
Hazard flashers .........................323
Headlamps ...................................89
aiming ..................................91–92
autolamp system .......................89
daytime running lights .............91
flash to pass ..............................90
high beam .................................90
replacing bulbs .........................95
turning on and off ....................89
Heating
heating and air conditioning
system .................................80, 83
Hill descent mode .....................285
Hill start assist ..........................299
Hood ..........................................375
I
Ignition ...............................269, 418
Illuminated visor mirror ...........101
Infant seats
(see Safety seats) .....................203
Index
450
2012 F-250/350/450/550(f23)
Owners Guide, 1st Printing
USA(fus)