Page 64 of 454

WARNING:Driving while distracted can result in loss of vehicle
control, accident and injury. Ford strongly recommends that
drivers use extreme caution when using any device or feature that may
take their focus off the road. Your primary responsibility is the safe
operation of the vehicle. We recommend against the use of any
handheld device while driving, encourage the use of voice-operated
systems when possible and that you become aware of applicable state
and local laws that may affect use of electronic devices while driving.
Accessory delay:Your vehicle is equipped with accessory delay which
allows you to operate the window switches and the audio for up to
10 minutes after the ignition has been turned off or until either front
door is opened.
1.
/: Press/to
manually go up or down the radio
frequency. Press and hold for a fast
advance through radio frequencies.
In satellite radio mode (if equipped), press
/to tune to the
next/previous channel.
Satellite radio is available only with a valid SIRIUS�radio
subscription. Check with your authorized dealer for availability.
2.
(Phone):If your vehicle is
equipped with SYNC�, press to
access SYNC PHONE features. For
further information, please refer to yourSYNC�supplement.
If your vehicle is not equipped with SYNC�, the display will read NO
PHONE.
3.MENU:Press MENU repeatedly
to access to the following settings:
Setting the clock:Press MENU until SET HOUR or SET MINUTES is
displayed. Use
//SEEK, SEEKto adjust the
hours/minutes.
Note:If your vehicle is equipped with a navigation system, refer to
Setting the clockin yourNavigation supplement.
Entertainment Systems
64
2012 F-250/350/450/550(f23)
Owners Guide, 1st Printing
USA(fus)
Page 78 of 454
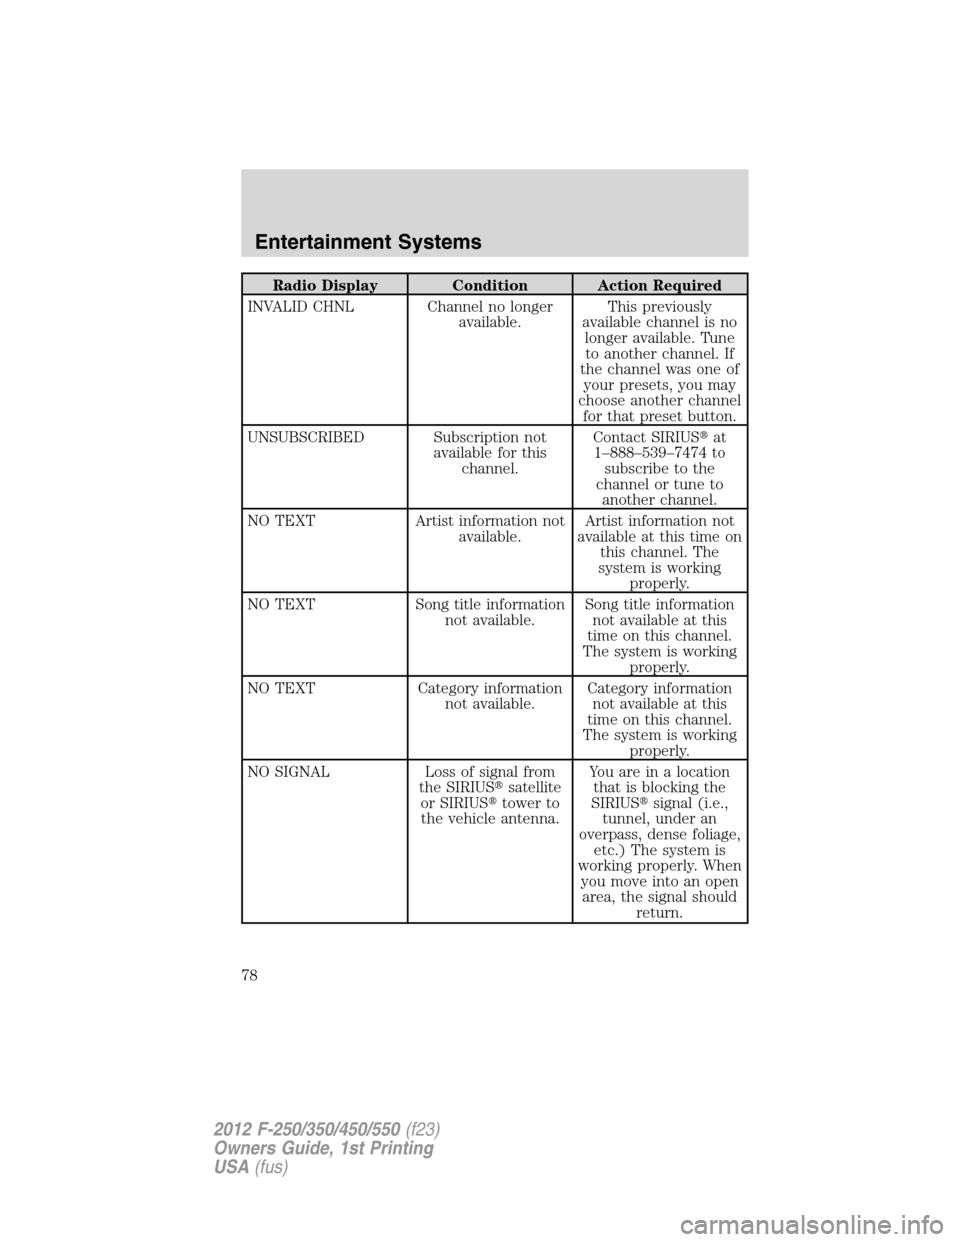
Radio Display Condition Action Required
INVALID CHNL Channel no longer
available.This previously
available channel is no
longer available. Tune
to another channel. If
the channel was one of
your presets, you may
choose another channel
for that preset button.
UNSUBSCRIBED Subscription not
available for this
channel.Contact SIRIUS�at
1–888–539–7474 to
subscribe to the
channel or tune to
another channel.
NO TEXT Artist information not
available.Artist information not
available at this time on
this channel. The
system is working
properly.
NO TEXT Song title information
not available.Song title information
not available at this
time on this channel.
The system is working
properly.
NO TEXT Category information
not available.Category information
not available at this
time on this channel.
The system is working
properly.
NO SIGNAL Loss of signal from
the SIRIUS�satellite
or SIRIUS�tower to
the vehicle antenna.You are in a location
that is blocking the
SIRIUS�signal (i.e.,
tunnel, under an
overpass, dense foliage,
etc.) The system is
working properly. When
you move into an open
area, the signal should
return.
Entertainment Systems
78
2012 F-250/350/450/550(f23)
Owners Guide, 1st Printing
USA(fus)
Page 89 of 454
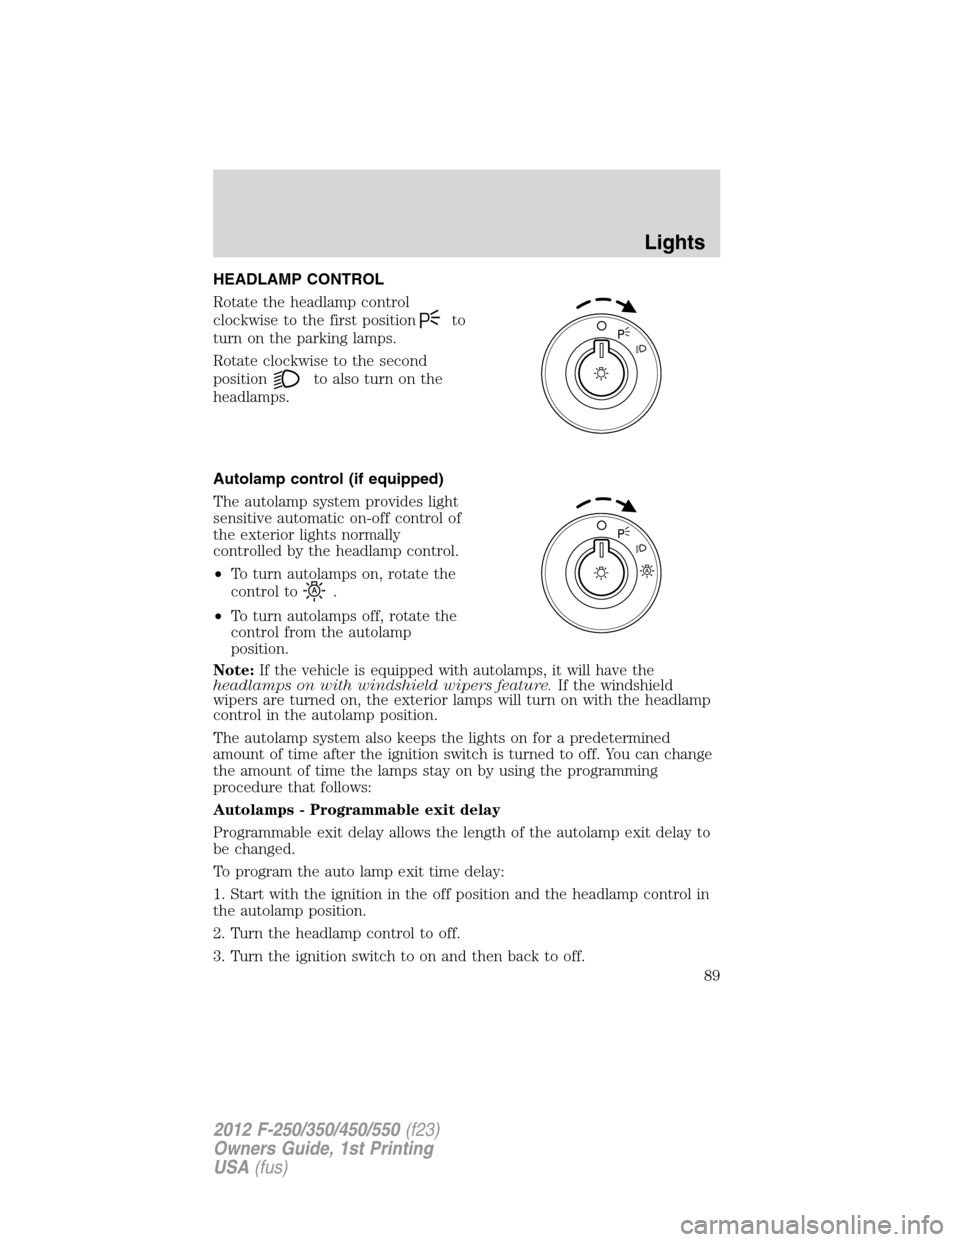
HEADLAMP CONTROL
Rotate the headlamp control
clockwise to the first position
to
turn on the parking lamps.
Rotate clockwise to the second
position
to also turn on the
headlamps.
Autolamp control (if equipped)
The autolamp system provides light
sensitive automatic on-off control of
the exterior lights normally
controlled by the headlamp control.
•To turn autolamps on, rotate the
control to
.
•To turn autolamps off, rotate the
control from the autolamp
position.
Note:If the vehicle is equipped with autolamps, it will have the
headlamps on with windshield wipers feature.If the windshield
wipers are turned on, the exterior lamps will turn on with the headlamp
control in the autolamp position.
The autolamp system also keeps the lights on for a predetermined
amount of time after the ignition switch is turned to off. You can change
the amount of time the lamps stay on by using the programming
procedure that follows:
Autolamps - Programmable exit delay
Programmable exit delay allows the length of the autolamp exit delay to
be changed.
To program the auto lamp exit time delay:
1. Start with the ignition in the off position and the headlamp control in
the autolamp position.
2. Turn the headlamp control to off.
3. Turn the ignition switch to on and then back to off.
Lights
89
2012 F-250/350/450/550(f23)
Owners Guide, 1st Printing
USA(fus)
Page 92 of 454
Vertical aim adjustment
The headlamps on your vehicle can only be vertically adjusted. Your
vehicle does not require horizontal aim adjustments.
To adjust the headlamps:
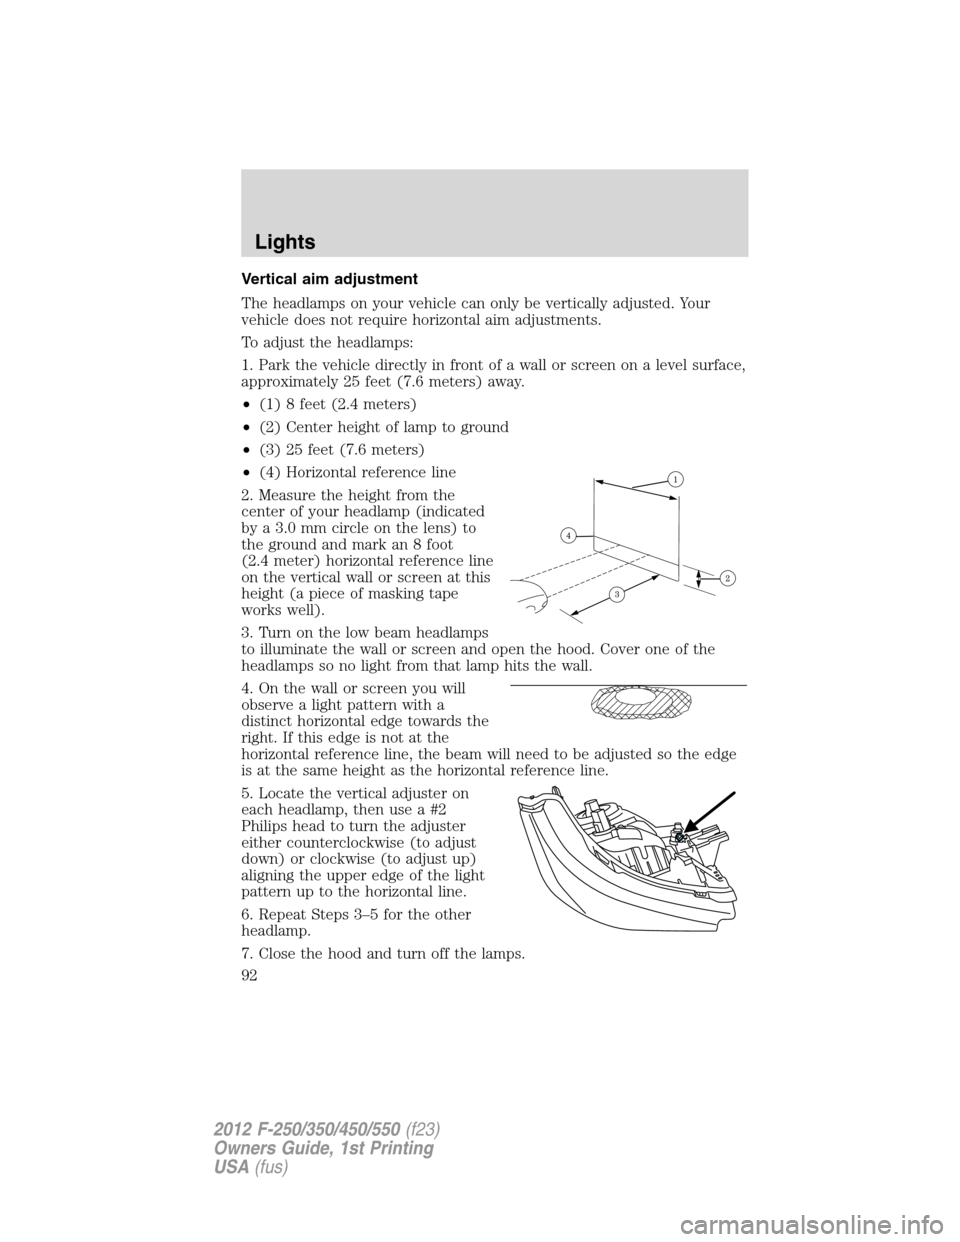
1. Park the vehicle directly in front of a wall or screen on a level surface,
approximately 25 feet (7.6 meters) away.
•(1) 8 feet (2.4 meters)
•(2) Center height of lamp to ground
•(3) 25 feet (7.6 meters)
•(4) Horizontal reference line
2. Measure the height from the
center of your headlamp (indicated
by a 3.0 mm circle on the lens) to
the ground and mark an 8 foot
(2.4 meter) horizontal reference line
on the vertical wall or screen at this
height (a piece of masking tape
works well).
3. Turn on the low beam headlamps
to illuminate the wall or screen and open the hood. Cover one of the
headlamps so no light from that lamp hits the wall.
4. On the wall or screen you will
observe a light pattern with a
distinct horizontal edge towards the
right. If this edge is not at the
horizontal reference line, the beam will need to be adjusted so the edge
is at the same height as the horizontal reference line.
5. Locate the vertical adjuster on
each headlamp, then use a #2
Philips head to turn the adjuster
either counterclockwise (to adjust
down) or clockwise (to adjust up)
aligning the upper edge of the light
pattern up to the horizontal line.
6. Repeat Steps 3–5 for the other
headlamp.
7. Close the hood and turn off the lamps.
Lights
92
2012 F-250/350/450/550(f23)
Owners Guide, 1st Printing
USA(fus)
Page 93 of 454
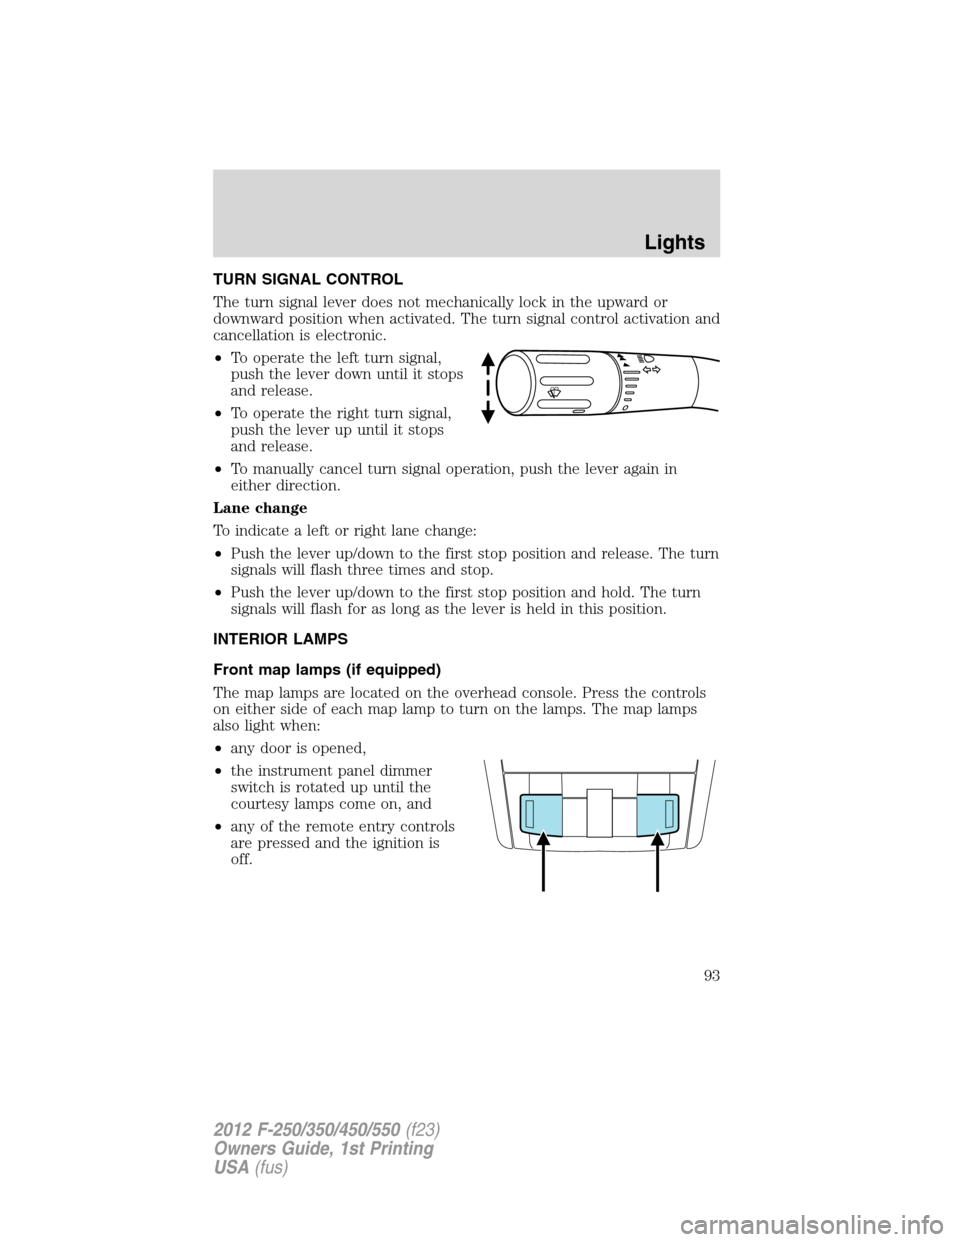
TURN SIGNAL CONTROL
The turn signal lever does not mechanically lock in the upward or
downward position when activated. The turn signal control activation and
cancellation is electronic.
•To operate the left turn signal,
push the lever down until it stops
and release.
•To operate the right turn signal,
push the lever up until it stops
and release.
•To manually cancel turn signal operation, push the lever again in
either direction.
Lane change
To indicate a left or right lane change:
•Push the lever up/down to the first stop position and release. The turn
signals will flash three times and stop.
•Push the lever up/down to the first stop position and hold. The turn
signals will flash for as long as the lever is held in this position.
INTERIOR LAMPS
Front map lamps (if equipped)
The map lamps are located on the overhead console. Press the controls
on either side of each map lamp to turn on the lamps. The map lamps
also light when:
•any door is opened,
•the instrument panel dimmer
switch is rotated up until the
courtesy lamps come on, and
•any of the remote entry controls
are pressed and the ignition is
off.
Lights
93
2012 F-250/350/450/550(f23)
Owners Guide, 1st Printing
USA(fus)
Page 96 of 454
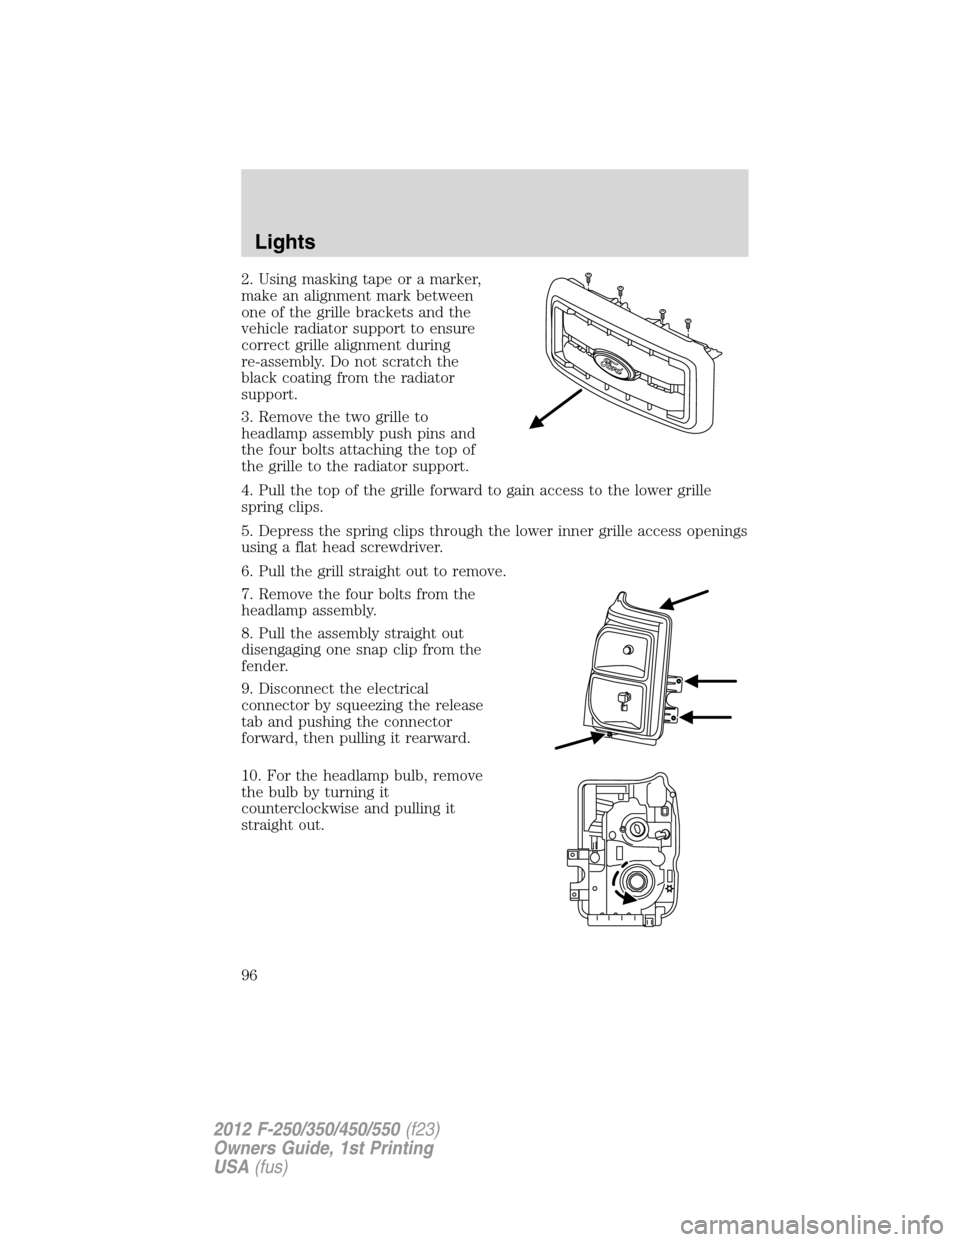
2. Using masking tape or a marker,
make an alignment mark between
one of the grille brackets and the
vehicle radiator support to ensure
correct grille alignment during
re-assembly. Do not scratch the
black coating from the radiator
support.
3. Remove the two grille to
headlamp assembly push pins and
the four bolts attaching the top of
the grille to the radiator support.
4. Pull the top of the grille forward to gain access to the lower grille
spring clips.
5. Depress the spring clips through the lower inner grille access openings
using a flat head screwdriver.
6. Pull the grill straight out to remove.
7. Remove the four bolts from the
headlamp assembly.
8. Pull the assembly straight out
disengaging one snap clip from the
fender.
9. Disconnect the electrical
connector by squeezing the release
tab and pushing the connector
forward, then pulling it rearward.
10. For the headlamp bulb, remove
the bulb by turning it
counterclockwise and pulling it
straight out.
Lights
96
2012 F-250/350/450/550(f23)
Owners Guide, 1st Printing
USA(fus)
Page 97 of 454
11. For the park or turn lamp bulb,
remove the bulb by turning it
counterclockwise and pulling it
straight out.
WARNING:Handle a halogen headlamp bulb carefully and keep
out of children’s reach. Grasp the bulb only by its plastic base
and do not touch the glass. The oil from your hand could cause the
bulb to break the next time the headlamps are operated.
Install the new bulb(s) in reverse order.
Replacing brake/tail/turn/back-up lamp bulbs (pick-ups only)
1. Make sure the headlamps are off,
then open the tailgate to expose the
lamp assemblies.
2. Remove the two bolts from the
tail lamp assembly and carefully pull
the lamp assembly from the tailgate
pillar by releasing the two retaining
tabs.
3. Rotate the bulb socket counterclockwise and remove from lamp
assembly.
4. Pull the bulb straight out of the socket.
Install the new bulb(s) in reverse order.
Lights
97
2012 F-250/350/450/550(f23)
Owners Guide, 1st Printing
USA(fus)
Page 98 of 454
Replacing brake/tail/turn/back-up lamp bulbs (chassis cabs only)
(if equipped)
1. Make sure the headlamps are off.
2. Remove the four screws and the
lamp lens from lamp assembly.
3. Carefully pull the bulb straight
out of the socket and push in the
new bulb.
Replacing cargo lamp and high-mount brake lamp bulbs
1. Make sure the headlamps are off.
2. Remove the screws and lamp
assembly from the vehicle as wiring
permits.
3. Remove the bulb socket by
rotating it counterclockwise.
4. Pull the bulb straight out of the
socket.
Lights
98
2012 F-250/350/450/550(f23)
Owners Guide, 1st Printing
USA(fus)