2012 FORD F550 lock
[x] Cancel search: lockPage 286 of 448

If the fuse is not blown and the brake lamps are working properly, the
following procedure will allow you to move the gearshift lever from P (Park):
1. Apply the parking brake. Turn the ignition key to 1 (off), then remove
the key.
2. Move the steering column to the full down and full rearward position
(toward the driver’s seat).
3. Remove the gearshift lever boot.
4. Place fingers into hole where the gearshift lever boot was removed
from and pull top half of shroud up and forward to separate it from the
lower half of the shroud. There is a hinge at the forward edge of the top
shroud. Roll the top half of the shroud upward on the hinge point to
clear the hazard flasher button, then pull straight rearward toward the
driver’s seat to remove.
5. Remove the top half of the shroud.
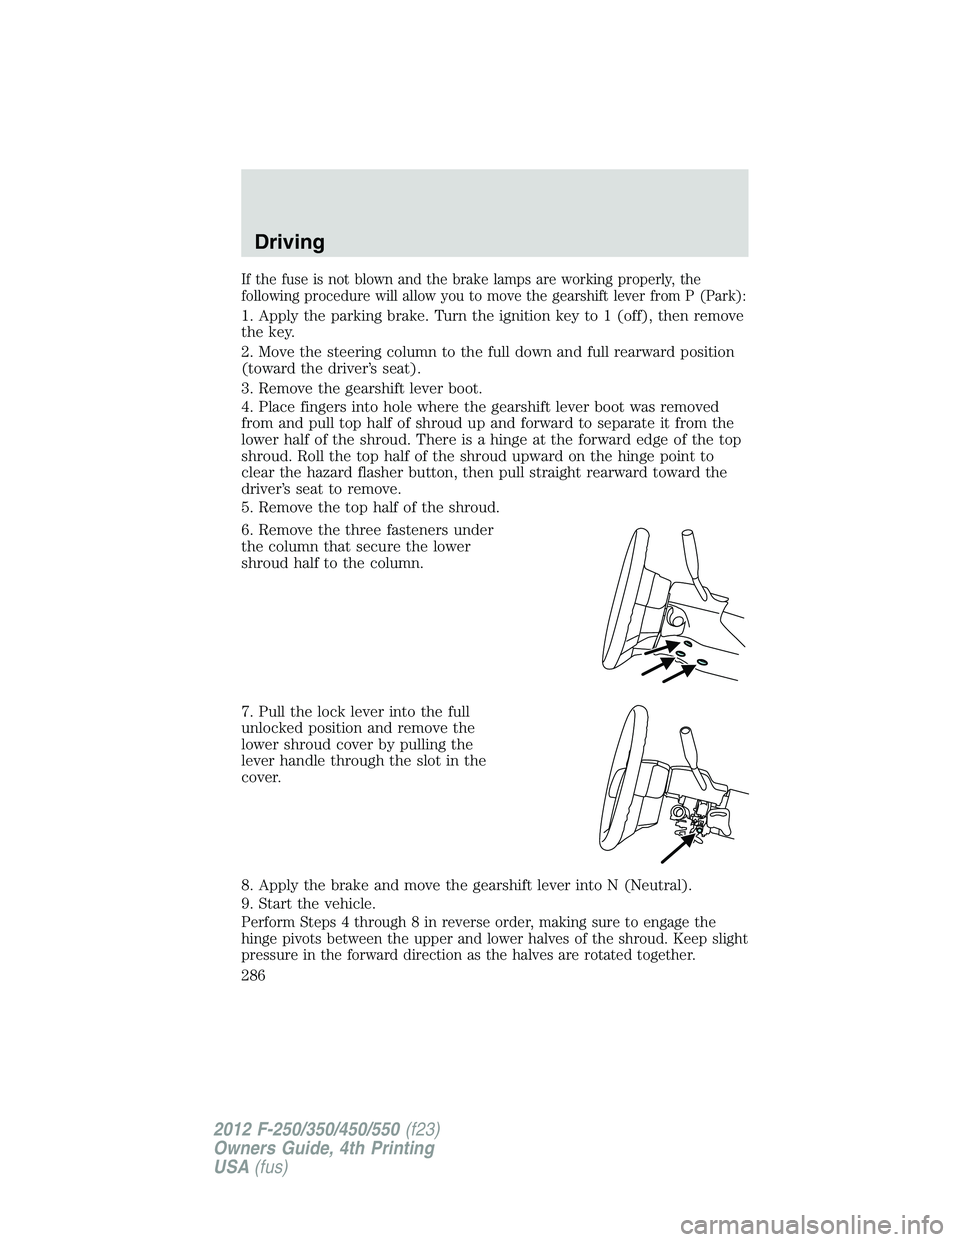
6. Remove the three fasteners under
the column that secure the lower
shroud half to the column.
7. Pull the lock lever into the full
unlocked position and remove the
lower shroud cover by pulling the
lever handle through the slot in the
cover.
8. Apply the brake and move the gearshift lever into N (Neutral).
9. Start the vehicle.
Perform Steps 4 through 8 in reverse order, making sure to engage the
hinge pivots between the upper and lower halves of the shroud. Keep slight
pressure in the forward direction as the halves are rotated together.Driving
286
2012 F-250/350/450/550 (f23)
Owners Guide, 4th Printing
USA (fus)
Page 287 of 448

WARNING: Do not drive your vehicle until you verify that the
brake lamps are working.
WARNING: When doing this procedure, you will be taking the
vehicle out of park which means the vehicle can roll freely. To
avoid unwanted vehicle movement, always fully set the parking brake
prior to doing this procedure. Use wheel chocks if appropriate.
WARNING: If the parking brake is fully released, but the brake
warning lamp remains illuminated, the brakes may not be
working properly. See your authorized dealer as soon as possible.
AUTOMATIC TRANSMISSION OPERATION
Understanding the shift positions of the 5–speed automatic
transmission (if equipped)
This vehicle is equipped with an adaptive transmission shift strategy.
Adaptive transmission shift strategy offers the optimal transmission
operation and shift quality. When the vehicle’s battery has been
disconnected for any type of service or repair, the transmission will need
to relearn the normal shift strategy parameters, much like having to reset
your radio stations when your vehicle battery has been disconnected.
The adaptive transmission shift strategy allows the transmission to
relearn these operating parameters. This learning process could take
several transmission upshifts and downshifts; during this learning
process, slightly firmer shifts may occur. After this learning process,
normal shift feel and shift scheduling will resume.
P (Park)
This position locks the transmission and prevents the rear wheels from
turning.
To put your vehicle in gear:
• Start the engine
• Press the brake pedal
• Move the gearshift lever into the desired gear Driving
287
2012 F-250/350/450/550 (f23)
Owners Guide, 4th Printing
USA (fus)
Page 290 of 448

Understanding the shift positions of the 6–speed automatic
transmission (if equipped)
This vehicle is equipped with an adaptive transmission shift strategy.
Adaptive transmission shift strategy offers the optimal transmission
operation and shift quality. When the vehicle’s battery has been
disconnected for any type of service or repair, the transmission will need
to relearn the normal shift strategy parameters, much like having to reset
your radio stations when your vehicle battery has been disconnected.
The adaptive transmission shift strategy allows the transmission to
relearn these operating parameters. This learning process could take
several transmission upshifts and downshifts; during this learning
process, slightly firmer shifts may occur. After this learning process,
normal shift feel and shift scheduling will resume.
P (Park)
This position locks the transmission and prevents the rear wheels from
turning.
To put your vehicle in gear:
1. Start the engine
2. Press the brake pedal
3. Move the gearshift lever into the desired gear
To put your vehicle in P (Park):
1. Come to a complete stop
2. Move the gearshift lever and securely latch it in P (Park)
WARNING: Always set the parking brake fully and make sure
the gearshift is latched in P (Park). Turn the ignition to the off
position and remove the key whenever you leave your vehicle.
R (Reverse)
With the gearshift lever in R (Reverse), the vehicle will move backward.
Always come to a complete stop before shifting into and out of R (Reverse).Driving
290
2012 F-250/350/450/550 (f23)
Owners Guide, 4th Printing
USA (fus)
Page 293 of 448

Understanding your SelectShift Automatic™ transmission (SST)
gearshift lever
This vehicle is equipped with a SelectShift Automatic™ transmission
(SST) gearshift lever. The SST is an automatic transmission with the
ability for the driver to change gears up or down (without a clutch) as
desired.
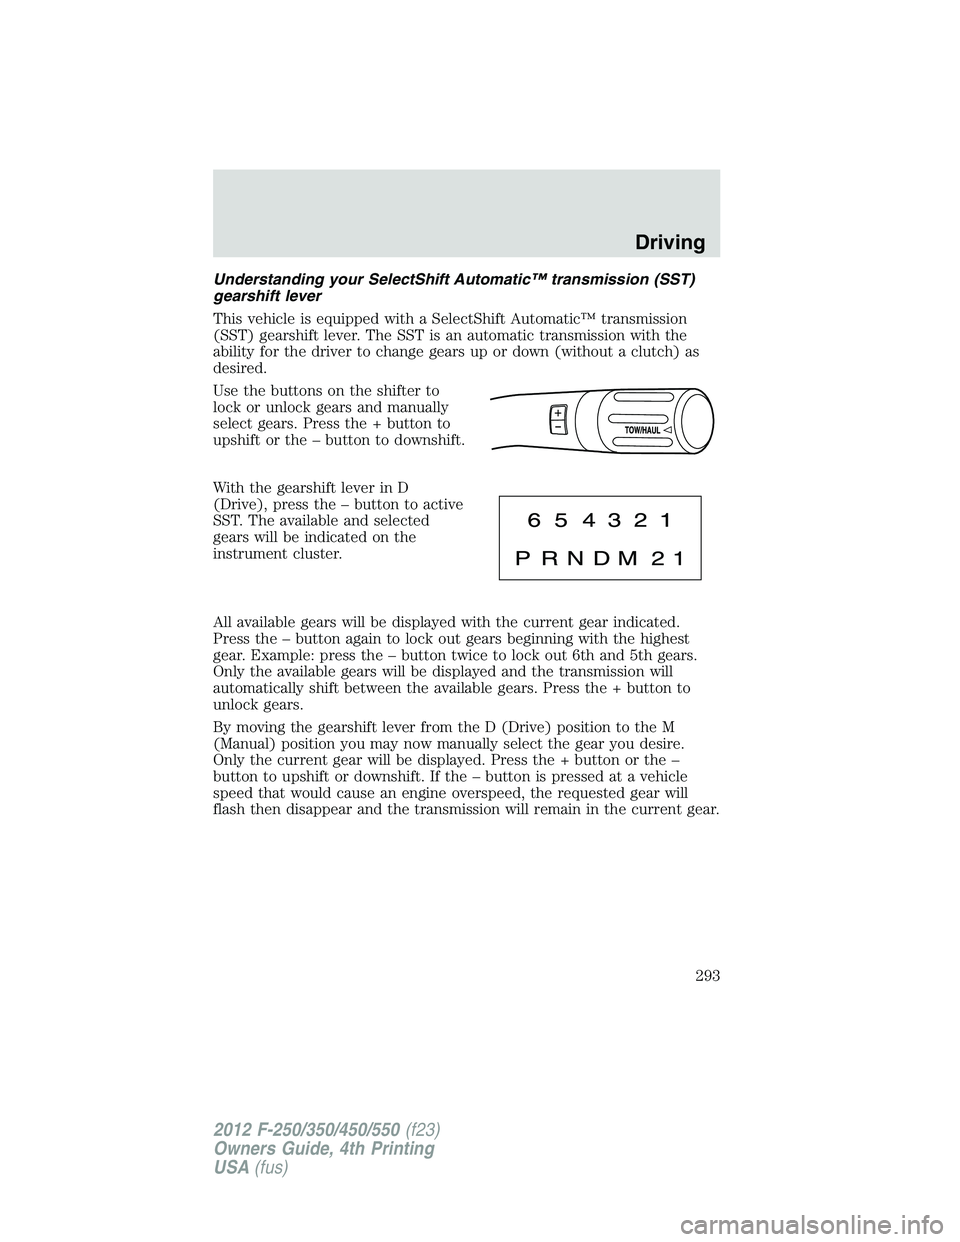
Use the buttons on the shifter to
lock or unlock gears and manually
select gears. Press the + button to
upshift or the – button to downshift.
With the gearshift lever in D
(Drive), press the – button to active
SST. The available and selected
gears will be indicated on the
instrument cluster.
All available gears will be displayed with the current gear indicated.
Press the – button again to lock out gears beginning with the highest
gear. Example: press the – button twice to lock out 6th and 5th gears.
Only the available gears will be displayed and the transmission will
automatically shift between the available gears. Press the + button to
unlock gears.
By moving the gearshift lever from the D (Drive) position to the M
(Manual) position you may now manually select the gear you desire.
Only the current gear will be displayed. Press the + button or the –
button to upshift or downshift. If the – button is pressed at a vehicle
speed that would cause an engine overspeed, the requested gear will
flash then disappear and the transmission will remain in the current gear. Driving
293
2012 F-250/350/450/550 (f23)
Owners Guide, 4th Printing
USA (fus)
Page 296 of 448

REVERSE SENSING SYSTEM (IF EQUIPPED)
The reverse sensing system (RSS) sounds a tone to warn the driver of
obstacles near the rear bumper when the R (Reverse) is selected and the
vehicle is moving at speeds less than 3 mph (5 km/h). The system is not
effective at speeds above 3 mph (5 km/h) and may not detect certain
angular or moving objects.
WARNING: To help avoid personal injury, please read and
understand the limitations of the reverse sensing system as
contained in this section. Reverse sensing is only an aid for some
(generally large and fixed) objects when moving in reverse on a flat
surface at “parking speeds”. Inclement weather may also affect the
function of the RSS; this may include reduced performance or a false
activation.
WARNING: To help avoid personal injury, always use caution
when in reverse and when using the RSS.
WARNING: This system is not designed to prevent contact with
small or moving objects. The system is designed to provide a
warning to assist the driver in detecting large stationary objects to
avoid damaging the vehicle. The system may not detect smaller
objects, particularly those close to the ground.
WARNING: Certain add-on devices such as large trailer hitches,
bike or surfboard racks and any device that may block the
normal detection zone of the RSS system may create false beeps.Driving
296
2012 F-250/350/450/550 (f23)
Owners Guide, 4th Printing
USA (fus)
Page 297 of 448

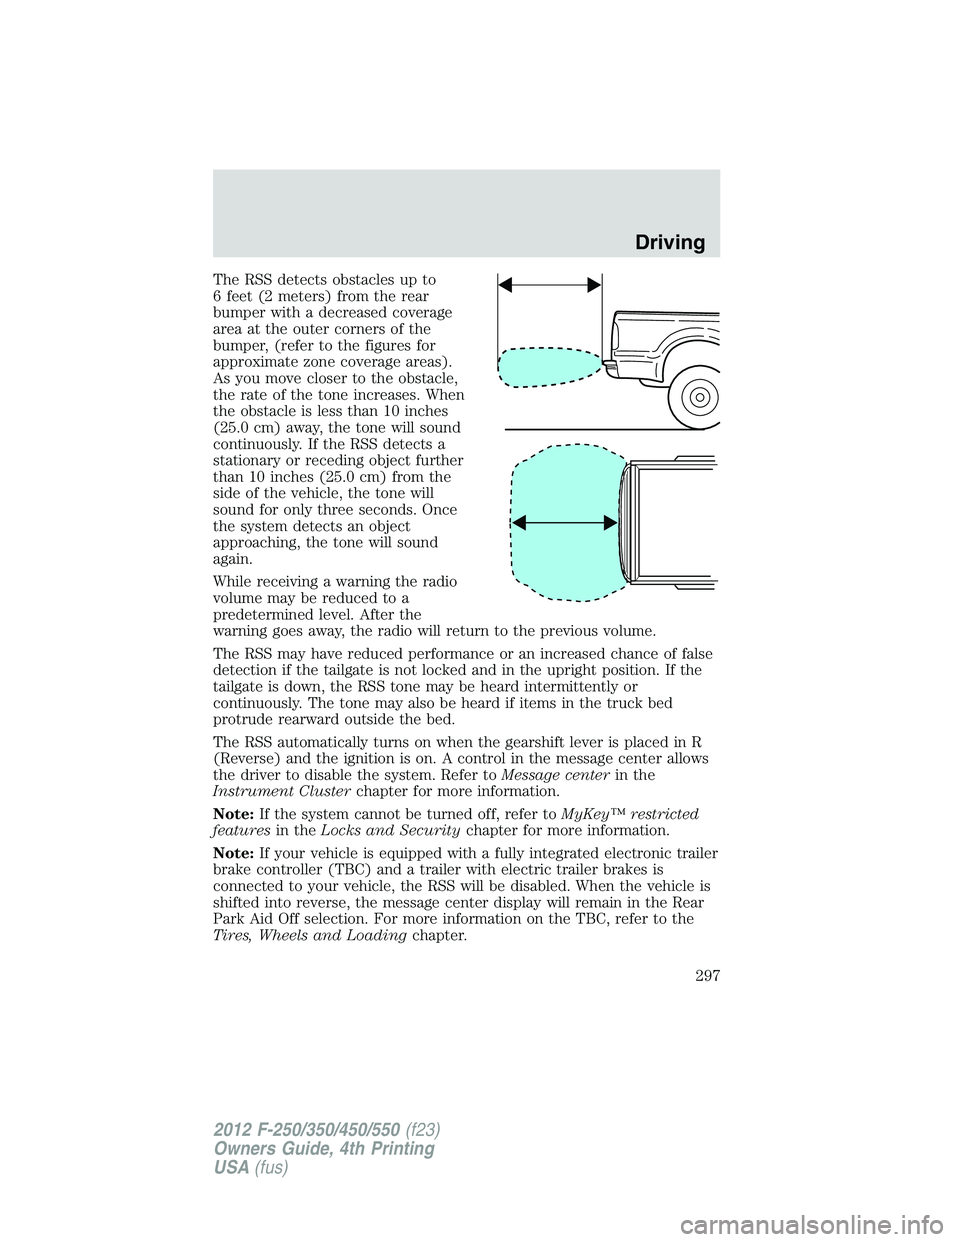
The RSS detects obstacles up to
6 feet (2 meters) from the rear
bumper with a decreased coverage
area at the outer corners of the
bumper, (refer to the figures for
approximate zone coverage areas).
As you move closer to the obstacle,
the rate of the tone increases. When
the obstacle is less than 10 inches
(25.0 cm) away, the tone will sound
continuously. If the RSS detects a
stationary or receding object further
than 10 inches (25.0 cm) from the
side of the vehicle, the tone will
sound for only three seconds. Once
the system detects an object
approaching, the tone will sound
again.
While receiving a warning the radio
volume may be reduced to a
predetermined level. After the
warning goes away, the radio will return to the previous volume.
The RSS may have reduced performance or an increased chance of false
detection if the tailgate is not locked and in the upright position. If the
tailgate is down, the RSS tone may be heard intermittently or
continuously. The tone may also be heard if items in the truck bed
protrude rearward outside the bed.
The RSS automatically turns on when the gearshift lever is placed in R
(Reverse) and the ignition is on. A control in the message center allows
the driver to disable the system. Refer to Message center in the
Instrument Cluster chapter for more information.
Note: If the system cannot be turned off, refer to MyKey™ restricted
features in the Locks and Security chapter for more information.
Note: If your vehicle is equipped with a fully integrated electronic trailer
brake controller (TBC) and a trailer with electric trailer brakes is
connected to your vehicle, the RSS will be disabled. When the vehicle is
shifted into reverse, the message center display will remain in the Rear
Park Aid Off selection. For more information on the TBC, refer to the
Tires, Wheels and Loading chapter. Driving
297
2012 F-250/350/450/550 (f23)
Owners Guide, 4th Printing
USA (fus)
Page 301 of 448

FOUR-WHEEL DRIVE (4WD) OPERATION (IF EQUIPPED)
WARNING: For important information regarding safe operation
of this type of vehicle, see Preparing to drive your vehicle in
this chapter.
When four–wheel drive (4WD) is engaged, power is supplied to all four
wheels through a transfer case. 4WD can be selected when additional
driving power is desired.
4WD operation is not recommended on dry pavement. Doing so could
result in difficult disengagement of the transfer case, increased tire wear
and decreased fuel economy.
Manual Shift On Stop (MSOS) 4x4 system (if equipped)
The 4WD system is engaged or
disengaged by rotating the control
for both front wheel hub locks from
the FREE or LOCK position, then
manually engaging or disengaging
the transfer case with the
floor-mounted shifter. For increased
fuel economy in 2WD, rotate both
hub locks to the FREE position.
• For proper operation, make
sure that each hub is fully
engaged and that both hub locks are set to the same position
(both set to LOCK or both set to FREE). To engage LOCK,
turn the hub locks completely clockwise; to disengage the hubs
(FREE), turn the hub locks completely counterclockwise.
• The vehicle should not be driven in 4X4 High or 4X4 Low
modes with the hub locks set to FREE as this condition may
damage driveline system components.
• Some vehicles may be equipped with wheel ornaments that cover the
4x4 manual hub lock. These ornaments must be removed to access
the manual hub locks.
Electronic Shift-On-the-Fly (ESOF) 4x4 system (if equipped)
If equipped with the electronic shift 4WD system, and 4X4 Low is
selected while the vehicle is moving above 3 mph (5 km/h), the
4WD system will not perform a shift. This is normal and should be
no reason for concern. Refer to Shifting to/from 4L (4X4 Low) for
proper system operation. Driving
301
2012 F-250/350/450/550 (f23)
Owners Guide, 4th Printing
USA (fus)
Page 302 of 448

The ESOF 4WD system:
• provides 4x4 High engagement and disengagement while the vehicle is
moving.
• is operated by a rotary control located on the instrument panel that
allows you select 4x2, 4x4 High or 4x4 Low operation.
• uses auto-manual hub locks that can be engaged and disengaged
automatically based on the 4x4 mode selected.
• auto-manual hub locks can be
manually overridden by rotating
the hub lock control from AUTO
to LOCK if desired.
• automatic operation of the
hub locks is recommended, and
will increase fuel economy
• For proper operation, make
sure that each hub is fully
engaged and that both hub
locks are set to the same position (both set to LOCK or both
set to AUTO). To engage LOCK, turn the hub locks completely
clockwise; to engage AUTO, turn the hub locks completely
counterclockwise.
4WD system indicator lights
The indicator lights illuminate in the message center in the
reconfigurable telltale (RTT) under the following conditions. Refer to
Warning lights and chimes in the Instrument Cluster chapter.
• 4X2 - Momentarily illuminates
when 2H is selected on electronic
shift 4WD systems only.
• 4X4 HIGH - Illuminates when 4H
(4x4 High) is engaged.
• 4X4 LOW - Illuminates when 4L
(4x4 Low) is engaged.
• CHECK 4X4 – Displays when a
4x4 system fault is present 4x2
4x4
HIGH
4x4
LOWDriving
302
2012 F-250/350/450/550 (f23)
Owners Guide, 4th Printing
USA (fus)