Page 149 of 210

148
CAR
MAINTENANCE
TECHNICAL
SPECIFICATIONS
INDEX
DASHBOARD
AND CONTROLS
SAFETY
DEVICES
CORRECT USE
OF THE CAR
WARNING
LIGHTS AND
MESSAGES
IN AN
EMERGENCY
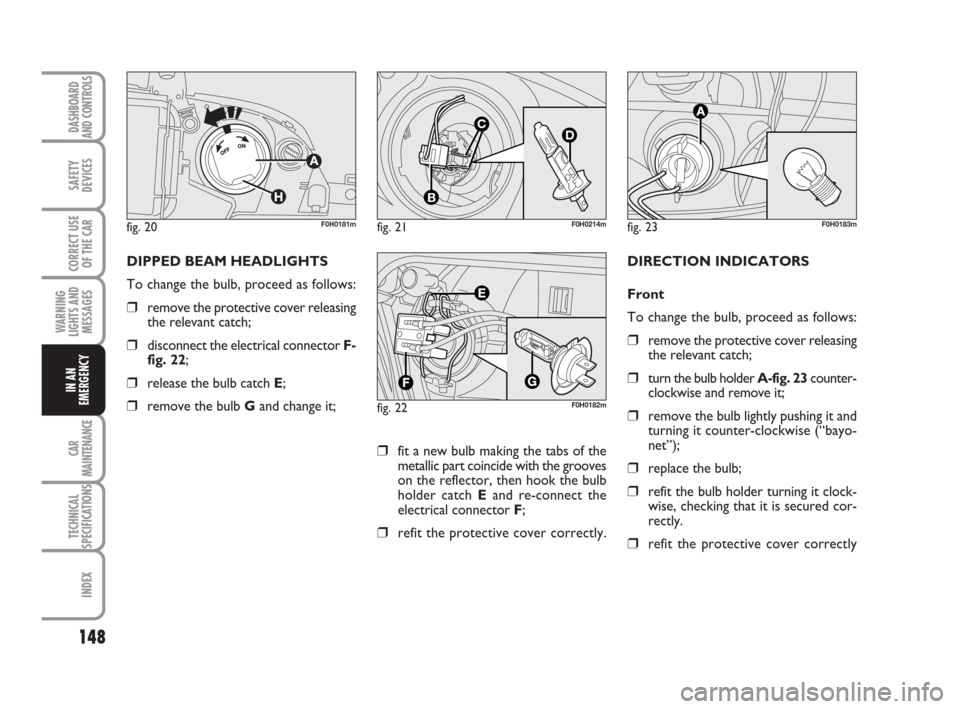
fig. 20F0H0181mfig. 21
C
B
D
F0H0214m
fig. 22F0H0182m
DIPPED BEAM HEADLIGHTS
To change the bulb, proceed as follows:
❒remove the protective cover releasing
the relevant catch;
❒disconnect the electrical connector F-
fig. 22;
❒release the bulb catch E;
❒remove the bulb Gand change it;
fig. 23F0H0183m
DIRECTION INDICATORS
Front
To change the bulb, proceed as follows:
❒remove the protective cover releasing
the relevant catch;
❒turn the bulb holder A-fig. 23counter-
clockwise and remove it;
❒remove the bulb lightly pushing it and
turning it counter-clockwise (“bayo-
net”);
❒replace the bulb;
❒refit the bulb holder turning it clock-
wise, checking that it is secured cor-
rectly.
❒refit the protective cover correctly
❒fit a new bulb making the tabs of the
metallic part coincide with the grooves
on the reflector, then hook the bulb
holder catch Eand re-connect the
electrical connector F;
❒refit the protective cover correctly.
133-160 idea GB 1 ed 10-07-2008 8:30 Pagina 148
Page 150 of 210

149
CAR
MAINTENANCE
TECHNICAL
SPECIFICATIONS
INDEX
DASHBOARD
AND CONTROLS
SAFETY
DEVICES
CORRECT USE
OF THE CAR
WARNING
LIGHTS AND
MESSAGES
IN AN
EMERGENCY
Side
To change the bulb, proceed as follows:
❒lever in the point shown by the arrow
to compress the catch and remove the
unit C-fig. 24;
❒turn the bulb holder Dcounter-clock-
wise, remove the snap-fitted bulb and
change it;
❒refit the bulb holder Din the trans-
parent cover, then position the unit
making sure the catch clicks into place.
fig. 24F0H0184m
FRONT SIDELIGHTS
To change the bulb, proceed as follows:
❒remove the protective cover releasing
the relevant catch;
❒remove the snap-fitted bulb holder A-
fig. 25, extract the bulb Band change
it;
❒refit the bulb holder A;
❒refit the protective cover correctly.FRONT FOG LIGHTS
(where provided)
To change the bulb, proceed as follows:
❒disconnect the electrical connector C-
fig. 26;
❒release the bulb catch D;
❒remove the bulb Eand change it;
❒fit the new bulb, hook the bulb catch
Dand re-connect the electrical con-
nector C.
fig. 25F0H0185mfig. 26F0H0186m
133-160 idea GB 1 ed 10-07-2008 8:30 Pagina 149
Page 151 of 210

150
CAR
MAINTENANCE
TECHNICAL
SPECIFICATIONS
INDEX
DASHBOARD
AND CONTROLS
SAFETY
DEVICES
CORRECT USE
OF THE CAR
WARNING
LIGHTS AND
MESSAGES
IN AN
EMERGENCY
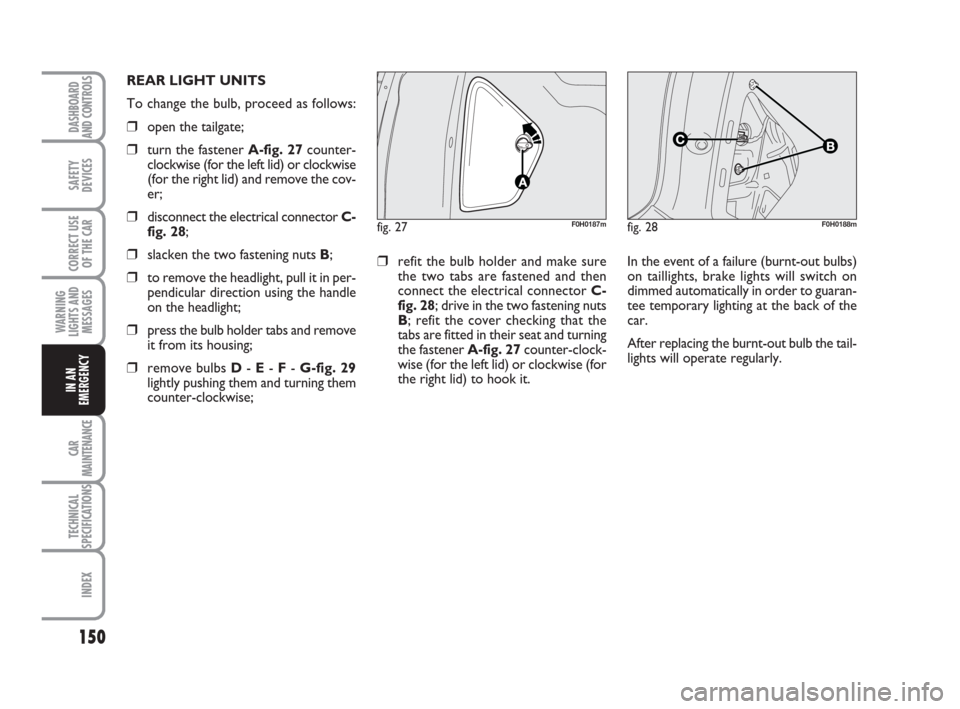
fig. 27F0H0187mfig. 28F0H0188m
REAR LIGHT UNITS
To change the bulb, proceed as follows:
❒open the tailgate;
❒turn the fastener A-fig. 27counter-
clockwise (for the left lid) or clockwise
(for the right lid) and remove the cov-
er;
❒disconnect the electrical connector C-
fig. 28;
❒slacken the two fastening nuts B;
❒to remove the headlight, pull it in per-
pendicular direction using the handle
on the headlight;
❒press the bulb holder tabs and remove
it from its housing;
❒remove bulbs D- E- F- G-fig. 29
lightly pushing them and turning them
counter-clockwise;
❒refit the bulb holder and make sure
the two tabs are fastened and then
connect the electrical connector C-
fig. 28; drive in the two fastening nuts
B; refit the cover checking that the
tabs are fitted in their seat and turning
the fastener A-fig. 27counter-clock-
wise (for the left lid) or clockwise (for
the right lid) to hook it. In the event of a failure (burnt-out bulbs)
on taillights, brake lights will switch on
dimmed automatically in order to guaran-
tee temporary lighting at the back of the
car.
After replacing the burnt-out bulb the tail-
lights will operate regularly.
133-160 idea GB 1 ed 10-07-2008 8:30 Pagina 150
Page 152 of 210

151
CAR
MAINTENANCE
TECHNICAL
SPECIFICATIONS
INDEX
DASHBOARD
AND CONTROLS
SAFETY
DEVICES
CORRECT USE
OF THE CAR
WARNING
LIGHTS AND
MESSAGES
IN AN
EMERGENCY
The bulbs are arranged inside the light unit
as follows:
D: sidelights / STOP
E: direction indicators
F: reversing light
G: rear fog lights
fig. 29F0H0189mfig. 30F0H0190m
ADDITIONAL BRAKING LIGHT
(THIRD STOP)
To change the bulbs, proceed as follows:
❒open the tailgate;
❒slacken the two fastening screws A-
fig. 30;
❒press the catch Band remove the bulb
holder;
❒remove the snap-fitted bulbs and
change them;
❒insert the bulb holder making sure the
catch Bclicks into place; drive in the
two fastening screws A.
IMPORTANT Where provided, on ver-
sions with dark windows, replace the
whole light unit since it is sealed.Number plate light
To change the bulb, proceed as follows:
❒work in the point shown by the arrow
and remove the transparent A-fig. 31;
❒change the bulb Breleasing it from the
side contacts and making sure the new
bulb is correctly fastened between the
contacts;
❒refit the transparent.
fig. 31F0H0192m
133-160 idea GB 1 ed 10-07-2008 8:30 Pagina 151
Page 153 of 210

152
CAR
MAINTENANCE
TECHNICAL
SPECIFICATIONS
INDEX
DASHBOARD
AND CONTROLS
SAFETY
DEVICES
CORRECT USE
OF THE CAR
WARNING
LIGHTS AND
MESSAGES
IN AN
EMERGENCY
IF AN INTERIOR LIGHT
BURNS OUT
For the type of bulb and power rating, see
“When needing to change a bulb”.
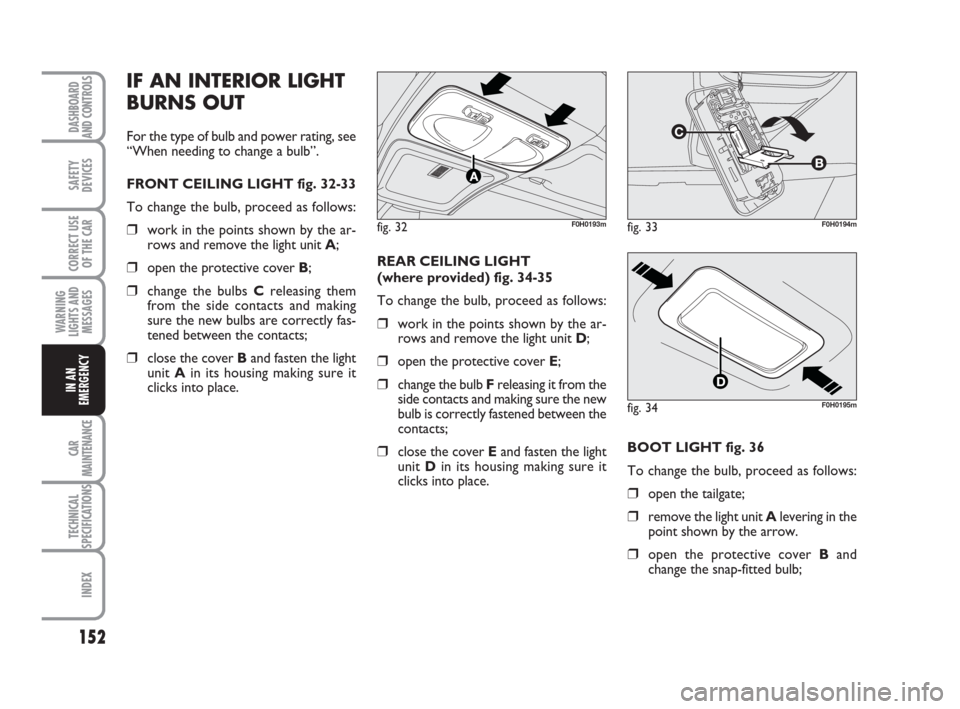
FRONT CEILING LIGHT fig. 32-33
To change the bulb, proceed as follows:
❒work in the points shown by the ar-
rows and remove the light unit A;
❒open the protective cover B;
❒change the bulbs Creleasing them
from the side contacts and making
sure the new bulbs are correctly fas-
tened between the contacts;
❒close the cover Band fasten the light
unit Ain its housing making sure it
clicks into place. REAR CEILING LIGHT
(where provided) fig. 34-35
To change the bulb, proceed as follows:
❒work in the points shown by the ar-
rows and remove the light unit D;
❒open the protective cover E;
❒change the bulb Freleasing it from the
side contacts and making sure the new
bulb is correctly fastened between the
contacts;
❒close the cover Eand fasten the light
unit Din its housing making sure it
clicks into place.
fig. 32F0H0193mfig. 33F0H0194m
fig. 34F0H0195m
BOOT LIGHT fig. 36
To change the bulb, proceed as follows:
❒open the tailgate;
❒remove the light unit Alevering in the
point shown by the arrow.
❒open the protective cover Band
change the snap-fitted bulb;
133-160 idea GB 1 ed 10-07-2008 8:30 Pagina 152
Page 154 of 210

153
CAR
MAINTENANCE
TECHNICAL
SPECIFICATIONS
INDEX
DASHBOARD
AND CONTROLS
SAFETY
DEVICES
CORRECT USE
OF THE CAR
WARNING
LIGHTS AND
MESSAGES
IN AN
EMERGENCY
❒refit the protective cover Bon the
transparent;
❒refit the light unit Ainserting it in its
correct position firstly on one end and
then on the other until it clicks into
place.
fig. 35F0H0196m
fig. 36F0H0197m
IF A FUSE BLOWS
GENERAL fig. 37
The fuse is a protective device for the
electric system: it comes into action (i.e.
it cuts off) mainly due to a fault or im-
proper action on the system.
If an electric device is not working, check
the efficiency of its fuse. The conductor el-
ement Amust be intact; if not, replace the
fuse with one of the same amp rating
(same colour).
B: Undamaged fuse
C: Fuse with broken filament.
Remove the blown fuse using the pincer
Dprovided in the control box on the
dashboard.
fig. 37F0H0198m
Never replace a broken fuse
with anything other than a
new fuse.
Never change a fuse with
another with a higher amp
rating, DANGER OF FIRE.
WARNING
If a general fuse (MEGA-
FUSE, MIDI-FUSE, MAXI-
FUSE) cuts in, do not attempt any re-
pair and contact Fiat Dealership. Be-
fore changing a fuse, check the igni-
tion key has been removed and that
all the other electric devices have
been turned off/disabled.
WARNING
If the fuse blows again, have
the car inspected at Fiat
Dealership.
WARNING
133-160 idea GB 1 ed 10-07-2008 8:30 Pagina 153
Page 155 of 210
154
CAR
MAINTENANCE
TECHNICAL
SPECIFICATIONS
INDEX
DASHBOARD
AND CONTROLS
SAFETY
DEVICES
CORRECT USE
OF THE CAR
WARNING
LIGHTS AND
MESSAGES
IN AN
EMERGENCY
F0H0720m
FUSE LOCATION
Fuses are grouped into two fuse boxes to
be found respectively on the left side of
the dashboard and in the engine com-
partment near the battery.Fuse box on the dashboard
To gain access to the fuses in the control
box on the dashboard fig. 38, remove the
protective trim A-fig. 39-40.
fig. 39 - Left-hand drive versionsF0H0719m
fig. 40 - Right-hand drive versionsF0H0198m
fig. 38
133-160 idea GB 1 ed 10-07-2008 8:30 Pagina 154
Page 156 of 210
155
CAR
MAINTENANCE
TECHNICAL
SPECIFICATIONS
INDEX
DASHBOARD
AND CONTROLS
SAFETY
DEVICES
CORRECT USE
OF THE CAR
WARNING
LIGHTS AND
MESSAGES
IN AN
EMERGENCY
F0H0720mfig. 42 fig. 41
F0H0201m
Fuse box near the battery
To gain access to the fuses fig. 42in the
fusebox on the battery post, remove the
protective cover B - fig. 41.
133-160 idea GB 1 ed 10-07-2008 8:30 Pagina 155