2012 FIAT FREEMONT stop start
[x] Cancel search: stop startPage 139 of 332
• When you move the shift lever to the REVERSE
position and ParkSense
®is turned off, the EVIC will
display the “PARK ASSIST OFF” message for as long as
the vehicle is in REVERSE.
• Clean the ParkSense
®sensors regularly, taking care
not to scratch or damage them. The sensors must not
be covered with ice, snow, slush, mud, dirt or debris.
Failure to do so can result in the system not working
properly. The ParkSense®system might not detect an
obstacle behind the fascia/bumper, or it could provide a
false indication that an obstacle is behind the fascia/
bumper.
• Objects such as bicycle carriers, trailer hitches, etc.,
must not be placed within 30 cm from the rear fascia/
bumper while driving the vehicle. Failure to do so can
result in the system misinterpreting a close object as a
sensor problem, causing the “SERVICE PARK ASSIST
SYSTEM” message to be displayed in the EVIC.
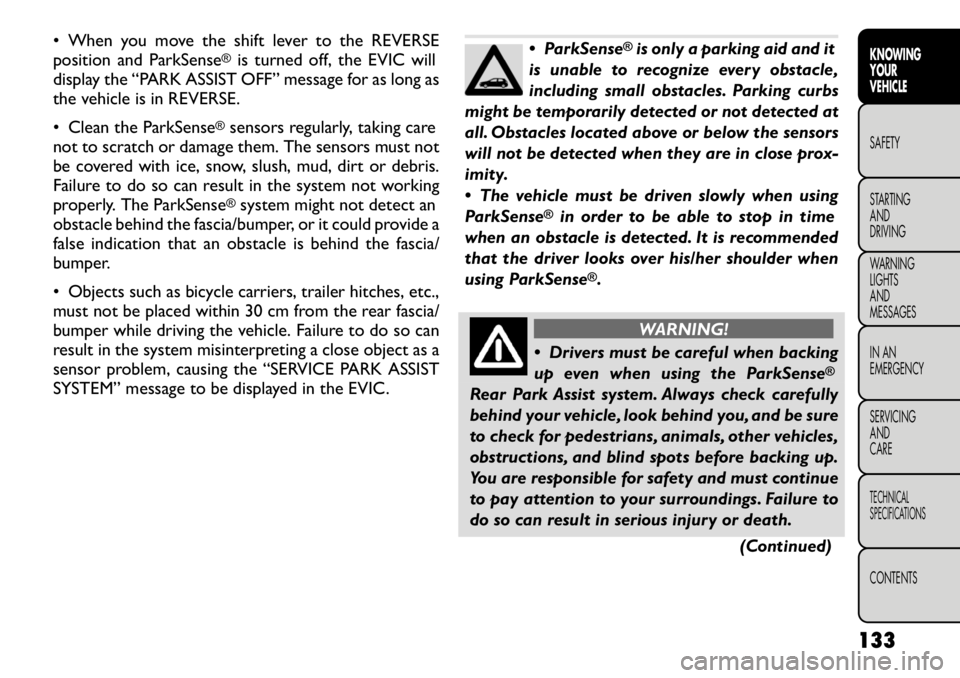
ParkSense
®is only a parking aid and it
is unable to recognize every obstacle,
including small obstacles. Parking curbs
might be temporarily detected or not detected at
all. Obstacles located above or below the sensors
will not be detected when they are in close prox-
imity.
The vehicle must be driven slowly when using
ParkSense
®
in order to be able to stop in time
when an obstacle is detected. It is recommended
that the driver looks over his/her shoulder when
using ParkSense
®.
WARNING!
Drivers must be careful when backing
up even when using the ParkSense
®
Rear Park Assist system. Always check carefully
behind your vehicle, look behind you, and be sure
to check for pedestrians, animals, other vehicles,
obstructions, and blind spots before backing up.
You are responsible for safety and must continue
to pay attention to your surroundings. Failure to
do so can result in serious injury or death.
(Continued)
133
KNOWING
YOURVEHICLESAFETY
STARTING ANDDRIVING
WARNING LIGHTSAND
MESSAGES
IN AN
EMERGENCY
SERVICING AND
CARETECHNICAL
SPECIFICATIONSCONTENTS
Page 141 of 332
WARNING!
Drivers must be careful when backing up
even when using the ParkView
®
Rear
Back Up Camera. Always check carefully behind
your vehicle, and be sure to check for pedestri-
ans, animals, other vehicles, obstructions, or blind
spots before backing up. You are responsible for
the safety of your surroundings and must con-
tinue to pay attention while backing up. Failure
to do so can result in serious injury or death.
To avoid vehicle damage, ParkView
®
should only be used as a parking aid.The
ParkView
®camera is unable to view ev-
ery obstacle or object in your drive path.
To avoid vehicle damage, the vehicle must be
driven slowly when using ParkView
®to be able to
stop in time when an obstacle is seen. It is recom-
mended that the driver look frequently over his/
her shoulder when using ParkView®. NOTE:
If snow, ice, mud, or any foreign substance
builds up on the camera lens, clean the lens, rinse with
water, and dry with a soft cloth. Do not cover the lens.
TURNING PARKVIEW
®ON OR OFF —
WITH TOUCH SCREEN RADIO
1. Turn the Radio on.
2. Press the “More” soft-key.
3. Press the “Settings” soft-key.
4. Press the “Safety & Driving Assistance” soft-key.
5. Press the check box soft key next to “Parkview
®
Backup Camera” to enable/disable.
135
KNOWING
YOURVEHICLESAFETY
STARTING ANDDRIVING
WARNING LIGHTSAND
MESSAGES
IN AN
EMERGENCY
SERVICING AND
CARETECHNICAL
SPECIFICATIONSCONTENTS
Page 148 of 332

RemoteControl Button Standard Screens Menu Screens
AM/FM/
MW/LW SAT–
Audio HDD–
HardDisc
Drive DISC/
DVD AUX/AUX1/
AUX2 Mode
Select Menu Screen
Setup
Play/Pause Not Available Not
AvailableNot
AvailablePause if
playing,else
resume
play Audio:
Pause if
playing/
resumeNot
Available
Not
Available Not
Available
Video
Play: Pause if
playing/
resume
Video
Menu: Activate
selected
item
Stop Not Available Not
AvailableNot
AvailableStop Stop
Not
AvailableNot
Available Not
Available
Mute Mute/Unmute Headphones
Slow Not Available Not
AvailableNot
AvailableNot
Available Audio:
Not
AvailableNot
AvailableNot
Available Not
Available
Video
Play: Slow
play/
resume
Video
Menu: Not
Available
142
KNOWING YOUR
VEHICLE
SAFETY
STARTING AND
DRIVING
WARNING LIGHTSAND
MESSAGES
IN AN
EMERGENCY
SERVICING AND
CARETECHNICAL
SPECIFICATIONSCONTENTS
Page 150 of 332
When the selector switch is in the Channel 1
position, the remote controls the functionality of
headphone Channel 1 (right side of the screen).
When the selector switch is in the Channel 2,
position the remote controls the functionality of
headphone Channel 2 (left side of the screen).
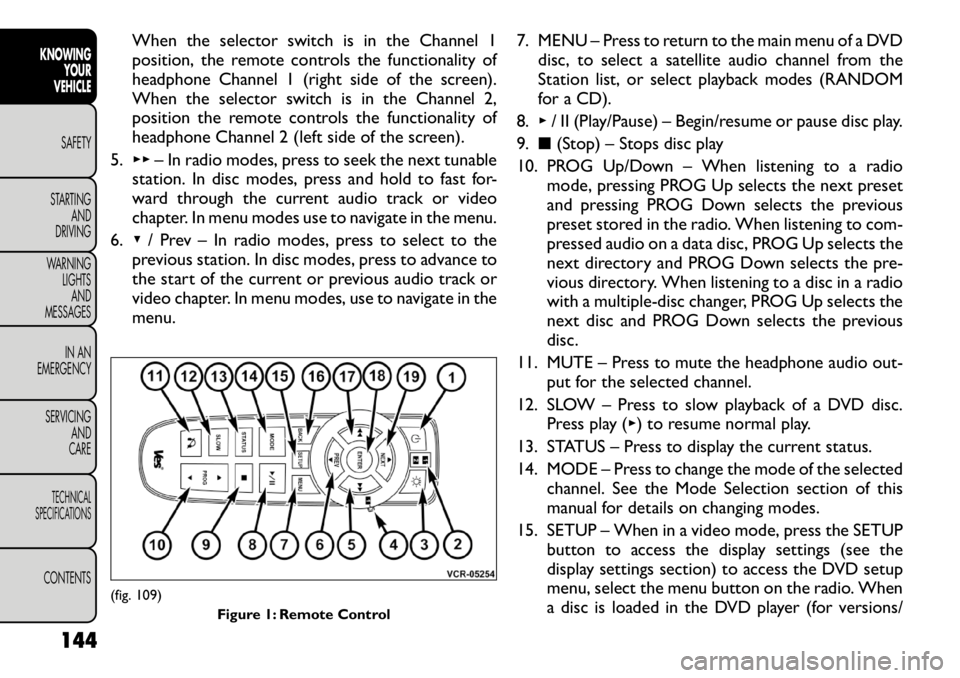
5. ▸▸ – In radio modes, press to seek the next tunable
station. In disc modes, press and hold to fast for-
ward through the current audio track or video
chapter. In menu modes use to navigate in the menu.
6. ▾/ Prev – In radio modes, press to select to the
previous station. In disc modes, press to advance to
the start of the current or previous audio track or
video chapter. In menu modes, use to navigate in the
menu. 7. MENU – Press to return to the main menu of a DVD
disc, to select a satellite audio channel from the
Station list, or select playback modes (RANDOM
for a CD).
8. ▸/ II (Play/Pause) – Begin/resume or pause disc play.
9. ■(Stop) – Stops disc play
10. PROG Up/Down – When listening to a radio mode, pressing PROG Up selects the next preset
and pressing PROG Down selects the previous
preset stored in the radio. When listening to com-
pressed audio on a data disc, PROG Up selects the
next directory and PROG Down selects the pre-
vious directory. When listening to a disc in a radio
with a multiple-disc changer, PROG Up selects the
next disc and PROG Down selects the previous
disc.
11. MUTE – Press to mute the headphone audio out- put for the selected channel.
12. SLOW – Press to slow playback of a DVD disc. Press play ( ▸) to resume normal play.
13. STATUS – Press to display the current status.
14. MODE – Press to change the mode of the selected channel. See the Mode Selection section of this
manual for details on changing modes.
15. SETUP – When in a video mode, press the SETUP button to access the display settings (see the
display settings section) to access the DVD setup
menu, select the menu button on the radio. When
a disc is loaded in the DVD player (for versions/
(fig. 109)
Figure 1: Remote Control
144
KNOWING YOUR
VEHICLE
SAFETY
STARTING AND
DRIVING
WARNING LIGHTSAND
MESSAGES
IN AN
EMERGENCY
SERVICING AND
CARETECHNICAL
SPECIFICATIONSCONTENTS
Page 151 of 332
markets, where provided) and the VES™ mode is
selected and the disc is stopped, press the SETUP
button to access the DVD Setup menu. (see the
DVD Setup Menu of this manual.)
16. BACK – When navigating in menu mode, press to return to the previous screen. When navigating a
DVDs disc menu, the operation depends on the
disc’s contents.
17. ◂◂– In radio modes, press to seek to the previous
tunable station. In disc modes, press and hold to
fast rewind through the current audio track or
video chapter. In menu modes use to navigate in
the menu.
18. ENTER – Press to select the highlighted option in a menu.
19. ▴/ NEXT – In radio modes, press to select to the
next station. In disc modes, press to advance to
the next audio track or video chapter. In menu
modes, use to navigate in the menu.
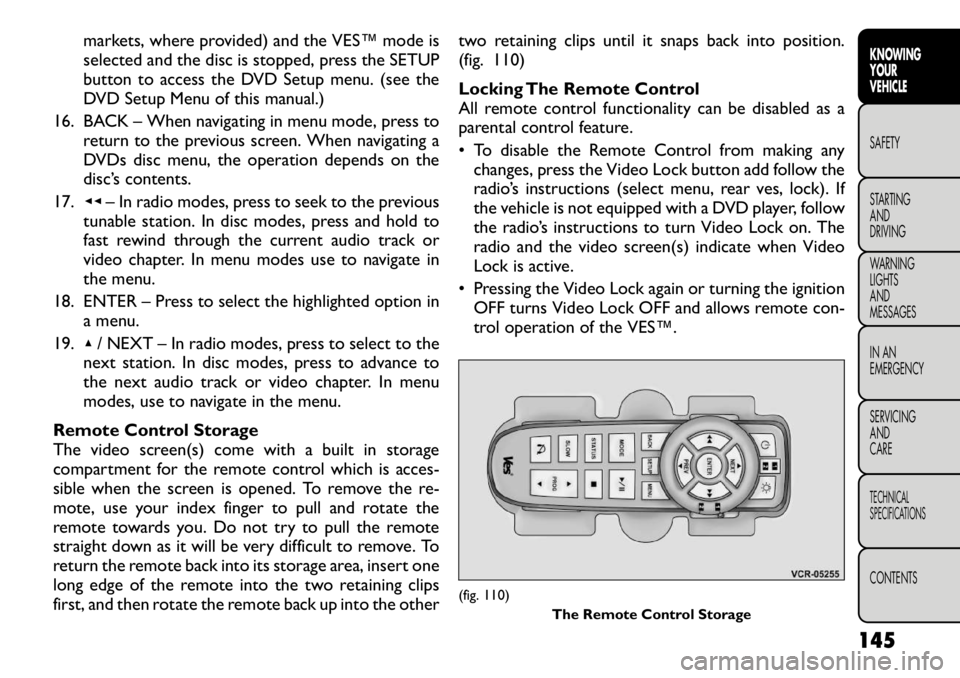
Remote Control Storage
The video screen(s) come with a built in storage
compartment for the remote control which is acces-
sible when the screen is opened. To remove the re-
mote, use your index finger to pull and rotate the
remote towards you. Do not try to pull the remote
straight down as it will be very difficult to remove. To
return the remote back into its storage area, insert one
long edge of the remote into the two retaining clips
first, and then rotate the remote back up into the other two retaining clips until it snaps back into position.
(fig. 110)
Locking The Remote Control
All remote control functionality can be disabled as a
parental control feature.
• To disable the Remote Control from making any
changes, press the Video Lock button add follow the
radio’s instructions (select menu, rear ves, lock). If
the vehicle is not equipped with a DVD player, follow
the radio’s instructions to turn Video Lock on. The
radio and the video screen(s) indicate when Video
Lock is active.
• Pressing the Video Lock again or turning the ignition OFF turns Video Lock OFF and allows remote con-
trol operation of the VES™.
(fig. 110) The Remote Control Storage
145
KNOWING
YOURVEHICLESAFETY
STARTING ANDDRIVING
WARNING LIGHTSAND
MESSAGES
IN AN
EMERGENCY
SERVICING AND
CARETECHNICAL
SPECIFICATIONSCONTENTS
Page 159 of 332
Disc Features control the remote DVD player's (for
versions/markets, where provided) settings of DVD
being watched in the remote player.
Listening To Audio With The Screen Closed
To listen to only audio portion of the channel with the
screen closed:
• Set the audio to the desired source and channel.
• Close the video screen.
• To change the current audio mode, press the remotecontrol’s MODE button. This will automatically se-
lect the next available audio mode without using the
Mode Select menu.
• When the screen is reopened, the video screen will automatically turn back on and show the appropriate
display menu or media.
If the screen is closed and there is no audio heard,
verify that the headphones are turned on (the ON
indicator is illuminated) and the headphone selector
switch is on the desired channel. If the headphones are
turned on, press the remote control’s power button to
turn audio on. If audio is still not heard, check that fully
charged batteries are installed in the headphones. Why Does The Screen Mode Change
Automatically?
In order to make the operation of the VES™ simple
and with the least amount of driver distraction, specific
events will cause the screen(s) to automatically switch
to DVD mode. These events are:
• Loading a disc in the DVD player (if so equipped),
• Pressing the PLAY button on the DVD player face-
plate when the disc is stopped or paused, or
• AM/FM band selection via Radio.
If your vehicle is not equipped with the separate DVD
player, the following events in the Radio will cause the
screen(s) to automatically switch to Radio Disc mode.
• Loading a disc in the radio CD/DVD player
• AM/FM band selection via Radio
Auxiliary Inputs
For each video screen there is an auxiliary (Aux jack)
device input which is used to connect external audio/
video sources to the VES™. Examples of devices that
can be connected to the Aux inputs include portable
music players, video cameras, VCR’s, game systems,
and other devices with audio and/or video outputs.
The Aux jacks are typically located on the back of the
center console or on one of the vehicles side panels in
the rear occupant area.
153
KNOWING
YOURVEHICLESAFETY
STARTING ANDDRIVING
WARNING LIGHTSAND
MESSAGES
IN AN
EMERGENCY
SERVICING AND
CARETECHNICAL
SPECIFICATIONSCONTENTS
Page 165 of 332

Buckle up even though you are an excellent driver, even
on short trips. Someone on the road may be a poor
driver and cause an accident that includes you. This can
happen far away from home or on your own street.
Research has shown that seat belts save lives, and they
can reduce the seriousness of injuries in an accident.
Some of the worst injuries happen when people are
thrown from the vehicle. Seat belts reduce the possi-
bility of ejection and the risk of injury caused by striking
the inside of the vehicle. Everyone in a motor vehicle
should be belted at all times.
LAP/SHOULDER BELTS
All seating positions in your vehicle are equipped with
a combination lap/shoulder belts.
The belt webbing retractor is designed to lock during
very sudden stops or impacts. This feature allows the
shoulder part of the belt to move freely with you under
normal conditions. However, in an accident, the belt
will lock and reduce your risk of striking the inside of
the vehicle or being thrown out.
WARNING!
It is dangerous to ride in a cargo area,
inside or outside of a vehicle. In an acci-
dent , people riding in these areas are more likely
to be seriously injured or killed.
(Continued)(Continued)
Do not allow people to ride in any area of your
vehicle that is not equipped with seats and seat
belts.
Be sure everyone in your vehicle is in a seat and
using a seat belt properly.
No modifications or additions should be made
by the user, which will either prevent the seat belt
adjusting devices from operating to remove
slack, or prevent the seat belt assembly from
being adjusted to remove slack.
Seat belts are designed to bear upon the bony
structure of the body, and should be worn low
across the front of the pelvis or the pelvis, chest
and shoulders, as applicable; wearing the lap
section of the belt across the abdominal area
must be avoided.
Seat belts should be adjusted as firmly as pos-
sible, consistent with comfort , to provide the
protection for which they have been designed. A
slack belt will greatly reduce the protection af-
forded to the wearer.
Each belt assembly must only be used by one
occupant ; it is dangerous to put a belt around a
child being carried on an occupant's lap.
(Continued)
159
KNOWING
YOURVEHICLESAFETYSTARTING ANDDRIVING
WARNING LIGHTSAND
MESSAGES
IN AN
EMERGENCY
SERVICING AND
CARETECHNICAL
SPECIFICATIONSCONTENTS
Page 167 of 332

WARNING!
A belt that is buckled into the wrong
buckle will not protect you properly.The
lap portion could ride too high on your body,
possibly causing internal injuries. Always buckle
your belt into the buckle nearest you.
A belt that is too loose will not protect you
properly. In a sudden stop, you could move too far
forward, increasing the possibility of injury.Wear
your seat belt snugly.
A belt that is worn under your arm is danger-
ous.Your body could strike the inside surfaces of
the vehicle in an accident , increasing head and
neck injury. A belt worn under the arm can cause
internal injuries. Ribs aren't as strong as shoulder
bones. Wear the belt over your shoulder so that
your strongest bones will take the force in a
collision.
A shoulder belt placed behind you will not
protect you from injury during an accident . You
are more likely to hit your head in a collision if
you do not wear your shoulder belt .The lap and
shoulder belt are meant to be used together.
4. Position the lap belt across your thighs, below your abdomen. To remove slack in the lap belt portion,
pull up a bit on the shoulder belt. To loosen the lap
belt if it is too tight, tilt the latch plate and pull on the lap belt. A snug belt reduces the risk of sliding
under the belt in an accident. (fig. 121)
WARNING!
A lap belt worn too high can increase
the risk of internal injury in an accident .
The belt forces won't be at the strong hip and
pelvic bones, but across your abdomen. Always
wear the lap belt as low as possible and keep it
snug.
A twisted belt will not protect you properly. In
a collision, it could even cut into you. Be sure the
belt is straight . If you can't straighten a belt in
your vehicle, take it to your authorized dealer
immediately and have it fixed.
(fig. 121) Removing Slack From Belt
161
KNOWING
YOURVEHICLESAFETYSTARTING ANDDRIVING
WARNING LIGHTSAND
MESSAGES
IN AN
EMERGENCY
SERVICING AND
CARETECHNICAL
SPECIFICATIONSCONTENTS