2012 FIAT FREEMONT manual radio set
[x] Cancel search: manual radio setPage 150 of 332

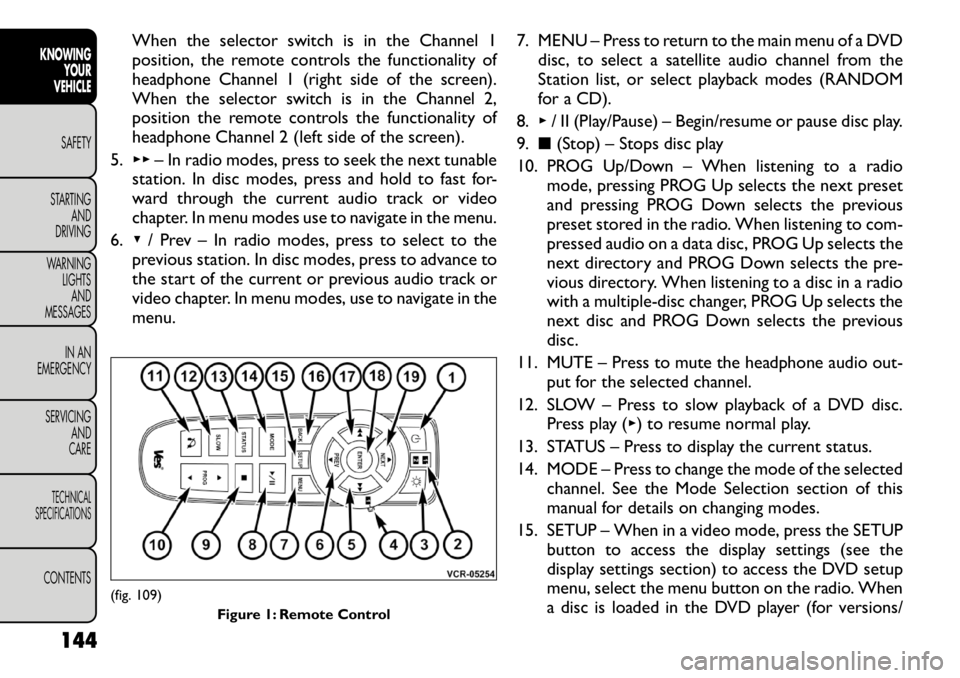
When the selector switch is in the Channel 1
position, the remote controls the functionality of
headphone Channel 1 (right side of the screen).
When the selector switch is in the Channel 2,
position the remote controls the functionality of
headphone Channel 2 (left side of the screen).
5. ▸▸ – In radio modes, press to seek the next tunable
station. In disc modes, press and hold to fast for-
ward through the current audio track or video
chapter. In menu modes use to navigate in the menu.
6. ▾/ Prev – In radio modes, press to select to the
previous station. In disc modes, press to advance to
the start of the current or previous audio track or
video chapter. In menu modes, use to navigate in the
menu. 7. MENU – Press to return to the main menu of a DVD
disc, to select a satellite audio channel from the
Station list, or select playback modes (RANDOM
for a CD).
8. ▸/ II (Play/Pause) – Begin/resume or pause disc play.
9. ■(Stop) – Stops disc play
10. PROG Up/Down – When listening to a radio mode, pressing PROG Up selects the next preset
and pressing PROG Down selects the previous
preset stored in the radio. When listening to com-
pressed audio on a data disc, PROG Up selects the
next directory and PROG Down selects the pre-
vious directory. When listening to a disc in a radio
with a multiple-disc changer, PROG Up selects the
next disc and PROG Down selects the previous
disc.
11. MUTE – Press to mute the headphone audio out- put for the selected channel.
12. SLOW – Press to slow playback of a DVD disc. Press play ( ▸) to resume normal play.
13. STATUS – Press to display the current status.
14. MODE – Press to change the mode of the selected channel. See the Mode Selection section of this
manual for details on changing modes.
15. SETUP – When in a video mode, press the SETUP button to access the display settings (see the
display settings section) to access the DVD setup
menu, select the menu button on the radio. When
a disc is loaded in the DVD player (for versions/
(fig. 109)
Figure 1: Remote Control
144
KNOWING YOUR
VEHICLE
SAFETY
STARTING AND
DRIVING
WARNING LIGHTSAND
MESSAGES
IN AN
EMERGENCY
SERVICING AND
CARETECHNICAL
SPECIFICATIONSCONTENTS
Page 151 of 332

markets, where provided) and the VES™ mode is
selected and the disc is stopped, press the SETUP
button to access the DVD Setup menu. (see the
DVD Setup Menu of this manual.)
16. BACK – When navigating in menu mode, press to return to the previous screen. When navigating a
DVDs disc menu, the operation depends on the
disc’s contents.
17. ◂◂– In radio modes, press to seek to the previous
tunable station. In disc modes, press and hold to
fast rewind through the current audio track or
video chapter. In menu modes use to navigate in
the menu.
18. ENTER – Press to select the highlighted option in a menu.
19. ▴/ NEXT – In radio modes, press to select to the
next station. In disc modes, press to advance to
the next audio track or video chapter. In menu
modes, use to navigate in the menu.
Remote Control Storage
The video screen(s) come with a built in storage
compartment for the remote control which is acces-
sible when the screen is opened. To remove the re-
mote, use your index finger to pull and rotate the
remote towards you. Do not try to pull the remote
straight down as it will be very difficult to remove. To
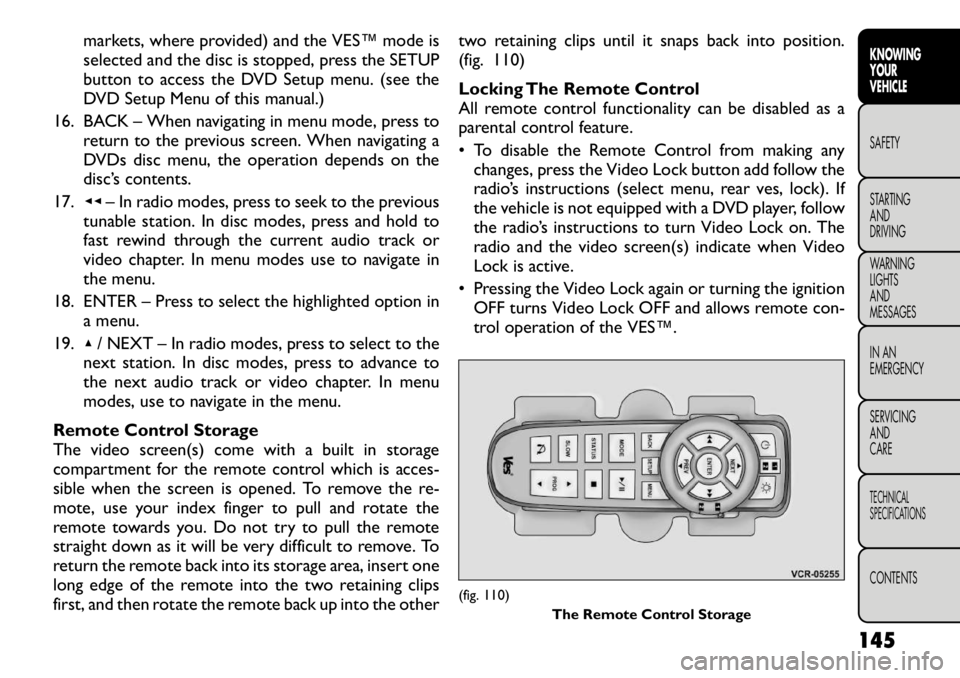
return the remote back into its storage area, insert one
long edge of the remote into the two retaining clips
first, and then rotate the remote back up into the other two retaining clips until it snaps back into position.
(fig. 110)
Locking The Remote Control
All remote control functionality can be disabled as a
parental control feature.
• To disable the Remote Control from making any
changes, press the Video Lock button add follow the
radio’s instructions (select menu, rear ves, lock). If
the vehicle is not equipped with a DVD player, follow
the radio’s instructions to turn Video Lock on. The
radio and the video screen(s) indicate when Video
Lock is active.
• Pressing the Video Lock again or turning the ignition OFF turns Video Lock OFF and allows remote con-
trol operation of the VES™.
(fig. 110) The Remote Control Storage
145
KNOWING
YOURVEHICLESAFETY
STARTING ANDDRIVING
WARNING LIGHTSAND
MESSAGES
IN AN
EMERGENCY
SERVICING AND
CARETECHNICAL
SPECIFICATIONSCONTENTS
Page 156 of 332

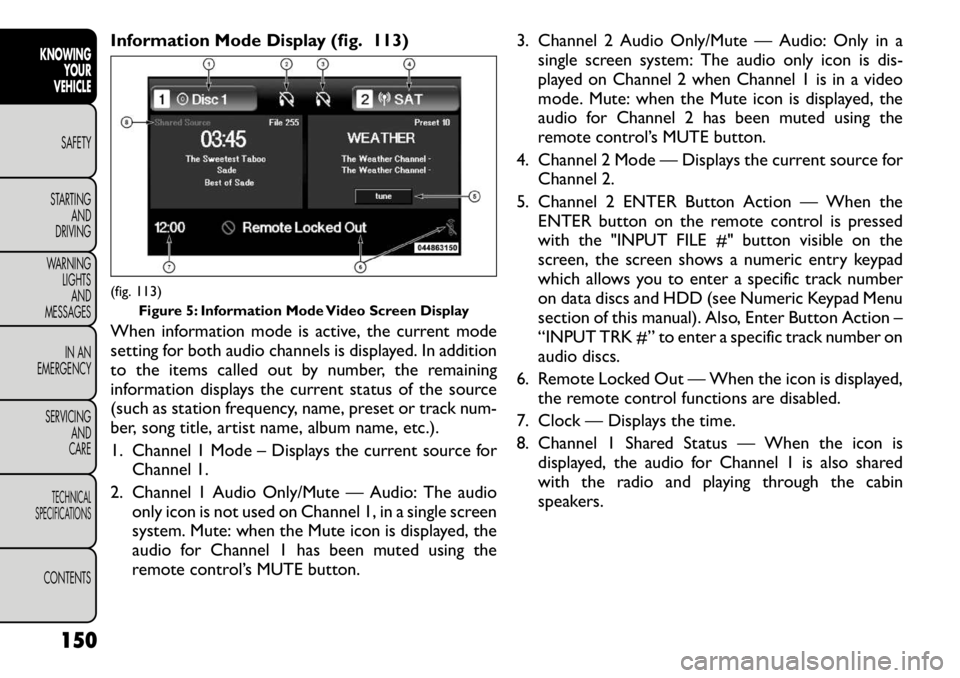
Information Mode Display (fig. 113)
When information mode is active, the current mode
setting for both audio channels is displayed. In addition
to the items called out by number, the remaining
information displays the current status of the source
(such as station frequency, name, preset or track num-
ber, song title, artist name, album name, etc.).
1. Channel 1 Mode – Displays the current source forChannel 1.
2. Channel 1 Audio Only/Mute — Audio: The audio only icon is not used on Channel 1, in a single screen
system. Mute: when the Mute icon is displayed, the
audio for Channel 1 has been muted using the
remote control’s MUTE button. 3. Channel 2 Audio Only/Mute — Audio: Only in a
single screen system: The audio only icon is dis-
played on Channel 2 when Channel 1 is in a video
mode. Mute: when the Mute icon is displayed, the
audio for Channel 2 has been muted using the
remote control’s MUTE button.
4. Channel 2 Mode — Displays the current source for Channel 2.
5. Channel 2 ENTER Button Action — When the ENTER button on the remote control is pressed
with the "INPUT FILE #" button visible on the
screen, the screen shows a numeric entry keypad
which allows you to enter a specific track number
on data discs and HDD (see Numeric Keypad Menu
section of this manual). Also, Enter Button Action –
“INPUT TRK #” to enter a specific track number on
audio discs.
6. Remote Locked Out — When the icon is displayed, the remote control functions are disabled.
7. Clock — Displays the time.
8. Channel 1 Shared Status — When the icon is displayed, the audio for Channel 1 is also shared
with the radio and playing through the cabin
speakers.(fig. 113) Figure 5: Information Mode Video Screen Display
150
KNOWING YOUR
VEHICLE
SAFETY
STARTING AND
DRIVING
WARNING LIGHTSAND
MESSAGES
IN AN
EMERGENCY
SERVICING AND
CARETECHNICAL
SPECIFICATIONSCONTENTS
Page 320 of 332

Vanity . . . . . . . . . . . . . . . . . . . . . . . . . . . . . . . 58
Mode Fuel Saver . . . . . . . . . . . . . . . . . . . . . . . . . . . . 24
Modifications/Alterations, Vehicle . . . . . . . . . . . . . . . 5
Monitor, Tire Pressure System . . . . . . . . . . . . . . . . 123
Multi-Function Control Lever . . . . . . . . . . . . . . . . . 73
Navigation System (Uconnect™ gps) . . . . . . . . 134,136
New Vehicle Break-In Period . . . . . . . . . . . . . . . . . 195
Occupant Restraints . . . . . . . . . . . . . . . . 158,186,189
Occupant Restraints (Sedan) . . . . . . . . 183,184,186,188
Octane Rating, Gasoline (Fuel) . . . . . . . . . . . . 298,302
Odometer . . . . . . . . . . . . . . . . . . . . . . . . . . . . . 226
Oil Change Indicator . . . . . . . . . . . . . . . . . . . . 23,226
Oil Change Indicator, Reset . . . . . . . . . . . . . . . 23,226
Oil, Engine . . . . . . . . . . . . . . . . . . . . . . . . . . 272,302 Capacity . . . . . . . . . . . . . . . . . . . . . . . . . . . . . 301
Change Interval . . . . . . . . . . . . . . . . . . . . . . 23,273
Checking . . . . . . . . . . . . . . . . . . . . . . . . . 272,273
Dipstick . . . . . . . . . . . . . . . . . . . . . . . . . . 272,273
Disposal . . . . . . . . . . . . . . . . . . . . . . . . . . . . . 273
Filter . . . . . . . . . . . . . . . . . . . . . . . . . . . . . . . 302
Filter Disposal . . . . . . . . . . . . . . . . . . . . . . . . . 273
Materials Added to . . . . . . . . . . . . . . . . . . . . . 273
Recommendation . . . . . . . . . . . . . . . . . . . . . . 301
Viscosity . . . . . . . . . . . . . . . . . . . . . . . . . 273,301
Onboard Diagnostic System . . . . . . . . . . . . . . . . . 120
Operating Precautions . . . . . . . . . . . . . . . . . . . . . 120
Operator Manual (Owner's Manual) . . . . . . . . . . . . . 4
Outside Rearview Mirrors . . . . . . . . . . . . . . . . . . . 57
Overhead Console . . . . . . . . . . . . . . . . . . . . . . . . 83
Owner's Manual (Operator Manual) . . . . . . . . . . . . . 4 Paint Care . . . . . . . . . . . . . . . . . . . . . . . . . . . . . 287
Park Sense System, Rear . . . . . . . . . . . . . . . . . . . . 129
Parking Brake . . . . . . . . . . . . . . . . . . . . . . . . . . . 200
Passenger Seat Back Tilt (Easy Entry System) . . . . . . . 52
Passing Light . . . . . . . . . . . . . . . . . . . . . . . . . . . . 73
Pets . . . . . . . . . . . . . . . . . . . . . . . . . . . . . . . . . 191
Power
Brakes . . . . . . . . . . . . . . . . . . . . . . . . . . . . . . 113
Distribution Center (Fuses) . . . . . . . . . . . . . . . . 256
Door Locks . . . . . . . . . . . . . . . . . . . . . . . . . . . 97
Mirrors . . . . . . . . . . . . . . . . . . . . . . . . . . . . . . 57
Outlet (Auxiliary Electrical Outlet) . . . . . . . . . . . 89
Seats . . . . . . . . . . . . . . . . . . . . . . . . . . . . . . . . 40
Steering . . . . . . . . . . . . . . . . . . . . . . . . . . 121,122
Transfer Unit . . . . . . . . . . . . . . . . . . . . . . . . . 287
Windows . . . . . . . . . . . . . . . . . . . . . . . . . . . . 103
Power Steering Fluid . . . . . . . . . . . . . . . . . . . . . . 303
Power Transfer Unit . . . . . . . . . . . . . . . . . . . 287,303
Pregnant Women and Seat Belts . . . . . . . . . . . . . . 169
Preparation for Jacking . . . . . . . . . . . . . . . . . . . . . 234
Pretensioners Seat Belts . . . . . . . . . . . . . . . . . . . . . . . . . . . . 164
Programming Transmitters (Remote Keyless Entry) . . 12
Radial Ply Tires . . . . . . . . . . . . . . . . . . . . . . . . . . 293
Radiator Cap (Coolant Pressure Cap) . . . . . . . . . . . 282
Radio (Sound Systems) . . . . . . . . . . . . . . . . . . . . . 136
Radio Operation . . . . . . . . . . . . . . . . . . . . . . . . . 155
Radio Remote Controls . . . . . . . . . . . . . . . . . . . . 137
Rear Air Conditioning . . . . . . . . . . . . . . . . . . . . . . 66
Rear Axle (Differential) . . . . . . . . . . . . . . . . . . . . 286
Rear Camera . . . . . . . . . . . . . . . . . . . . . . . . . . . 134
Rear Cupholder . . . . . . . . . . . . . . . . . . . . . . . . . . 92
314
KNOWING YOUR
VEHICLE
SAFETY
STARTING AND
DRIVING
WARNING LIGHTSAND
MESSAGES
IN AN
EMERGENCY
SERVICING AND
CARETECHNICAL
SPECIFICATIONSCONTENTS