Page 258 of 391
5. Using wheels/tires not equipped with TPM sensors.
NOTE:Your vehicle is equipped with a compact spare
wheel and tire assembly.
1. The compact spare tire does not have a tire pressure
monitoring sensor. Therefore, the TPMS will not monitor
the tire pressure in the compact spare tire.
2. If you install the compact spare tire in place of a road
tire that has a pressure below the low-pressure warning
limit, upon the next ignition key cycle, a chime will
sound and the Tire Pressure Monitoring Telltale Light
will still turn ON due to the low tire.
3. However, after driving the vehicle for up to 20 min-
utes above 15 mph (24 km/h), the Tire Pressure Moni-
toring Telltale Light will flash on and off for 75 seconds
and then remain on solid. 4. For each subsequent ignition key cycle, a chime will
sound and the Tire Pressure Monitoring Telltale Light
will flash on and off for 75 seconds and then remain on
solid.
5. Once you repair or replace the original road tire and
reinstall it on the vehicle in place of the compact spare
tire, the TPMS will update automatically and the Tire
Pressure Monitoring Telltale Light will turn OFF, as long
as no tire pressure is below the low-pressure warning
limit in any of the four active road tires. The vehicle may
need to be driven for up to 20 minutes above 15 mph
(24 km/h) in order for the TPMS to receive this
information.
General Information
This device complies with Part 15 of the FCC rules and
RSS 210 of Industry Canada. Operation is subject to the
following conditions:
•This device may not cause harmful interference.
256 STARTING AND OPERATING
Page 259 of 391
•This device must accept any interference received,
including interference that may cause undesired
operation.
The tire pressure sensors are covered under one of the
following licenses:
United States ................... MRXC4W4MA4
Canada ................ 2546A-C4W4MA4 (Single)
FUEL REQUIREMENTS
Your vehicle is designed to meet all emis-
sion regulations and provide satisfactory
fuel economy and performance when us-
ing high-quality unleaded gasoline having
an octane range of 87 to 91. The manufac-
turer recommends the use of 91 octane or
higher for optimum performance. Light spark knock at low engine speeds is not harmful to
your engine. However, continued heavy spark knock at
high speeds can cause damage and immediate service is
required.
Poor quality gasoline can cause problems such as hard
starting, stalling and hesitations. If you experience these
symptoms, try another brand of gasoline (with the ap-
propriate octane rating for your engine) before consider-
ing service for the vehicle.Reformulated Gasoline
Many areas of the country require the use of cleaner
burning gasoline referred to as “Reformulated Gasoline.”
Reformulated gasoline contains oxygenates and are spe-
cifically blended to reduce vehicle emissions and im-
prove air quality.
5
STARTING AND OPERATING 257
Page 260 of 391
The manufacturer supports the use of reformulated gaso-
line. Properly blended reformulated gasoline will pro-
vide excellent performance and durability of engine and
fuel system components.
Gasoline/Oxygenate Blends
Some fuel suppliers blend unleaded gasoline with oxy-
genates such as 10% Ethanol, MTBE, and ETBE. Oxygen-
ates are required in some areas of the country during the
winter months to reduce carbon monoxide emissions.
Fuels blended with these oxygenates may be used in
your vehicle.
CAUTION!
Do not use gasoline containing Methanol or E-85
Ethanol. Use of these blends may result in starting
and driveability problems and may damage critical
fuel system components.Problems that result from using methanol/gasoline
blends are not the responsibility of the manufacturer.
While MTBE is an oxygenate made from Methanol, it
does not have the negative effects of Methanol.
E-85 Usage In Non-Flex Fuel Vehicles
Non-FFV vehicles are compatible with gasoline contain-
ing 10% Ethanol (E10). Gasoline with higher Ethanol
content may void the vehicle’s warranty.
If a Non-FFV vehicle is inadvertently fueled with E-85
fuel, the engine will have some or all of these symptoms:
•operate in a lean mode
•OBD II “check engine light” on
•poor engine performance
•poor cold start and cold driveability
•increased risk for fuel system component corrosion
258 STARTING AND OPERATING
Page 262 of 391
Fuel System Cautions
CAUTION!
Follow these guidelines to maintain your vehicle’s
performance:
•The use of leaded gas is prohibited by Federal law.
Using leaded gasoline can impair engine perfor-
mance and damage the emission control system.
•An out-of-tune engine, or certain fuel or ignition
malfunctions, can cause the catalytic converter to
overheat. If you notice a pungent burning odor or
some light smoke, your engine may be out of tune
or malfunctioning and may require immediate
service. Contact your authorized dealer for service
assistance.(Continued)
CAUTION! (Continued)
•The use of fuel additives, which are now being
sold as octane enhancers, is not recommended.
Most of these products contain high concentra-
tions of Methanol. Fuel system damage or vehicle
performance problems resulting from the use of
such fuels or additives is not the responsibility of
the manufacturer.
NOTE: Intentional tampering with emissions control
systems can result in civil penalties being assessed
against you.
260 STARTING AND OPERATING
Page 264 of 391
ADDING FUEL
Fuel Filler Cap (Gas Cap)
The gas cap is located on the passenger side of the
vehicle. If the gas cap is lost or damaged, be sure the
replacement cap is the correct one for this vehicle.
CAUTION!
•Damage to the fuel system or emission control
system could result from using an improper fuel
cap (gas cap). A poorly fitting cap could let impu-
rities into the fuel system. Also, a poorly fitting
aftermarket cap can cause the “Malfunction Indi-
cator Light (MIL)” to illuminate, due to fuel vapors
escaping from the system.
•To avoid fuel spillage and overfilling, do not “top
off” the fuel tank after filling.
Fuel Filler Cap
262 STARTING AND OPERATING
Page 290 of 391
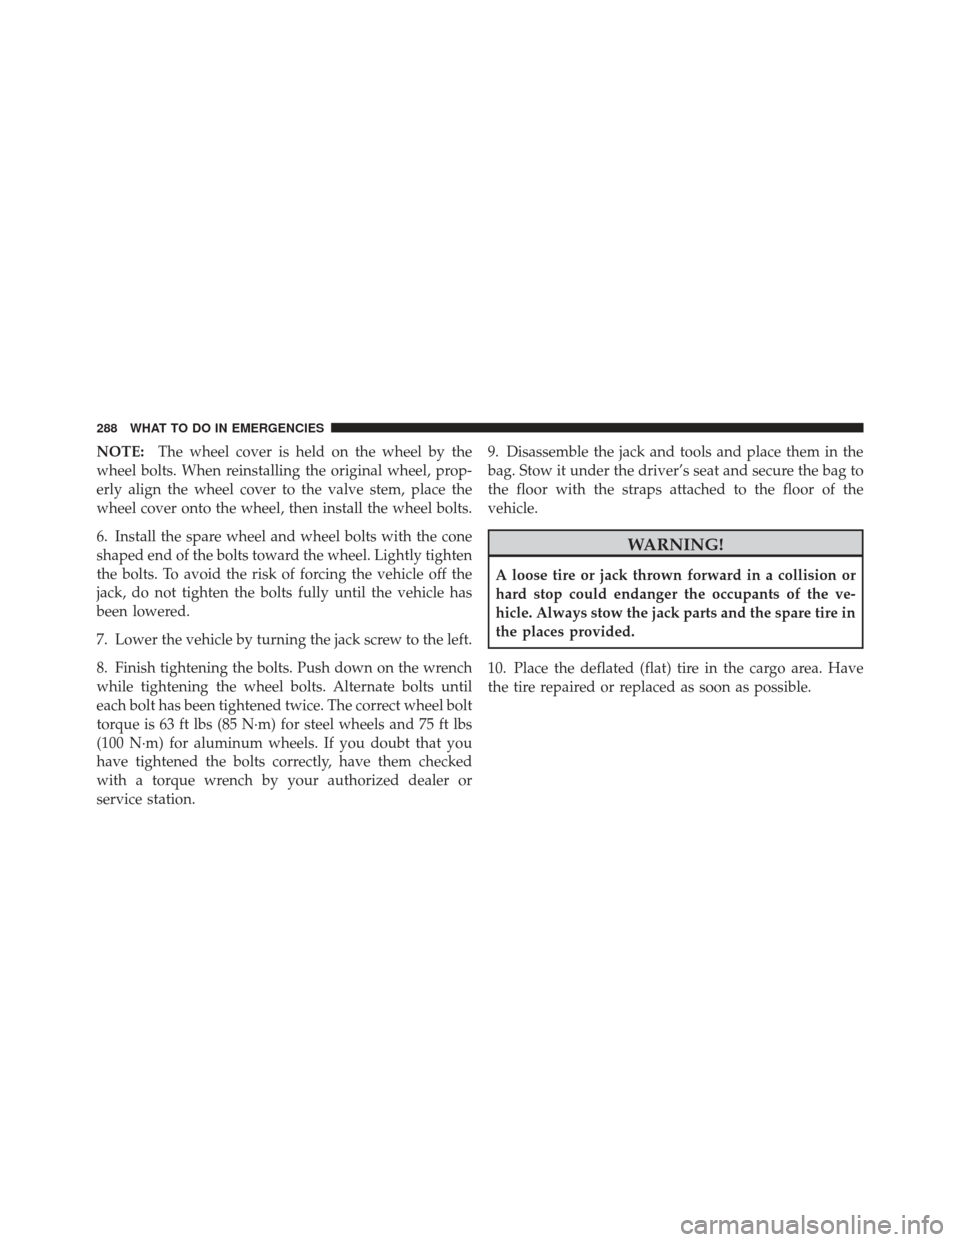
NOTE:The wheel cover is held on the wheel by the
wheel bolts. When reinstalling the original wheel, prop-
erly align the wheel cover to the valve stem, place the
wheel cover onto the wheel, then install the wheel bolts.
6. Install the spare wheel and wheel bolts with the cone
shaped end of the bolts toward the wheel. Lightly tighten
the bolts. To avoid the risk of forcing the vehicle off the
jack, do not tighten the bolts fully until the vehicle has
been lowered.
7. Lower the vehicle by turning the jack screw to the left.
8. Finish tightening the bolts. Push down on the wrench
while tightening the wheel bolts. Alternate bolts until
each bolt has been tightened twice. The correct wheel bolt
torque is 63 ft lbs (85 N·m) for steel wheels and 75 ft lbs
(100 N·m) for aluminum wheels. If you doubt that you
have tightened the bolts correctly, have them checked
with a torque wrench by your authorized dealer or
service station. 9. Disassemble the jack and tools and place them in the
bag. Stow it under the driver’s seat and secure the bag to
the floor with the straps attached to the floor of the
vehicle.
WARNING!
A loose tire or jack thrown forward in a collision or
hard stop could endanger the occupants of the ve-
hicle. Always stow the jack parts and the spare tire in
the places provided.
10. Place the deflated (flat) tire in the cargo area. Have
the tire repaired or replaced as soon as possible.
288 WHAT TO DO IN EMERGENCIES
Page 299 of 391
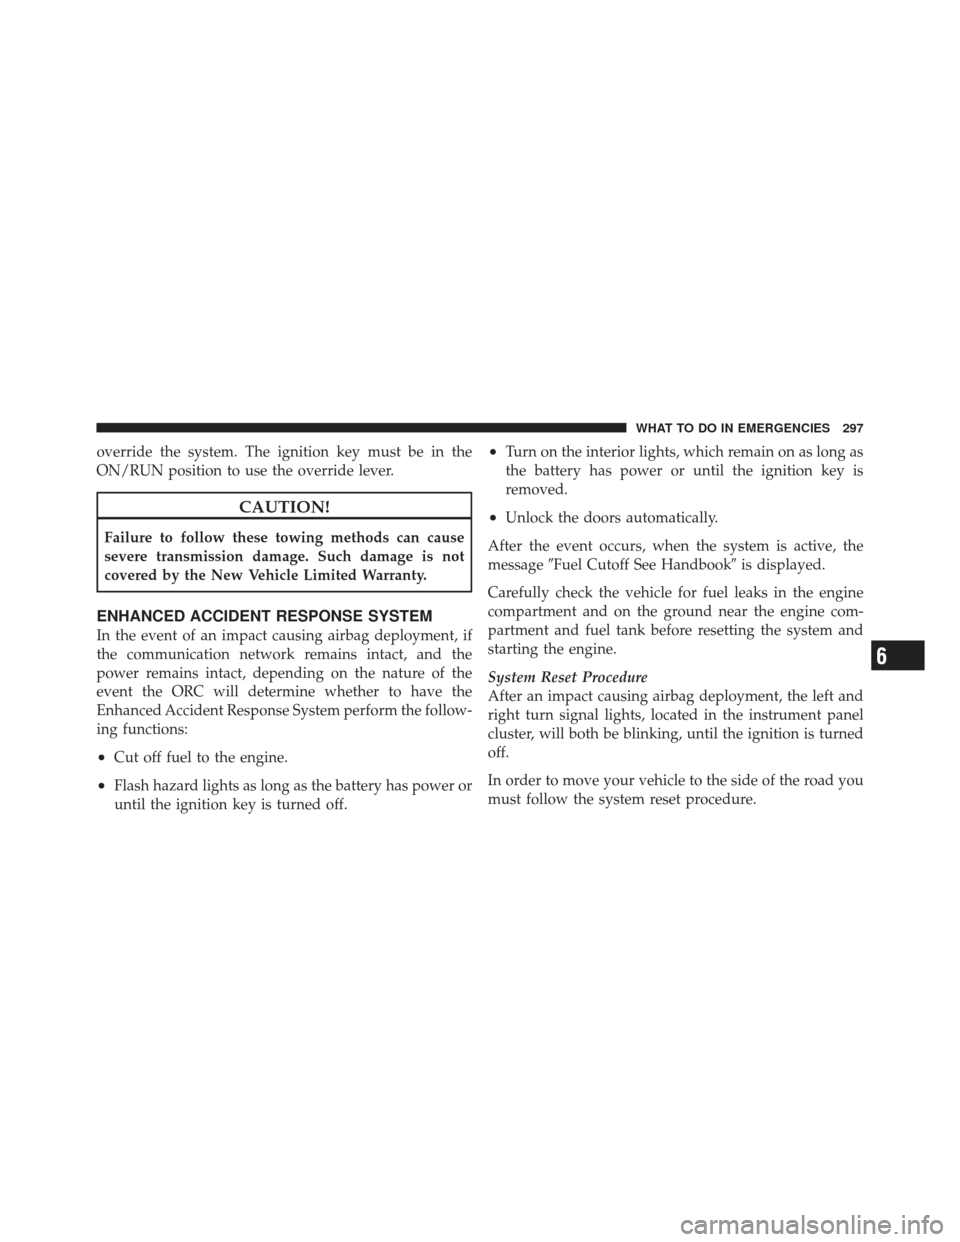
override the system. The ignition key must be in the
ON/RUN position to use the override lever.
CAUTION!
Failure to follow these towing methods can cause
severe transmission damage. Such damage is not
covered by the New Vehicle Limited Warranty.
ENHANCED ACCIDENT RESPONSE SYSTEM
In the event of an impact causing airbag deployment, if
the communication network remains intact, and the
power remains intact, depending on the nature of the
event the ORC will determine whether to have the
Enhanced Accident Response System perform the follow-
ing functions:
•Cut off fuel to the engine.
•Flash hazard lights as long as the battery has power or
until the ignition key is turned off.
•Turn on the interior lights, which remain on as long as
the battery has power or until the ignition key is
removed.
•Unlock the doors automatically.
After the event occurs, when the system is active, the
message �Fuel Cutoff See Handbook� is displayed.
Carefully check the vehicle for fuel leaks in the engine
compartment and on the ground near the engine com-
partment and fuel tank before resetting the system and
starting the engine.
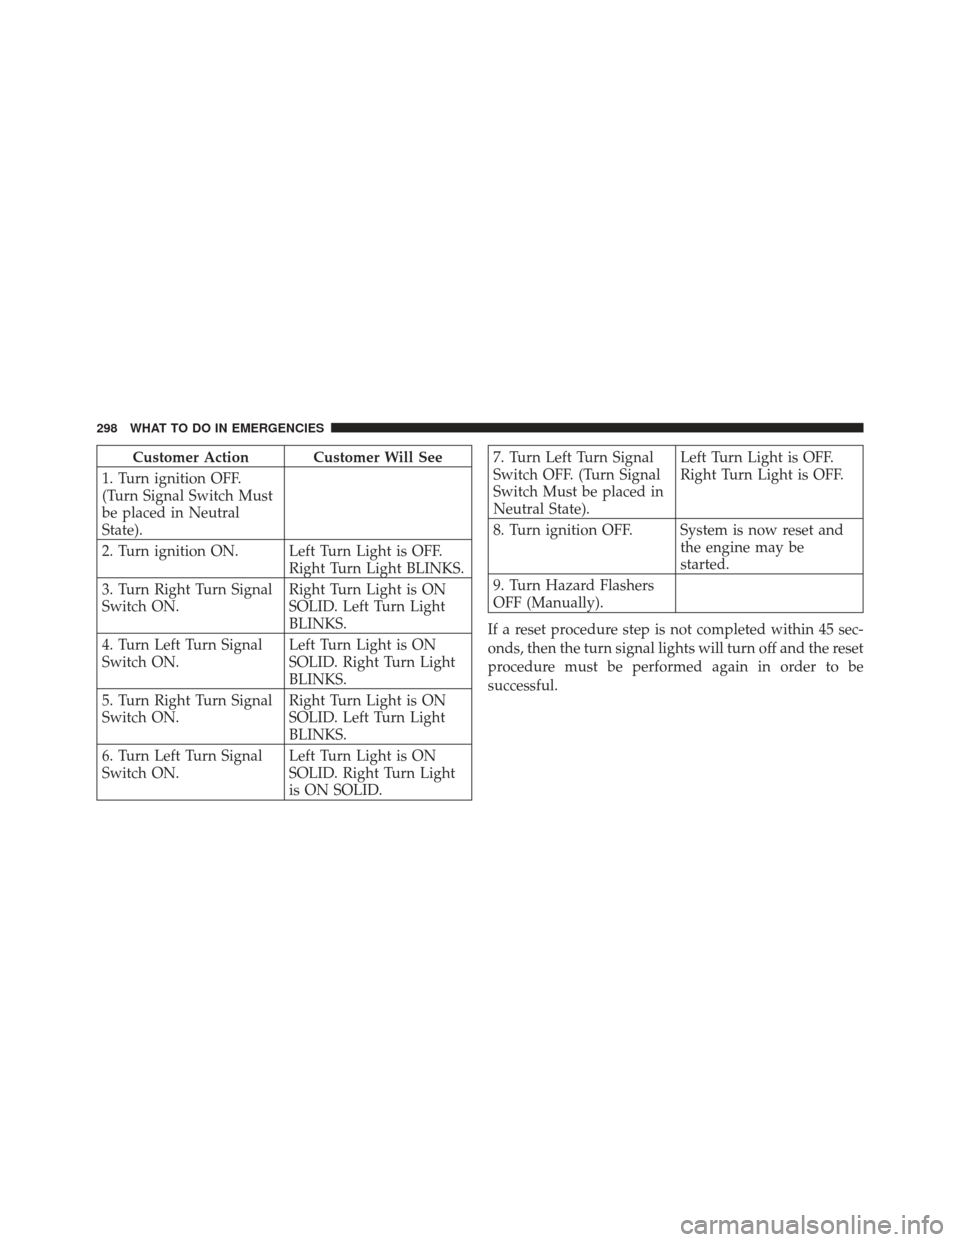
System Reset Procedure
After an impact causing airbag deployment, the left and
right turn signal lights, located in the instrument panel
cluster, will both be blinking, until the ignition is turned
off.
In order to move your vehicle to the side of the road you
must follow the system reset procedure.
6
WHAT TO DO IN EMERGENCIES 297
Page 300 of 391
Customer Action Customer Will See
1. Turn ignition OFF.
(Turn Signal Switch Must
be placed in Neutral
State).
2. Turn ignition ON. Left Turn Light is OFF. Right Turn Light BLINKS.
3. Turn Right Turn Signal
Switch ON. Right Turn Light is ON
SOLID. Left Turn Light
BLINKS.
4. Turn Left Turn Signal
Switch ON. Left Turn Light is ON
SOLID. Right Turn Light
BLINKS.
5. Turn Right Turn Signal
Switch ON. Right Turn Light is ON
SOLID. Left Turn Light
BLINKS.
6. Turn Left Turn Signal
Switch ON. Left Turn Light is ON
SOLID. Right Turn Light
is ON SOLID.7. Turn Left Turn Signal
Switch OFF. (Turn Signal
Switch Must be placed in
Neutral State).Left Turn Light is OFF.
Right Turn Light is OFF.
8. Turn ignition OFF. System is now reset and the engine may be
started.
9. Turn Hazard Flashers
OFF (Manually).
If a reset procedure step is not completed within 45 sec-
onds, then the turn signal lights will turn off and the reset
procedure must be performed again in order to be
successful.
298 WHAT TO DO IN EMERGENCIES