2012 Citroen DS4 instrument panel
[x] Cancel search: instrument panelPage 63 of 396

61Monitoring
Customising the polyphonic
sounds
This menu allows you to choose a family of polyphonic sounds from the four available.
These sounds are grouped together in a familyand are adapted to suit the situation and context (alert, confirmation, rejection, direction
indicators, lighting left on, key in ignition...).
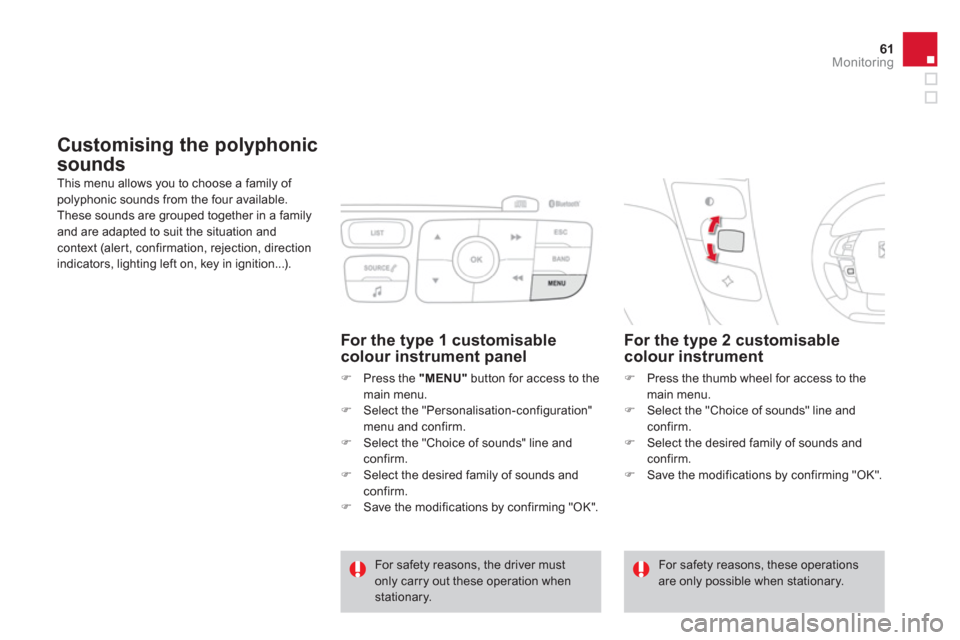
For the type 2 customisablecolour instrument
�)
Press the thumb wheel for access to the main menu.�)
Select the "Choice of sounds" line and confirm.
�)
Select the desired family of sounds and confirm. �)
Save the modifications by confirming "OK".
For safety reasons, the driver mustonly carry out these operation when stationary.
For safety reasons, these operations are only possible when stationary.
For the type 1 customisable colour instrument panel
�)
Press the "MENU"button for access to the
main menu. �) Select the "Personalisation-configuration"
menu and confirm.
�) Select the "Choice of sounds" line andconfirm.�)
Select the desired family of sounds and confirm.�)
Save the modifications by confirming "OK".
Page 74 of 396

Type 2 central instrument panel screen
Information displays
- Display of instantaneous information with:
●
the ran
ge,
●
the current fuel consumption,
●
Stop & Start time counter,
- Display of trip "1"
with:
●
the distance travelled,
●
the average fuel consumption,
●
the average speed,
for the first trip.
- Displa
y of trip "2"
with:
●
the distance travelled,
●
the average fuel consumption,
●
the average speed, for the second trip.
●
information on the current audio source,
●
black screen,
●
navi
gation-guidance messages.
�)Press the button, located at the end of the
wiper stalkor �)turn the thumb wheel, located on the left of
the steering wheel
,
to display the following information in turn:
●
reminder of the speed,
●
instantaneous information
,●
trip "1" ,
●
trip "2",
Page 110 of 396

This system allows automatic simultaneous locking of the doors and boot as soon as the speed of the vehicle exceeds 6 mph (10 km/h).
Anti-intrusion security
Operation
Activation
/Deactivation
You can activate or deactivate this function
permanently.
�) With the ignition on, press this buttonuntil an audible signal star ts and acorresponding message is displayed. If one of the doors or the boot is open,
the automatic central lockin
g does not take place.
This is signalled by the sound of thelocks rebounding, accompanied byillumination of this warning lamp in the
instrument panel, an audible signal
and the display of an aler t message.
Carrying long and voluminousobjects If you want to drive with the boot open,you should press the central locking button to lock the the doors. Other wise,
every time the speed of the vehicle exceeds 6 mph (10 km/h), the lockswill rebound and the alerts mentioned above will appear.
In the event of a serious impact with deployment of an airbag, the vehicle'sdoors unlock automatically to allow the exit of occupants and access for the security services.
Pressin
g the central locking button unlocks
the vehicle.
Above 6 mph (10 km/h), this locking is
temporary. The state o
f the system stays in memory when
switchin
g off the ignition.
Page 119 of 396

11 7Access
Fuel tank Capacity of the tank: approximately 60 litres.
Low fuel level
When the low fuel level in the
tank is reached, this warning lamp
comes on in the instrument panel, accompanied by an audible warning
and the display o
f an aler t message. When itfirst comes on, around 6 litresof fuel remain
in the tank.
Until sufficient fuel has been added, every time
the ignition is switched on, this warning lamp
appears, accompanied by an audible signal and
an aler t message. When driving, this audiblesignal and the display of this aler t message are
repeated with increasing frequency, as the level
drops towards 0 .
You must refuel as soon as possible to avoid
runnin
g out.
If you run out of fuel (Diesel), refer also to
"Checks".
Refuelling
�)Press control A
until the automatic openingof the fuel flap is heard.
This control remains active for a few minutes after switching off the ignition.
If necessary, switch the ignition on again
to reactivate it. �)Take care to select the pump that delivers
the correct fuel for your vehicle.
With Stop & Star t, never refuel with the system in STOP mode; you must switchoff the ignition with the key. Additions of fuel must be of at least
5 litres to
be registered by the fuel gauge.
Opening the filler cap may result in an inrush of air. This vacuum is entirely normal and results from the sealing of the fuel system.
Page 127 of 396

Visibility
Model without AUTO lighting
Model with AUTO li
ghting
Manual controls
The lighting is controlled directly by the driver
by means of the ring A and the stalk B.
Sidelamps (luminous signature).
Automatic illumination of headlamps.
B
. Stalk for switching headlamps: pull the stalk
towards
you to switch the lighting between
dipped and main beam headlamps.
In the lamps off and sidelamps modes, the
driver can switch on the main beam headlamps
temporaril
y ("headlamp flash") by maintaining a
pull on the stalk. A
.Main lighting mode selection ring: turn it
to position the symbol required facing themark.
Lamps o
ff.
Sidelamps.
Di
pped headlamps or main beam headlamps.
Displays
Illumination of the corresponding indicator
lamp in the instrument panel confirms that the
li
ghting selected is on. Da
ytime lighting, compulsory in cer tain countries, which comes on automatically when
the engine is star ted making the vehicle more
visible to other users.
Thi
s function is assured:
- in countries where it is imposed byregulations,
by illumination of the dipped beam headlamps associated with illumination of
the sidelamps and number plate lamps;
this function cannot be deactivated.
- for other countries where it is provided,
by illumination of dedicated lamps associated with illumination of the
sidelamps and number plate lamps; this
function can be activated or deactivated viathe vehicle configuration menu.
The instruments and controls
(multifunctionscreen, air conditioning control panel, ...)are not illuminated, except in night mode with
manual or automatic illumination of headlamps.
Daytime running lamps
The lighting control must be in position "0"
or "AUTO"
(day mode).
Page 129 of 396

127Visibility
Switching off the lighting when switching off the ignition
When the ignition is switched off, allof the lamps switch off immediately, except for the dipped beam headlamps if automatic guide-me-home lighting is activated.
Temporarily keeping the dipped beamheadlamps on after the vehicle's ignition has been switched off makes the driver's exit easier when the light is poor.
Switching on
�)
With the ignition off, "flash" the headlamps using the lighting stalk.�)
A further "headlamp flash" switches thefunction off.
Switching off
The manual guide-me-home lighting switches
o
ff automatically after a set time.
Manual guide-me-home
lighting
Switching on the lightingwhen switching on the ignition
To reactivate the lighting control stalk, turnthe ring Ato position A"0"
- lighting off, then to the position of your choice.
If the lighting is switched on manually after switching off the ignition, there is an audible signal when a front door is opened to warn the driver that they have forgotten to switchoff the vehicle's lighting, with the ignition off.
They switch off automatically after a periodwhich depends on the state of charge of thebattery (entry to energy economy mode).
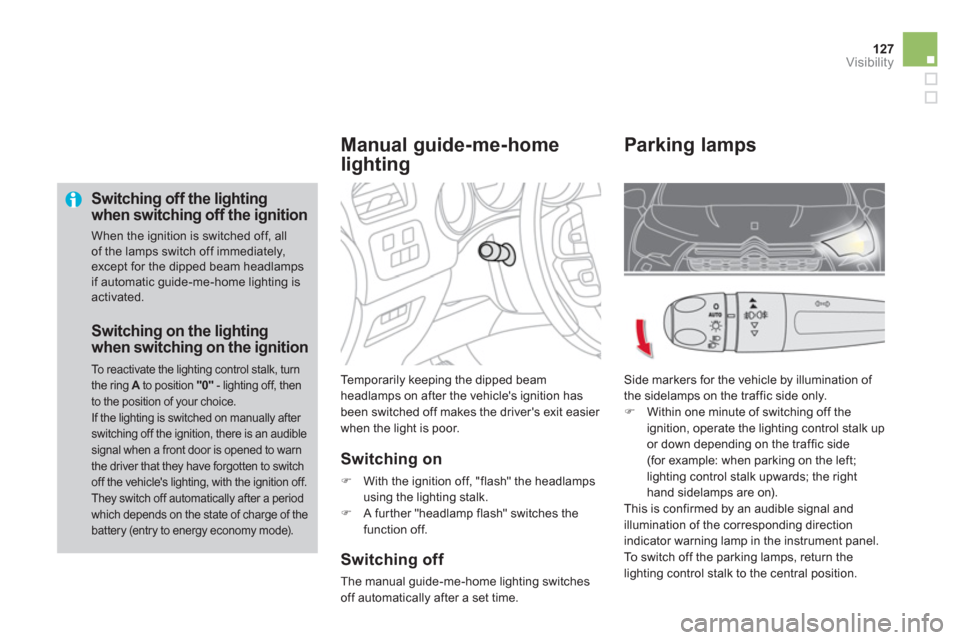
Parking lamps
Side markers for the vehicle by illumination of
the sidelamps on the traffic side only.�) Within one minute of switching off the
ignition, operate the lighting control stalk up
or down dependin
g on the traffic side(for example: when parking on the left;
lighting control stalk upwards; the right hand sidelamps are on).
This is confirmed by an audible signal and
illumination of the corresponding direction
indicator warning lamp in the instrument panel.
To switch o
ff the parking lamps, return the
lighting control stalk to the central position.
Page 130 of 396

When a low level of ambient light is detected by a sunshine sensor, the number plate
lamps, sidelamps and dipped beam headlamps are switched on automatically, without any action on the par t of the driver. They can also come on if rain is detected, at the same time as automatic operation of the windscreen wipers.
As soon as the brightness returns to a sufficient level or after the windscreen wipers are switched off, the lamps are switched off automatically.
Automatic illumination of
headlam
ps
Activation
�)
Turn the ring to the "AUTO"
position. The
activation of the function is accompanied
by the display of a message in the screen.
Deactivation
�)
Turn the ring to another position.
Deactivation of the function isaccompanied by the display of a message
in the screen.
Automatic "guide-me-
home" li
ghting
Operating fault
In the event of a malfunction of
the sunshine sensor, the lighting comes on, this warning lamp is
displayed in the instrument panel and/or a
message appears in the screen, accompanied by an audible signal.
Contact a CITROËN dealer or a qualified
workshop.
In fog or snow, the sunshine sensor may detect sufficient light. In thiscase, the lighting will not come on automatically.
Do not cover the sunshine sensor,coupled with the rain sensor and located in the centre of the windscreen
behind the rear view mirror; theassociated functions would no longer be controlled.
When the automatic illumination of headlamps
function is activated, under low ambient
li
ght the dipped beams headlamps come on
automatically when the ignition is switched off.
Programming
Activation or deactivation, as well
as the duration of the guide-me-home lighting, is set in the vehicle configuration menu.
Page 132 of 396

Automatic adjustment of xenon headlamps
Do not touch the xenon bulbs. Contact a CITROËN dealer or a
qualified workshop. This s
ystem adjusts the height of the xenon
headlamp beams automatically and when
stationary, according to the load in the vehicle, so
as to avoid causing a nuisance to other road user.
I
f a malfunction occurs, this
warning lamp is displayed in the
instrument panel, accompanied byan audible signal and a message in the screen.
The system then places your headlamps in the lowest position.
Manual adjustment
of halogen
headlamps
To avoid causing a nuisance to other road
users, the height of the halogen headlampsshould be adjusted according to the load in the
vehicle.0.1 or 2 people in the front seats. -.3 people.1. 5 people.-.Intermediate setting. 2.
5 people + maximum authorised load. -.Intermediate setting. 3.
Driver + maximum authorised load.
The initial setting is position "0".