2012 CITROEN C6 door lock
[x] Cancel search: door lockPage 37 of 216

35
II
00
00A
A
INSTRUMENT PANEL
Maintenance intervals
If you use your vehicle in particu-larly diffi cult conditions, it is essen-
tialto use the service schedule for "severe conditions" comprisingshorter intervals between services.See "Maintenance and WarrantyGuide".
Reset to zero
It is reset by your CITROËN dealer
or a qualifi ed workshop after eachservice. However, if you do your
own servicing, the procedure for resetting to zero is as follows:1. Switch off the ignition.2. Press on button A and keep it pressed.3. Switch on the ignition.4. Keep buttonA pressed down until the screen indicates"=0"
and the maintenance symboldisappears.
Note:If the maximum time between two oil changes is reached before the mileage has been covered, the mainte-nance spanner lights up and the instrument panel indicates "0".
MILEAGE RECORDER
Display
When the driver's door is opened or the vehicle is unlocked with
the remote control, for around
30 seconds there is display of the mileage recorders and sometimes
the maintenance spanner.
Trip mileage recorder reset
This can operate when the ignition is switched on.
With a long press on the zero
reset buttonA, the trip mileage dis-
played resets to zero.
FUEL GAUGE
From the time the low fuel warninglamp is on continuously on levelground, accompanied by an audi-
ble signal, there remains around8 litresof fuel in the tank.
When the second-to-last bar disap-pears, you still have approx. 5 l of
fuel.
REV COUNTER
When you approach maximumengine speed, crossing into the redzone indicates the need to engage
a higher gear.
Page 59 of 216

57
II
STEERING COLUMN ADJUSTMENT –
SEAT BELT HEIGHT ADJUSTMENT
MANUAL ADJUSTMENT OFTHE STEERING WHEEL FORHEIGHT AND REACH
While the vehicle is stationary,unlock the steering wheel bypushing the lever forward.
Adjust the height and the reach
of the steering wheel, then lock
the position by pulling the lever upwards.
ELECTRICAL ADJUSTMENT
OF THE STEERING WHEEL
FOR HEIGHT OR REAC
H
While the vehicle is stationary,
adjust the height or the reach of
the steering wheel by moving the control:forward or rearward to adjust
the reach
up or down to adjust the
height.
The steering wheel adjustment is
memorised with the driving posi-
tion (See "Memorisation").
SEAT BELT HEIGHT
ADJUSTMENT
Thecorrect positioningof the beltstrap is through the middle of the
shoulder. See "Seat belts".
To a d
just the seat belt for height,compress the control andslideitin the desired direction.
As a matter of safety, the adjustments in your driving position must be made only while the vehicle is stationary.
First adjust your seat to the most suitable position, then adjust the position of the steering wheel. See "Memorisation".
THE WELCOME FUNCTION
As the driver’s door is opened
and with the ignition switched off,
the steering wheel moves in order
to
facilitate entering or exiting the
vehicle.
Yo u can activate or deactivate thisfunction by going to the "Persona-lisation-Confi guration" menu of themultifunction screen.
Page 65 of 216

63
II
21
REAR VIEW MIRRORS
ELECTRIC EXTERIOR REAR VIEW MIRRORS
Features
The end of the glass in the exte-rior rear view mirrors is aspherical,so as to enlarge the lateral fi eld of
vision.
Objects observed in the aspheri-cal part of the rear view mirrors
are in reality closer than theyappear.
Yo u must take this into account in
order to be properly aware of thedistances involved.
Adjustment of the rear view mirrors
This can operate when the ignition is switched on.
The driver selects the rear view mirror by moving control 1, to the left or to the
right, then adjusts the mirror in the four directions by moving control 2.
Demisting-deicing of the rear view mirrors is linked with that for the rear screen.
The ad
justments you have made to the rear view mirrors are included in the
memorisation of driving positions. See "Memorisation".
Fold-back of door mirrors
When the vehicle is parked, the door mirrors can be folded back either manuallyor electrically.
Electric fold-back
From the central position, one press towards the rear on control1folds therear view mirrors back.
To return them to the initial position, press again on control 1 towards therear.
Automatic fold-back
Automatic fold-back operates when you lock the doors.
Page 84 of 216

82
III
LOCKING/UNLOCKING
FROM THE INSIDE
A press on the controlA operates
the electric central locking andunlocking, provided all the doorsare closed.
It is still possible to open the doorsfrom the inside.
Note: ControlAis inactive if thevehicle has been locked using theremote control or the key.
The three statuses for locking/unlock-ing the vehicle are signalled by the
warning lamp on the control A:It fl ashes when the vehicle is
locked, engine stopped.
It lights up when the ignition is switched on, vehicle locked.It goes out when the vehicle is unlocked.
ï
ï
ï
ACCESS
ANTI-THEFT PROTECTION
When you start the vehicle, doors
and boot closed, the system
automatically locksthe doorsas soon as you reach a speed of
around 6 mph (10 km/h).Note: If a door has been opened, this will lock again automatically whenthe vehicle reaches approx. 6 mph(10 km/h).
Activation/Deactivation of
the anti-intrusion protection
Give a long press on control Afor central locking until you see a mes-sage displayed.ANTI-THEFT
The boot locks automatically as soon as the vehicle reaches a
speed of around6 mph (10 km/h).Note: The opening of a door or use of the control A unlocks the vehicle.
Your vehicle is fi tted with doors that have frameless windows. When you open the doors, immediately youaction the exterior handle, a micro-descent device on the SIDE WINDOWS lowers the glass slightly.
If this device were not working properly, it could result in thewindows breaking:If there should be a battery failure:
Open the doors gently.Do not close the door abruptly as this risks breaking the window, if possible wait until the battery ispowering the vehicle again.If you are intending to work on the battery, open the windows fi rst.In freezing conditions, ice may form to hinder the operation of the micro-descent device. If the actionon the door handle does not move the window down, it is essential fi rst to free the ice.
ï
--
-ï
Page 85 of 216

83
IIIA
ACCESS
To make it easier to open the doors,
the windows automatically open bya few millimetres.
Note:This movement occurs immediately you touch an interior door handle.
The window recloses, automati-cally adjusting for a perfect seal.
IMPORTANT
This function has no anti-pinch. Donot leave your hand on the window
when you close the door.
Any interruption of your vehicle'selectrical supply will prevent the
windows from opening and closingcorrectly.
Note: Travelling at high speed,closing of windows may be hin-
dered by the aerodynamic pres-sure. Acoustic comfort may then
be adversely affected.
ELECTRICALLY-CONTROLLED CHILD SAFETY
This deactivates the controls in the rear of the vehicle, both for the rear
windows and for opening the rear doors from the inside.
For Pack Lounge seats, the seat slide adjustments, and those for the front
seats from the rear of the vehicle, are also deactivated.
Activation
The electric safety device is activated by pressing the controlA located on
the windows control panel. A message appears to confi rm that the child
safety is activated.
It is still possible to open the doors from the outside and to operate the
electric windows from the front of the vehicle.
Before changing or repairing the battery, open all four windows.
If you unlock your vehicle using the key because of a problemwith the battery, be aware that opening/closing a door withthe window closed can seriously damage the glass, even tothe point of breaking it.
Page 86 of 216

84
III
A
B
ACCESS
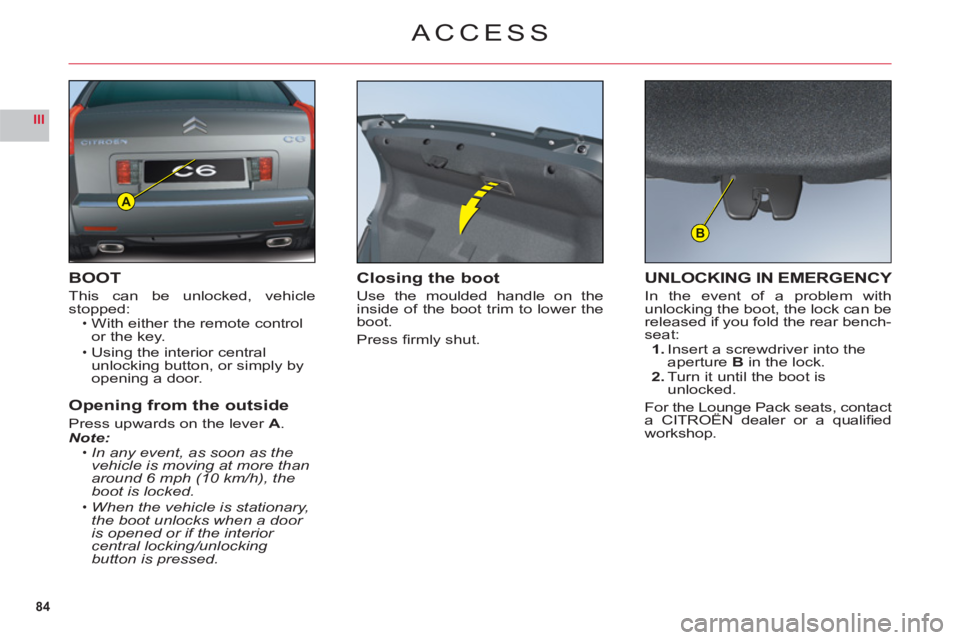
BOOT
This can be unlocked, vehiclestopped:With either the remote control
or the key.
Using the interior central
unlocking button, or simply byopening a door.
Opening from the outside
Press upwards on the lever A.Note:In any event, as soon as the
vehicle is moving at more than
around 6 mph (10 km/h), the boot is locked.
When the vehicle is stationary, the boot unlocks when a door is opened or if the interior
central locking/unlocking button is pressed.
•
•
•
•
Closing the boot
Use the moulded handle on the
inside of the boot trim to lower the boot.
Press fi rml
y shut.
UNLOCKING IN EMERGENCY
In the event of a problem withunlocking the boot, the lock can bereleased if you fold the rear bench-seat:1.Insert a screwdriver into the
aperture Bin the lock.2.Turn it until the boot is unlocked.
For the Lounge Pack seats, contacta CITROËN dealer or a qualifi edg,
workshop.
Page 111 of 216

109
III221
2
2
INTERIOR LIGHTING
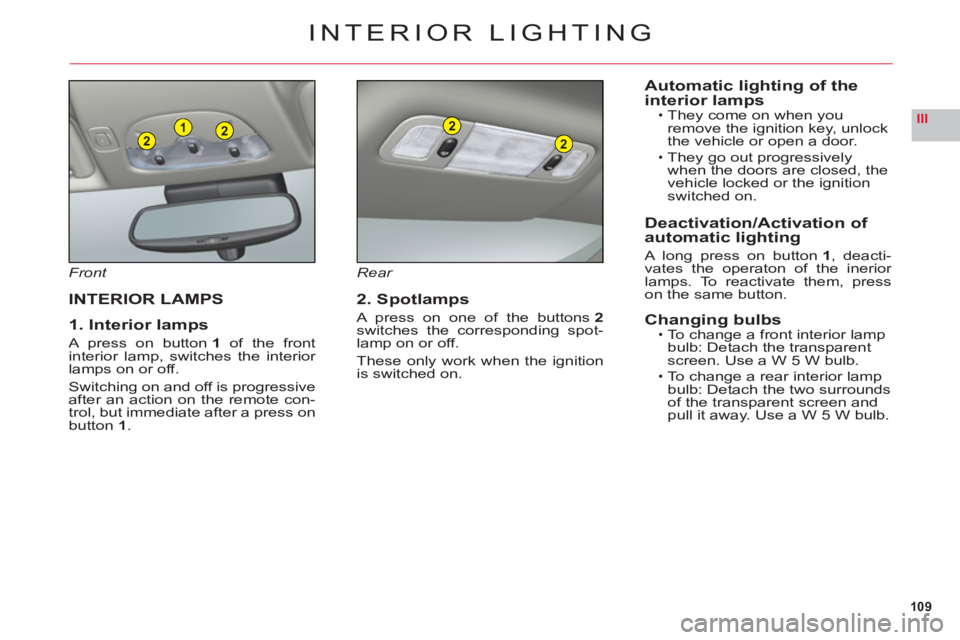
Front
INTERIOR LAMPS
1. Interior lamps
A press on button 1 of the front
interior lamp, switches the interior lamps on or off.
Switching on and off is progressiveafter an action on the remote con-
trol, but immediate after a press on
button 1.
Rear
2. Spotlamps
A press on one of the buttons2switches the corresponding spot-lamp on or off.
These only work when the ignition
is switched on.
Automatic lighting of the
interior lampsThey come on when you
remove the ignition key, unlock
the vehicle or open a door.
They go out progressively
when the doors are closed, the
vehicle locked or the i
gnitionswitched on.
Deactivation/Activation of
automatic lighting
A long press on button1, deacti-
vates the operaton of the inerior lamps. To reactivate them, presson the same button.
Changing bulbsTo change a front interior lamp
bulb: Detach the transparent
screen. Use a W 5 W bulb.
To change a rear interior lamp bulb: Detach the two surroundsof the transparent screen and pull it away. Use a W 5 W bulb.
•
•
•
•
Page 126 of 216

124
IV
A
D
C
B
BATTERY LOCATION AND
ACCESS
The battery is located in the bootunder the left hand wing trim. To
access the battery, rotate the pin
on the fl ap by a 1/4.
CHANGING THE BATTERY (Contact a CITROËN dealer or a qualifi ed
workshop).
1. Release the two pins on each side at the back of the boot, and remove
the boot fl oor.2. On each side trim, release the two fi xing pinsA.3. Undo the two screws Bon each side and remove the sill embellisher.4. On the side trim close to the battery, release the pin D.5. Separate the side trim close to the battery, pulling hard to free the other fi xing points.
6. Unclip the boot lamp C.7.Disconnect both battery terminals.8. Release the battery from its support.9. Remove the battery.
Before changing or repairing the battery, open all four windows.
If you have to unlock your vehicle with the key because of a problem with the battery, any opening/closingof a door with the window closed may seriously damage the glass to the point of breaking it.
12 V BATTERY