Page 17 of 168
.Familiarisation
15
Driving safely
P.
Parking.
Press the brake pedal to come out of this
position. R.Reverse. N. Neutral. D.Drive (forward).
Drive selector
55- Check that the drive selector is in position
P.P- Inser t the key in the ignition switch.
- Turn the key to position 4 (START).- Hold it in this position for a few seconds,until the " READY" lamp comes on,
accompanied by an audible signal.
- Release the key.
The switch returns automatically to
position
3 (ON) .
Starting the motor
53
- Stop the vehicle.
- Keep your foot on the brake pedal.
- Put the drive selector in position P
. P
- Apply the parking brake.
- Turn the key anti-clockwise to the LOCKposition.
Stopping the motor
53
Page 18 of 168

Familiarisation
16
Charging your vehicle
This procedure consists of connecting the
vehicle to a special fast charging station.
A.Interior opening control.
B.Exterior flap (left hand side of the vehicle).
C.Socket cover.
The cable to use is the one attached to the charging station.
Fast charge **
86
This procedure consists of connecting the
vehicle to a domestic power point. A. Interior opening control.B.
Exterior flap (right hand side of the vehicle).
C.Socket cover.
Normal charge
82
Before making any connection, checkthat the power point you want to use meets standards *
and is compatiblewith the current rating on the control unit of the charging cable.In all cases, it is recommended that you first have an initial check and then regular checks on your
installation by a qualified electrician.
Ensure that the charging station and its cable are compatible with your vehicle.
You must always use a genuineCITROËN charging cable.
Do not use an electricalextension lead, multi-wayconnector, adaptor or timer.
*(For example, in France: the standard is NF C 15 -10 0).
**
Depending on equipment.
To optimise the ser vice life of themain battery, recharge it completely ever y 15 days.For a recharge to be complete
, follow the procedure for a normalrecharge
(domestic power point)without interruption, until it switches off
automatically (charging lamp goes off inthe instrument panel).
Page 19 of 168

.Familiarisation
17
For more economical driving, and increased range
Practical advice for everyday use to optimise the range of your vehicle by conser ving battery power.
Adopt a smooth driving
style
The electrical consumption of your vehicle
depends greatly on your journey, your driving style and your speed.
In all cases, adopt a smooth driving style.
Sta
y in the "Eco" zoneindicated in the energy consumption / generation meter: depress the
accelerator pedal progressively, without sudden movement, and if the conditions permit, drive at
steady and moderate speed.
Recover energy
Anticipating the driving conditions allows you torecover energy and increase the range of your
vehicle.
Use the "Charge" zoneof the energyconsumption / generation meter whenever possible: anticipate the traffic slowing
down and if the the conditions permit, use
deceleration rather than the brakes.
Control the use of your
electrical equipment
The heating and air conditioning systems operate on energy from the main battery.
Excessive use of these systems greatlyreduces the range of your vehicle. Remember
to switch them off once the desired level of comfor t is reached and check their settings every time you set off.
Control also the use of demisting / defrostingand the heated seat.
Limit the causes of excess
consumption
As with any vehicle, limit the loads carried
in th
e vehicle and reduce wind resistance (windows open above 30 mph (50 km/h), roof
bars, roof box, …).
Observe the recommendations
on maintenance
Check the tyre pressures regularly andfollow the schedule for routine ser vicing
recommended by CITROËN.
Page 20 of 168
Monitoring
18
Instrument panel Panel bringing together the various gauges and indicators for the operation of the vehicle.
1.State of charge gauge for the main battery.
Drive selector position indicator.2.Energy consumption / generationindicator.3.Speedometer4.Screen.
A.Total distance recorder.B.Trip distance recorder (Trip A or B).C.Instrument panel lighting dimmer.D.Indicator of distance remaining to the
next service.E.Indicator of time remaining to the next
service.F.Indicator of remaining range.
5.Screen control button. Displays the various functions in turn.
Resets the function selected (trip recorder or ser vice indicator).
Adjusts the level of instrument lighting.
For more information, refer to thecorresponding section.
Gauges and indicators
Screen
Page 21 of 168
1
Monitoring
19
Indicator and warning
lamps
Visual indicators informing the driver that a
system is in operation, is deactivated or has a fault.
When the ignition is switched on
Cer tain warning lamps come on for a few seconds when the vehicle's ignition isswitched on.
These same warning lamps go off after a
few seconds.
If you notice one of these warning lamps
remaining on, refer to the information on the
warning lamp in question.
Associated warnings
The illumination of cer tain warning lamps may
be accompanied by an audible signal.
The warning lamps may come on continuously (fixed) or flash.
Cer tain warning lamps may come on in one of two modes. Only by relating the type of lighting to the operating status of the vehicle can it be ascertained whether the situation is normal or whether a fault has occurred.
Page 22 of 168

Monitoring
20
Operation indicator lamps
If one of the following indicator lamps comes on in the instrument panel, this confirms that the corresponding system has come into operation.
Warning / indicator lampStateCauseAction / Observations
Left-hand direction indicator
Flashing with audible signal. The lighting stalk is pushed down.
Right-hand direction indicator
Flashing with audible signal. The lighting stalk is pushed up.
Hazard warning lampsFlashing with audible signal. The hazard warning lamps switch,located on the dashboard, has been
operated. The left-hand and ri
ght-hand direction indicators and
their associated indicator lamps flash simultaneously.
Sidelampsand/or dipped beamheadlamps
On fixed. The sidelamps and/or dipped beamheadlamps are on.
Front foglampsOn fixed. The front foglamps are switched on. Turn the ring on the stalk rear wards twice to switch off
the front foglamps.
Rear foglampOn fixed. The rear foglamp is switched on. Turn the ring on the stalk rear wards to switch off the
rear foglamp.
Main beam headlampsOn fixed. The lighting stalk is pulled towardsyou. Pull the stalk to return to dipped beam headlamps.
Page 23 of 168
1
Monitoring
21
Warning / indicator lampStateCauseAction / Observations
Ready(ready to moveoff)
On fixed,
accompanied by an
audible signal when it
comes on. The vehicle is read
y to move off andyou can press the accelerator. The illumination period corresponds to the powering-up of the vehicle.
Parking brake
On fixed. The parking brake is applied or notproperly released. Release the parking brake to switch off the warninglamp, keeping your foot on the brake pedal.
Obser ve the safety recommendations.
For further information on the parking brake, refer to
the "Driving" section.
Main batterycharge (normal or fast)
On fixed.The main battery is on charge. On completion of the charge, the lamp goes off.
Flashin
g. The charging cable is connected to
the vehicle but the main battery is not yet charging. Check the connection of the char
ging cable.
Page 24 of 168
Monitoring
22
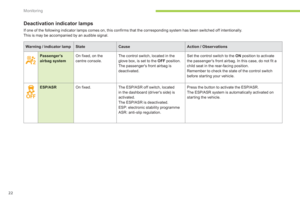
Deactivation indicator lamps
If one of the following indicator lamps comes on, this confirms that the corresponding system has been switched off intentionally.This is may be accompanied by an audible signal.
Warning / indicator lampStateCauseAction / Observations
Passenger's airbag systemOn fixed, on thecentre console. The control switch, located in the glove box, is set to the OFF
position.
The passenger's front airbag is deactivated.
Set the control switch to the ON
position to activate
the passenger's front airbag. In this case, do not fit achild seat in the rear-facing position.
Remember to check the state of the control switch
before star ting your vehicle.
ESP/ASROn fixed.The ESP/ASR off switch, located
in the dashboard (driver's side) is activated.
The ESP/ASR is deactivated.
ESP: electronic stability programme
ASR: anti-slip regulation.Pr
ess the button to activate the ESP/ASR.
The ESP/ASR system is automatically activated on star ting the vehicle.