Page 231 of 652

WARNING! (Continued)
•Before using the ParkSense�Rear Park Assist
System, it is strongly recommended that the ball
mount and hitch ball assembly is disconnected
from the vehicle when the vehicle is not used for
towing. Failure to do so can result in injury or
damage to vehicles or obstacles because the hitch
ball will be much closer to the obstacle than the
rear fascia when the warning display turns on the
single flashing arc and sounds the continuous
tone. Also, the sensors could detect the ball mount
and hitch ball assembly, depending on its size and
shape, giving a false indication that an obstacle is
behind the vehicle.
PARKVIEW� REAR BACK UP CAMERA — IF
EQUIPPED
Your vehicle may be equipped with the ParkView� Rear
Back Up Camera that allows you to see an on-screen
image of the rear surroundings of your vehicle whenever
the shift lever is put into REVERSE. The image will be
displayed on the Navigation/Multimedia radio display
screen along with a caution note to “check entire sur-
roundings” across the top of the screen. After five sec-
onds this note will disappear. The ParkView� camera is
located on the rear of the vehicle above the rear License
plate.
When the vehicle is shifted out of REVERSE, the rear
camera mode is exited and the navigation or audio screen
appears again.
3
UNDERSTANDING THE FEATURES OF YOUR VEHICLE 229
Page 240 of 652
Before You Begin Programming HomeLink�
Be sure that your vehicle is parked outside of the garage
before you begin programming.
For more efficient programming and accurate transmis-
sion of the radio-frequency signal it is recommended that
a new battery be placed in the hand-held transmitter of
the device that is being programmed to the HomeLink�
system.
Erase all channels before you begin programming. To
erase the channels place the ignition in the ON/RUN
position and press and hold the two outside HomeLink�
buttons (I and III) for up 20 seconds or until the red
indicator flashes.NOTE:•Erasing all channels should only be performed when
programming HomeLink�
for the first time. Do not
erase channels when programming additional buttons.
•If you have any problems, or require assistance, please
call toll-free 1–800–355–3515 or, on the Internet at
www.HomeLink.com for information or assistance.
Programming A Rolling Code
For programming garage door openers that were manu-
factured after 1995. These garage door openers can be
identified by the “LEARN” or “TRAIN” button located
where the hanging antenna is attached to the garage door
opener. It is NOT the button that is normally used to
open and close the door. The name and color of the
button may vary by manufacturer.
238 UNDERSTANDING THE FEATURES OF YOUR VEHICLE
Page 310 of 652
•Key not programmed
•Vehicle Not in Park
•Key Left Vehicle
•Key Not Detected
•Press Brake Pedal and Push Button to Start
•Door(s) Ajar (with a single chime, if vehicle is in
motion)
•Liftgate Ajar (chime will sound when vehicle starts
moving)
•Low Tire Pressure
•Service TPM System (refer to “Tire Pressure Monitor-
ing System” in “Starting And Operating”)
•Turn Signal On
•RKE Battery Low
•Service Keyless System
•LOW WASHER FLUID
•Oil Change Required
•Check Gascap
•Left Front Turn Signal Light Out
•Left Rear Turn Signal Light Out
•Right Front Turn Signal Light Out
•Right Rear Turn Signal Light Out
•Park Assist Disabled
•Service Park Assist System
•Personal Settings Not Available — Vehicle Not in Park
•Blind Spot System Off — This message is displayed
when the ignition is turned to ON to indicate the Blind
Spot System has been turned off.
308 UNDERSTANDING YOUR INSTRUMENT PANEL
Page 323 of 652
Press and release the UP or DOWN button until�System
Setup� is highlighted in the main menu of the EVIC. Then
press the SELECT button to enter the System Setup
sub-menu. Press and release the UP or DOWN button to
select a feature form the following choices:
Language
When in this display you may select one of five lan-
guages for all display nomenclature, including the trip
functions and the navigation system (if equipped). Press
the UP or DOWN button while in this display and scroll
through the language choices. Press the SELECT button
to select English, Spanish (Español), French (Français).
Then, as you continue, the information will display in the
selected language.
Nav–Turn By Turn
When this feature is selected, the navigation system
utilizes voice commands, guiding through the drive route, mile by mile, turn-by-turn until the final destina-
tion is reached. To make your selection, press and release
the SELECT button until a check-mark appears next to
the feature showing the system has been activated or the
check-mark is removed showing the system has been
deactivated.
Enable/Disable the Rear Park Assist System
The Rear Park Assist system will scan for objects behind
the vehicle when the transmission is in the REVERSE
position and the vehicle speed is less than 11 mph
(18 km/h). The system can be enabled with Sound Only,
Sound and Display, or turned OFF through the EVIC. To
make your selection, press and release the SELECT
button until a check-mark appears next to the feature
showing the system has been activated or the check-mark
is removed showing the system has been deactivated.
Refer to “Rear Park Assist System” in “Understanding
The Features Of Your Vehicle” for system function and
operating information.4
UNDERSTANDING YOUR INSTRUMENT PANEL 321
Page 424 of 652
�Driving Through Water ................. 444
▫ Flowing/Rising Water ................. 444
▫ Shallow Standing Water ............... 444
� Power Steering ....................... 446
▫ Power Steering Fluid Check ............. 447
� Parking Brake ........................ 447
� Anti-Lock Brake System (ABS) ............ 450
▫ Anti-Lock Brake Warning Light .......... 451
� Electronic Brake Control System ........... 452
▫ Traction Control System (TCS) ........... 452
▫ Brake Assist System (BAS) .............. 453
▫ Electronic Stability Control (ESC) ......... 454
▫ Hill Start Assist (HSA) ................ 457 �
Tire Safety Information ................. 460
▫ Tire Markings ....................... 460
▫ Tire Identification Number (TIN) ......... 464
▫ Tire Terminology And Definitions ......... 465
▫ Tire Loading And Tire Pressure .......... 466
� Tires — General Information ............. 470
▫ Tire Pressure ....................... 470
▫ Tire Inflation Pressures ................ 471
▫ Tire Pressures For High-Speed Operation . . . 472
▫ Radial-Ply Tires ..................... 473
▫ Spare Tire Matching Original Equipped Tire
And Wheel – If Equipped .............. 473
▫ Compact Spare Tire – If Equipped ........ 474
422 STARTING AND OPERATING
Page 448 of 652
POWER STEERING
The standard power steering system will give you good
vehicle response and increased ease of maneuverability
in tight spaces. The system will provide mechanical
steering capability if power assist is lost.
If for some reason the power assist is interrupted, it will
still be possible to steer your vehicle. Under these condi-
tions, you will observe a substantial increase in steering
effort, especially at very low vehicle speeds and during
parking maneuvers.
NOTE:
•Increased noise levels at the end of the steering wheel
travel are considered normal and do not indicate that
there is a problem with the power steering system.
•Upon initial start-up in cold weather, the power steer-
ing pump may make noise for a short amount of time.
This is due to the cold, thick fluid in the steering
system. This noise should be considered normal, and it
does not in any way damage the steering system.
WARNING!
Continued operation with reduced power steering
assist could pose a safety risk to yourself and others.
Service should be obtained as soon as possible.
CAUTION!
Prolonged operation of the steering system at the end
of the steering wheel travel will increase the steering
fluid temperature and it should be avoided when
possible. Damage to the power steering pump may
occur.
446 STARTING AND OPERATING
Page 496 of 652
CAUTION! (Continued)
•An out-of-tune engine or certain fuel or ignition
malfunctions can cause the catalytic converter to
overheat. If you notice a pungent burning odor or
some light smoke, your engine may be out of tune
or malfunctioning and may require immediate
service. Contact your authorized dealer for service
assistance.
•The use of fuel additives, which are now being
sold as octane enhancers, is not recommended.
Most of these products contain high concentra-
tions of methanol. Fuel system damage or vehicle
performance problems resulting from the use of
such fuels or additives is not the responsibility of
the manufacturer.
NOTE: Intentional tampering with the emissions con-
trol system can result in civil penalties being assessed
against you.
Carbon Monoxide Warnings
WARNING!
Carbon monoxide (CO) in exhaust gases is deadly.
Follow the precautions below to prevent carbon
monoxide poisoning:
•Do not inhale exhaust gases. They contain carbon
monoxide, a colorless and odorless gas, which can
kill. Never run the engine in a closed area, such as
a garage, and never sit in a parked vehicle with the
engine running for an extended period. If the
vehicle is stopped in an open area with the engine
running for more than a short period, adjust the
ventilation system to force fresh, outside air into
the vehicle.
(Continued)
494 STARTING AND OPERATING
Page 594 of 652
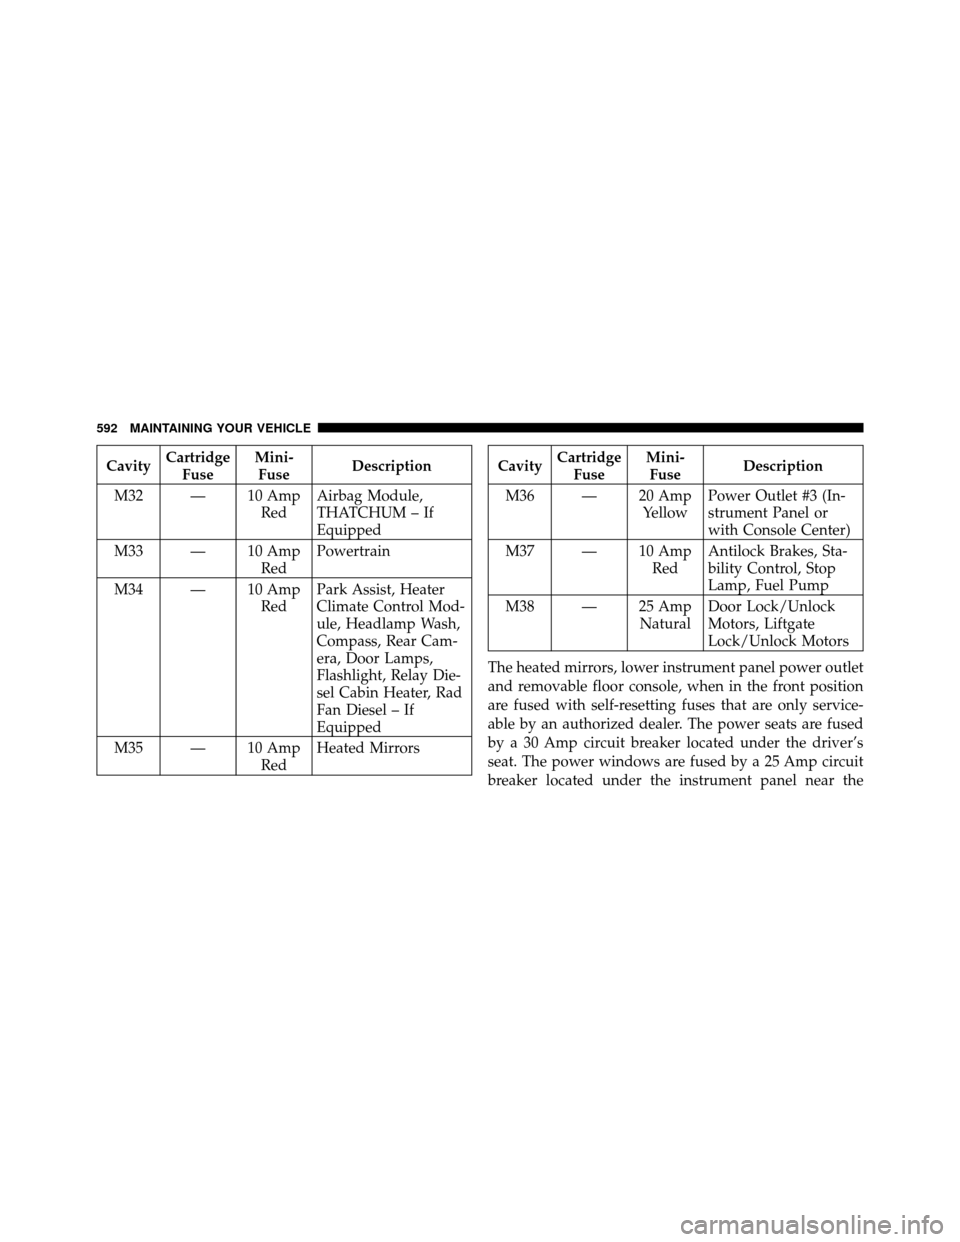
CavityCartridge
Fuse Mini-
Fuse Description
M32 — 10 Amp RedAirbag Module,
THATCHUM – If
Equipped
M33 — 10 Amp RedPowertrain
M34 — 10 Amp RedPark Assist, Heater
Climate Control Mod-
ule, Headlamp Wash,
Compass, Rear Cam-
era, Door Lamps,
Flashlight, Relay Die-
sel Cabin Heater, Rad
Fan Diesel – If
Equipped
M35 — 10 Amp RedHeated MirrorsCavity
Cartridge
Fuse Mini-
Fuse Description
M36 — 20 Amp YellowPower Outlet #3 (In-
strument Panel or
with Console Center)
M37 — 10 Amp RedAntilock Brakes, Sta-
bility Control, Stop
Lamp, Fuel Pump
M38 — 25 Amp NaturalDoor Lock/Unlock
Motors, Liftgate
Lock/Unlock Motors
The heated mirrors, lower instrument panel power outlet
and removable floor console, when in the front position
are fused with self-resetting fuses that are only service-
able by an authorized dealer. The power seats are fused
by a 30 Amp circuit breaker located under the driver’s
seat. The power windows are fused by a 25 Amp circuit
breaker located under the instrument panel near the
592 MAINTAINING YOUR VEHICLE