Page 159 of 557
NOTE:
1. Only available with Navigation equipped vehicles.
2. You can replace “Player” with “Radio”, “Navigation”,
“Phone”, “Climate”, “More” or “Settings”.
3. Navigation commands only work if equipped with
Navigation.
4. Available Voice Commands are shown in bold face
and shaded grey.
3
UNDERSTANDING THE FEATURES OF YOUR VEHICLE 157
Page 176 of 557

WARNING!
•Be certain that the seatback is securely locked into
position. If the seatback is not securely locked into
position, the seat will not provide the proper
stability for child seats and/or passengers. An
improperly latched seat could cause serious injury.
•The cargo area in the rear of the vehicle (with the
rear seatbacks in the locked-up or folded down
position) should not be used as a play area by
children when the vehicle is in motion. They could
be seriously injured in a collision. Children
should be seated and using the proper restraint
system.
DRIVER MEMORY SEAT — IF EQUIPPED
This feature allows the driver to store up to two different
memory profiles for easy recall through a memory
switch. Each memory profile contains desired position
settings for the driver seat, side mirrors, adjustable
pedals (if equipped), and power tilt and telescopic steer-
ing column (if equipped) and a set of desired radio
station presets. Your Remote Keyless Entry (RKE) trans-
mitter can also be programmed to recall the same posi-
tions when the UNLOCK button is pressed.
NOTE:
•Only one RKE transmitter can be linked to each of the
memory positions.
•Passive Entry door handles cannot be linked to the
memory function. Use either the memory recall switch
or the RKE transmitter (if linked to the memory
feature) to recall memory positions 1 or 2.
174 UNDERSTANDING THE FEATURES OF YOUR VEHICLE
Page 177 of 557
The memory seat switch is located on the driver ’s door
trim panel. The switch consists of three buttons: The (S)
button, which is used to activate the memory save
function and the (1) and (2) buttons which are used to
recall either of two pre-programmed memory profiles.Programming The Memory Feature
To create a new memory profile, perform the following:
1. Place the ignition into the RUN position.
2.
Adjust all memory profile settings to desired prefer-
ences (i.e., seat, side mirror, adjustable pedals [if equipped],
power tilt and telescopic steering column [if equipped],
and radio station presets).
3. Press and release the S (Set) button on the memory
switch.
4. Within five seconds, press and release either of the
memory buttons (1) or (2). The Electronic Vehicle Infor-
mation Center (EVIC) will display which memory posi-
tion has been set.
Memory Seat Switch
3
UNDERSTANDING THE FEATURES OF YOUR VEHICLE 175
Page 193 of 557
Dome Light Position
Rotate the dimmer control completely upward to the
second detent to turn on the interior lights. The interior
lights will remain on when the dimmer control is in this
position.
Interior Light Defeat (OFF)
Rotate the dimmer control to the extreme bottom OFF
position. The interior lights will remain off when the
doors are open.
Parade Mode (Daytime Brightness Feature)
Rotate the dimmer control upward to the first detent.
This feature brightens all text displays such as the
odometer, EVIC (if equipped), and radio when the park-
ing lights or headlights are on.
WINDSHIELD WIPERS AND WASHERS
The multifunction lever operates the windshield wipers
and washer when the ignition is placed in the RUN
position. The multifunction lever is located on the left
side of the steering column.
Windshield Wiper/Washer Control
3
UNDERSTANDING THE FEATURES OF YOUR VEHICLE 191
Page 243 of 557

PARKVIEW�REAR BACK UP CAMERA — IF
EQUIPPED
Your vehicle may be equipped with the ParkView� Rear
Back Up Camera that allows you to see an on-screen
image of the rear surroundings of your vehicle whenever
the shift lever is put into REVERSE. The image will be
displayed on the radio touchscreen display along with a
caution note to “check entire surroundings” across the
top of the screen. After five seconds this note will
disappear. The ParkView� camera is located on the rear
of the vehicle above the rear License plate. When the vehicle is shifted out of REVERSE, the rear
camera mode is exited and the navigation or audio screen
appears again.
When displayed, static grid lines will illustrate the width
of the vehicle while a dashed center-line will indicate the
center of the vehicle to assist with parking or aligning to
a hitch/receiver. The static grid lines will show separate
zones that will help indicate the distance to the rear of the
vehicle. The following table shows the approximate
distances for each zone:
Zone
Distance to the rear of the vehicle
Red 0 - 1 ft (0 - 30 cm)
Yellow 1 ft - 3 ft (30 cm - 1 m)
Green 3 ft or greater (1 m or greater)
3
UNDERSTANDING THE FEATURES OF YOUR VEHICLE 241
Page 245 of 557
Turning ParkView�On Or Off — With Touch
Screen Radio
1. Turn the Radio on.
2. Press the “More” soft-key.
3. Press the “Settings” soft-key.
4. Press the “Safety & Driving Assistance” soft-key.
5. Press the check box soft key next to “Parkview �
Backup Camera” to enable/disable.
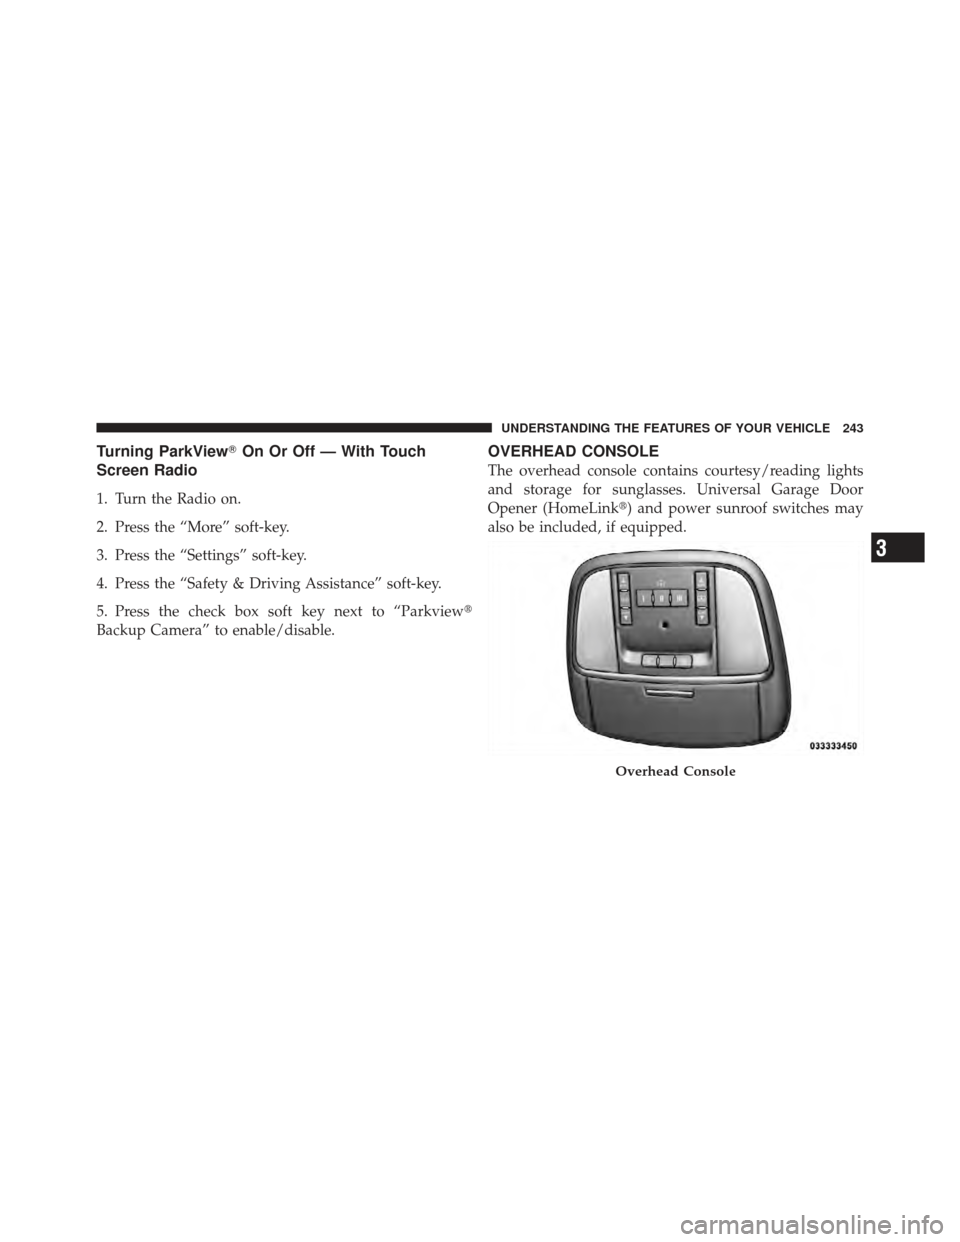
OVERHEAD CONSOLE
The overhead console contains courtesy/reading lights
and storage for sunglasses. Universal Garage Door
Opener (HomeLink�) and power sunroof switches may
also be included, if equipped.
Overhead Console
3
UNDERSTANDING THE FEATURES OF YOUR VEHICLE 243
Page 249 of 557
Before You Begin Programming HomeLink�
Be sure that your vehicle is parked outside of the garage
before you begin programming.
For more efficient programming and accurate transmis-
sion of the radio-frequency signal it is recommended that
a new battery be placed in the hand-held transmitter of
the device that is being programmed to the HomeLink �
system.
Erase all channels before you begin programming. To
erase the channels place the ignition in the ON/RUN
position and press and hold the two outside HomeLink �
buttons (I and III) for up 20 seconds or until the red
indicator flashes. NOTE:•Erasing all channels should only be performed when
programming HomeLink�
for the first time. Do not
erase channels when programming additional buttons.
•If you have any problems, or require assistance, please
call toll-free 1–800–355–3515 or, on the Internet at
www.HomeLink.com for information or assistance.3
UNDERSTANDING THE FEATURES OF YOUR VEHICLE 247
Page 253 of 557

Reprogramming A Single HomeLink�Button
To reprogram a channel that has been previously trained,
follow these steps:
1. Turn the ignition switch to the ON/RUN position.
2. Press and hold the desired HomeLink� button until
the indicator light begins to flash after 20 seconds. Do not
release the button.
3. Without releasing the button proceed with “Program-
ming A Non-Rolling Code” Step 2 and follow all remain-
ing steps.
Canadian/Gate Operator Programming
For programming transmitters in Canada/United States
that require the transmitter signals to “time-out” after
several seconds of transmission.
Canadian radio frequency laws require transmitter sig-
nals to time-out (or quit) after several seconds of trans-
mission – which may not be long enough for HomeLink �to pick up the signal during programming. Similar to this
Canadian law, some U.S. gate operators are designed to
time-out in the same manner.
It may be helpful to unplug the device during the cycling
process to prevent possible overheating of the garage
door or gate motor.
1. Turn the ignition switch to the ON/RUN position.
2. Place the hand-held transmitter 1 to 3 in (3 to 8 cm)
away from the HomeLink�
button you wish to program
while keeping the HomeLink� indicator light in view.
3. Continue to press and hold the HomeLink� button,
while you press and release (“cycle”), your hand-held
transmitter every two seconds until HomeLink �has
successfully accepted the frequency signal. The indicator
light will flash slowly and then rapidly when fully
trained.
3
UNDERSTANDING THE FEATURES OF YOUR VEHICLE 251


button, which is used to activate the memory save
function and the (1) and (2) butto")