2012 CHEVROLET SUBURBAN automatic transmission
[x] Cancel search: automatic transmissionPage 1 of 514

Black plate (1,1)Chevrolet Tahoe/Suburban Owner Manual - 2012
2012 Chevrolet Tahoe/Suburban Owner ManualM
In Brief. . . . . . . . . . . . . . . . . . . . . . . . 1-1
Instrument Panel . . . . . . . . . . . . . . 1-2
Initial Drive Information . . . . . . . . 1-4
Vehicle Features . . . . . . . . . . . . . 1-20
Performance and Maintenance . . . . . . . . . . . . . . . . 1-26
Keys, Doors, and Windows . . . . . . . . . . . . . . . . . . . . 2-1
Keys and Locks . . . . . . . . . . . . . . . 2-2
Doors . . . . . . . . . . . . . . . . . . . . . . . . . . 2-9
Vehicle Security . . . . . . . . . . . . . . 2-13
Exterior Mirrors . . . . . . . . . . . . . . . 2-16
Interior Mirrors . . . . . . . . . . . . . . . . 2-19
Windows . . . . . . . . . . . . . . . . . . . . . 2-20
Roof . . . . . . . . . . . . . . . . . . . . . . . . . . 2-22
Seats and Restraints . . . . . . . . . 3-1
Head Restraints . . . . . . . . . . . . . . . 3-2
Front Seats . . . . . . . . . . . . . . . . . . . . 3-3
Rear Seats . . . . . . . . . . . . . . . . . . . 3-10
Safety Belts . . . . . . . . . . . . . . . . . . 3-19
Airbag System . . . . . . . . . . . . . . . . 3-29
Child Restraints . . . . . . . . . . . . . . 3-45 Storage
. . . . . . . . . . . . . . . . . . . . . . . 4-1
Storage Compartments . . . . . . . . 4-1
Additional Storage Features . . . 4-2
Roof Rack System . . . . . . . . . . . . . 4-3
Instruments and Controls . . . . 5-1
Controls . . . . . . . . . . . . . . . . . . . . . . . 5-2
Warning Lights, Gauges, and
Indicators . . . . . . . . . . . . . . . . . . . 5-10
Information Displays . . . . . . . . . . 5-26
Vehicle Messages . . . . . . . . . . . . 5-35
Vehicle Personalization . . . . . . . 5-45
Universal Remote System . . . . 5-53
Lighting . . . . . . . . . . . . . . . . . . . . . . . 6-1
Exterior Lighting . . . . . . . . . . . . . . . 6-1
Interior Lighting . . . . . . . . . . . . . . . . 6-7
Lighting Features . . . . . . . . . . . . . . 6-8
Infotainment System . . . . . . . . . 7-1
Introduction . . . . . . . . . . . . . . . . . . . . 7-1
Radio . . . . . . . . . . . . . . . . . . . . . . . . . . 7-8
Audio Players . . . . . . . . . . . . . . . . 7-14 Rear Seat Infotainment . . . . . . . 7-35
Phone . . . . . . . . . . . . . . . . . . . . . . . . 7-47
Trademarks and License
Agreements . . . . . . . . . . . . . . . . . 7-54
Climate Controls . . . . . . . . . . . . . 8-1
Climate Control Systems . . . . . . 8-1
Air Vents . . . . . . . . . . . . . . . . . . . . . 8-13
Driving and Operating . . . . . . . . 9-1
Driving Information . . . . . . . . . . . . . 9-2
Starting and Operating . . . . . . . 9-21
Engine Exhaust . . . . . . . . . . . . . . 9-29
Automatic Transmission . . . . . . 9-31
Drive Systems . . . . . . . . . . . . . . . . 9-36
Brakes . . . . . . . . . . . . . . . . . . . . . . . 9-43
Ride Control Systems . . . . . . . . 9-45
Cruise Control . . . . . . . . . . . . . . . . 9-49
Object Detection Systems . . . . 9-51
Fuel . . . . . . . . . . . . . . . . . . . . . . . . . . 9-60
Towing . . . . . . . . . . . . . . . . . . . . . . . 9-65
Conversions and Add-Ons . . . 9-85
Page 9 of 514

Black plate (3,1)Chevrolet Tahoe/Suburban Owner Manual - 2012
In Brief 1-3
A.Air Vents on page 8‑13.
B. Turn and Lane‐Change Lever. See Turn and Lane-Change
Signals on page 6‑5.
Windshield Wiper/Washer on
page 5‑5.
Rear Window Wiper/Washer on
page 5‑5.
C. Instrument Cluster on
page 5‑11.
D. Hazard Warning Flashers on
page 6‑5 (Out of View).
E. Shift Lever. See Automatic
Transmission on page 9‑31.
F. Manual Mode on page 9‑34
(If Equipped).
Tow/Haul Mode on page 9‑35
(If Equipped).
G. Driver Information Center (DIC) Buttons. See Driver Information
Center (DIC) on page 5‑26.
H. Infotainment on page 7‑1.
I. Exterior Lamp Controls on
page 6‑1. J.
Dome Lamps on page 6‑7.
Instrument Panel Illumination
Control on page 6‑7.
Fog Lamps on page 6‑6
(If Equipped).
K. Hood Release. See Hood on
page 10‑5.
L. Integrated Trailer Brake Controller (If Equipped). See
Towing Equipment on
page 9‑75.
M. Data Link Connector (DLC) (Out of View). See Malfunction
Indicator Lamp on page 5‑18.
N. Automatic Transfer Case Control (If Equipped). See
Four-Wheel Drive (Two Speed
Automatic Transfer Case) on
page 9‑36 orFour-Wheel Drive
(Single Speed Automatic
Transfer Case) on page 9‑41.
O. Cruise Control on page 9‑49.
P. Steering Wheel Adjustment on
page 5‑2. Q.
Horn on page 5‑4.
R. Steering Wheel Controls on
page 5‑2.
S. Climate Control Systems on
page 8‑1 (If Equipped).
Dual Automatic Climate Control
System on page 8‑4
(If Equipped).
T. Power Outlets on page 5‑8.
U. StabiliTrak
®System on
page 9‑45 (If Equipped).
Pedal Adjust Button
(If Equipped). See Adjustable
Throttle and Brake Pedal on
page 9‑22.
Ultrasonic Parking Assist on
page 9‑51 (If Equipped).
Power Assist Steps on
page 2‑13 (If Equipped).
Page 24 of 514
Black plate (18,1)Chevrolet Tahoe/Suburban Owner Manual - 2012
1-18 In Brief
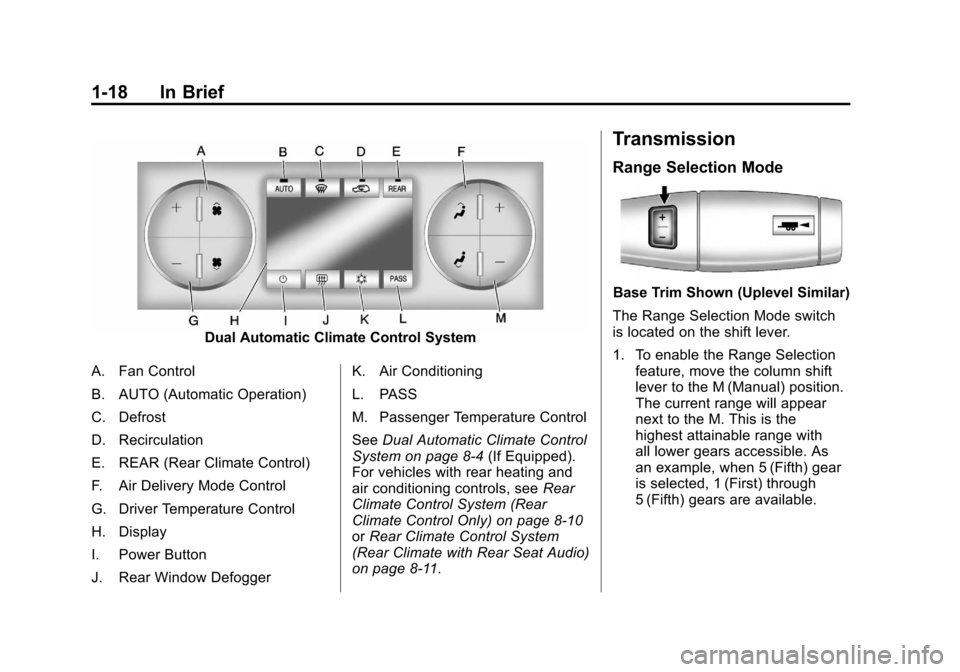
Dual Automatic Climate Control System
A. Fan Control
B. AUTO (Automatic Operation)
C. Defrost
D. Recirculation
E. REAR (Rear Climate Control)
F. Air Delivery Mode Control
G. Driver Temperature Control
H. Display
I. Power Button
J. Rear Window Defogger K. Air Conditioning
L. PASS
M. Passenger Temperature Control
See
Dual Automatic Climate Control
System on page 8‑4 (If Equipped).
For vehicles with rear heating and
air conditioning controls, see Rear
Climate Control System (Rear
Climate Control Only) on page 8‑10
or Rear Climate Control System
(Rear Climate with Rear Seat Audio)
on page 8‑11.
Transmission
Range Selection Mode
Base Trim Shown (Uplevel Similar)
The Range Selection Mode switch
is located on the shift lever.
1. To enable the Range Selection feature, move the column shift
lever to the M (Manual) position.
The current range will appear
next to the M. This is the
highest attainable range with
all lower gears accessible. As
an example, when 5 (Fifth) gear
is selected, 1 (First) through
5 (Fifth) gears are available.
Page 70 of 514
Black plate (14,1)Chevrolet Tahoe/Suburban Owner Manual - 2012
3-14 Seats and Restraints
Automatic Fold and Tumble
Feature
The transmission must be in
P (Park) for this feature to work.
{WARNING
Automatically folding and
tumbling the seat when someone
is sitting in the seat, could cause
injury to the person sitting there.
Always make sure there is no one
sitting in the seat before pressing
the automatic seat release button.Folding and Tumbling the Second
Row Seat from the Third Row Seat
or Outside the Vehicle
{WARNING
Using the third row seating
position while the second row is
folded, or folded and tumbled,
could cause injury in a sudden
stop or crash. Be sure to return
the seat to the passenger seating
position. Push and pull on the
seat to make sure it is locked into
place.To fold and tumble the seat from the
third row seat, if equipped:
1. Make sure that there is nothing
under, in front of, or on the seat.
Notice: Folding a rear seat with
the safety belts still fastened may
cause damage to the seat or the
safety belts. Always unbuckle the
safety belts and return them to
their normal stowed position
before folding a rear seat.
Page 155 of 514
Black plate (29,1)Chevrolet Tahoe/Suburban Owner Manual - 2012
Instruments and Controls 5-29
To stop the timer, press the set/reset
button briefly while TIMER is
displayed.
To reset the timer to zero, press and
hold the set/reset button while
TIMER is displayed.
Transmission Temperature
Press the trip/fuel button until
TRANS TEMP displays. This
display shows the temperature of
the automatic transmission fluid in
either degrees Celsius (°C) or
degrees Fahrenheit (°F).
Instantaneous Economy and
Active Fuel Management™
Indicator
If your vehicle has this display,
press the trip/fuel button until INST
ECON V8 displays. This display
shows the current fuel economy at a
particular moment and will changefrequently as driving conditions
change. This display shows the
instantaneous fuel economy in liters
per 100 kilometers (L/100 km) or
miles per gallon (mpg). Unlike
average economy, this screen
cannot be reset.
An Active Fuel Management
indicator will display on the right
side of the DIC, while INST ECON
displays on the left side. Active Fuel
Management allows the engine to
operate on either four or eight
cylinders, depending on your
driving demands. When Active
Fuel Management is active, V4 will
display on the DIC. When Active
Fuel Management is inactive,
V8 will display. See
Active Fuel
Management
®on page 9‑28 for
more information.
Blank Display
This display shows no information.
Vehicle Information Menu
Items (With DIC Buttons)
T(Vehicle Information): Press
to scroll through the following menu
items:
Oil Life
Press the vehicle information
button until OIL LIFE REMAINING
displays. This display shows an
estimate of the oil's remaining
useful life. If you see 99% OIL LIFE
REMAINING on the display, that
means 99% of the current oil life
remains. The engine oil life system
will alert you to change the oil on a
schedule consistent with your
driving conditions.
When the remaining oil life is low,
the CHANGE ENGINE OIL SOON
message will appear on the display.
See “CHANGE ENGINE OIL SOON”
under Engine Oil Messages on
page 5‑38. You should change
the oil as soon as you can.
See Engine Oil on page 10‑7.
Page 159 of 514
Black plate (33,1)Chevrolet Tahoe/Suburban Owner Manual - 2012
Instruments and Controls 5-33
4. Once the desired language isdisplayed, release the trip
odometer reset stem to set your
choice.
Trip Odometer
Press the trip odometer reset
stem until TRIP displays. This
display shows the current distance
traveled in either kilometers (km) or
miles (mi) since the last reset for the
trip odometer.
The trip odometer can be reset to
zero by pressing and holding the trip
odometer reset stem while the trip
odometer is displayed.
The trip odometer has a feature
called the retroactive reset. This can
be used to set the trip odometer to
the number of kilometers (miles)
driven since the ignition was last
turned on. This can be used if the
trip odometer is not reset at the
beginning of the trip.
To use the retroactive reset feature,
press and hold the trip odometer
reset stem for at least four seconds. The trip odometer will display the
number of kilometers (km) or
miles (mi) driven since the ignition
was last turned on and the vehicle
was moving. Once the vehicle
begins moving, the trip odometer
will accumulate mileage. For
example, if the vehicle was driven
8 km (5 miles) before it is started
again, and then the retroactive reset
feature is activated, the display will
show 8 km (5 miles). As the vehicle
begins moving, the display will then
increase to 8.2 km (5.1 miles),
8.4 km (5.2 miles), etc.
Transmission Temperature
Press the trip odometer reset stem
until TRANS TEMP displays. This
display shows the temperature of
the automatic transmission fluid in
either degrees Celsius (°C) or
degrees Fahrenheit (°F).
Trailer Gain and Output
On vehicles with the Integrated
Trailer Brake Control (ITBC) system,
the trailer brake display appears in
the DIC. Press the trip odometer
reset stem until TRAILER GAIN and
OUTPUT display.
TRAILER GAIN shows the trailer
gain setting. This setting can be
adjusted from 0.0 to 10.0 with
either a trailer connected or
disconnected. To adjust this setting,
see
“Integrated Trailer Brake Control
System” underTowing Equipment
on page 9‑75 for more information.
OUTPUT shows the power output
to the trailer anytime a trailer with
electric brakes is connected. Output
is displayed in 0 to 10 bars. Dashes
may appear in the OUTPUT display.
See “Integrated Trailer Brake
Control System” underTowing
Equipment on page 9‑75 for more
information.
Page 187 of 514
Black plate (3,1)Chevrolet Tahoe/Suburban Owner Manual - 2012
Lighting 6-3
When the high beams are on, this
indicator light on the instrument
panel cluster will also be on.
Flash-to-Pass
This feature lets you use the
high-beam headlamps to signal
a driver in front of you that you
want to pass. It works even if the
headlamps are in the automatic
position.
To use it, pull the turn signal lever
toward you, then release it.
If the headlamps are in the
automatic position or on low beam,
the high-beam headlamps will
turn on. They will stay on as long
as you hold the lever toward you.The high-beam indicator on the
instrument panel cluster will come
on. Release the lever to return to
normal operation.
Daytime Running
Lamps (DRL)
Daytime Running Lamps (DRL) can
make it easier for others to see the
front of your vehicle during the day.
Fully functional daytime running
lamps are required on all vehicles
first sold in Canada.
The DRL system comes on when
the following conditions are met:
.The ignition is on.
.The exterior lamps control is
in AUTO.
.The transmission is not in Park.
.The light sensor determines it is
daytime.
When the DRL system is on,
only the DRL lamps are on. The
taillamps, sidemarker, instrument
panel lights, and other lamps will not
be on.
When it begins to get dark, the
automatic headlamp system
switches from DRL to the
headlamps.
To turn off the DRL lamps, turn the
exterior lamps control to the OFF
position and then release. For
vehicles first sold in Canada, the
transmission must be in the P (Park)
position before the DRL lamps can
be turned off.
Automatic Headlamp
System
When it is dark enough outside, the
automatic headlamp system turns
on the headlamps at the normal
brightness, along with the taillamps,
sidemarker, parking lamps, and the
instrument panel lights. The radio
lights will also be dim.
Page 188 of 514
Black plate (4,1)Chevrolet Tahoe/Suburban Owner Manual - 2012
6-4 Lighting
To turn off the automatic headlamp
system, turn the exterior lamps
switch to the off position and then
release it. For vehicles first sold in
Canada, the transmission must be
in the P (Park) position before the
automatic headlamp system can be
turned off.
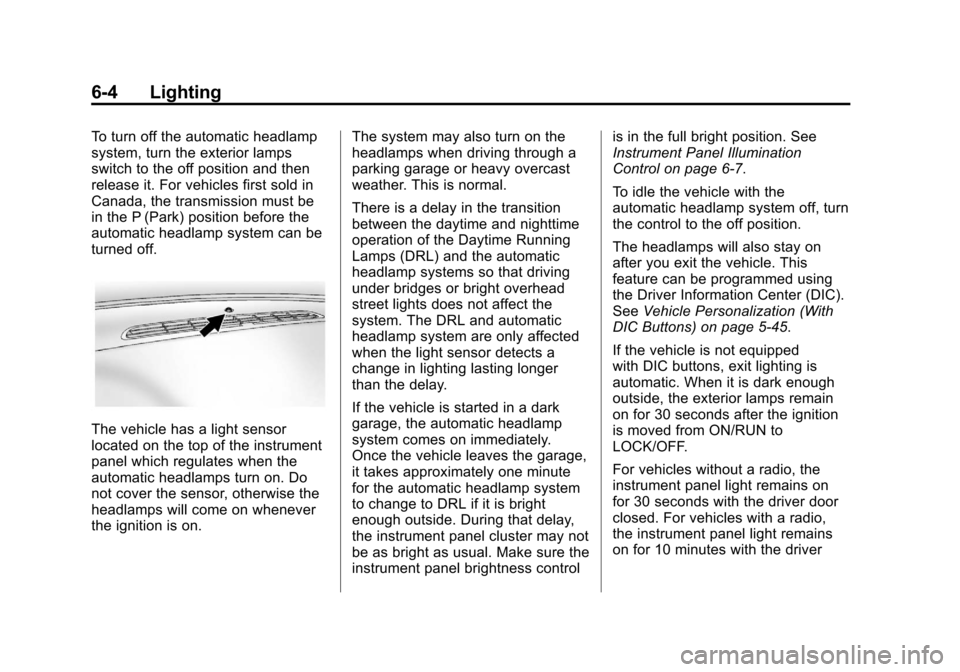
The vehicle has a light sensor
located on the top of the instrument
panel which regulates when the
automatic headlamps turn on. Do
not cover the sensor, otherwise the
headlamps will come on whenever
the ignition is on.The system may also turn on the
headlamps when driving through a
parking garage or heavy overcast
weather. This is normal.
There is a delay in the transition
between the daytime and nighttime
operation of the Daytime Running
Lamps (DRL) and the automatic
headlamp systems so that driving
under bridges or bright overhead
street lights does not affect the
system. The DRL and automatic
headlamp system are only affected
when the light sensor detects a
change in lighting lasting longer
than the delay.
If the vehicle is started in a dark
garage, the automatic headlamp
system comes on immediately.
Once the vehicle leaves the garage,
it takes approximately one minute
for the automatic headlamp system
to change to DRL if it is bright
enough outside. During that delay,
the instrument panel cluster may not
be as bright as usual. Make sure the
instrument panel brightness controlis in the full bright position. See
Instrument Panel Illumination
Control on page 6‑7.
To idle the vehicle with the
automatic headlamp system off, turn
the control to the off position.
The headlamps will also stay on
after you exit the vehicle. This
feature can be programmed using
the Driver Information Center (DIC).
See
Vehicle Personalization (With
DIC Buttons) on page 5‑45.
If the vehicle is not equipped
with DIC buttons, exit lighting is
automatic. When it is dark enough
outside, the exterior lamps remain
on for 30 seconds after the ignition
is moved from ON/RUN to
LOCK/OFF.
For vehicles without a radio, the
instrument panel light remains on
for 30 seconds with the driver door
closed. For vehicles with a radio,
the instrument panel light remains
on for 10 minutes with the driver