2012 CHEVROLET SILVERADO parking brake
[x] Cancel search: parking brakePage 486 of 584
Black plate (80,1)Chevrolet Silverado Owner Manual - 2012
10-80 Vehicle Care
{WARNING
Changing a tire can be
dangerous. The vehicle can slip
off the jack and roll over or fall
causing injury or death. Find a
level place to change the tire.
To help prevent the vehicle from
moving:1. Set the parking brake firmly.
2. Put an automatic transmission in P (Park) or
a manual transmission in
1 (First) or R (Reverse).
3. For four-wheel-drive vehicles, be sure the
transfer case is in a drive
gear –not in N (Neutral).
4. Turn off the engine and do not restart while the
vehicle is raised.
(Continued)
WARNING (Continued)
5. Do not allow passengers toremain in the vehicle.
6. Place wheel blocks on both sides of the tire at the
opposite corner of the tire
being changed.
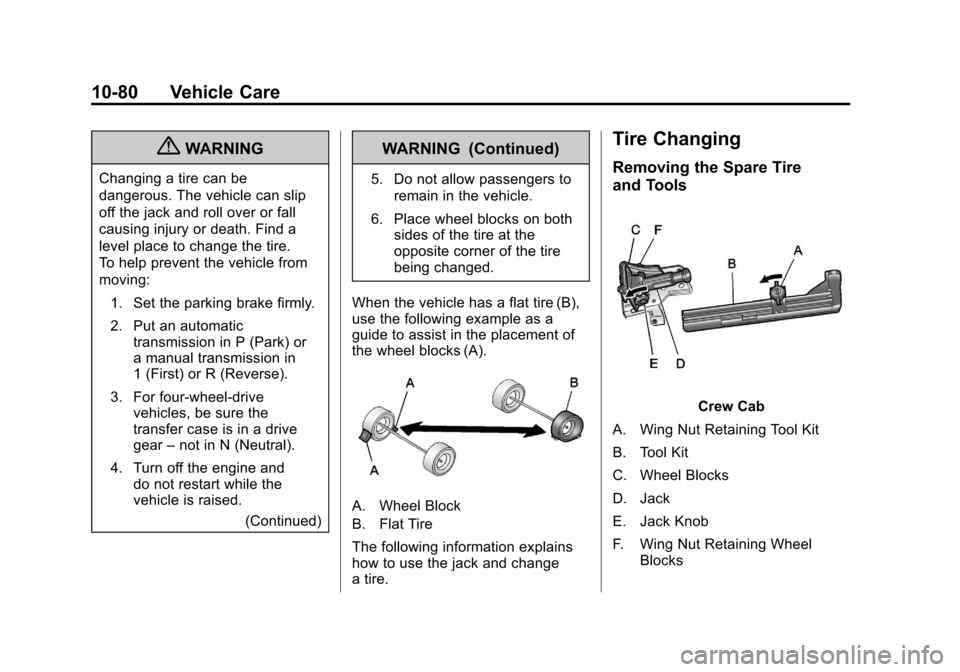
When the vehicle has a flat tire (B),
use the following example as a
guide to assist in the placement of
the wheel blocks (A).
A. Wheel Block
B. Flat Tire
The following information explains
how to use the jack and change
a tire.
Tire Changing
Removing the Spare Tire
and Tools
Crew Cab
A. Wing Nut Retaining Tool Kit
B. Tool Kit
C. Wheel Blocks
D. Jack
E. Jack Knob
F. Wing Nut Retaining Wheel Blocks
Page 499 of 584
Black plate (93,1)Chevrolet Silverado Owner Manual - 2012
Vehicle Care 10-93
3. Get the vehicles close enoughso the jumper cables can reach,
but be sure the vehicles are not
touching each other. If they are,
it could cause an unwanted
ground connection. You would
not be able to start your vehicle,
and the bad grounding could
damage the electrical systems.
To avoid the possibility of the
vehicles rolling, set the parking
brake firmly on both vehicles
involved in the jump start
procedure. Put the automatic
transmission in P (Park) or a
manual transmission in Neutral
before setting the parking brake.
If you have a four-wheel-drive
vehicle, be sure the transfer
case is in a drive gear, not in
Neutral. Notice:
If any accessories are left
on or plugged in during the jump
starting procedure, they could be
damaged. The repairs would not
be covered by the vehicle
warranty. Whenever possible,
turn off or unplug all accessories
on either vehicle when jump
starting the vehicle.
4. Turn off the ignition on both
vehicles. Unplug unnecessary
accessories plugged into the
cigarette lighter or the accessory
power outlets. Turn off the radio
and all the lamps that are not
needed. This will avoid sparks
and help save both batteries.
And it could save the radio!
5. Open the hood on the other vehicle and locate the
positive (+) and negative (−)
terminal locations on that
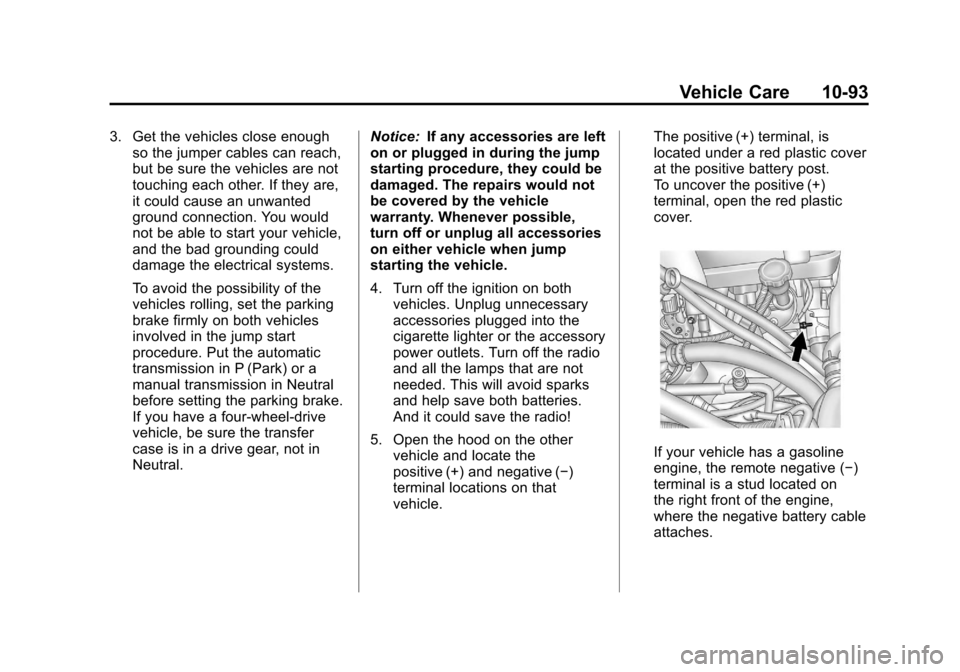
vehicle. The positive (+) terminal, is
located under a red plastic cover
at the positive battery post.
To uncover the positive (+)
terminal, open the red plastic
cover.
If your vehicle has a gasoline
engine, the remote negative (−)
terminal is a stud located on
the right front of the engine,
where the negative battery cable
attaches.
Page 504 of 584
Black plate (98,1)Chevrolet Silverado Owner Manual - 2012
10-98 Vehicle Care
Dinghy Towing
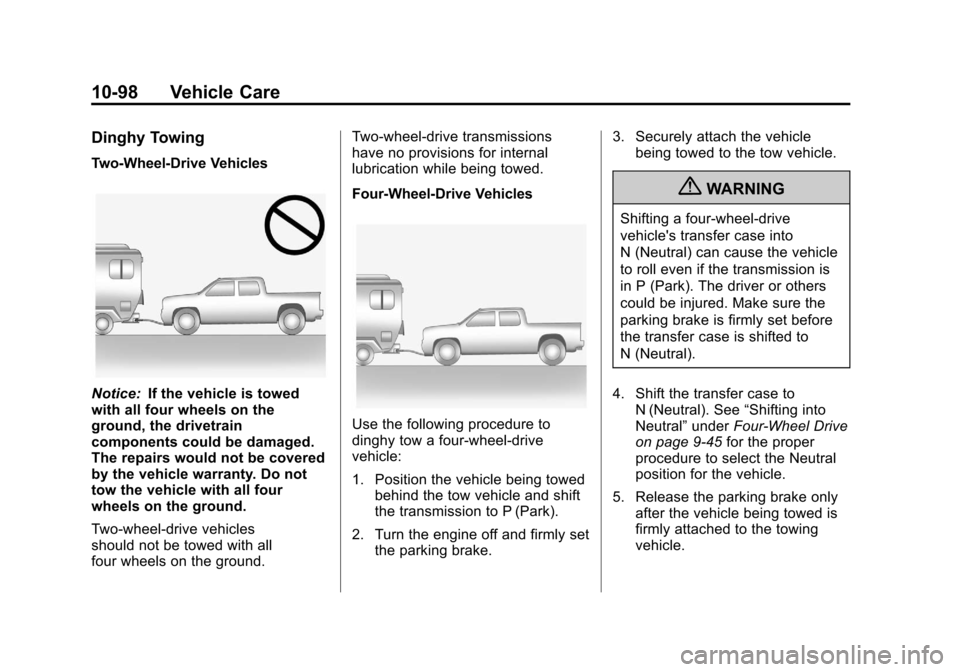
Two-Wheel-Drive Vehicles
Notice:If the vehicle is towed
with all four wheels on the
ground, the drivetrain
components could be damaged.
The repairs would not be covered
by the vehicle warranty. Do not
tow the vehicle with all four
wheels on the ground.
Two-wheel-drive vehicles
should not be towed with all
four wheels on the ground. Two-wheel-drive transmissions
have no provisions for internal
lubrication while being towed.
Four-Wheel-Drive Vehicles
Use the following procedure to
dinghy tow a four-wheel-drive
vehicle:
1. Position the vehicle being towed
behind the tow vehicle and shift
the transmission to P (Park).
2. Turn the engine off and firmly set the parking brake. 3. Securely attach the vehicle
being towed to the tow vehicle.
{WARNING
Shifting a four-wheel-drive
vehicle's transfer case into
N (Neutral) can cause the vehicle
to roll even if the transmission is
in P (Park). The driver or others
could be injured. Make sure the
parking brake is firmly set before
the transfer case is shifted to
N (Neutral).
4. Shift the transfer case to N (Neutral). See “Shifting into
Neutral” underFour-Wheel Drive
on page 9‑45 for the proper
procedure to select the Neutral
position for the vehicle.
5. Release the parking brake only after the vehicle being towed is
firmly attached to the towing
vehicle.
Page 506 of 584
Black plate (100,1)Chevrolet Silverado Owner Manual - 2012
10-100 Vehicle Care
3. Shift the transmission toP (Park).
4. Firmly set the parking brake.
{WARNING
Shifting a four-wheel-drive
vehicle's transfer case into
N (Neutral) can cause the vehicle
to roll even if the transmission is
in P (Park). The driver or others
could be injured. Make sure the
parking brake is firmly set before
the transfer case is shifted to
N (Neutral).
5. Use an adequate clamping device designed for towing to
ensure that the front wheels are
locked into the straight position. 6. Secure the vehicle to the dolly
following the manufacturer's
instructions.
7. Shift the transfer case to N (Neutral). See “Shifting into
Neutral” underFour-Wheel Drive
on page 9‑45 for the proper
procedure to select the neutral
position for the vehicle.
8. Release the parking brake only after the vehicle being towed is
firmly attached to the towing
vehicle.
9. Turn the ignition to LOCK/OFF.
After towing, see “Shifting Out of
Neutral” underFour-Wheel Drive on
page 9‑45.
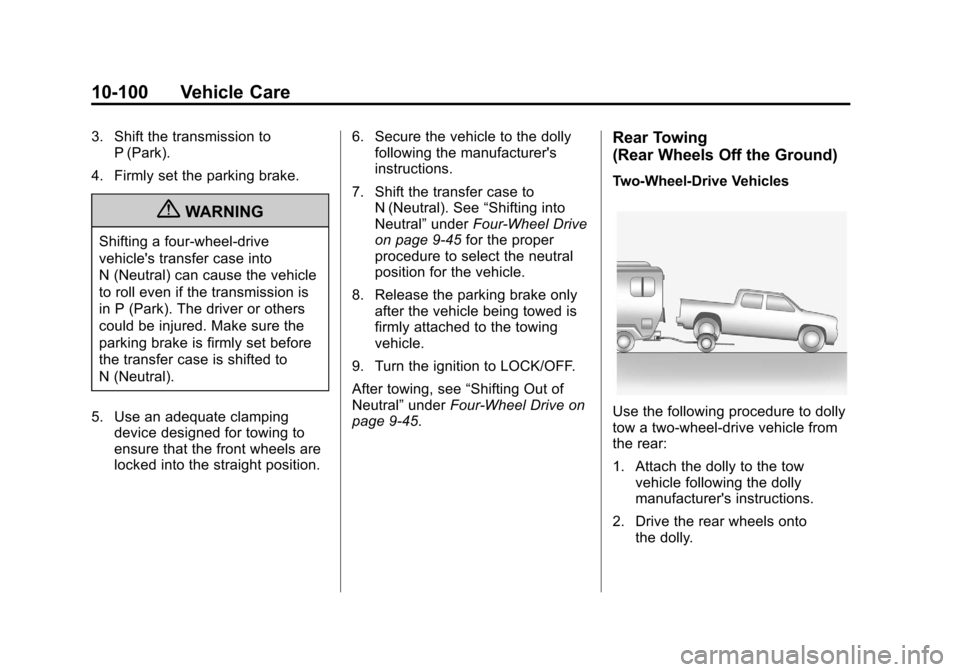
Rear Towing
(Rear Wheels Off the Ground)
Two‐Wheel‐Drive Vehicles
Use the following procedure to dolly
tow a two-wheel-drive vehicle from
the rear:
1. Attach the dolly to the tow
vehicle following the dolly
manufacturer's instructions.
2. Drive the rear wheels onto the dolly.
Page 507 of 584
Black plate (101,1)Chevrolet Silverado Owner Manual - 2012
Vehicle Care 10-101
3. Firmly set the parking brake.See Parking Brake on
page 9‑60.
4. Put the transmission in P (Park).
5. Secure the vehicle to the dolly following the manufacturer's
instructions.
6. Use an adequate clamping device designed for towing to
ensure that the front wheels are
locked into the straight position.
7. Turn the ignition to LOCK/OFF. Four‐Wheel‐Drive Vehicles
Use the following procedure to dolly
tow a four-wheel-drive vehicle from
the rear:
1. Attach the dolly to the tow
vehicle following the dolly
manufacturer's instructions.
2. Drive the rear wheels onto the dolly.
3. Firmly set the parking brake. See Parking Brake on
page 9‑60.
4. Put the transmission in P (Park).
5. Secure the vehicle to the dolly following the manufacturer's
instructions.
6. Use an adequate clamping device designed for towing to
ensure that the front wheels are
locked into the straight position.{WARNING
Shifting a four-wheel-drive
vehicle's transfer case into
N (Neutral) can cause the vehicle
to roll even if the transmission is
in P (Park). The driver or others
could be injured. Make sure the
parking brake is firmly set before
the transfer case is shifted to
N (Neutral).
7. Shift the transfer case to N (Neutral). See “Shifting into
Neutral” underFour-Wheel Drive
on page 9‑45 for the proper
procedure to select the neutral
position for the vehicle.
8. Turn the ignition to LOCK/OFF.
After towing, see “Shifting Out of
Neutral” underFour-Wheel Drive on
page 9‑45.
Page 519 of 584

Black plate (5,1)Chevrolet Silverado Owner Manual - 2012
Service and Maintenance 11-5
.Check automatic transmission
shift lock control function.
SeeAutomatic Transmission
Shift Lock Control Function
Check on page 10‑37.
.Check ignition transmission lock.
See Ignition Transmission Lock
Check on page 10‑38.
.Check parking brake and
automatic transmission park
mechanism. See Park Brake
and P (Park) Mechanism Check
on page 10‑38.
.Check accelerator pedal for
damage, high effort, or binding.
Replace if needed.
.Visually inspect gas strut for
signs of wear, cracks, or other
damage. Check the hold open
ability of the strut. See your
dealer if service is required.
.Inspect sunroof track and seal,
if equipped. See Sunroof
(Extended Cab) on page 2‑20
or Sunroof (Crew Cab) on
page 2‑22.
.Check hybrid low pressure
coolant level, if equipped.
Page 572 of 584

Black plate (2,1)Chevrolet Silverado Owner Manual - 2012
i-2 INDEX
AutomaticDoor Locks . . . . . . . . . . . . . . . . . . . . 2-8
Headlamp System . . . . . . . . . . . . . 6-4
Automatic Transmission . . . . . . . 9-38 Fluid . . . . . . . . . . . . . . . . . 10-11, 10-14
Manual Mode . . . . . . . . . . . . . . . . . 9-42
Shift Lock ControlFunction Check . . . . . . . . . . . 10-37
Auxiliary Roof Mounted Lamp . . . . . . . . . . . 6-7
Auxiliary Devices . . . . . . . . . . . . . . 7-34
Axle, Front . . . . . . . . . . . . . . . . . . . . 10-33
Axle, Rear . . . . . . . . . . . . . . . . . . . . 10-34
B
Battery . . . . . . . . . . . . . . . . . . . . . . . 10-31
Jump Starting . . . . . . . . . . . . . . . 10-92
Load Management . . . . . . . . . . . . . 6-9
Power Protection . . . . . . . . . . . . . 6-10
Voltage and ChargingMessages . . . . . . . . . . . . . . . . . . . 5-42
Blade Replacement, Wiper . . . . . . . . . . . . . . . . . . . . . . . 10-39
Bluetooth . . . . . . . . . . . . . . . . . . . . . . 7-52 Brake
Pedal and Adjustable
Throttle . . . . . . . . . . . . . . . . . . . . . . 9-26
Brake System Warning Light . . . . . . . . . . . . . . . . . . . . . . . . . 5-26
Brakes . . . . . . . . . . . . . . . . . . . . . . . . 10-28 Antilock . . . . . . . . . . . . . . . . . . . . . . . 9-58
Assist . . . . . . . . . . . . . . . . . . . . . . . . . 9-61
Fluid . . . . . . . . . . . . . . . . . . . . . . . . 10-30
Parking . . . . . . . . . . . . . . . . . . . . . . . 9-60
System Messages . . . . . . . . . . . . 5-42
Braking . . . . . . . . . . . . . . . . . . . . . . . . . 9-4
Break-In, New Vehicle . . . . . . . . . 9-26
Bulb Replacement . . . . . . . . . . . . 10-45 Center High-MountedStoplamp (CHMSL) and
Cargo Lamp . . . . . . . . . . . . . . . 10-44
Fog Lamps . . . . . . . . . . . . . . . . . . . . 6-6
Halogen Bulbs . . . . . . . . . . . . . . 10-42
Headlamp Aiming . . . . . . . . . . . 10-39
Headlamps . . . . . . . . . . . . . . . . . 10-42
Headlamps, Front Turn Signal, Sidemarker, and
Parking Lamps . . . . . . . . . . . . 10-42
License Plate Lamps . . . . . . . 10-45 Bulb Replacement (cont'd)
Pick-up Box Identification
and Fender Marker
Lamps . . . . . . . . . . . . . . . . . . . . 10-43
Taillamps . . . . . . . . . . . . . . . . . . . 10-43
Taillamps, Turn Signal, Stoplamps, and
Back-up Lamps . . . . . . . . . . . 10-44
Buying New Tires . . . . . . . . . . . . . 10-72
C
Calibration . . . . . . . . . . . . . . . . . . . . . . 5-6
California
Fuel Requirements . . . . . . . . . . . 9-77
Perchlorate MaterialsRequirements . . . . . . . . . . . . . . . 10-3
Warning . . . . . . . . . . . . . . . . . . . . . . 10-3
Camera, Rear Vision . . . . . . . . . . 9-70
Canadian Vehicle Owners . . . . . . . . iii
Capacities and Specifications . . . . . . . . . . . . . . . . 12-2
Carbon Monoxide Engine Exhaust . . . . . . . . . . . . . . . 9-36
Tailgate . . . . . . . . . . . . . . . . . . . . . . . 2-10
Winter Driving . . . . . . . . . . . . . . . . 9-14
Page 579 of 584

Black plate (9,1)Chevrolet Silverado Owner Manual - 2012
INDEX i-9
O
Object Detection SystemMessages . . . . . . . . . . . . . . . . . . . . 5-47
Odometer . . . . . . . . . . . . . . . . . . . . . . 5-14 Trip . . . . . . . . . . . . . . . . . . . . . . . . . . . 5-14
Off-Road . . . . . . . . . . . . . . . . . . . . . . . 9-6 Driving . . . . . . . . . . . . . . . . . . . . . . . . . 9-6
Recovery . . . . . . . . . . . . . . . . . . . . . . 9-5
Oil Engine . . . . . . . . . . . . . . . . . . . . . . . . 10-7
Engine Oil Life System . . . . . 10-10
Engine Oil PressureGauge . . . . . . . . . . . . . . . . . . . . . . 5-16
Messages . . . . . . . . . . . . . . . . . . . . 5-45
Pressure Light . . . . . . . . . . . . . . . . 5-30
Older Children, Restraints . . . . . 3-42
Online Owner Center . . . . . . . . . . 13-6
OnStar
®
Additional Information . . . . . . . . 14-5
Connections . . . . . . . . . . . . . . . . . . 14-4
Diagnostics . . . . . . . . . . . . . . . . . . . 14-5
Emergency . . . . . . . . . . . . . . . . . . . 14-2
Navigation . . . . . . . . . . . . . . . . . . . . 14-2
Overview . . . . . . . . . . . . . . . . . . . . . 14-1
Security . . . . . . . . . . . . . . . . . . . . . . 14-2 OnStar
®System . . . . . . . . . . . . . . . 1-35
Operation, Infotainment
System . . . . . . . . . . . . . . . . . . . . . . . . 7-3
Ordering Service Publications . . . . . . . . 13-17
Outlets Power . . . . . . . . . . . . . . . . . . . . . . . . 5-10
Overheated Engine Protection
Operating Mode . . . . . . . . . . . . . 10-26
Overheating, Engine . . . . . . . . . . 10-23
Overview, OnStar
®. . . . . . . . . . . . 14-1
P
Park
Shifting into . . . . . . . . . . . . . . . . . . . 9-33
Shifting out of . . . . . . . . . . . . . . . . . 9-35
Park Tilt Mirrors . . . . . . . . . . . . . . . . 2-17
Parking . . . . . . . . . . . . . . . . . . . . . . . . 9-35
Assist, Ultrasonic . . . . . . . . . . . . . 9-68
Brake . . . . . . . . . . . . . . . . . . . . . . . . . 9-60
Brake and P (Park)Mechanism Check . . . . . . . . 10-38
Over Things That Burn . . . . . . . 9-35 Passenger Airbag Status
Indicator . . . . . . . . . . . . . . . . . . . . . 5-22
Passenger Sensing System . . . . . . . . . . . . . . . . . . . . . . . 3-34
Perchlorate Materials Requirements, California . . . . . 10-3
Personalization
Vehicle . . . . . . . . . . . . . . . . . . . . . . . 5-52
Phone Bluetooth . . . . . . . . . . . . . . . . . . . . . 7-52
Pick-up Box Identification
and Fender Marker
Lamps . . . . . . . . . . . . . . . . . . . . . . 10-43
Pickup Conversion to Chassis Cab . . . . . . . . . . . . . . . . 9-119
Power
Door Locks . . . . . . . . . . . . . . . . . . . . 2-8
Mirrors . . . . . . . . . . . . . . . . . . . . . . . . 2-15
Outlets . . . . . . . . . . . . . . . . . . . . . . . 5-10
Protection, Battery . . . . . . . . . . . . 6-10
Retained Accessory (RAP) . . . 9-32
Seat Adjustment . . . . . . . . . . . . . . . 3-5
Steering Fluid . . . . . . . . . . . . . . . 10-27
Windows . . . . . . . . . . . . . . . . . . . . . 2-18