2012 CHEVROLET ORLANDO tire pressure
[x] Cancel search: tire pressurePage 286 of 378
Black plate (52,1)Chevrolet Orlando Owner Manual - 2012
10-52 Vehicle Care
If the tires have an all‐season tread
design, the TPC spec number will
be followed by MS, for mud and
snow. SeeTire Sidewall Labeling on
page 10‑39 for additional
information.
GM recommends replacing all the
tires at the same time. Uniform tread
depth on all tires will help to
maintain the performance of the
vehicle. Braking and handling
performance may be adversely
affected if all the tires are not
replaced at the same time. See Tire
Inspection on page 10‑49 andTire
Rotation on page 10‑49 for
information on proper tire rotation.
{WARNING
Tires could explode during
improper service. Attempting
to mount or dismount a tire
could cause injury or death.
Only your dealer or authorized
tire service center should
mount or dismount the tires.
{WARNING
Mixing tires of different sizes,
brands, or types may cause
loss of control of the vehicle,
resulting in a crash or other
vehicle damage. Use the
correct size, brand, and type
of tire on all wheels.
{WARNING
Using bias-ply tires on the
vehicle may cause the wheel
rim flanges to develop cracks
after many miles of driving.
A tire and/or wheel could fail
suddenly and cause a crash.
Use only radial-ply tires with
the wheels on the vehicle.
If the vehicle tires must be replaced
with a tire that does not have a TPC
Spec number, make sure they are the same size, load range, speed
rating, and construction (radial) as
the original tires.
Vehicles that have a tire pressure
monitoring system could give an
inaccurate low‐pressure warning if
non‐TPC Spec rated tires are
installed. See
Tire Pressure Monitor
System on page 10‑45.
The Tire and Loading Information
Label indicates the original
equipment tires on the vehicle. See
Vehicle Load Limits on page 9‑10,
for the label location and more
information about the Tire and
Loading Information label.
Different Size Tires and
Wheels
If wheels or tires are installed that
are a different size than the original
equipment wheels and tires, vehicle
performance, including its braking,
ride and handling characteristics,
stability, and resistance to rollover
may be affected. If the vehicle has
electronic systems such as antilock
Page 289 of 378
Black plate (55,1)Chevrolet Orlando Owner Manual - 2012
Vehicle Care 10-55
Wheel Alignment and Tire
Balance
The tires and wheels were aligned
and balanced at the factory to
provide the longest tire life and best
overall performance. Adjustments to
wheel alignment and tire balancing
will not be necessary on a regular
basis. However, check the
alignment if there is unusual tire
wear or if the vehicle is pulling to
one side or the other. If the vehicle
vibrates when driving on a smooth
road, the tires and wheels might
need to be rebalanced. See your
dealer for proper diagnosis.
Wheel Replacement
Replace any wheel that is bent,
cracked, or badly rusted or
corroded. If wheel nuts keep coming
loose, the wheel, wheel bolts, and
wheel nuts should be replaced.
If the wheel leaks air, replace it.Some aluminum wheels can be
repaired. See your dealer if any of
these conditions exist.
Your dealer will know the kind of
wheel that is needed.
Each new wheel should have the
same load-carrying capacity,
diameter, width, offset, and be
mounted the same way as the one it
replaces.
Replace wheels, wheel bolts, wheel
nuts, or Tire Pressure Monitor
System (TPMS) sensors with new
GM original equipment parts.
{WARNING
Using the wrong replacement
wheels, wheel bolts, or wheel
nuts can be dangerous. It could
affect the braking and handling of
the vehicle. Tires can lose air,
and cause loss of control, causing
a crash. Always use the correct
wheel, wheel bolts, and wheel
nuts for replacement.Notice:
The wrong wheel can
also cause problems with bearing
life, brake cooling, speedometer
or odometer calibration,
headlamp aim, bumper height,
vehicle ground clearance, and tire
or tire chain clearance to the
body and chassis.
See If a Tire Goes Flat on
page 10‑56 for more information.
Used Replacement Wheels
{WARNING
Replacing a wheel with a used
one is dangerous. How it has
been used or how far it has been
driven may be unknown. It could
fail suddenly and cause a crash.
When replacing wheels, use a
new GM original equipment
wheel.
Page 292 of 378
Black plate (58,1)Chevrolet Orlando Owner Manual - 2012
10-58 Vehicle Care
The following information explains
how to repair or change a tire.
Tire Sealant and
Compressor Kit
{WARNING
Idling a vehicle in an enclosed
area with poor ventilation is
dangerous. Engine exhaust may
enter the vehicle. Engine exhaust
contains carbon monoxide (CO)
which cannot be seen or smelled.
It can cause unconsciousness
and even death. Never run the
engine in an enclosed area that
has no fresh air ventilation. For
more information, seeEngine
Exhaust on page 9‑21.
{WARNING
Overinflating a tire could cause
the tire to rupture and you or
others could be injured. Be sure
to read and follow the tire sealant
and compressor kit instructions
and inflate the tire to its
recommended pressure. Do not
exceed the recommended
pressure.
{WARNING
Storing the tire sealant and
compressor kit or other
equipment in the passenger
compartment of the vehicle could
cause injury. In a sudden stop or
collision, loose equipment could
strike someone. Store the tire
sealant and compressor kit in its
original location. If this vehicle has a tire sealant
and compressor kit, there may not
be a spare tire or tire changing
equipment, and on some vehicles
there may not be a place to store
a tire.
The tire sealant and compressor
can be used to temporarily seal
punctures up to 6 mm (0.25 in) in
the tread area of the tire. It can also
be used to inflate an
underinflated tire.
If the tire has been separated from
the wheel, has damaged sidewalls,
or has a large puncture, the tire is
too severely damaged for the tire
sealant and compressor kit to be
effective. See
Roadside Assistance
Program on page 13‑5.
Read and follow all of the tire
sealant and compressor kit
instructions.
Page 293 of 378
Black plate (59,1)Chevrolet Orlando Owner Manual - 2012
Vehicle Care 10-59
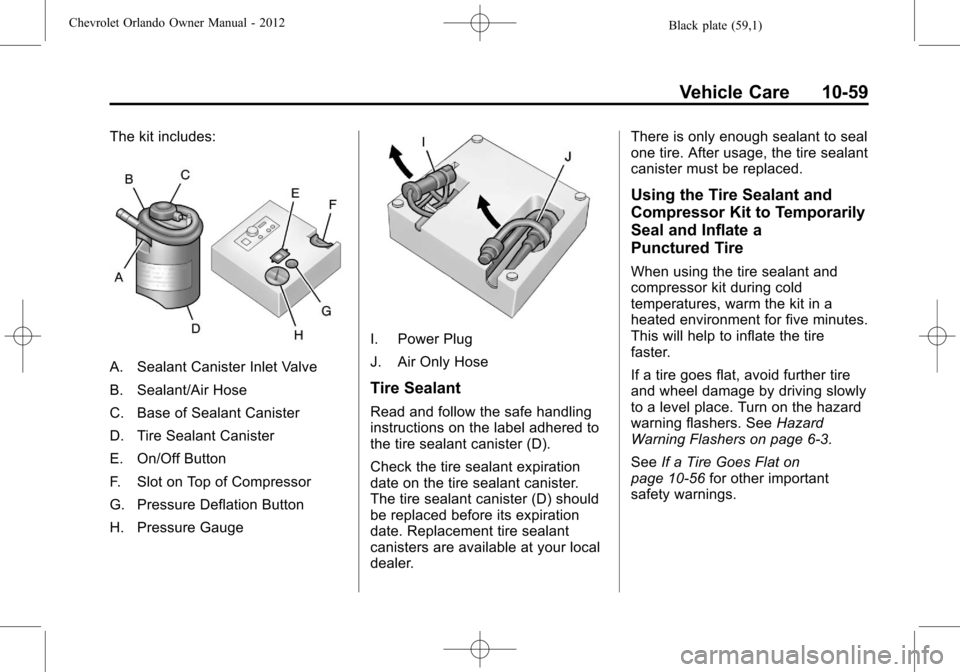
The kit includes:
A. Sealant Canister Inlet Valve
B. Sealant/Air Hose
C. Base of Sealant Canister
D. Tire Sealant Canister
E. On/Off Button
F. Slot on Top of Compressor
G. Pressure Deflation Button
H. Pressure Gauge
I. Power Plug
J. Air Only Hose
Tire Sealant
Read and follow the safe handling
instructions on the label adhered to
the tire sealant canister (D).
Check the tire sealant expiration
date on the tire sealant canister.
The tire sealant canister (D) should
be replaced before its expiration
date. Replacement tire sealant
canisters are available at your local
dealer.There is only enough sealant to seal
one tire. After usage, the tire sealant
canister must be replaced.
Using the Tire Sealant and
Compressor Kit to Temporarily
Seal and Inflate a
Punctured Tire
When using the tire sealant and
compressor kit during cold
temperatures, warm the kit in a
heated environment for five minutes.
This will help to inflate the tire
faster.
If a tire goes flat, avoid further tire
and wheel damage by driving slowly
to a level place. Turn on the hazard
warning flashers. See
Hazard
Warning Flashers on page 6‑3.
See If a Tire Goes Flat on
page 10‑56 for other important
safety warnings.
Page 295 of 378
Black plate (61,1)Chevrolet Orlando Owner Manual - 2012
Vehicle Care 10-61
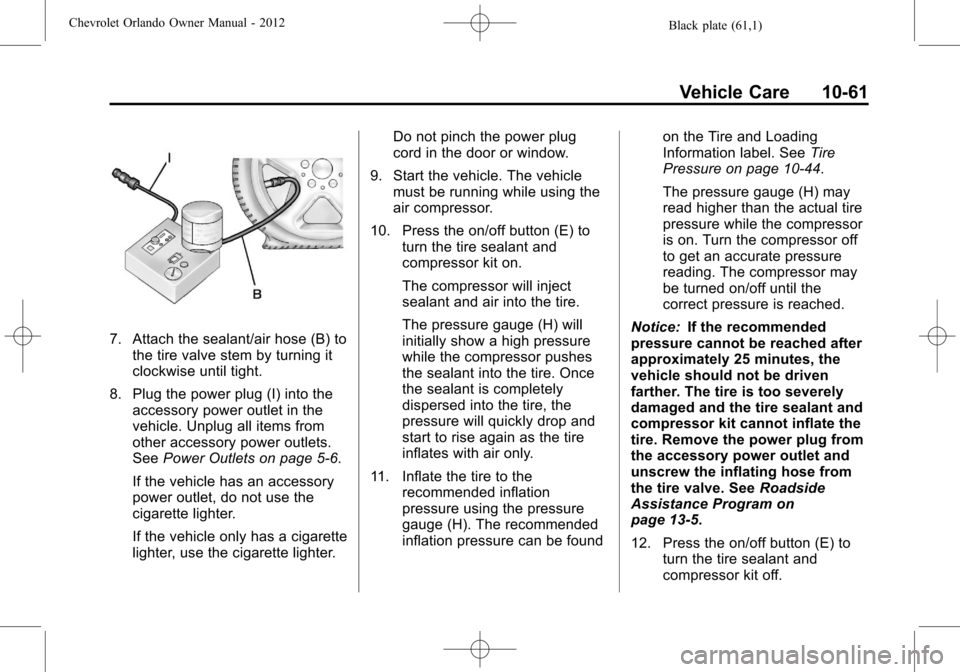
7. Attach the sealant/air hose (B) tothe tire valve stem by turning it
clockwise until tight.
8. Plug the power plug (I) into the accessory power outlet in the
vehicle. Unplug all items from
other accessory power outlets.
See Power Outlets on page 5‑6.
If the vehicle has an accessory
power outlet, do not use the
cigarette lighter.
If the vehicle only has a cigarette
lighter, use the cigarette lighter. Do not pinch the power plug
cord in the door or window.
9. Start the vehicle. The vehicle must be running while using the
air compressor.
10. Press the on/off button (E) to turn the tire sealant and
compressor kit on.
The compressor will inject
sealant and air into the tire.
The pressure gauge (H) will
initially show a high pressure
while the compressor pushes
the sealant into the tire. Once
the sealant is completely
dispersed into the tire, the
pressure will quickly drop and
start to rise again as the tire
inflates with air only.
11. Inflate the tire to the recommended inflation
pressure using the pressure
gauge (H). The recommended
inflation pressure can be found on the Tire and Loading
Information label. See
Tire
Pressure on page 10‑44.
The pressure gauge (H) may
read higher than the actual tire
pressure while the compressor
is on. Turn the compressor off
to get an accurate pressure
reading. The compressor may
be turned on/off until the
correct pressure is reached.
Notice: If the recommended
pressure cannot be reached after
approximately 25 minutes, the
vehicle should not be driven
farther. The tire is too severely
damaged and the tire sealant and
compressor kit cannot inflate the
tire. Remove the power plug from
the accessory power outlet and
unscrew the inflating hose from
the tire valve. See Roadside
Assistance Program on
page 13‑5.
12. Press the on/off button (E) to turn the tire sealant and
compressor kit off.
Page 296 of 378

Black plate (62,1)Chevrolet Orlando Owner Manual - 2012
10-62 Vehicle Care
The tire is not sealed and will
continue to leak air until the
vehicle is driven and the
sealant is distributed in the tire.
Therefore, Steps 13 through
21 must be done immediately
after Step 12.
Be careful while handling the
tire sealant and compressor kit
as it could be warm after
usage.
13. Unplug the power plug (I) from the accessory power outlet in
the vehicle.
14. Turn the sealant/air hose (B) counterclockwise to remove it
from the tire valve stem.
15. Replace the tire valve stem cap.
16. Remove the tire sealant canister (D) from the slot on
top of the compressor (F).
17. Turn the air only hose (J) counterclockwise to remove it
from the tire sealant canister
inlet valve (A). 18. Turn the sealant/air hose (B)
clockwise onto the sealant
canister inlet valve (A) to
prevent sealant leakage.
19. Return the air only hose (J) and power plug (I) back to their
original storage location.
20. If the flat tire was able to inflate
to the recommended inflation
pressure, remove the
maximum speed label from the
sealant canister and place it in
a highly visible location.
Do not exceed the speed on
this label until the damaged tire
is repaired or replaced.
21. Return the equipment to its original storage location in the
vehicle. 22. Immediately drive the vehicle
8 km (5 mi) to distribute the
sealant in the tire.
23. Stop at a safe location and check the tire pressure. Refer
to Steps 1 through 10 under
“Using the Tire Sealant and
Compressor Kit without Sealant
to Inflate a Tire (Not
Punctured).”
If the tire pressure has fallen
more than 68 kPa (10 psi)
below the recommended
inflation pressure, stop driving
the vehicle. The tire is too
severely damaged and the tire
sealant cannot seal the tire.
SeeRoadside Assistance
Program on page 13‑5.
If the tire pressure has not
dropped more than 68 kPa
(10 psi) from the recommended
inflation pressure, inflate the
tire to the recommended
inflation pressure.
Page 297 of 378
Black plate (63,1)Chevrolet Orlando Owner Manual - 2012
Vehicle Care 10-63
24. Wipe off any sealant from thewheel, tire, or vehicle.
25. Dispose of the used tire sealant canister (D) at a local
dealer or in accordance with
local state codes and practices.
26. Replace it with a new canister available from your dealer.
27. After temporarily sealing a tire using the tire sealant and
compressor kit, take the
vehicle to an authorized dealer
within 161 km (100 mi) of
driving to have the tire repaired
or replaced.Using the Tire Sealant and
Compressor Kit without
Sealant to Inflate a Tire
(Not Punctured)
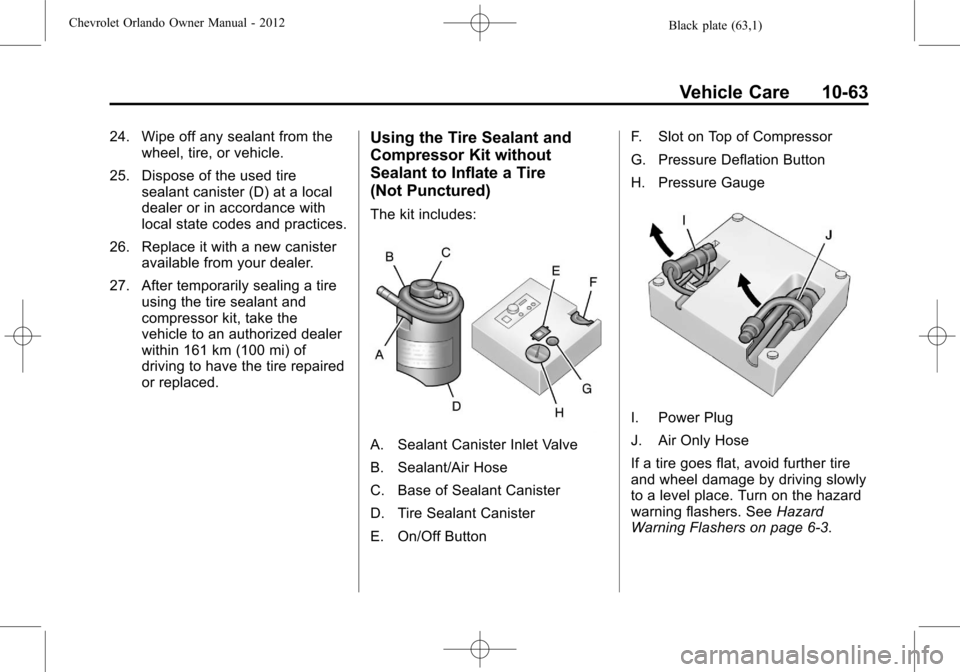
The kit includes:
A. Sealant Canister Inlet Valve
B. Sealant/Air Hose
C. Base of Sealant Canister
D. Tire Sealant Canister
E. On/Off Button F. Slot on Top of Compressor
G. Pressure Deflation Button
H. Pressure Gauge
I. Power Plug
J. Air Only Hose
If a tire goes flat, avoid further tire
and wheel damage by driving slowly
to a level place. Turn on the hazard
warning flashers. See
Hazard
Warning Flashers on page 6‑3.
Page 298 of 378

Black plate (64,1)Chevrolet Orlando Owner Manual - 2012
10-64 Vehicle Care
SeeIf a Tire Goes Flat on
page 10‑56 for other important
safety warnings.
1. Remove the compressor from its storage location. See Storing the
Tire Sealant and Compressor Kit
on page 10‑65.
2. Remove the air only hose (J) and the power plug (I) from the
bottom of the compressor.
3. Place the compressor on the ground near the flat tire.
Make sure the tire valve stem is
positioned close to the ground
so the hose will reach it.
4. Remove the valve stem cap from the flat tire by turning it
counterclockwise. 5. Attach the air only hose (J) to
the tire valve stem by turning it
clockwise until tight.
6. Plug the power plug (I) into the accessory power outlet in the
vehicle. Unplug all items from
other accessory power outlets.
See Power Outlets on page 5‑6.
If the vehicle has an accessory
power outlet, do not use the
cigarette lighter.
If the vehicle only has a cigarette
lighter, use the cigarette lighter.
Do not pinch the power plug
cord in the door or window.
7. Start the vehicle. The vehicle must be running while using the
air compressor. 8. Press the on/off button (E) to
turn the tire sealant and
compressor kit on.
The compressor will inflate the
tire with air only.
9. Inflate the tire to the recommended inflation pressure
using the pressure gauge (H).
The recommended inflation
pressure can be found on the
Tire and Loading Information
label. See Tire Pressure on
page 10‑44.
The pressure gauge (H) may
read higher than the actual tire
pressure while the compressor is
on. Turn the compressor off to
get an accurate pressure
reading. The compressor may
be turned on/off until the correct
pressure is reached.