2012 CHEVROLET ORLANDO tire pressure
[x] Cancel search: tire pressurePage 299 of 378
Black plate (65,1)Chevrolet Orlando Owner Manual - 2012
Vehicle Care 10-65
Notice:If the recommended
pressure cannot be reached after
approximately 25 minutes, the
vehicle should not be driven
farther. The tire is too severely
damaged and the tire sealant and
compressor kit cannot inflate the
tire. Remove the power plug from
the accessory power outlet and
unscrew the inflating hose from
the tire valve. See Roadside
Assistance Program on
page 13‑5.
10. Press the on/off button (E) to turn the tire sealant and
compressor kit off.
Be careful while handling the
compressor as it could be
warm after usage. 11. Unplug the power plug (I) from
the accessory power outlet in
the vehicle.
12. Turn the air only hose (J) counterclockwise to remove it
from the tire valve stem.
13. Replace the tire valve stem cap.
14. Return the air only hose (J) and power plug (I) back to their
original storage location.
15. Return the equipment to its original storage location in the
vehicle.
The tire sealant and compressor kit
has accessory adapters located in a
compartment on the bottom of its
housing that can be used to inflate
air mattresses, balls, etc.Storing the Tire Sealant
and Compressor Kit
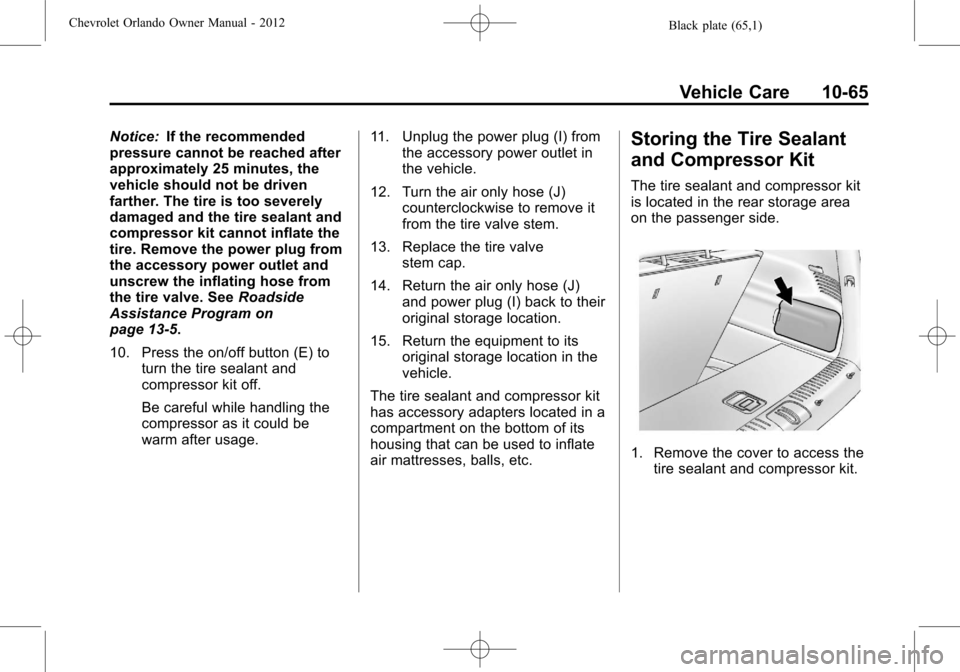
The tire sealant and compressor kit
is located in the rear storage area
on the passenger side.
1. Remove the cover to access the tire sealant and compressor kit.
Page 306 of 378
Black plate (72,1)Chevrolet Orlando Owner Manual - 2012
10-72 Vehicle Care
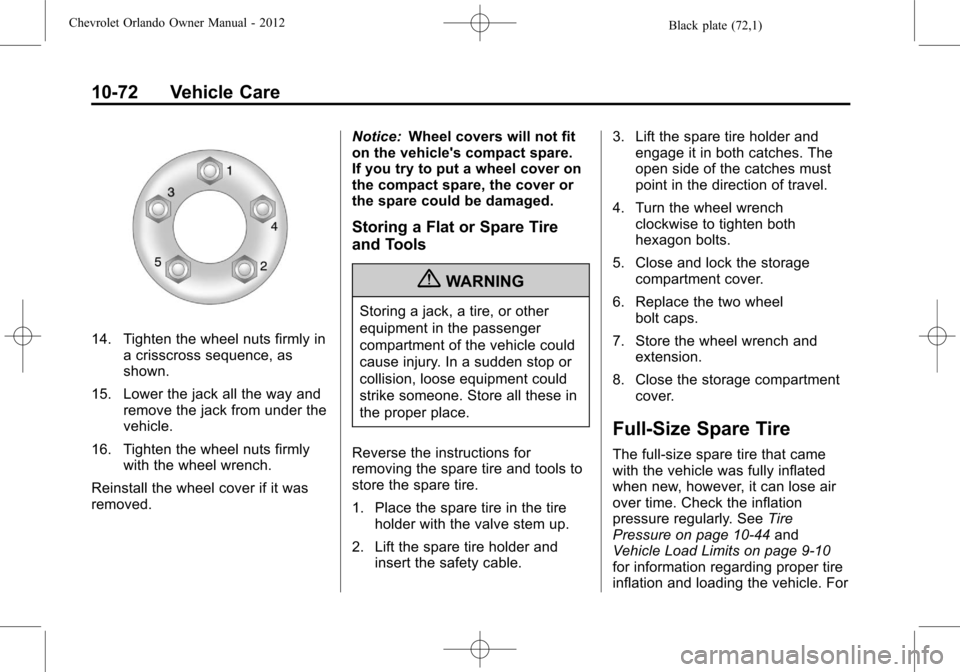
14. Tighten the wheel nuts firmly ina crisscross sequence, as
shown.
15. Lower the jack all the way and remove the jack from under the
vehicle.
16. Tighten the wheel nuts firmly with the wheel wrench.
Reinstall the wheel cover if it was
removed. Notice:
Wheel covers will not fit
on the vehicle's compact spare.
If you try to put a wheel cover on
the compact spare, the cover or
the spare could be damaged.
Storing a Flat or Spare Tire
and Tools
{WARNING
Storing a jack, a tire, or other
equipment in the passenger
compartment of the vehicle could
cause injury. In a sudden stop or
collision, loose equipment could
strike someone. Store all these in
the proper place.
Reverse the instructions for
removing the spare tire and tools to
store the spare tire.
1. Place the spare tire in the tire holder with the valve stem up.
2. Lift the spare tire holder and insert the safety cable. 3. Lift the spare tire holder and
engage it in both catches. The
open side of the catches must
point in the direction of travel.
4. Turn the wheel wrench clockwise to tighten both
hexagon bolts.
5. Close and lock the storage compartment cover.
6. Replace the two wheel bolt caps.
7. Store the wheel wrench and extension.
8. Close the storage compartment cover.
Full-Size Spare Tire
The full-size spare tire that came
with the vehicle was fully inflated
when new, however, it can lose air
over time. Check the inflation
pressure regularly. See Tire
Pressure on page 10‑44 and
Vehicle Load Limits on page 9‑10
for information regarding proper tire
inflation and loading the vehicle. For
Page 307 of 378
Black plate (73,1)Chevrolet Orlando Owner Manual - 2012
Vehicle Care 10-73
instructions on how to remove,
install, or store a spare tire, seeTire
Changing on page 10‑66.
After installing the spare tire on the
vehicle, stop as soon as possible
and check that the spare is correctly
inflated. The spare tire is made to
perform well at speeds up to
112 km/h (70 mph) at the
recommended inflation pressure, so
you can finish your trip.
Have the damaged or flat road tire
repaired or replaced and installed
back onto the vehicle as soon as
possible so the spare tire will be
available in case it is needed again.
Do not mix tires and wheels of
different sizes, because they will not
fit. Keep the spare tire and its wheel
together.Jump Starting
For more information about the
vehicle battery, see Battery on
page 10‑21.
If the battery has run down, try to
use another vehicle and some
jumper cables to start your vehicle.
Be sure to use the following steps to
do it safely.
{WARNING
Batteries can hurt you. They can
be dangerous because:
.They contain acid that can
burn you.
.They contain gas that can
explode or ignite.
.They contain enough
electricity to burn you.
If you do not follow these steps
exactly, some or all of these
things can hurt you. Notice:
Ignoring these steps
could result in costly damage to
the vehicle that would not be
covered by the warranty.
Trying to start the vehicle by
pushing or pulling it will not
work, and it could damage the
vehicle.
The jump start positive post is
located in the engine compartment
on the driver side of the vehicle.
See Engine Compartment Overview
on page 10‑6.
The jump start negative grounding
point is the engine block or an
engine mounting bolt. Connect to a
spot as far away from the
discharged battery as possible.
These locations are used instead of
a direct connection to the battery.
Page 323 of 378
Black plate (3,1)Chevrolet Orlando Owner Manual - 2012
Service and Maintenance 11-3
The Additional Required
Services‐Severe are for vehicles
that are:
.Mainly driven in heavy city traffic
in hot weather.
.Mainly driven in hilly or
mountainous terrain.
.Frequently towing a trailer.
.Used for high speed or
competitive driving.
.Used for taxi, police, or delivery
service.
Refer to the information in the
Maintenance Schedule Additional
Required Services ‐Severe chart.
{WARNING
Performing maintenance work can
be dangerous and can cause
serious injury. Perform
maintenance work only if the
required information, proper tools,
and equipment are available.
If they are not, see your dealer to
have a trained technician do the
work. See Doing Your Own
Service Work on page 10‑3.
Maintenance
Schedule
Owner Checks and Services
At Each Fuel Stop
.Check the engine oil level. See
Engine Oil on page 10‑7.
Once a Month
.Check the tire inflation
pressures. See Tire Pressure on
page 10‑44.
.Inspect the tires for wear. See
Tire Inspection on page 10‑49.
.Check the windshield washer
fluid level. See Washer Fluid on
page 10‑18.
Page 324 of 378
Black plate (4,1)Chevrolet Orlando Owner Manual - 2012
11-4 Service and Maintenance
Engine Oil Change
When the CHANGE ENGINE OIL
SOON DIC message or Code 82
DIC message displays, have the
engine oil and filter changed within
the next 1 000 km/600 mi. If driven
under the best conditions, the
engine oil life system might not
indicate the need for vehicle service
for more than a year. The engine oil
and filter must be changed at least
once a year and the oil life system
must be reset. Your trained dealer
technician can perform this work.
If the engine oil life system is reset
accidentally, service the vehicle
within 5 000 km/3,000 mi since the
last service. Reset the oil life
system when the oil is changed.
SeeEngine Oil Life System on
page 10‑9.
Tire Rotation and Required
Services Every 12 000 km/
7,500 mi
Rotate the tires, if recommended for
the vehicle, and perform the
following services. See Tire
Rotation on page 10‑49.
.Check engine oil level and oil
life percentage. If needed,
change engine oil and filter, and
reset oil life system. See Engine
Oil on page 10‑7 andEngine Oil
Life System on page 10‑9.
.Check engine coolant level. See
Engine Coolant on page 10‑14.
.Check windshield washer fluid
level. See Washer Fluid on
page 10‑18.
.Visually inspect windshield wiper
blades for wear, cracking,
or contamination. See Exterior
Care on page 10‑79. Replace
worn or damaged wiper blades.
See Wiper Blade Replacement
on page 10‑24.
.Check tire inflation pressures.
See Tire Pressure on
page 10‑44.
.Inspect tire wear. See Tire
Inspection on page 10‑49.
.Visually check for fluid leaks.
.Inspect engine air cleaner filter.
See Engine Air Cleaner/Filter on
page 10‑11.
.Inspect brake system.
Page 357 of 378
Black plate (15,1)Chevrolet Orlando Owner Manual - 2012
Customer Information 13-15
GM will not access this data or
share it with others except: with the
consent of the vehicle owner or,
if the vehicle is leased, with the
consent of the lessee; in response
to an official request by police or
similar government office; as part of
GM's defense of litigation through
the discovery process; or, as
required by law. Data that GM
collects or receives may also be
used for GM research needs or may
be made available to others for
research purposes, where a need is
shown and the data is not tied to a
specific vehicle or vehicle owner.
OnStar®
If the vehicle is equipped with an
active OnStar system, that system
may also record data in crash or
near crash‐like situations. The
OnStar Terms and Conditions
provides information on data
collection and use and is available
at www.onstar.com (U.S.) or
www.onstar.ca (Canada), or bypressing the
Qbutton and speaking
to an advisor. See OnStar Overview
on page 14‑1 for more information.
Navigation System
If the vehicle has a navigation
system, use of the system may
result in the storage of destinations,
addresses, telephone numbers, and
other trip information. Refer to the
navigation manual for information on
stored data and for deletion
instructions.
Radio Frequency
Identification (RFID)
RFID technology is used in some
vehicles for functions such as tire
pressure monitoring and ignition
system security, as well as in
connection with conveniences such
as key fobs for remote door locking/
unlocking and starting, and
in-vehicle transmitters for garage
door openers. RFID technology in
GM vehicles does not use or record personal information or link with any
other GM system containing
personal information.
Radio Frequency
Statement
This vehicle has systems that
operate on a radio frequency that
comply with Part 15 of the Federal
Communications Commission (FCC)
rules and with Industry Canada
Standards RSS‐GEN/210/220/310.
Operation is subject to the following
two conditions:
1. The device may not cause
harmful interference.
2. The device must accept any interference received, including
interference that may cause
undesired operation of the
device.
Changes or modifications to any of
these systems by other than an
authorized service facility could void
authorization to use this equipment.
Page 362 of 378
Black plate (4,1)Chevrolet Orlando Owner Manual - 2012
14-4 OnStar
Hands-Free Calling
1. PushX. System responds:
“OnStar ready.”
2. Say “Dial.”System responds:
“Please say the name or number
to call.”
3. Say the entire number without pausing, including a “1”and the
area code. System responds:
“OK calling.”
Retrieve My Number
1. PushX. System responds:
“OnStar ready.”
2. Say “My Number.” System
responds: “Your OnStar
Hands-Free Calling number is.”
End a Call
PushX. System responds: “Call
ended.”
Store a Name Tag for Speed
Dialing
1. PushX. System responds:
“OnStar ready.”
2. Say “Store.” System responds:
“Please say the number you
would like to store.”
3. Say the entire number without pausing. System responds:
“Please say the name tag.”
4. Pick a name tag. “System
responds:”About to store
5. Say “Yes”or“No” to try again.
System responds: “OK, storing
Place a Call Using a Stored
Number
1. PushX. System responds:
“OnStar ready.”
2. Say “Call
responds: “OK, calling
Verify Minutes and Expiration
PushXand say “minutes” then
“verify” to check how many minutes
remain and their expiration date.
OnStar Mobile App
With an iPhone®or
Android™-based mobile device,
an OnStar mobile app can be
downloaded. The vehicle can be
remote started, if equipped, or
the doors can be unlocked from
anywhere there is cell phone
service. It can also check the fuel
level, tire pressure, and oil life.
It can connect to an OnStar Advisor
anytime. For OnStar mobile app
compatibility or further information,
see www.onstar.com.
Page 363 of 378
Black plate (5,1)Chevrolet Orlando Owner Manual - 2012
OnStar 14-5
Diagnostics
OnStar Vehicle Diagnostics will
perform a vehicle check every
month. It will check the engine,
transmission, antilock brakes, and
major vehicle systems. It also
checks the tire pressures, if the
vehicle is equipped with the Tire
Pressure Monitoring System. If a
diagnostics check is needed
between e-mails, push
Q, and an
Advisor can run a check.
OnStar Additional
Information
Transferring Service
PushQto request account transfer
eligibility information. The Advisor
can assist in canceling or removing
account information. If OnStar
receives information that vehicle
ownership has changed, OnStar
may send a voice message to the
vehicle, requesting updated account
information.
Reactivation for Subsequent
Owners
PushQand follow the prompts to
speak to an Advisor as soon as
possible after acquiring the vehicle.
The Advisor will update vehicle
records and will explain the OnStar
service offers and options available.
How OnStar Service Works
Automatic Crash Response,
Emergency Services, Crisis Assist,
Stolen Vehicle Assistance, Vehicle
Diagnostics, Remote Door Unlock,
Roadside Assistance, Turn-by-Turn
Navigation, and Hands-Free Calling
are available on most vehicles. Not
all OnStar services are available
everywhere or on all vehicles. For
more information, a full description
of OnStar services, system
limitations, and OnStar terms and
conditions, see www.onstar.com
(U.S.) or www.onstar.ca (Canada);
contact OnStar at 1-888-4-ONSTAR
(1‐888‐466‐7827) or TTY
1‐877‐248‐2080; or push
Qto
speak with an Advisor. OnStar
services require a vehicle electrical
system, wireless service, and GPS
satellite technologies to be available
and operating for features to
function properly. These systems
may not operate if the battery is
discharged or disconnected.