2012 CHEVROLET ORLANDO airbag
[x] Cancel search: airbagPage 204 of 378
Black plate (16,1)Chevrolet Orlando Owner Manual - 2012
9-16 Driving and Operating
2. Shift the vehicle to neutral. Thiscan be done while the vehicle is
moving. After shifting to neutral,
firmly apply the brakes and steer
the vehicle to a safe location.
3. Come to a complete stop. Shift to P (Park) with an automatic
transmission, or Neutral with a
manual transmission. Turn the
ignition to LOCK/OFF.
4. Set the parking brake. See Parking Brake on page 9‑28.
{WARNING
Turning off the vehicle while
moving may cause loss of power
assist in the brake and steering
systems and disable the airbags.
While driving, only shut the
vehicle off in an emergency.
If the vehicle cannot be pulled over,
and must be shut off while driving,
turn the ignition to ACC/
ACCESSORY. The ignition switch can bind in the
LOCK/OFF position with the key
removed and wheels turned off
center. If this happens, move the
steering wheel from right to left
while turning the key to ACC/
ACCESSORY. If this does not work,
then the vehicle needs service.
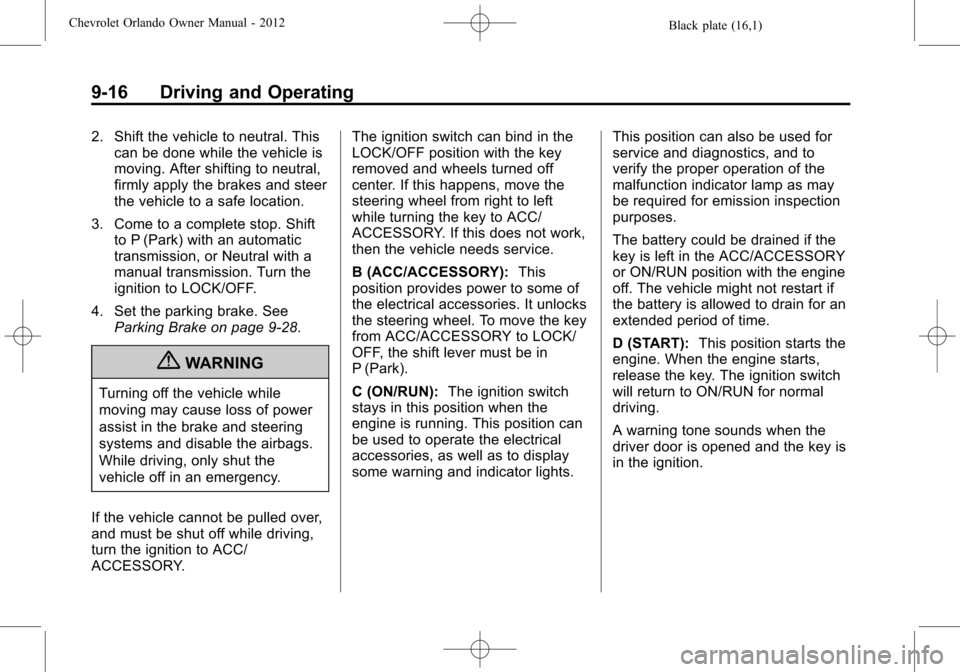
B (ACC/ACCESSORY):
This
position provides power to some of
the electrical accessories. It unlocks
the steering wheel. To move the key
from ACC/ACCESSORY to LOCK/
OFF, the shift lever must be in
P (Park).
C (ON/RUN): The ignition switch
stays in this position when the
engine is running. This position can
be used to operate the electrical
accessories, as well as to display
some warning and indicator lights. This position can also be used for
service and diagnostics, and to
verify the proper operation of the
malfunction indicator lamp as may
be required for emission inspection
purposes.
The battery could be drained if the
key is left in the ACC/ACCESSORY
or ON/RUN position with the engine
off. The vehicle might not restart if
the battery is allowed to drain for an
extended period of time.
D (START):
This position starts the
engine. When the engine starts,
release the key. The ignition switch
will return to ON/RUN for normal
driving.
A warning tone sounds when the
driver door is opened and the key is
in the ignition.
Page 234 of 378
Black plate (46,1)Chevrolet Orlando Owner Manual - 2012
9-46 Driving and Operating
are, seal the holes when the
hitch is removed. If the holes
are not sealed, dirt, water, and
deadly carbon monoxide (CO)
from the exhaust can get into the
vehicle. SeeEngine Exhaust on
page 9‑21.
Safety Chains
Always attach chains between the
vehicle and the trailer. Cross the
safety chains under the tongue of
the trailer to help prevent the tongue
from contacting the road if it
becomes separated from the hitch.
Leave enough slack so the rig can
turn. Never allow safety chains to
drag on the ground.
Trailer Brakes
Does the trailer have its own
brakes? Be sure to read and follow
the instructions for the trailer brakes
so they are installed, adjusted, and
maintained properly.
Because the vehicle has antilock
brakes, do not tap into the vehicle's
brake system. If this is done, both
brake systems will not work well,
or at all.
Conversions and
Add-Ons
Add-On Electrical
Equipment
Notice: Do not add anything
electrical to the vehicle unless
you check with your dealer first.
Some electrical equipment can
damage the vehicle and the
damage would not be covered by
the vehicle's warranty. Some
add-on electrical equipment can
keep other components from
working as they should.
Add-on equipment can drain the
vehicle's 12‐volt battery, even if the
vehicle is not operating.
The vehicle has an airbag system.
Before attempting to add anything
electrical to the vehicle, see
Servicing the Airbag-Equipped
Vehicle on page 3‑31 andAdding
Equipment to the Airbag-Equipped
Vehicle on page 3‑31.
Page 236 of 378
Black plate (2,1)Chevrolet Orlando Owner Manual - 2012
10-2 Vehicle Care
Different Size Tires andWheels . . . . . . . . . . . . . . . . . . . 10-52
Uniform Tire Quality Grading . . . . . . . . . . . . . . . . . . . 10-53
Wheel Alignment and Tire
Balance . . . . . . . . . . . . . . . . . . . 10-55
Wheel Replacement . . . . . . . . 10-55
Tire Chains . . . . . . . . . . . . . . . . . 10-56
If a Tire Goes Flat . . . . . . . . . . 10-56
Tire Sealant and Compressor Kit . . . . . . . . . . . 10-58
Storing the Tire Sealant and Compressor Kit . . . . . . . . . . . 10-65
Tire Changing . . . . . . . . . . . . . . 10-66
Full-Size Spare Tire . . . . . . . . 10-72
Jump Starting
Jump Starting . . . . . . . . . . . . . . 10-73
Towing
Towing the Vehicle . . . . . . . . . 10-76
Recreational Vehicle Towing . . . . . . . . . . . . . . . . . . . . 10-76
Appearance Care
Exterior Care . . . . . . . . . . . . . . . 10-79
Interior Care . . . . . . . . . . . . . . . . 10-82
Floor Mats . . . . . . . . . . . . . . . . . . 10-85
General Information
For service and parts needs, visit
your dealer. You will receive
genuine GM parts and GM-trained
and supported service people.
Genuine GM parts have one of
these marks:
Accessories and
Modifications
Adding non‐dealer accessories or
making modifications to the vehicle
can affect vehicle performance and
safety, including such things as
airbags, braking, stability, ride and
handling, emissions systems,
aerodynamics, durability, and
electronic systems like antilock
brakes, traction control, and stability
control. These accessories or
modifications could even cause
malfunction or damage not covered
by the vehicle warranty.
Damage to vehicle components
resulting from modifications or the
installation or use of non‐GM
certified parts, including control
module or software modifications, is
not covered under the terms of the
vehicle warranty and may affect
remaining warranty coverage for
affected parts.
Page 237 of 378
Black plate (3,1)Chevrolet Orlando Owner Manual - 2012
Vehicle Care 10-3
GM Accessories are designed to
complement and function with other
systems on the vehicle. See your
dealer to accessorize the vehicle
using genuine GM Accessories
installed by a dealer technician.
Also, seeAdding Equipment to the
Airbag-Equipped Vehicle on
page 3‑31.Vehicle Checks
Doing Your Own
Service Work
{WARNING
It can be dangerous to work on
your vehicle if you do not have
the proper knowledge, service
manual, tools, or parts. Always
follow owner manual procedures
and consult the service manual
for your vehicle before doing any
service work. If doing some of your own service
work, use the proper service
manual. It tells you much more
about how to service the vehicle
than this manual can. To order the
proper service manual, see
Service
Publications Ordering Information
on page 13‑11.
This vehicle has an airbag system.
Before attempting to do your own
service work, see Servicing the
Airbag-Equipped Vehicle on
page 3‑31.
Keep a record with all parts receipts
and list the mileage and the date of
any service work performed. See
Maintenance Records on
page 11‑16.
Page 267 of 378
Black plate (33,1)Chevrolet Orlando Owner Manual - 2012
Vehicle Care 10-33
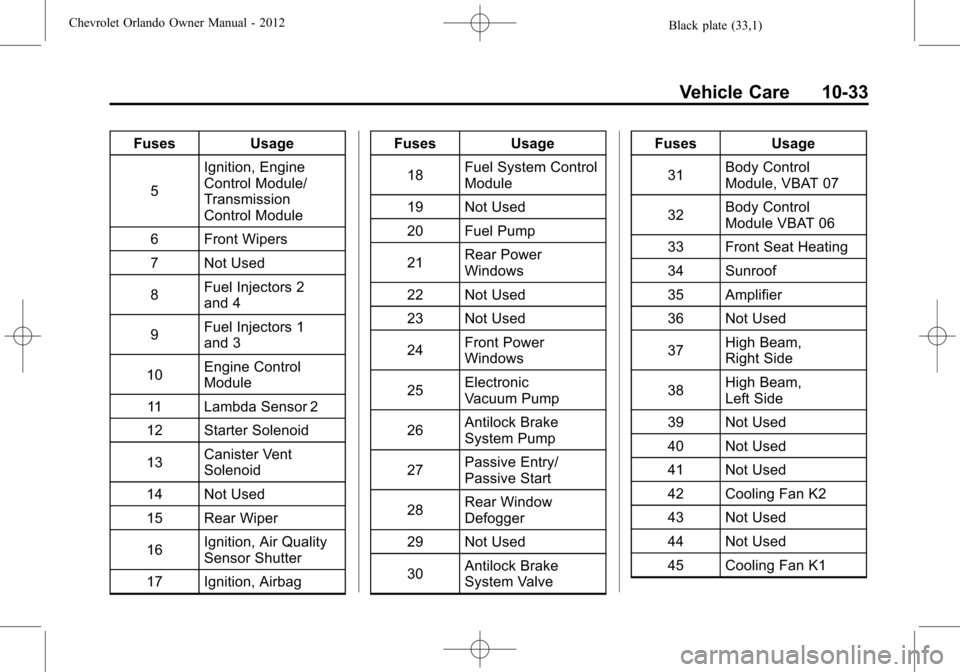
FusesUsage
5 Ignition, Engine
Control Module/
Transmission
Control Module
6 Front Wipers
7 Not Used
8 Fuel Injectors 2
and 4
9 Fuel Injectors 1
and 3
10 Engine Control
Module
11 Lambda Sensor 2
12 Starter Solenoid
13 Canister Vent
Solenoid
14 Not Used
15 Rear Wiper
16 Ignition, Air Quality
Sensor Shutter
17 Ignition, Airbag Fuses
Usage
18 Fuel System Control
Module
19 Not Used
20 Fuel Pump
21 Rear Power
Windows
22 Not Used
23 Not Used
24 Front Power
Windows
25 Electronic
Vacuum Pump
26 Antilock Brake
System Pump
27 Passive Entry/
Passive Start
28 Rear Window
Defogger
29 Not Used
30 Antilock Brake
System Valve Fuses
Usage
31 Body Control
Module, VBAT 07
32 Body Control
Module VBAT 06
33 Front Seat Heating
34 Sunroof
35 Amplifier
36 Not Used
37 High Beam,
Right Side
38 High Beam,
Left Side
39 Not Used
40 Not Used
41 Not Used
42 Cooling Fan K2
43 Not Used
44 Not Used
45 Cooling Fan K1
Page 270 of 378
Black plate (36,1)Chevrolet Orlando Owner Manual - 2012
10-36 Vehicle Care
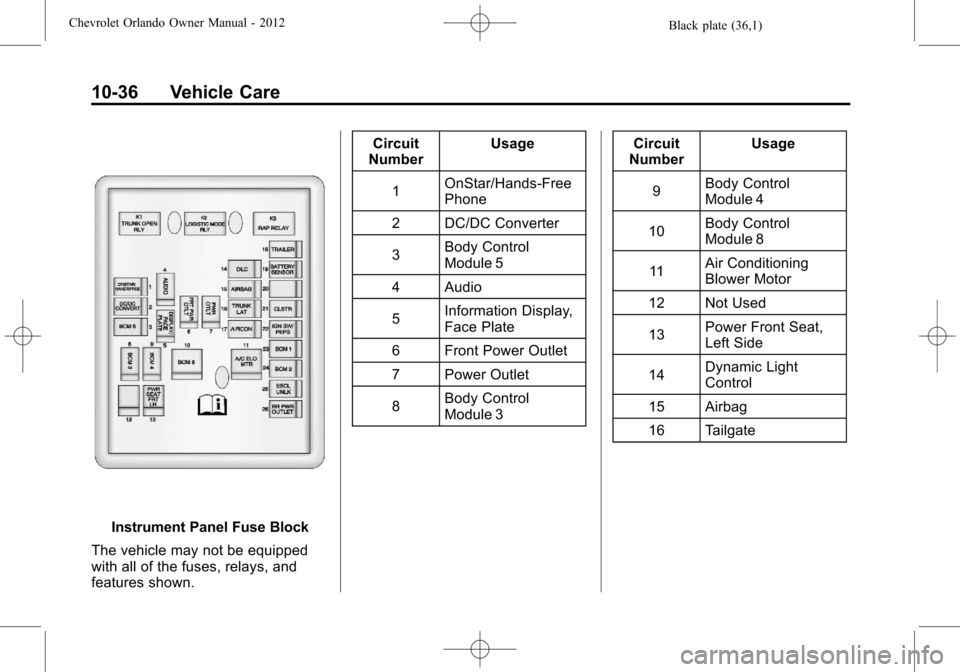
Instrument Panel Fuse Block
The vehicle may not be equipped
with all of the fuses, relays, and
features shown. Circuit
Number Usage
1 OnStar/Hands‐Free
Phone
2 DC/DC Converter
3 Body Control
Module 5
4 Audio
5 Information Display,
Face Plate
6 Front Power Outlet
7 Power Outlet
8 Body Control
Module 3 Circuit
Number Usage
9 Body Control
Module 4
10 Body Control
Module 8
11 Air Conditioning
Blower Motor
12 Not Used
13 Power Front Seat,
Left Side
14 Dynamic Light
Control
15 Airbag
16 Tailgate
Page 287 of 378
Black plate (53,1)Chevrolet Orlando Owner Manual - 2012
Vehicle Care 10-53
brakes, rollover airbags, traction
control, and electronic stability
control, the performance of these
systems can also be affected.
{WARNING
If different sized wheels are used,
there may not be an acceptable
level of performance and safety if
tires not recommended for those
wheels are selected. This
increases the chance of a crash
and serious injury. Only use GM
specific wheel and tire systems
developed for the vehicle, and
have them properly installed by a
GM certified technician.
See Buying New Tires on
page 10‑51 andAccessories and
Modifications on page 10‑2 for
additional information.
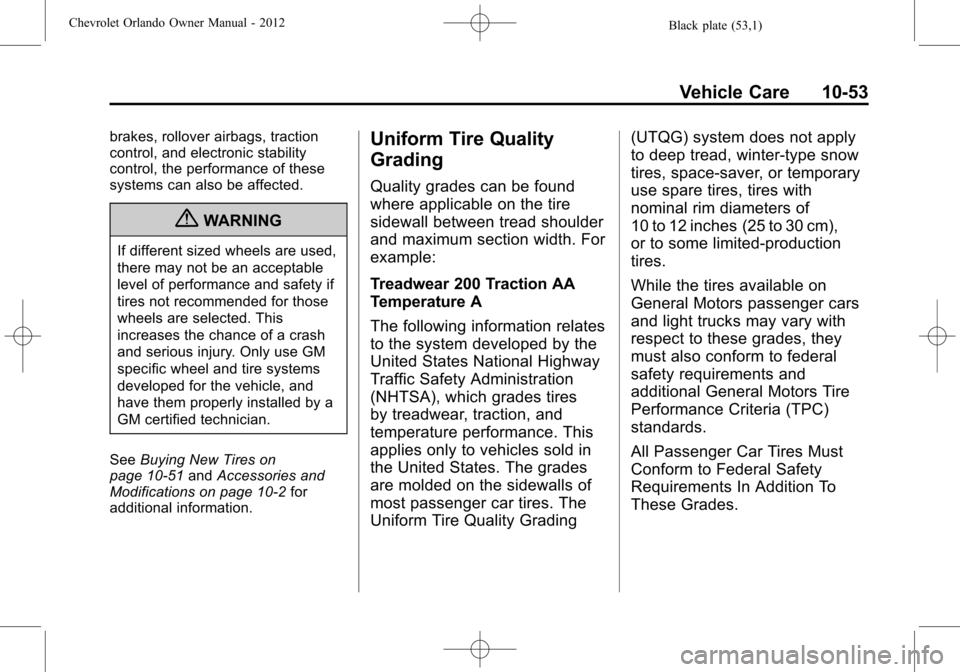
Uniform Tire Quality
Grading
Quality grades can be found
where applicable on the tire
sidewall between tread shoulder
and maximum section width. For
example:
Treadwear 200 Traction AA
Temperature A
The following information relates
to the system developed by the
United States National Highway
Traffic Safety Administration
(NHTSA), which grades tires
by treadwear, traction, and
temperature performance. This
applies only to vehicles sold in
the United States. The grades
are molded on the sidewalls of
most passenger car tires. The
Uniform Tire Quality Grading (UTQG) system does not apply
to deep tread, winter-type snow
tires, space-saver, or temporary
use spare tires, tires with
nominal rim diameters of
10 to 12 inches (25 to 30 cm),
or to some limited-production
tires.
While the tires available on
General Motors passenger cars
and light trucks may vary with
respect to these grades, they
must also conform to federal
safety requirements and
additional General Motors Tire
Performance Criteria (TPC)
standards.
All Passenger Car Tires Must
Conform to Federal Safety
Requirements In Addition To
These Grades.
Page 353 of 378
Black plate (11,1)Chevrolet Orlando Owner Manual - 2012
Customer Information 13-11
Choose a reputable repair facility
that uses quality replacement parts.
See“Collision Parts” earlier in this
section.
If the airbag has inflated, see What
Will You See after an Airbag
Inflates? on page 3‑30.
Managing the Vehicle Damage
Repair Process
In the event that the vehicle requires
damage repairs, GM recommends
that you take an active role in its
repair. If you have a pre-determined
repair facility of choice, take the
vehicle there, or have it towed there.
Specify to the facility that any
required replacement collision parts
be original equipment parts, either
new Genuine GM parts or recycled
original GM parts. Remember,
recycled parts will not be covered by
the GM vehicle warranty. Insurance pays the bill for the repair,
but you must live with the repair.
Depending on your policy limits,
your insurance company may
initially value the repair using
aftermarket parts. Discuss this with
the repair professional, and insist on
Genuine GM parts. Remember,
if the vehicle is leased, you may be
obligated to have the vehicle
repaired with Genuine GM parts,
even if your insurance coverage
does not pay the full cost.
If another party's insurance
company is paying for the repairs,
you are not obligated to accept a
repair valuation based on that
insurance company's collision policy
repair limits, as you have no
contractual limits with that company.
In such cases, you can have control
of the repair and parts choices as
long as the cost stays within
reasonable limits.
Service Publications
Ordering Information
Service Manuals
Service Manuals have the diagnosis
and repair information on the
engines, transmission, axle,
suspension, brakes, electrical,
steering, body, etc.
Service Bulletins
Service Bulletins give additional
technical service information
needed to knowledgeably service
General Motors cars and trucks.
Each bulletin contains instructions
to assist in the diagnosis and
service of the vehicle.