2012 CHEVROLET MALIBU buttons
[x] Cancel search: buttonsPage 9 of 398

Black plate (3,1)Chevrolet Malibu Owner Manual - 2012
In Brief 1-3
A.Air Vents on page 8‑9.
B. Turn and Lane‐Change Lever. See Turn and Lane-Change
Signals on page 6‑4.
C. Instrument Cluster on
page 5‑10.
D. Windshield Wiper/Washer on
page 5‑4.
E. Instrument Panel Storage on
page 4‑1.
F. Infotainment on page 7‑1.
G. Instrument Panel Illumination
Control on page 6‑5.
H. Driver Compartment Storage. See Front Storage on page 4‑2.
I. Hood Release. See Hood on
page 10‑4. J.
Cruise Control on page 9‑33.
Driver Information Center (DIC)
Buttons. See Driver Information
Center (DIC) on page 5‑24.
K. Data Link Connector (DLC) (Out of View). See Malfunction
Indicator Lamp on page 5‑16.
L. Steering Wheel Adjustment on
page 5‑2 (Out of View).
M. Horn on page 5‑3.
N. Steering Wheel Controls on
page 5‑2 (If Equipped).
O. Ignition Positions on page 9‑16.
P. Climate Control Systems on
page 8‑1 (If Equipped).
Automatic Climate Control
System on page 8‑5
(If Equipped). Q.
Hazard Warning Flashers on
page 6‑4.
R. Shift Lever. See Automatic
Transmission on page 9‑24.
S. Front Storage on page 4‑2.
Power Outlets on page 5‑7.
T. Passenger Sensing System on
page 3‑26.
U. Traction Control System (TCS)
on page 9‑30.
Page 23 of 398
Black plate (17,1)Chevrolet Malibu Owner Manual - 2012
In Brief 1-17
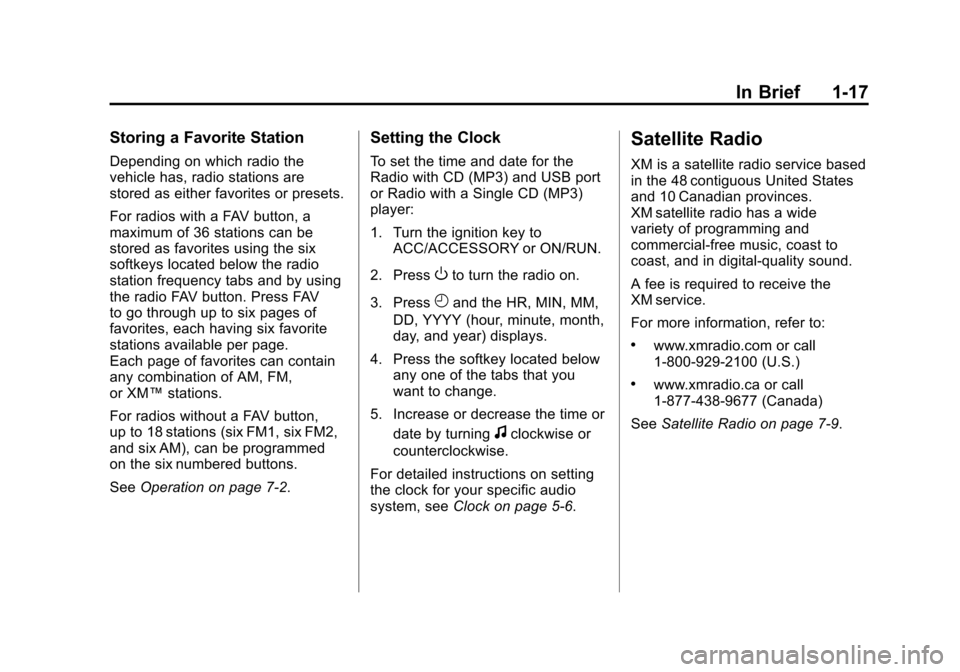
Storing a Favorite Station
Depending on which radio the
vehicle has, radio stations are
stored as either favorites or presets.
For radios with a FAV button, a
maximum of 36 stations can be
stored as favorites using the six
softkeys located below the radio
station frequency tabs and by using
the radio FAV button. Press FAV
to go through up to six pages of
favorites, each having six favorite
stations available per page.
Each page of favorites can contain
any combination of AM, FM,
or XM™stations.
For radios without a FAV button,
up to 18 stations (six FM1, six FM2,
and six AM), can be programmed
on the six numbered buttons.
See Operation on page 7‑2.
Setting the Clock
To set the time and date for the
Radio with CD (MP3) and USB port
or Radio with a Single CD (MP3)
player:
1. Turn the ignition key to
ACC/ACCESSORY or ON/RUN.
2. Press
Oto turn the radio on.
3. Press
Hand the HR, MIN, MM,
DD, YYYY (hour, minute, month,
day, and year) displays.
4. Press the softkey located below any one of the tabs that you
want to change.
5. Increase or decrease the time or date by turning
fclockwise or
counterclockwise.
For detailed instructions on setting
the clock for your specific audio
system, see Clock on page 5‑6.
Satellite Radio
XM is a satellite radio service based
in the 48 contiguous United States
and 10 Canadian provinces.
XM satellite radio has a wide
variety of programming and
commercial-free music, coast to
coast, and in digital-quality sound.
A fee is required to receive the
XM service.
For more information, refer to:
.www.xmradio.com or call
1-800-929-2100 (U.S.)
.www.xmradio.ca or call
1-877-438-9677 (Canada)
See Satellite Radio on page 7‑9.
Page 25 of 398
Black plate (19,1)Chevrolet Malibu Owner Manual - 2012
In Brief 1-19
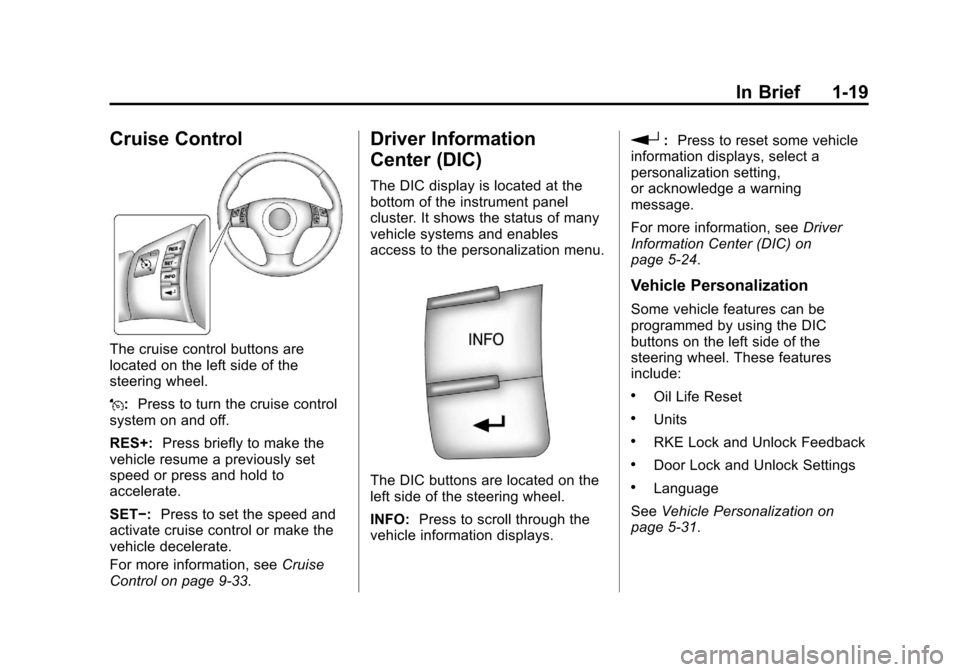
Cruise Control
The cruise control buttons are
located on the left side of the
steering wheel.
J:Press to turn the cruise control
system on and off.
RES+: Press briefly to make the
vehicle resume a previously set
speed or press and hold to
accelerate.
SET−: Press to set the speed and
activate cruise control or make the
vehicle decelerate.
For more information, see Cruise
Control on page 9‑33.
Driver Information
Center (DIC)
The DIC display is located at the
bottom of the instrument panel
cluster. It shows the status of many
vehicle systems and enables
access to the personalization menu.
The DIC buttons are located on the
left side of the steering wheel.
INFO: Press to scroll through the
vehicle information displays.
r: Press to reset some vehicle
information displays, select a
personalization setting,
or acknowledge a warning
message.
For more information, see Driver
Information Center (DIC) on
page 5‑24.
Vehicle Personalization
Some vehicle features can be
programmed by using the DIC
buttons on the left side of the
steering wheel. These features
include:
.Oil Life Reset
.Units
.RKE Lock and Unlock Feedback
.Door Lock and Unlock Settings
.Language
See Vehicle Personalization on
page 5‑31.
Page 28 of 398

Black plate (22,1)Chevrolet Malibu Owner Manual - 2012
1-22 In Brief
Engine Oil Life System
The engine oil life system calculates
engine oil life based on vehicle use
and displays the“Change Oil Soon”
DIC message when it is necessary
to change the engine oil and filter.
The oil life system should be reset
to 100% only following an oil
change.
Resetting the Oil Life System
1. Turn the ignition to ON/RUN, with the engine off.
2. Press and hold the DIC INFO and reset buttons, on the left
side of the steering wheel,
at the same time to enter the
personalization menu. The “Oil
Life Reset” message displays.
3. Press and hold the reset button until the DIC display shows
“Acknowledged.”
4. Turn the key to LOCK/OFF.
See Engine Oil Life System on
page 10‑12.
Fuel E85 (85% Ethanol)
Vehicles that have a FlexFuel badge
and a yellow fuel cap can use either
unleaded gasoline or ethanol fuel
containing up to 85% ethanol (E85).
See Fuel E85 (85% Ethanol) on
page 9‑39. For all other vehicles,
use only the unleaded gasoline
described under Recommended
Fuel on page 9‑36.
Driving for Better Fuel
Economy
Driving habits can affect fuel
mileage. Here are some driving tips
to get the best fuel economy
possible.
.Avoid fast starts and accelerate
smoothly.
.Brake gradually and avoid
abrupt stops.
.Avoid idling the engine for long
periods of time.
.When road and weather
conditions are appropriate,
use cruise control.
.Always follow posted speed
limits or drive more slowly when
conditions require.
.Keep vehicle tires properly
inflated.
.Combine several trips into a
single trip.
.Replace the vehicle's tires with
the same TPC Spec number
molded into the tire's sidewall
near the size.
.Follow recommended scheduled
maintenance.
Page 44 of 398
Black plate (14,1)Chevrolet Malibu Owner Manual - 2012
2-14 Keys, Doors, and Windows
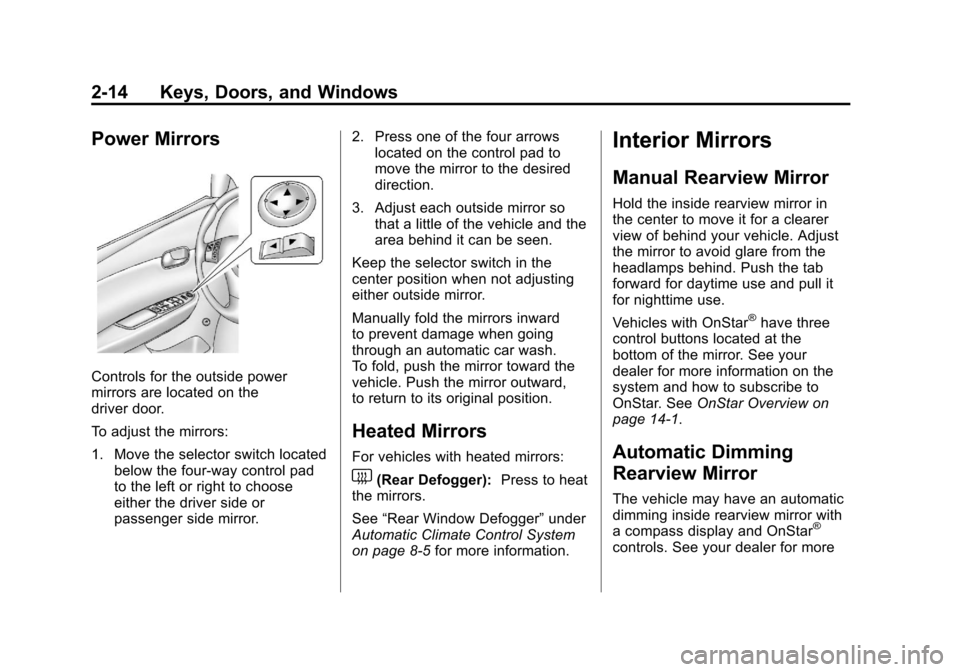
Power Mirrors
Controls for the outside power
mirrors are located on the
driver door.
To adjust the mirrors:
1. Move the selector switch locatedbelow the four-way control pad
to the left or right to choose
either the driver side or
passenger side mirror. 2. Press one of the four arrows
located on the control pad to
move the mirror to the desired
direction.
3. Adjust each outside mirror so that a little of the vehicle and the
area behind it can be seen.
Keep the selector switch in the
center position when not adjusting
either outside mirror.
Manually fold the mirrors inward
to prevent damage when going
through an automatic car wash.
To fold, push the mirror toward the
vehicle. Push the mirror outward,
to return to its original position.
Heated Mirrors
For vehicles with heated mirrors:
1(Rear Defogger): Press to heat
the mirrors.
See “Rear Window Defogger” under
Automatic Climate Control System
on page 8‑5 for more information.
Interior Mirrors
Manual Rearview Mirror
Hold the inside rearview mirror in
the center to move it for a clearer
view of behind your vehicle. Adjust
the mirror to avoid glare from the
headlamps behind. Push the tab
forward for daytime use and pull it
for nighttime use.
Vehicles with OnStar
®have three
control buttons located at the
bottom of the mirror. See your
dealer for more information on the
system and how to subscribe to
OnStar. See OnStar Overview on
page 14‑1.
Automatic Dimming
Rearview Mirror
The vehicle may have an automatic
dimming inside rearview mirror with
a compass display and OnStar
®
controls. See your dealer for more
Page 62 of 398
Black plate (14,1)Chevrolet Malibu Owner Manual - 2012
3-14 Seats and Restraints
Shoulder Belt Height Adjuster
Your vehicle has a shoulder belt
height adjuster for the driver and
right front passenger position.
Adjust the height so the shoulder
portion of the belt is on the shoulder
and not falling off of it. The belt
should be close to, but not
contacting, the neck. Improper
shoulder belt height adjustment
could reduce the effectiveness of
the safety belt in a crash. SeeHow
to Wear Safety Belts Properly on
page 3‑10.
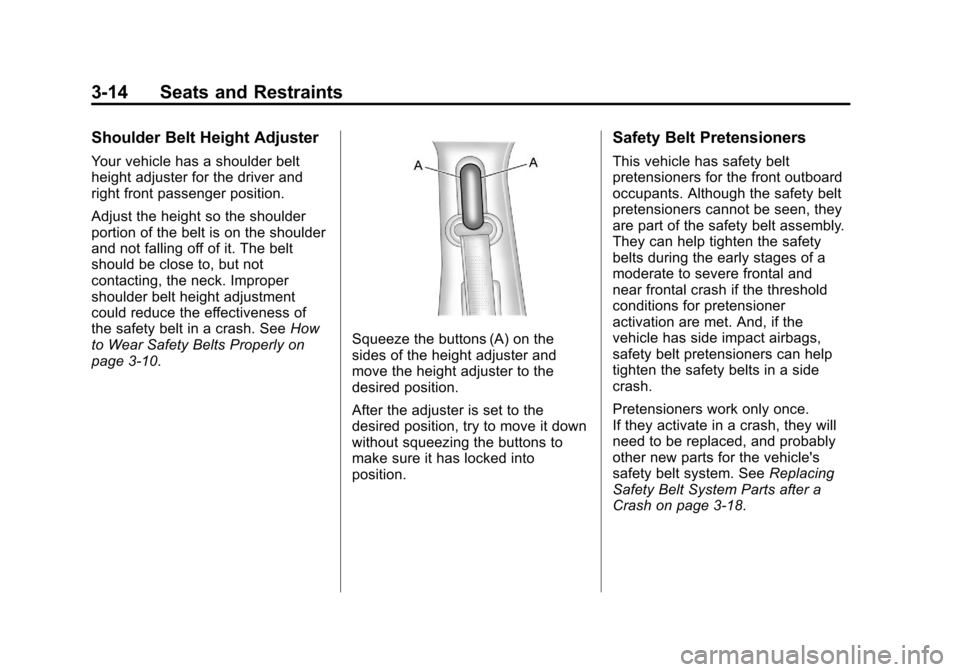
Squeeze the buttons (A) on the
sides of the height adjuster and
move the height adjuster to the
desired position.
After the adjuster is set to the
desired position, try to move it down
without squeezing the buttons to
make sure it has locked into
position.
Safety Belt Pretensioners
This vehicle has safety belt
pretensioners for the front outboard
occupants. Although the safety belt
pretensioners cannot be seen, they
are part of the safety belt assembly.
They can help tighten the safety
belts during the early stages of a
moderate to severe frontal and
near frontal crash if the threshold
conditions for pretensioner
activation are met. And, if the
vehicle has side impact airbags,
safety belt pretensioners can help
tighten the safety belts in a side
crash.
Pretensioners work only once.
If they activate in a crash, they will
need to be replaced, and probably
other new parts for the vehicle's
safety belt system. See Replacing
Safety Belt System Parts after a
Crash on page 3‑18.
Page 130 of 398
Black plate (24,1)Chevrolet Malibu Owner Manual - 2012
5-24 Instruments and Controls
Information Displays
Driver Information
Center (DIC)
Your vehicle has a Driver
Information Center (DIC). The DIC
display gives you the status of many
of your vehicle's systems. The DIC
is also used to display driver
personalization menu modes and
warning/status messages. All
messages will appear in the DIC
display, located at the bottom of the
instrument panel cluster.
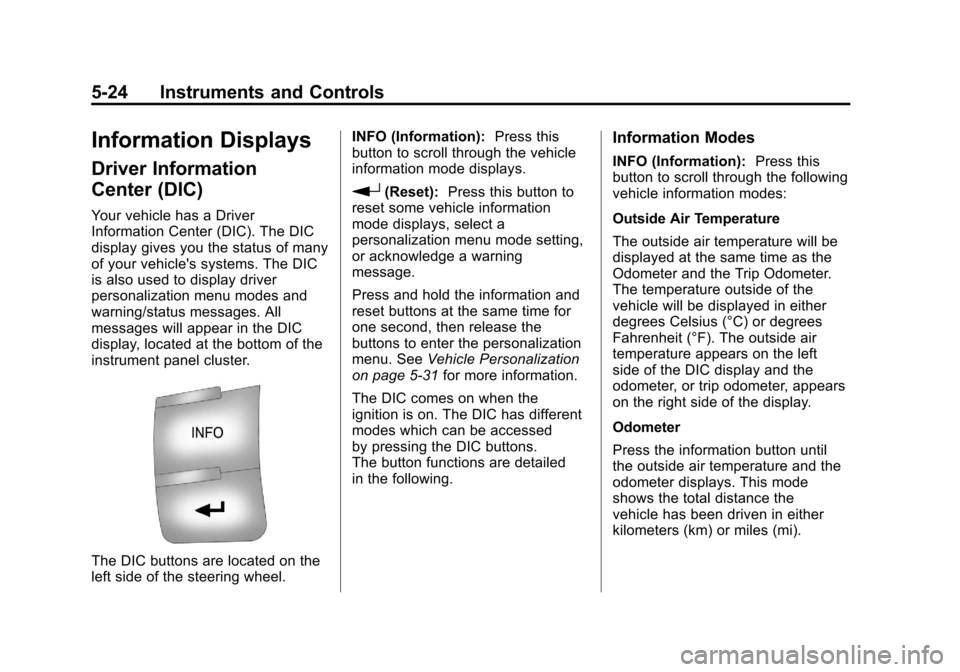
The DIC buttons are located on the
left side of the steering wheel.INFO (Information):
Press this
button to scroll through the vehicle
information mode displays.
r(Reset): Press this button to
reset some vehicle information
mode displays, select a
personalization menu mode setting,
or acknowledge a warning
message.
Press and hold the information and
reset buttons at the same time for
one second, then release the
buttons to enter the personalization
menu. See Vehicle Personalization
on page 5‑31 for more information.
The DIC comes on when the
ignition is on. The DIC has different
modes which can be accessed
by pressing the DIC buttons.
The button functions are detailed
in the following.
Information Modes
INFO (Information): Press this
button to scroll through the following
vehicle information modes:
Outside Air Temperature
The outside air temperature will be
displayed at the same time as the
Odometer and the Trip Odometer.
The temperature outside of the
vehicle will be displayed in either
degrees Celsius (°C) or degrees
Fahrenheit (°F). The outside air
temperature appears on the left
side of the DIC display and the
odometer, or trip odometer, appears
on the right side of the display.
Odometer
Press the information button until
the outside air temperature and the
odometer displays. This mode
shows the total distance the
vehicle has been driven in either
kilometers (km) or miles (mi).
Page 132 of 398
Black plate (26,1)Chevrolet Malibu Owner Manual - 2012
5-26 Instruments and Controls
OIL LIFE
Press the information button until
OIL LIFE displays. The engine oil
life system shows an estimate of the
oil's remaining useful life. It shows
100% when the system is reset
after an oil change. It alerts you to
change the oil on a schedule
consistent with your driving
conditions.
In addition to the engine oil life
system monitoring the oil life,
additional maintenance is
recommended in the Maintenance
Schedule in this manual. See
Engine Oil on page 10‑10and
Maintenance Schedule on
page 11‑2.
Always reset the engine oil life
system after an oil change. See
“How to Reset the Engine Oil Life
System” underEngine Oil Life
System on page 10‑12. Tire Pressure
On vehicles with the Tire Pressure
Monitor System (TPMS), the
pressure for each tire can be viewed
in the DIC. The tire pressure is
shown in either kilopascals (kPa)
or pounds per square inch (psi).
Press the information button until
LF ## PSI (kPa) ## RF displays
for the front tires. Press the
information button again until
LR ## PSI (kPa) ## RR displays
for the rear tires.
If a low tire pressure condition is
detected by the system while
driving, a message advising you to
add air will appear in the display.
See
Tire Pressure on page 10‑50
and Tire Messages on page 5‑30
for more information.Vehicle Messages
The following messages appear if
there is a problem detected in one
of your vehicle's systems.
A message clears when the
vehicle's condition is no longer
present. To acknowledge a
message and clear it from the
display, press and hold any of the
DIC buttons. If the condition is still
present, the warning message
comes back on the next time the
vehicle is turned off and back on.
With most messages, a warning
chime sounds when the message
displays. Your vehicle may have
other warning messages.