2012 CHEVROLET MALIBU trunk
[x] Cancel search: trunkPage 40 of 398
Black plate (10,1)Chevrolet Malibu Owner Manual - 2012
2-10 Keys, Doors, and Windows
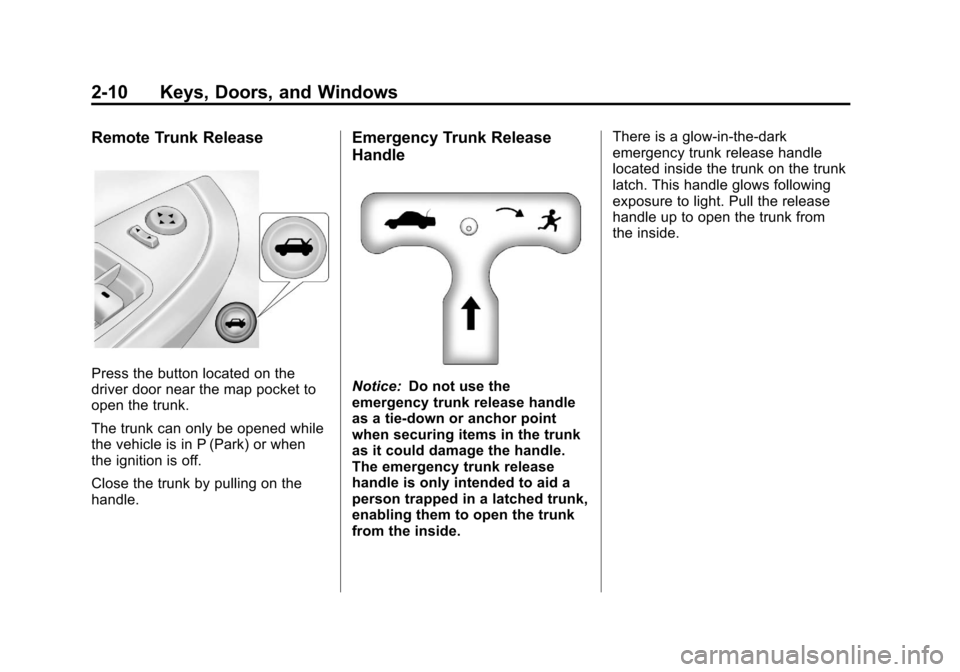
Remote Trunk Release
Press the button located on the
driver door near the map pocket to
open the trunk.
The trunk can only be opened while
the vehicle is in P (Park) or when
the ignition is off.
Close the trunk by pulling on the
handle.
Emergency Trunk Release
Handle
Notice:Do not use the
emergency trunk release handle
as a tie-down or anchor point
when securing items in the trunk
as it could damage the handle.
The emergency trunk release
handle is only intended to aid a
person trapped in a latched trunk,
enabling them to open the trunk
from the inside. There is a glow-in-the-dark
emergency trunk release handle
located inside the trunk on the trunk
latch. This handle glows following
exposure to light. Pull the release
handle up to open the trunk from
the inside.
Page 41 of 398
Black plate (11,1)Chevrolet Malibu Owner Manual - 2012
Keys, Doors, and Windows 2-11
Vehicle Security
This vehicle has theft-deterrent
features; however, they do not make
it impossible to steal.
Anti-theft Alarm System
Your vehicle may have an anti-theft
alarm system.
Arming the System
With the ignition off, press the
Remote Keyless Entry (RKE)
transmitter lock button to arm the
system.
The system will arm 30 seconds
after all the doors are closed,
or 60 seconds with any door open.
If you press the lock button on the
transmitter a second time while all
the doors are closed, the system will
arm immediately. The system will
still arm in 60 seconds if a door is
open. When the open door is
closed, the system will arm.
The security light, located on the
instrument panel cluster, comes on
to indicate that arming has been
initiated. Once the system is armed,
the security light flashes once every
three seconds.
If the security light is flashing twice
per second, this means that a door
is open.
If the system is armed and the key
is used to unlock the vehicle, the
alarm will be activated.
If you do not want to arm the
system, lock the vehicle with the
manual lock knob on the doors or
with the inside power door lock
switches.
The alarm will sound and the
exterior lights will flash if any door is
opened while armed.
Disarming the System
To disarm the system:
.Press the RKE transmitter
unlock button.
.Turn the ignition to ON/RUN.
Once the system is disarmed, the
security light will stop flashing.
How the System Alarm is
Activated
To activate the system if it is armed:
.Open the driver's door or trunk.
A ten second pre-alarm chirp
will sound followed by a
thirty second full alarm of horn
and lights.
.Open any other door. A full
alarm of horn and lights will
immediately sound for thirty
seconds.
.Open the hood. If the vehicle
has the remote start feature,
it will activate the full alarm.
Page 133 of 398
Black plate (27,1)Chevrolet Malibu Owner Manual - 2012
Instruments and Controls 5-27
Brake System Messages
BRAKE FLUID
This message displays, while the
ignition is on, when the brake fluid
level is low. The brake system
warning light on the instrument
panel cluster also comes on. See
Brake System Warning Light on
page 5‑18for more information.
Have the brake system serviced by
your dealer as soon as possible.
PUSH PARK PEDAL
This message displays if the parking
brake is left engaged. See Parking
Brake on page 9‑29 for more
information.
Cruise Control Messages
CRUISE ENGAGED
This message displays when the
cruise control system is active.
See Cruise Control on page 9‑33 for
more information.
Door Ajar Messages
DOOR AJAR
This message displays if one or
more of the vehicle's doors are not
closed properly. Make sure that the
door(s) are closed completely.
TRUNK AJAR
This message displays when the
trunk is not closed completely.
Make sure that the trunk is closed
completely. See Trunk on page 2‑9
for more information.
Engine Oil Messages
CHANGE OIL SOON
This message displays when the life
of the engine oil has expired and it
should be changed.
When this message is
acknowledged and cleared from
the display, the engine oil life
system must still be reset
separately. See Engine Oil Life System on page 10‑12,
Engine Oil
on page 10‑10, and Maintenance
Schedule on page 11‑2 for more
information.
Engine Power Messages
ENG (Engine) PWR (Power)
REDUCED
This message displays when the
vehicle's engine power is reduced.
Reduced engine power can affect
the vehicle's ability to accelerate.
If this message is on, but there is
no reduction in performance,
proceed to your destination.
The performance may be reduced
the next time the vehicle is driven.
The vehicle may be driven at a
reduced speed while this message
is on, but acceleration and speed
may be reduced. Anytime this
message stays on, the vehicle
should be taken to your dealer for
service as soon as possible.
Page 139 of 398
Black plate (33,1)Chevrolet Malibu Owner Manual - 2012
Instruments and Controls 5-33
UNLOCK HORN
This feature, which allows the
vehicle's horn to chirp on the first
press of the unlock button on the
Remote Keyless Entry (RKE)
transmitter, can be enabled or
disabled. When UNLOCK HORN
appears on the display, press and
hold the reset button for at least
one second to scroll through the
available settings:
OFF (default):The horn will not
chirp when the unlock button on the
RKE transmitter is pressed.
ON: The horn will chirp on the first
press of the unlock button on the
RKE transmitter.
See Remote Keyless Entry (RKE)
System Operation on page 2‑3 for
more information.
To select a setting and move on
to the next feature, press the
information button while the desired
setting is displayed on the DIC. LIGHT FLASH
This feature, which allows the
vehicle's exterior hazard/turn signal
lighting to flash every time the lock,
unlock, or trunk release buttons on
the Remote Keyless Entry (RKE)
transmitter are pressed, can be
enabled or disabled. When LIGHT
FLASH appears on the display,
press and hold the reset button for
at least one second to scroll through
the available settings:
OFF:
The exterior hazard/turn
signal lighting will not flash when
the lock, unlock, or trunk release
buttons on the RKE transmitter are
pressed.
ON (default): The exterior hazard/
turn signal lighting will flash when
the lock, unlock, or trunk release
buttons on the RKE transmitter are
pressed.
See Remote Keyless Entry (RKE)
System Operation on page 2‑3 for
more information. To select a setting and move on
to the next feature, press the
information button while the desired
setting is displayed on the DIC.
DELAY LOCK
This feature, which delays the
actual locking of the vehicle, can be
enabled or disabled. When DELAY
LOCK appears on the display, press
and hold the reset button for at least
one second to scroll through the
available settings:
ON (default):
The doors will not
lock until five seconds after the last
door is closed. You can temporarily
override delayed locking by
pressing the power lock switch or
the lock button on the Remote
Keyless Entry (RKE) transmitter a
second time.
OFF: The doors will lock
immediately when pressing the
power lock switch or the lock button
on the RKE transmitter.
Page 149 of 398
Black plate (7,1)Chevrolet Malibu Owner Manual - 2012
Lighting 6-7
This is because the generator
(alternator) may not be spinning
fast enough at idle to produce all of
the power needed for very high
electrical loads.
A high electrical load occurs when
several of the following are on, such
as: headlamps, high beams, fog
lamps, rear window defogger,
climate control fan at high speed,
heated seats, engine cooling fans,
trailer loads, and loads plugged into
accessory power outlets.
EPM works to prevent excessive
discharge of the battery. It does this
by balancing the generator's output
and the vehicle's electrical needs.
It can increase engine idle speed to
generate more power whenever
needed. It can temporarily reduce
the power demands of some
accessories.Normally, these actions occur in
steps or levels, without being
noticeable. In rare cases at the
highest levels of corrective action,
this action may be noticeable to the
driver. If so, a DIC message might
be displayed, such as BATTERY
SAVER ACTIVE, BATTERY
VOLTAGE LOW, or LOW BATTERY.
If one of these messages displays,
it is recommended that the driver
reduce the electrical loads as much
as possible. See
Driver Information
Center (DIC) on page 5‑24.
Battery Power Protection
The vehicle has a battery run-down
protection feature designed to
protect the vehicle's battery.
When any interior lamp (trunk,
reading, or visor vanity) is left on
while the ignition is turned off, the
battery run-down protection system
will automatically shut the lamp(s)
off after 20 minutes. This will avoid
draining the battery. To reactivate the interior lamps,
do one of the following:
.Turn on the ignition.
.Turn the exterior lamp control off
and then on.
.Open a door.
.Press any Remote Keyless
Entry (RKE) transmitter button
(if equipped).
.Press the remote trunk release
button.
.Press the power door lock
switch.
The battery run-down feature will
also be activated when any door
on the vehicle is left open and the
ignition is in LOCK/OFF.
Page 233 of 398
Black plate (41,1)Chevrolet Malibu Owner Manual - 2012
Driving and Operating 9-41
{WARNING
If a fire starts while you are
refueling, do not remove the
nozzle. Shut off the flow of fuel by
shutting off the pump or by
notifying the station attendant.
Leave the area immediately.
Notice: If a new fuel cap is
needed, be sure to get the right
type of cap from your dealer.
The wrong type of fuel cap might
not fit properly, might cause the
malfunction indicator lamp to
light, and could damage the fuel
tank and emissions system.
See Malfunction Indicator Lamp
on page 5‑16.
Filling a Portable Fuel
Container
{WARNING
Never fill a portable fuel container
while it is in the vehicle. Static
electricity discharge from the
container can ignite the fuel
vapor. You can be badly burned
and the vehicle damaged if this
occurs. To help avoid injury to
you and others:
.Dispense fuel only into
approved containers.
.Do not fill a container while
it is inside a vehicle, in a
vehicle's trunk, pickup bed,
or on any surface other than
the ground.
(Continued)
WARNING (Continued)
.Bring the fill nozzle in contact
with the inside of the fill
opening before operating the
nozzle. Contact should be
maintained until the filling is
complete.
.Do not smoke while
pumping fuel.
.Do not use a cellular phone
while pumping fuel.
Page 270 of 398
Black plate (30,1)Chevrolet Malibu Owner Manual - 2012
10-30 Vehicle Care
Headlamp Aiming
Headlamp aim has been preset at
the factory and should need no
further adjustment.
However, if the vehicle is damaged
in a crash, the headlamp aim may
be affected. Aim adjustment to the
low-beam headlamps may be
necessary if oncoming drivers flash
their high-beam headlamps at you
(for vertical aim).
If the headlamps need to be
re-aimed, it is recommended that
the vehicle be taken to a dealer for
service.
Bulb Replacement
For the proper type of replacement
bulbs, seeReplacement Bulbs on
page 10‑33.
For any bulb‐changing procedure
not listed in this section, contact
your dealer.
Halogen Bulbs
{WARNING
Halogen bulbs have pressurized
gas inside and can burst if you
drop or scratch the bulb. You or
others could be injured. Be sure
to read and follow the instructions
on the bulb package.
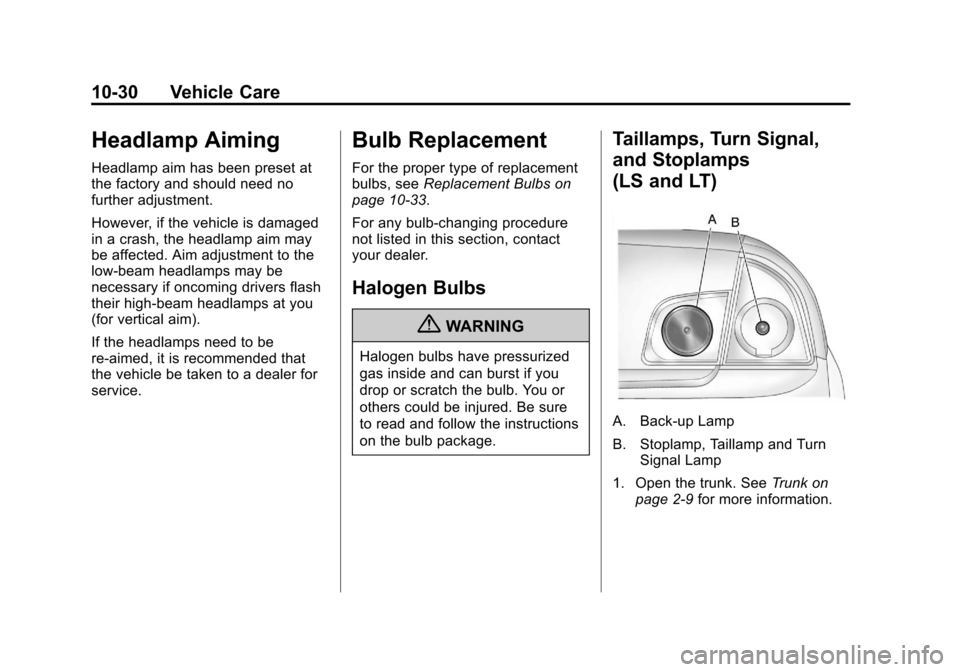
Taillamps, Turn Signal,
and Stoplamps
(LS and LT)
A. Back‐up Lamp
B. Stoplamp, Taillamp and Turn
Signal Lamp
1. Open the trunk. See Trunk on
page 2‑9 for more information.
Page 271 of 398
Black plate (31,1)Chevrolet Malibu Owner Manual - 2012
Vehicle Care 10-31
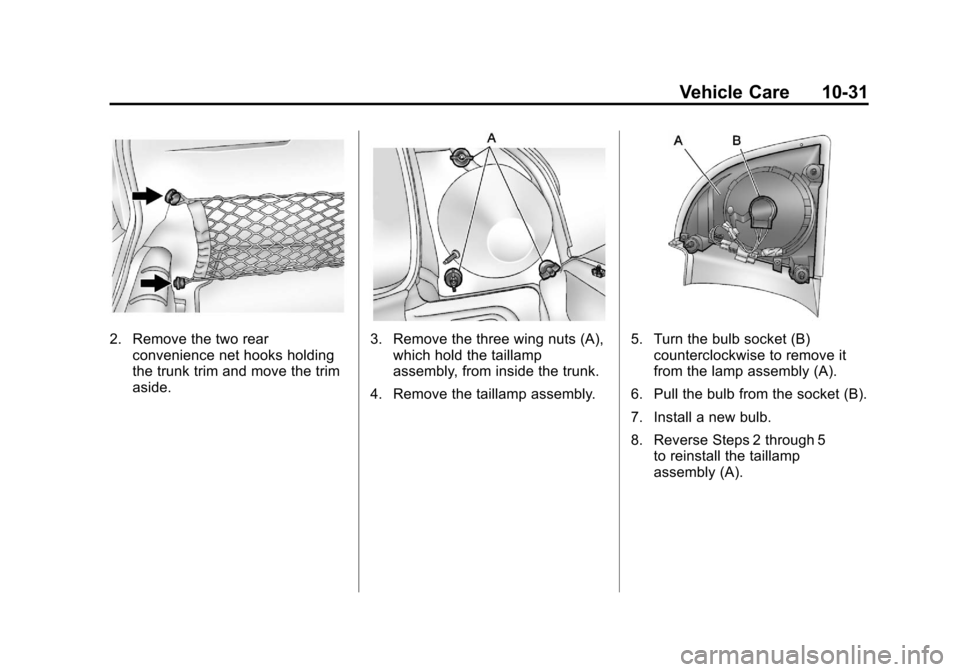
2. Remove the two rearconvenience net hooks holding
the trunk trim and move the trim
aside.3. Remove the three wing nuts (A),which hold the taillamp
assembly, from inside the trunk.
4. Remove the taillamp assembly.5. Turn the bulb socket (B) counterclockwise to remove it
from the lamp assembly (A).
6. Pull the bulb from the socket (B).
7. Install a new bulb.
8. Reverse Steps 2 through 5 to reinstall the taillamp
assembly (A).