2012 CHEVROLET IMPALA ECU
[x] Cancel search: ECUPage 98 of 374
Black plate (54,1)Chevrolet Impala Owner Manual - 2012
3-54 Seats and Restraints
A label on the sun visor says,
“Never put a rear-facing child seat in
the front.”This is because the risk to
the rear-facing child is so great,
if the airbag deploys.
{WARNING
A child in a rear-facing child
restraint can be seriously
injured or killed if the right front
passenger airbag inflates. This is
because the back of the
rear-facing child restraint would
be very close to the inflating
airbag. A child in a forward-facing
child restraint can be seriously
injured or killed if the right front
passenger airbag inflates and the
passenger seat is in a forward
position.
(Continued)
WARNING (Continued)
Even if the passenger sensing
system has turned off the right
front passenger frontal airbag, no
system is fail-safe. No one can
guarantee that an airbag will not
deploy under some unusual
circumstance, even though it is
turned off.
Secure rear-facing child
restraints in a rear seat, even if
the airbag is off. If you secure a
forward-facing child restraint in
the right front seat, always move
the front passenger seat as far
back as it will go. It is better to
secure the child restraint in a
rear seat.
SeePassenger Sensing System
on page 3‑28 for additional
information. If the child restraint has the LATCH
system, see
Lower Anchors and
Tethers for Children (LATCH
System) on page 3‑45 for how and
where to install the child restraint
using LATCH. If a child restraint is
secured using a safety belt and it
uses a top tether, see for top tether
anchor locations.
Do not secure a child seat in a
position without a top tether anchor
if a national or local law requires
that the top tether be anchored, or if
the instructions that come with the
child restraint say that the top strap
must be anchored.
In Canada, the law requires that
forward-facing child restraints have
a top tether, and that the tether be
attached.
Page 99 of 374
Black plate (55,1)Chevrolet Impala Owner Manual - 2012
Seats and Restraints 3-55
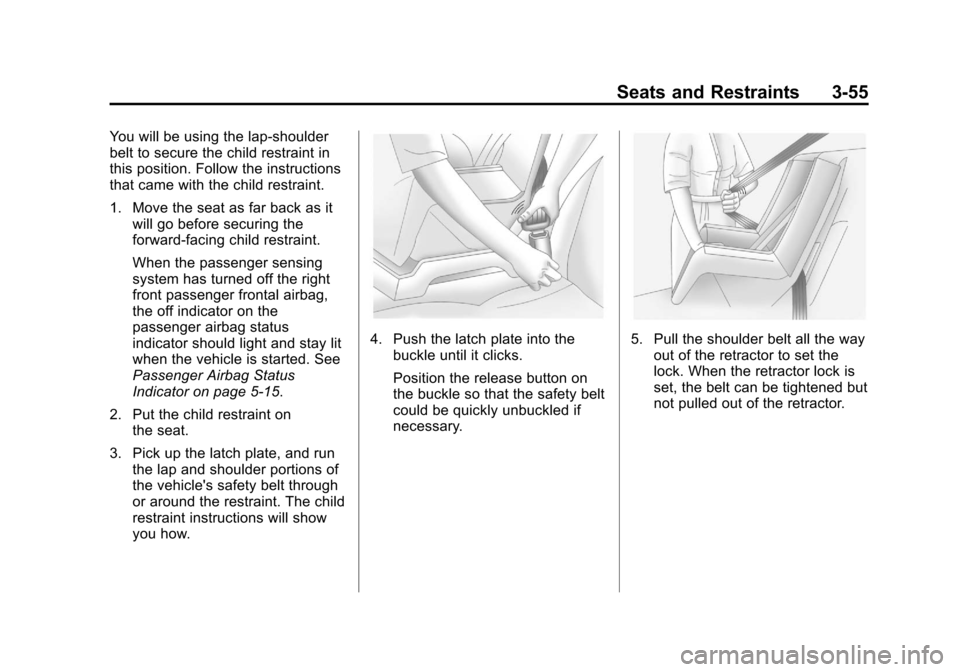
You will be using the lap-shoulder
belt to secure the child restraint in
this position. Follow the instructions
that came with the child restraint.
1. Move the seat as far back as itwill go before securing the
forward-facing child restraint.
When the passenger sensing
system has turned off the right
front passenger frontal airbag,
the off indicator on the
passenger airbag status
indicator should light and stay lit
when the vehicle is started. See
Passenger Airbag Status
Indicator on page 5‑15.
2. Put the child restraint on the seat.
3. Pick up the latch plate, and run the lap and shoulder portions of
the vehicle's safety belt through
or around the restraint. The child
restraint instructions will show
you how.
4. Push the latch plate into the
buckle until it clicks.
Position the release button on
the buckle so that the safety belt
could be quickly unbuckled if
necessary.5. Pull the shoulder belt all the wayout of the retractor to set the
lock. When the retractor lock is
set, the belt can be tightened but
not pulled out of the retractor.
Page 100 of 374
Black plate (56,1)Chevrolet Impala Owner Manual - 2012
3-56 Seats and Restraints
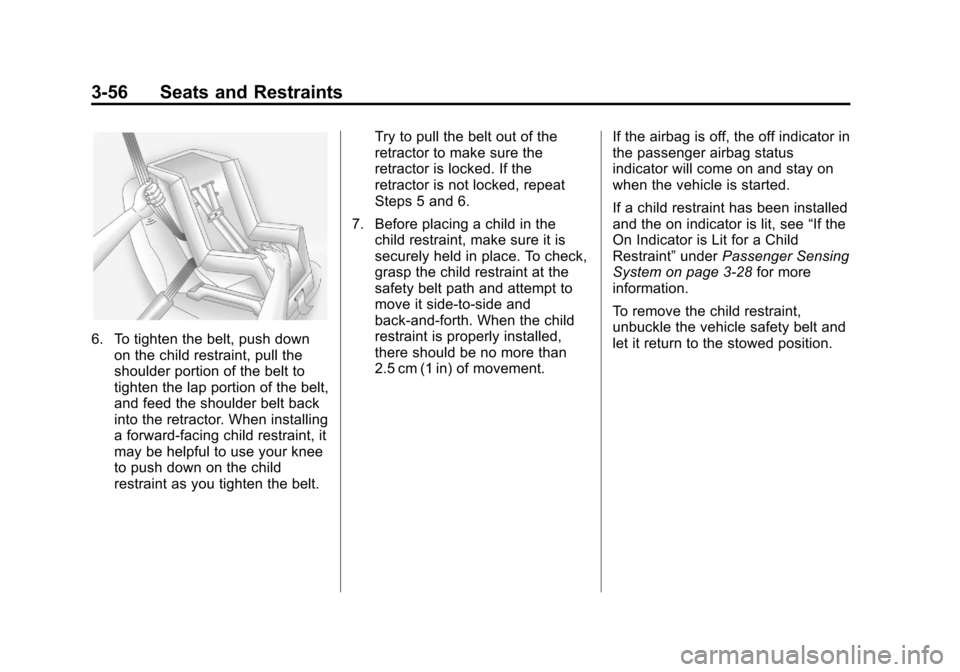
6. To tighten the belt, push downon the child restraint, pull the
shoulder portion of the belt to
tighten the lap portion of the belt,
and feed the shoulder belt back
into the retractor. When installing
a forward-facing child restraint, it
may be helpful to use your knee
to push down on the child
restraint as you tighten the belt. Try to pull the belt out of the
retractor to make sure the
retractor is locked. If the
retractor is not locked, repeat
Steps 5 and 6.
7. Before placing a child in the child restraint, make sure it is
securely held in place. To check,
grasp the child restraint at the
safety belt path and attempt to
move it side‐to‐side and
back‐and‐forth. When the child
restraint is properly installed,
there should be no more than
2.5 cm (1 in) of movement. If the airbag is off, the off indicator in
the passenger airbag status
indicator will come on and stay on
when the vehicle is started.
If a child restraint has been installed
and the on indicator is lit, see
“If the
On Indicator is Lit for a Child
Restraint” underPassenger Sensing
System on page 3‑28 for more
information.
To remove the child restraint,
unbuckle the vehicle safety belt and
let it return to the stowed position.
Page 103 of 374

Black plate (1,1)Chevrolet Impala Owner Manual - 2012
Instruments and Controls 5-1
Instruments and
Controls
Controls
Steering Wheel Adjustment . . . 5-2
Steering Wheel Controls . . . . . . 5-3
Horn . . . . . . . . . . . . . . . . . . . . . . . . . . 5-3
Windshield Wiper/Washer . . . . . 5-4
Compass . . . . . . . . . . . . . . . . . . . . . 5-5
Clock . . . . . . . . . . . . . . . . . . . . . . . . . 5-6
Power Outlets . . . . . . . . . . . . . . . . . 5-8
Cigarette Lighter . . . . . . . . . . . . . . 5-8
Ashtrays . . . . . . . . . . . . . . . . . . . . . . 5-9
Warning Lights, Gauges, and
Indicators
Warning Lights, Gauges, andIndicators . . . . . . . . . . . . . . . . . . . . 5-9
Instrument Cluster . . . . . . . . . . . 5-10
Speedometer . . . . . . . . . . . . . . . . 5-11
Odometer . . . . . . . . . . . . . . . . . . . . 5-11
Tachometer . . . . . . . . . . . . . . . . . . 5-11
Fuel Gauge . . . . . . . . . . . . . . . . . . 5-11
Engine Coolant Temperature Gauge . . . . . . . . . . . . . . . . . . . . . . 5-12
Safety Belt Reminders . . . . . . . 5-13
Airbag Readiness Light . . . . . . 5-14 Passenger Airbag Status
Indicator . . . . . . . . . . . . . . . . . . . . 5-15
Charging System Light . . . . . . 5-16
Malfunction Indicator Lamp . . . . . . . . . . . . . 5-16
Brake System Warning Light . . . . . . . . . . . . . . . . . . . . . . . 5-19
Antilock Brake System (ABS) Warning Light . . . . . . . . . . . . . . 5-20
Electronic Stability Control (ESC) Off Light . . . . . . . . . . . . . 5-20
Electronic Stability Control (ESC)/Traction Control
System (TCS) Indicator/
Warning Light . . . . . . . . . . . . . . 5-21
Engine Coolant Temperature Warning Light . . . . . . . . . . . . . . 5-21
Tire Pressure Light . . . . . . . . . . 5-22
Engine Oil Pressure Light . . . . 5-22
Security Light . . . . . . . . . . . . . . . . 5-23
High-Beam On Light . . . . . . . . . 5-23
Front Fog Lamp Light . . . . . . . . 5-24
Cruise Control Light . . . . . . . . . 5-24
Information Displays
Driver Information Center (DIC) . . . . . . . . . . . . . . . 5-24
Vehicle Messages
Vehicle Messages . . . . . . . . . . . 5-29
Battery Voltage and ChargingMessages . . . . . . . . . . . . . . . . . . 5-29
Brake System Messages . . . . 5-29
Door Ajar Messages . . . . . . . . . 5-30
Engine Cooling System Messages . . . . . . . . . . . . . . . . . . 5-30
Engine Oil Messages . . . . . . . . 5-31
Engine Power Messages . . . . 5-32
Fuel System Messages . . . . . . 5-32
Key and Lock Messages . . . . . 5-33
Lamp Messages . . . . . . . . . . . . . 5-33
Ride Control System Messages . . . . . . . . . . . . . . . . . . 5-33
Airbag System Messages . . . . 5-34
Anti-theft Alarm System Messages . . . . . . . . . . . . . . . . . . 5-35
Service Vehicle Messages . . . 5-35
Tire Messages . . . . . . . . . . . . . . . 5-36
Transmission Messages . . . . . 5-36
Vehicle Reminder Messages . . . . . . . . . . . . . . . . . . 5-37
Washer Fluid Messages . . . . . 5-37
Page 125 of 374
Black plate (23,1)Chevrolet Impala Owner Manual - 2012
Instruments and Controls 5-23
This light comes on briefly while
starting the engine. If it does not,
have the vehicle serviced by your
dealer. If the system is working
normally, the indicator light then
goes off.
If the light comes on and stays on, it
means that oil is not flowing through
the engine properly. The vehicle
could be low on oil and it might
have some other system problem.
Security Light
The security light should come on
briefly as the engine is started. If the
system is working normally, the
indicator light turns off. If it does not
come on, have the vehicle serviced
by your dealer.If the light stays on and the engine
does not start, there could be a
problem with the theft-deterrent
system.
This light is also used to indicate the
status of the anti-theft alarm system
when the ignition is turned off. The
light will flash rapidly if the alarm
system is arming and one or more
of the monitored entry points is not
closed. The light will stay on if the
alarm is arming and all entry points
are closed.
For information regarding this light
and the vehicle's security system,
see
Anti-theft Alarm System on
page 2‑11.
High-Beam On Light
This light comes on when the
high-beam headlamps are in use.
See Headlamp High/Low-Beam
Changer on page 6‑2 for more
information.
Page 145 of 374

Black plate (43,1)Chevrolet Impala Owner Manual - 2012
Instruments and Controls 5-43
Exiting the Feature
Settings Menu
The feature settings menu will be
exited when any of the following
occurs:
.The vehicle is shifted out of
P (Park).
.The vehicle is no longer in
ON/RUN.
.The trip/fuel or vehicle
information DIC buttons are
pressed.
.The end of the feature settings
menu is reached and exited.
.A 40-second time period has
elapsed with no selection made.
Universal Remote
System
SeeRadio Frequency Statement on
page 13‑16 for information
regarding Part 15 of the Federal
Communications Commission (FCC)
rules and Industry Canada
Standards RSS-GEN/210/220/310.
Universal Remote System
Programming
This vehicle may have the Universal
Home Remote System. This system provides a way to
replace up to three remote control
transmitters used to activate
devices such as garage door
openers, security systems, and
home automation devices.
Do not use this system with any
garage door opener that does not
have the stop and reverse feature.
This includes any garage door
opener model manufactured before
April 1, 1982.
Read the instructions completely
before attempting to program the
transmitter. Because of the steps
involved, it may be helpful to have
another person available to assist in
programming the transmitter.
Page 147 of 374
Black plate (45,1)Chevrolet Impala Owner Manual - 2012
Instruments and Controls 5-45
3. Immediately return to thevehicle. Press and hold the
Universal Home Remote button
that will be used to control the
garage door until the garage
door moves. The indicator light,
above the selected button,
should slowly blink. This button
may need to be held for up to
20 seconds.
4. Immediately, within one second, release the button when the
garage door moves. The
indicator light will blink rapidly
until programming is complete.
5. Press and release the same button again. The garage door
should move, confirming that
programming is successful and
complete.
To program another Rolling Code
device such as an additional garage
door opener, a security device,
or home automation device, repeat
Steps 1 through 5, choosing a different function button in Step 3
than what was used for the garage
door opener.
If these instructions do not work,
the garage door opener is probably
a Fixed Code unit. Follow the
Programming instructions that follow
for a Fixed Code garage door
opener.
Programming Universal Home
Remote
—Fixed Code
For questions or help programming
the Universal Home Remote
System, call 1-866-572-2728 or go
to www.learcar2u.com.
Most garage door openers sold
before 1996 are Fixed Code units.
Programming a garage door opener
involves time-sensitive actions, so
read the entire procedure before
starting. Otherwise, the device will
time out and the procedure will have
to be repeated.To program up to three devices:
1. To verify that the garage door
opener is a Fixed Code unit,
remove the battery cover on the
hand held transmitter supplied
by the manufacturer of the
garage door opener motor.
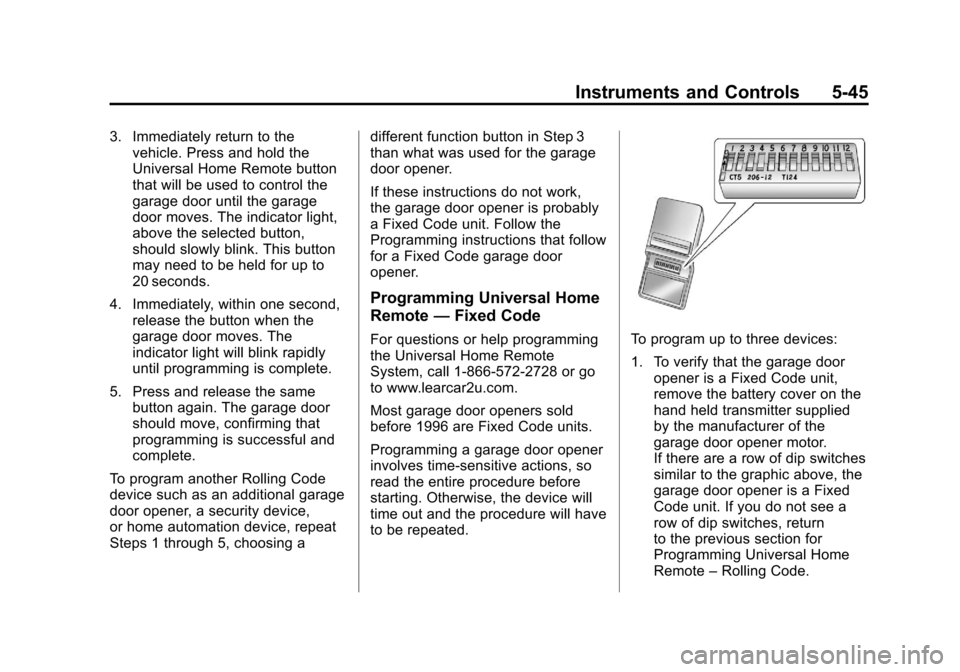
If there are a row of dip switches
similar to the graphic above, the
garage door opener is a Fixed
Code unit. If you do not see a
row of dip switches, return
to the previous section for
Programming Universal Home
Remote –Rolling Code.
Page 150 of 374
Black plate (48,1)Chevrolet Impala Owner Manual - 2012
5-48 Instruments and Controls
6. Press and hold the button thatwill be used to control the
garage door until the garage
door moves. The indicator light
above the selected button
should slowly blink. This button
may need to be held for up to
55 seconds.
7. Immediately release the button when the garage door moves.
The indicator light will blink
rapidly until programming is
complete.
8. Press and release the same button again. The garage door
should move, confirming that
programming is successful and
complete. To program another Fixed Code
device such as an additional garage
door opener, a security device,
or home automation device, repeat
Steps 1 through 8, choosing a
different button in Step 6 than what
was used for the garage door
opener.
Universal Remote System
Operation
Press and hold the appropriate
button for at least half of a second.
The indicator light will come on
while the signal is being transmitted.
Reprogramming Universal
Home Remote Buttons
Any of the three buttons can be
reprogrammed by repeating the
instructions.
Erasing Universal Home
Remote Buttons
The programmed buttons should be
erased when the vehicle is sold or
the lease ends.
To erase either Rolling Code or
Fixed Code on the Universal Home
Remote device:
1. Press and hold the 2 outside
buttons at the same time for
approximately 20 seconds, until
the indicator lights, located
directly above the buttons, begin
to blink rapidly.
2. Once the indicator lights begin to blink, release both buttons. The
codes from all buttons will be
erased.
For help or information on the
Universal Home Remote System,
call the customer assistance phone
number under Customer Assistance
Offices on page 13‑3.