2012 CHEVROLET CRUZE jump start
[x] Cancel search: jump startPage 2 of 400

Black plate (2,1)Chevrolet Cruze Owner Manual - 2012
2012 Chevrolet Cruze Owner ManualM
Driving and Operating. . . . . . . . 9-1
Driving Information . . . . . . . . . . . . . 9-2
Starting and Operating . . . . . . . 9-15
Engine Exhaust . . . . . . . . . . . . . . 9-27
Automatic Transmission . . . . . . 9-29
Manual Transmission . . . . . . . . . 9-33
Brakes . . . . . . . . . . . . . . . . . . . . . . . 9-35
Ride Control Systems . . . . . . . . 9-37
Cruise Control . . . . . . . . . . . . . . . . 9-40
Object Detection Systems . . . . 9-42
Fuel . . . . . . . . . . . . . . . . . . . . . . . . . . 9-44
Towing . . . . . . . . . . . . . . . . . . . . . . . 9-48
Conversions and
Add-Ons . . . . . . . . . . . . . . . . . . . . 9-55 Vehicle Care
. . . . . . . . . . . . . . . . . 10-1
General Information . . . . . . . . . . 10-2
Vehicle Checks . . . . . . . . . . . . . . . 10-4
Headlamp Aiming . . . . . . . . . . . 10-29
Bulb Replacement . . . . . . . . . . 10-29
Electrical System . . . . . . . . . . . . 10-35
Wheels and Tires . . . . . . . . . . . 10-42
Jump Starting . . . . . . . . . . . . . . . 10-80
Towing . . . . . . . . . . . . . . . . . . . . . . 10-83
Appearance Care . . . . . . . . . . . 10-86
Service and Maintenance . . . 11-1
General Information . . . . . . . . . . 11-1
Maintenance Schedule . . . . . . . 11-3
Special Application
Services . . . . . . . . . . . . . . . . . . . . 11-9
Additional Maintenance
and Care . . . . . . . . . . . . . . . . . . . 11-10
Recommended Fluids, Lubricants, and Parts . . . . . . 11-13
Maintenance Records . . . . . . . 11-16 Technical Data
. . . . . . . . . . . . . . . 12-1
Vehicle Identification . . . . . . . . . 12-1
Vehicle Data . . . . . . . . . . . . . . . . . . 12-2
Customer Information . . . . . . . 13-1
Customer Information . . . . . . . . 13-1
Reporting Safety Defects . . . . 13-13
Vehicle Data Recording and
Privacy . . . . . . . . . . . . . . . . . . . . 13-14
Index . . . . . . . . . . . . . . . . . . . . . i-1
Page 215 of 400
Black plate (17,1)Chevrolet Cruze Owner Manual - 2012
Driving and Operating 9-17
The battery could be drained if the
key is left in the ACC/ACCESSORY
or ON/RUN position with the engine
off. The vehicle might not start if the
battery is allowed to drain for an
extended period of time.
D (START):This position starts the
engine. When the engine starts,
release the key. The ignition switch
will return to ON/RUN for normal
driving.
A warning tone sounds when the
driver door is opened if the ignition
is still in ACC/ACCESSORY and the
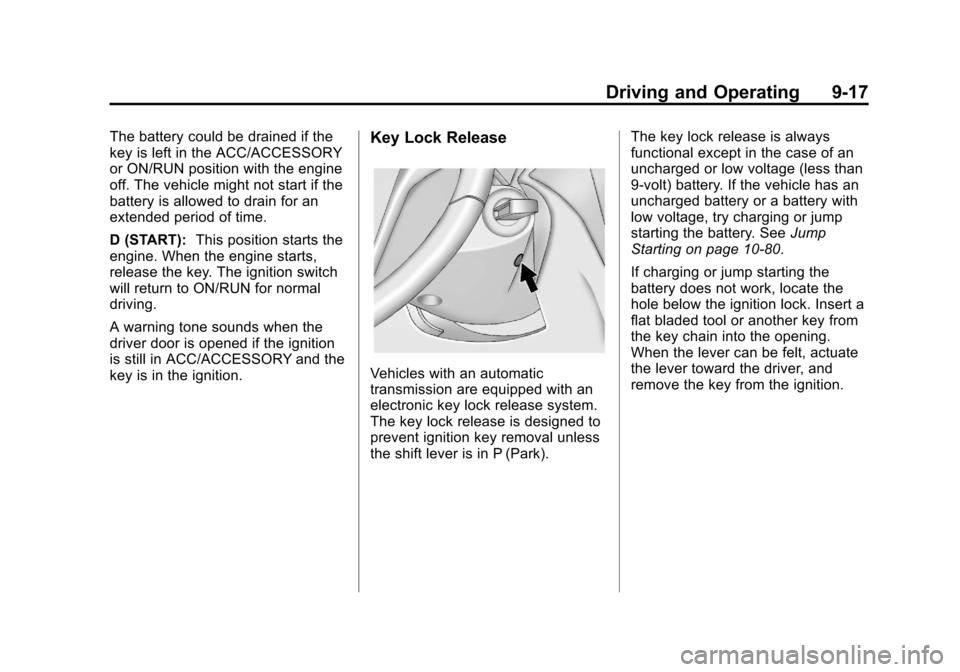
key is in the ignition.Key Lock Release
Vehicles with an automatic
transmission are equipped with an
electronic key lock release system.
The key lock release is designed to
prevent ignition key removal unless
the shift lever is in P (Park). The key lock release is always
functional except in the case of an
uncharged or low voltage (less than
9‐volt) battery. If the vehicle has an
uncharged battery or a battery with
low voltage, try charging or jump
starting the battery. See
Jump
Starting on page 10‑80.
If charging or jump starting the
battery does not work, locate the
hole below the ignition lock. Insert a
flat bladed tool or another key from
the key chain into the opening.
When the lever can be felt, actuate
the lever toward the driver, and
remove the key from the ignition.
Page 223 of 400
Black plate (25,1)Chevrolet Cruze Owner Manual - 2012
Driving and Operating 9-25
Shifting out of Park
This vehicle is equipped with an
automatic transmission shift lock
control system. The shift lock is
designed to:
.Prevent ignition key removal
unless the shift lever is in
P (Park) with the shift lever
button fully released.
.Prevent movement of the shift
lever out of P (Park) unless the
ignition is in ON/RUN and the
brake pedal is applied.The shift lock release is always
functional except in the case of an
uncharged or low voltage (less than
9‐volt) battery.
If the vehicle has an uncharged
battery or a battery with low voltage,
try charging or jump starting the
battery. See
Jump Starting on
page 10‑80
To shift out of P (Park):
1. Apply the brake pedal.
2. Turn the ignition to ON/RUN.
3. Press the shift lever button.
4. Move the shift lever to the
desired position. If still unable to shift out of P (Park):
1. Fully release the shift lever
button.
2. Hold the brake pedal down and press the shift lever button
again.
3. Move the shift lever to the desired position.
If the shift lever still cannot be
moved from P (Park), see
“Shift Lock Manual Release.”
Page 256 of 400
Black plate (2,1)Chevrolet Cruze Owner Manual - 2012
10-2 Vehicle Care
Wheels and Tires
Tires . . . . . . . . . . . . . . . . . . . . . . . . 10-42
Winter Tires . . . . . . . . . . . . . . . . 10-42
Low-Profile Tires . . . . . . . . . . . 10-43
Tire Sidewall Labeling . . . . . . 10-44
Tire Designations . . . . . . . . . . . 10-46
Tire Terminology andDefinitions . . . . . . . . . . . . . . . . 10-46
Tire Pressure . . . . . . . . . . . . . . . 10-49
Tire Pressure Monitor System . . . . . . . . . . . . . . . . . . . 10-50
Tire Pressure Monitor Operation . . . . . . . . . . . . . . . . . 10-52
Tire Inspection . . . . . . . . . . . . . . 10-55
Tire Rotation . . . . . . . . . . . . . . . 10-55
When It Is Time for New Tires . . . . . . . . . . . . . . . . . . . . . . 10-57
Buying New Tires . . . . . . . . . . . 10-57
Different Size Tires and Wheels . . . . . . . . . . . . . . . . . . . 10-59
Uniform Tire Quality Grading . . . . . . . . . . . . . . . . . . . 10-59
Wheel Alignment and Tire Balance . . . . . . . . . . . . . . . . . . . 10-61 Wheel Replacement . . . . . . . . 10-61
Tire Chains . . . . . . . . . . . . . . . . . 10-62
If a Tire Goes Flat . . . . . . . . . . 10-63
Tire Sealant and
Compressor Kit . . . . . . . . . . . 10-65
Storing the Tire Sealant and Compressor Kit . . . . . . . . . . . 10-72
Tire Changing . . . . . . . . . . . . . . 10-72
Compact Spare Tire . . . . . . . . 10-80
Jump Starting
Jump Starting . . . . . . . . . . . . . . 10-80
Towing
Towing the Vehicle . . . . . . . . . 10-83
Recreational Vehicle Towing . . . . . . . . . . . . . . . . . . . . 10-84
Appearance Care
Exterior Care . . . . . . . . . . . . . . . 10-86
Interior Care . . . . . . . . . . . . . . . . 10-90
Floor Mats . . . . . . . . . . . . . . . . . . 10-93
General Information
For service and parts needs, visit
your dealer. You will receive
genuine GM parts and GM-trained
and supported service people.
Genuine GM parts have one of
these marks:
Page 261 of 400

Black plate (7,1)Chevrolet Cruze Owner Manual - 2012
Vehicle Care 10-7
A.Engine Air Cleaner/Filter on
page 10‑14.
B. Engine Oil Dipstick. See “Checking Engine Oil” under
Engine Oil on page 10‑9.
C. Electric Engine Cooling Fan (Out of View). See Cooling
System on page 10‑16.
D. Engine Oil Fill Cap. See “When
to Add Engine Oil” under
Engine Oil on page 10‑9. E. Remote Negative (-) Terminal.
See Jump Starting on
page 10‑80.
F. Brake/Clutch Fluid Reservoir. See “Brake Fluid” underBrakes
on page 10‑22 andHydraulic
Clutch on page 10‑14.
G. Battery on page 10‑25 (Under
Cover).
H. Engine Coolant Surge Tank and Pressure Cap. See Engine
Coolant on page 10‑16. I. Remote Positive (+) Terminal.
See Jump Starting on
page 10‑80.
J. Engine Compartment Fuse
Block on page 10‑36.
K. Windshield Washer Fluid Reservoir. See “Adding Washer
Fluid” under Washer Fluid on
page 10‑22.
Page 263 of 400
Black plate (9,1)Chevrolet Cruze Owner Manual - 2012
Vehicle Care 10-9
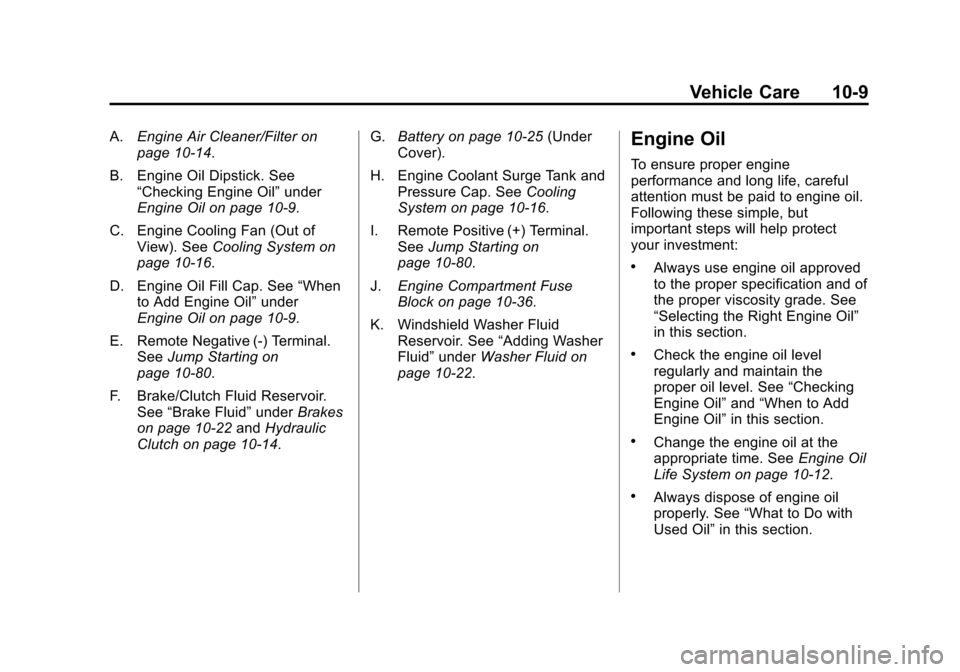
A.Engine Air Cleaner/Filter on
page 10‑14.
B. Engine Oil Dipstick. See “Checking Engine Oil” under
Engine Oil on page 10‑9.
C. Engine Cooling Fan (Out of View). See Cooling System on
page 10‑16.
D. Engine Oil Fill Cap. See “When
to Add Engine Oil” under
Engine Oil on page 10‑9.
E. Remote Negative (-) Terminal. See Jump Starting on
page 10‑80.
F. Brake/Clutch Fluid Reservoir. See “Brake Fluid” underBrakes
on page 10‑22 andHydraulic
Clutch on page 10‑14. G.
Battery on page 10‑25 (Under
Cover).
H. Engine Coolant Surge Tank and Pressure Cap. See Cooling
System on page 10‑16.
I. Remote Positive (+) Terminal. See Jump Starting on
page 10‑80.
J. Engine Compartment Fuse
Block on page 10‑36.
K. Windshield Washer Fluid Reservoir. See “Adding Washer
Fluid” under Washer Fluid on
page 10‑22.Engine Oil
To ensure proper engine
performance and long life, careful
attention must be paid to engine oil.
Following these simple, but
important steps will help protect
your investment:
.Always use engine oil approved
to the proper specification and of
the proper viscosity grade. See
“Selecting the Right Engine Oil”
in this section.
.Check the engine oil level
regularly and maintain the
proper oil level. See “Checking
Engine Oil” and“When to Add
Engine Oil” in this section.
.Change the engine oil at the
appropriate time. See Engine Oil
Life System on page 10‑12.
.Always dispose of engine oil
properly. See “What to Do with
Used Oil” in this section.
Page 279 of 400
Black plate (25,1)Chevrolet Cruze Owner Manual - 2012
Vehicle Care 10-25
Notice
.Using the wrong fluid can
badly damage brake/clutch
hydraulic system parts. For
example, just a few drops of
mineral-based oil, such as
engine oil, in the brake
hydraulic system can
damage brake hydraulic
system parts so badly that
they will have to be replaced.
Do not let someone put in
the wrong kind of fluid.
.If brake fluid is spilled on
the vehicle's painted
surfaces, the paint finish can
be damaged. Be careful not
to spill brake fluid on the
vehicle. If you do, wash it off
immediately.
Battery
Refer to the replacement number on
the original battery label when a
new battery is needed.
{WARNING
Battery posts, terminals, and
related accessories contain lead
and lead compounds, chemicals
known to the State of California to
cause cancer and reproductive
harm. Wash hands after handling.
Vehicle Storage
{WARNING
Batteries have acid that can burn
you and gas that can explode.
You can be badly hurt if you are
not careful. See Jump Starting on
page 10‑80 for tips on working
around a battery without
getting hurt.
Infrequent Usage: Remove the
black, negative (−) cable from the
battery to keep the battery from
running down.
Extended Storage: Remove the
black, negative (−) cable from the
battery or use a battery trickle
charger.
Page 334 of 400
Black plate (80,1)Chevrolet Cruze Owner Manual - 2012
10-80 Vehicle Care
Compact Spare Tire
{WARNING
Driving with more than one
compact spare tire at a time could
result in loss of braking and
handling. This could lead to a
crash and you or others could be
injured. Use only one compact
spare tire at a time.
If this vehicle has a compact spare
tire, it was fully inflated when the
vehicle was new; however, it can
lose air after a time. Check the
inflation pressure regularly.
It should be 420 kPa (60 psi).
After installing the compact spare
on the vehicle, stop as soon as
possible and make sure the spare
tire is correctly inflated. The
compact spare is made to perform
well at speeds up to 105 km/h
(65 mph) for distances up to
5 000 km (3,000 mi), so you can
finish your trip and have the full-size tire repaired or replaced at your
convenience. Of course, it is best to
replace the spare with a full-size tire
as soon as possible. The spare tire
will last longer and be in good
shape in case it is needed again.
Notice:
When the compact spare
is installed, do not take the
vehicle through an automatic car
wash with guide rails. The
compact spare can get caught on
the rails which can damage the
tire, wheel, and other parts of the
vehicle.
Do not use the compact spare on
other vehicles.
Do not mix the compact spare tire or
wheel with other wheels or tires.
They will not fit. Keep the spare tire
and its wheel together.
Notice: Tire chains will not fit the
compact spare. Using them can
damage the vehicle and can
damage the chains too. Do not
use tire chains on the compact
spare.
Jump Starting
For more information about the
vehicle battery, see Battery on
page 10‑25.
If the battery has run down, try to
use another vehicle and some
jumper cables to start your vehicle.
Be sure to use the following steps to
do it safely.
{WARNING
Batteries can hurt you. They can
be dangerous because:
.They contain acid that can
burn you.
.They contain gas that can
explode or ignite.
.They contain enough
electricity to burn you.
If you do not follow these steps
exactly, some or all of these
things can hurt you.