2012 BMW Z4 SDRIVE35I engine
[x] Cancel search: enginePage 110 of 220
Ensure that the floor mats are securely fastened
again when they are returned after being re‐
moved, such as for cleaning.◀
Driving in wet conditions
When roads are wet or there is heavy rain, briefly
exert gentle pressure on the brake pedal every
few miles.
Ensure that this action does not endanger other
road users.
The heat generated in this process helps dry the
brake discs and pads.
In this way braking efficiency will be available
when you need it.
Hills
Drive long or steep downhill gradients in the gear
in which the least braking is required. Otherwise,
the brake system may overheat, resulting in a
reduction in the brake system efficiency.
You can increase the engine's braking effect by
shifting down, going all the way to first gear, if
necessary.
Downshifting in manual mode of the 8-gear
Sport automatic transmission, refer to page 54.
Downshifting in manual mode of the 7-gear
Sport automatic transmission with dual clutch,
refer to page 57.
Avoid load on the brakes
Avoid placing excessive load on the brake
system. Light but consistent brake pressure can
lead to high temperatures, brake wear and pos‐
sibly even brake failure.◀
Do not drive in neutral
Never drive with the transmission in neu‐
tral, with the engine switched off or with the
clutch depressed; otherwise, you will have nei‐
ther the braking action of the engine or nor its
power assistance when braking or steering.◀Brake disc corrosion
Corrosion on the brake discs and contamination
on the brake pads are furthered by:▷Low mileage.▷Extended periods when the vehicle is not
used at all.▷Infrequent use of the brakes.
Corrosion occurs when the minimum pressure
that must be exerted by the pads during brake
applications to clean the discs is not reached.
Should corrosion form on the brake discs, the
brakes will tend to respond with a pulsating ef‐
fect that generally cannot be corrected.
Condensation under the parked vehicle
When using the automatic climate control, con‐
densation water develops that exits underneath
the vehicle.
Therefore, traces of condensed water under the
vehicle are normal.
Loading Overloading the vehicle
To avoid exceeding the approved carrying
capacity of the tires, never overload the vehicle.
Overloading can lead to overheating and in‐
creases the rate at which damage develops in‐
side the tires. This could result in a sudden loss
of tire inflation pressure.◀
Secure heavy objects
Never transport unsecured heavy or hard
objects in the passenger compartment, as they
could be thrown around and pose a safety haz‐
ard to the vehicle's occupants during abrupt
braking or evasive maneuvers.◀
No fluids in the cargo area
Make sure that fluids do not leak into the
cargo area; otherwise, the vehicle may be dam‐
aged.◀
Seite 110Driving tipsThings to remember when driving110
Online Edition for Part no. 01 40 2 609 184 - 09 11 500
Page 113 of 220

Close both windows
An open window causes higher air resistance
and thus increases fuel consumption.
Check the tire inflation pressure
regularly
Check and, if necessary, correct the tire inflation
pressure, refer to page 155, at least twice a
month and before starting on a long trip.
Low tire inflation pressure increases rolling re‐
sistance and thus raises fuel consumption and
tire wear.
Drive away without delay
Do not wait for the engine to warm up while the
vehicle remains stationary. Start driving right
away, but at moderate engine speeds.
This is the fastest way for the cold engine to
reach its operating temperature.
Look well ahead when driving
Avoid unnecessary acceleration and braking.
By maintaining a suitable distance to the vehicle
driving ahead of you.
Driving smoothly and looking ahead reduces
fuel consumption.
Avoid high engine speeds
Use 1st gear to get the vehicle in motion. Be‐
ginning with 2nd gear, accelerate rapidly. When
accelerating, shift up before reaching high en‐
gine speeds.
When you reach the desired speed, shift into the
highest applicable gear and drive with the en‐
gine speed as low as possible and at a constant
speed.
As a rule: driving at low engine speeds lowers
fuel consumption and reduces wear.
Use coasting conditions
When approaching a red light, take your foot off
the accelerator and coast to a halt in the highest
applicable gear.On a downhill slope, take your foot off the ac‐
celerator and coast in a suitable gear.
The flow of fuel is interrupted while coasting.
Switch off the engine during longer
stops
Switch off the engine during longer stops, e.g.,
at traffic lights, railroad crossings or in traffic
congestion.
Fuel savings are achieved after the vehicle is
switched off for only approx. 4 seconds.
The Automatic Engine Start/Stop Function au‐
tomatically switches the engine off during a
stop. Additional information on the Automatic
Engine Start/Stop Function, refer to page 47.
Switch off any functions that are not
currently needed
Functions such as the automatic climate control
require a large amount of energy and consume
additional fuel, especially in city and stop-and-
go traffic.
Therefore, switch off these functions if they are
not actually needed.
Have maintenance carried out
Have vehicles maintained regularly to achieve
optimal vehicle economy and operating life.
Have the maintenance carried out by your serv‐
ice center.
Please also note the BMW Maintenance Sys‐
tem, refer to page 168.Seite 113Things to remember when drivingDriving tips113
Online Edition for Part no. 01 40 2 609 184 - 09 11 500
Page 119 of 220
2."RESET"
Time
Displaying the time
Press the button.
When the ignition or the radio ready state is
switched off, the time is displayed for several
seconds.
Setting the time, date, and time format
1.Switch on the radio ready state or the igni‐
tion.2. Press the button.3."CONFIG"4."TIME"5.Select the desired category.6.Create the settings and press the right knob.
Setting the units of measure of the
computer and the language
1.Switch on the radio ready state or the igni‐
tion.2. Press the button.3."CONFIG"4.▷"DIST": change the unit of measure for
the range.▷"LANG": select the language of the dis‐
play texts.▷"CONSMP" : change the unit of measure
for the average fuel consumption.▷"TEMP" : change the unit of measure for
the external temperature.5.Highlight the desired menu item and press
the button.6.Create the desired setting.
The settings of the units of measure are adopted
for display on the radio and in the instrument
cluster and are stored in the remote control cur‐
rently in use.
Computer
The following vehicle information can be call up
via the computer:▷Average fuel consumption▷Average speed▷Range▷External temperature
Displaying information
1.Switch on the radio ready state or the igni‐
tion.2. Press the button.3."COMP"
Average fuel consumption
The average fuel consumption is calculated for
the time during which the engine is running.
To start calculation of the average fuel con‐
sumption:
1."CONSMP"2."RESET"
The previous display is set to zero and the sys‐
tem begins recalculating the average fuel con‐
sumption.
Average speed
The average speed is calculated for the time
during which the engine is running.
To start calculation of the average speed:
1."SPEED"2."RESET"
Estimated range
"RANGE"
The display shows the distance that can be
driven on the remaining fuel quantity, taking into
Seite 119Professional RadioEntertainment119
Online Edition for Part no. 01 40 2 609 184 - 09 11 500
Page 136 of 220
▷Bluetooth presettings may need to be made
on the mobile phone, e.g., for a connection
without confirmation or visibility, refer to the
mobile phone operating instructions.▷A number with at least four and a maximum
of 16 digits was defined as the Bluetooth
passkey. It is only required once for pairing.▷The ignition is switched on.
Activating/deactivating Bluetooth
Bluetooth is not permitted everywhere. Comply
with all safety guidelines and regulations.
To activate the connection:
1.Switch on the radio ready state or the igni‐
tion.2. Press the button.3."PHONE"4."BT-ON"
To deactivate the connection again:
1."BT"2."BT-OFF"3."YES"
Pairing and connecting
Pairing the mobile phone
To avoid becoming distracted and posing
an unnecessary hazard both to your own vehi‐
cle's occupants and to other road users, only
pair the mobile phone while the vehicle is sta‐
tionary.◀
1.Switch on the radio ready state or the igni‐
tion.2. Press the button.3."PHONE"4."BT"5."PAIR"
Turn the right knob to display the Bluetooth
name of your vehicle.6.To perform additional steps on the mobile
phone, refer to the mobile phone operating
instructions: for instance, search for or con‐
nect the Bluetooth device or a new device.
The Bluetooth name of the vehicle appears
on the mobile phone display.7.Select the Bluetooth name of the vehicle on
the mobile phone display.
You are prompted by the radio or mobile
phone to enter the same Bluetooth passkey.8.Enter the passkey on the mobile phone and
confirm it.9."ADD"10.Enter the same passkey on the radio using
the function buttons and confirm it.
To delete the last digit: "DELETE"11."OK"
Press twice if necessary.
If pairing was successful, the mobile phone ap‐
pears on the radio display.
Four mobile phones can be paired with the ve‐
hicle at once.
If pairing was unsuccessful: What to do if..., refer
to page 137.
Repeating the pairing procedure/help
If pairing failed:
1."REPEAT"2.Repeat steps 6 to 10.
To display the Customer Relations phone num‐
ber: "CALLS"
Turn the right knob to display the Customer Re‐
lations phone number and information needed
for pairing.
Following the initial pairing
▷The mobile phone is detected/connected in
the vehicle within a short period of time
when the engine is running or the ignition is
switched on.Seite 136CommunicationTelephone136
Online Edition for Part no. 01 40 2 609 184 - 09 11 500
Page 152 of 220
RefuelingVehicle equipment
This chapter describes all series equipment as
well as country-specific and special equipment
offered for this model series.Therefore, it also
describes equipment that may not be found in
your vehicle, for instance due to the selected
special equipment or the country version. This
also applies to safety-related functions and sys‐
tems.
General information Refuel promptly
At the latest, refuel at a range of 30 miles/
50 km; otherwise, the engine function is not en‐
sured and damage may occur.◀
Notes Switch off the engine before refueling
Always switch off the engine before refu‐
eling; otherwise, fuel cannot be added to the
tank and a message will be displayed.◀
Observe when handling fuel▷Take all precautionary measures and
observe all applicable regulations
when handling fuel.▷Do not carry any spare fuel containers in
your vehicle. They can develop a leak and
cause an explosion or cause a fire in the
event of an accident.◀Fuel filler flap
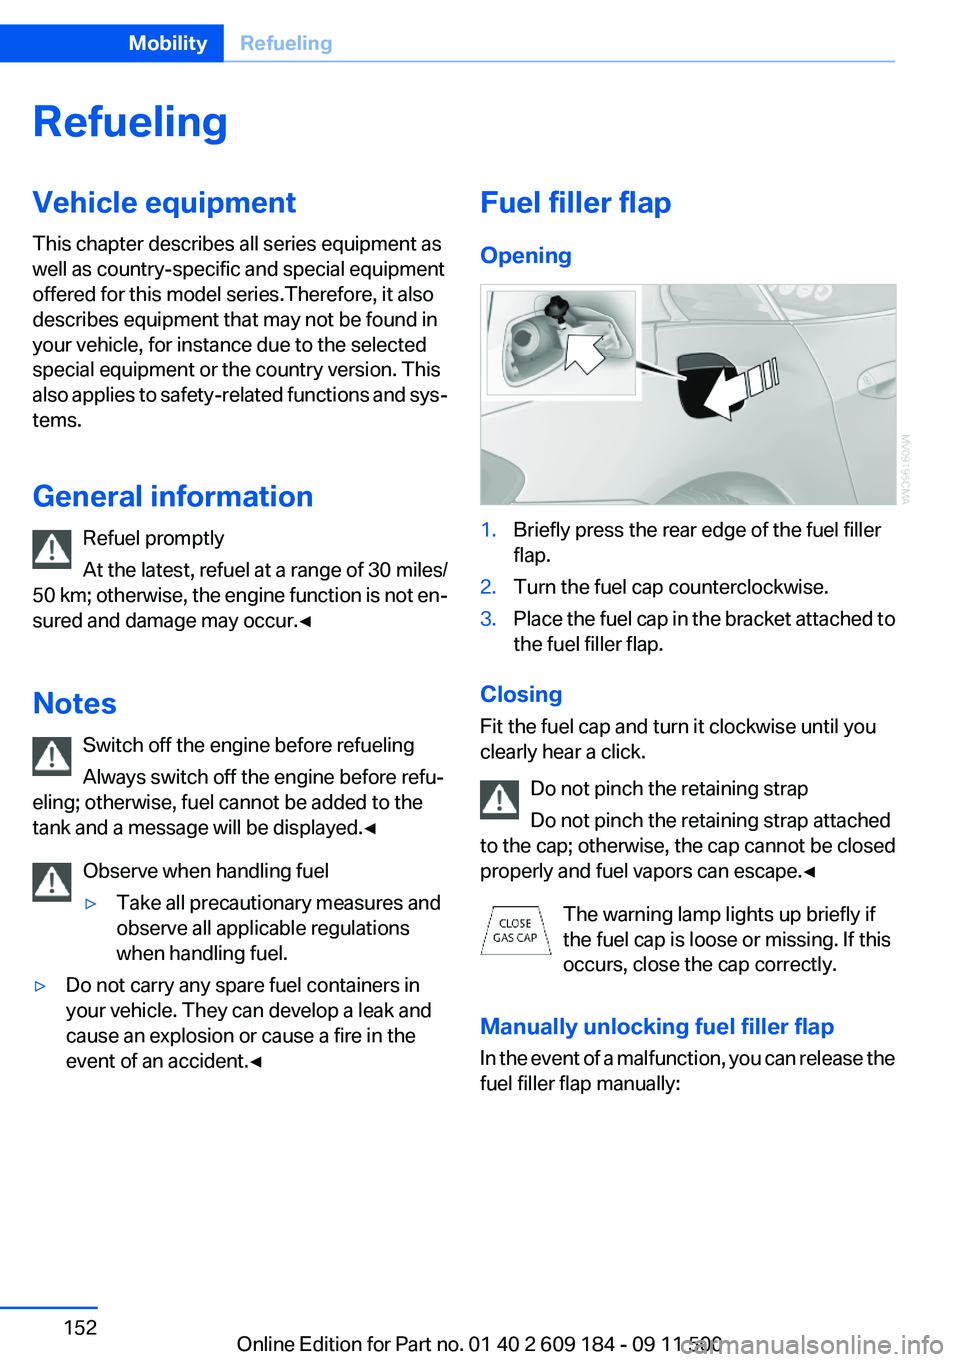
Opening1.Briefly press the rear edge of the fuel filler
flap.2.Turn the fuel cap counterclockwise.3.Place the fuel cap in the bracket attached to
the fuel filler flap.
Closing
Fit the fuel cap and turn it clockwise until you
clearly hear a click.
Do not pinch the retaining strap
Do not pinch the retaining strap attached
to the cap; otherwise, the cap cannot be closed
properly and fuel vapors can escape.◀
The warning lamp lights up briefly if
the fuel cap is loose or missing. If this
occurs, close the cap correctly.
Manually unlocking fuel filler flap
In the event of a malfunction, you can release the
fuel filler flap manually:
Seite 152MobilityRefueling152
Online Edition for Part no. 01 40 2 609 184 - 09 11 500
Page 154 of 220
FuelVehicle equipment
This chapter describes all series equipment as
well as country-specific and special equipment
offered for this model series.Therefore, it also
describes equipment that may not be found in
your vehicle, for instance due to the selected
special equipment or the country version. This
also applies to safety-related functions and sys‐
tems.
Fuel quality
Do not use fuels that are labeled at the fuel pump
as containing metals.
Only refuel with lead-free gasoline without
metal additives
Do not refuel with leaded gasoline or gasoline
with metal additives, e. g., manganese or iron;
otherwise, the catalytic converter and other
components will be permanently damaged.◀
Do not refuel with ethanol E85
Do not refuel with E85, i.e., fuel with an
ethanol content of 85 %, or with Flex Fuel, as this
would damage the engine and fuel supply sys‐
tem.◀
Required fuel
Super Premium Gasoline/AKI 91
This gasoline is highly recommended.
Gasoline with lower AKI
However, you may also use gasoline with less
AKI.
The minimum AKI rating is: 89
If you use gasoline with this minimum AKI Rat‐
ing, the engine may produce knocking sounds
when starting at high outside temperatures.This has no effect on the engine life.
Minimum fuel grade
Do not use any gasoline below the mini‐
mum specified fuel grade; otherwise, engine
damage may occur.◀
Use high-quality brands
Field experience has indicated significant differ‐
ences in fuel quality: volatility, composition, ad‐
ditives, etc., among gasolines offered for sale in
the United States and Canada.
Fuels containing up to and including 10 % etha‐
nol or other oxygenates with up to 2.8 % oxygen
by weight, that is, 15 % MTBE or 3 % methanol
plus an equivalent amount of co-solvent, will not
void the applicable warranties with respect to
defects in materials or workmanship.
Minimum fuel grade
The use of poor-quality fuels may result in
driveability, starting and stalling problems es‐
pecially under certain environmental conditions
such as high ambient temperature and high al‐
titude.
Should you encounter driveability problems
which you suspect could be related to the fuel
you are using, we recommend that you respond
by switching to a recognized high-quality brand
such as gasoline that is advertised as Top Tier
Detergent Gasoline.
Failure to comply with these recommendations
may result in unscheduled maintenance.◀Seite 154MobilityFuel154
Online Edition for Part no. 01 40 2 609 184 - 09 11 500
Page 163 of 220
Engine compartmentVehicle equipment
This chapter describes all series equipment as
well as country-specific and special equipment
offered for this model series.Therefore, it alsodescribes equipment that may not be found in
your vehicle, for instance due to the selected
special equipment or the country version. This
also applies to safety-related functions and sys‐
tems.
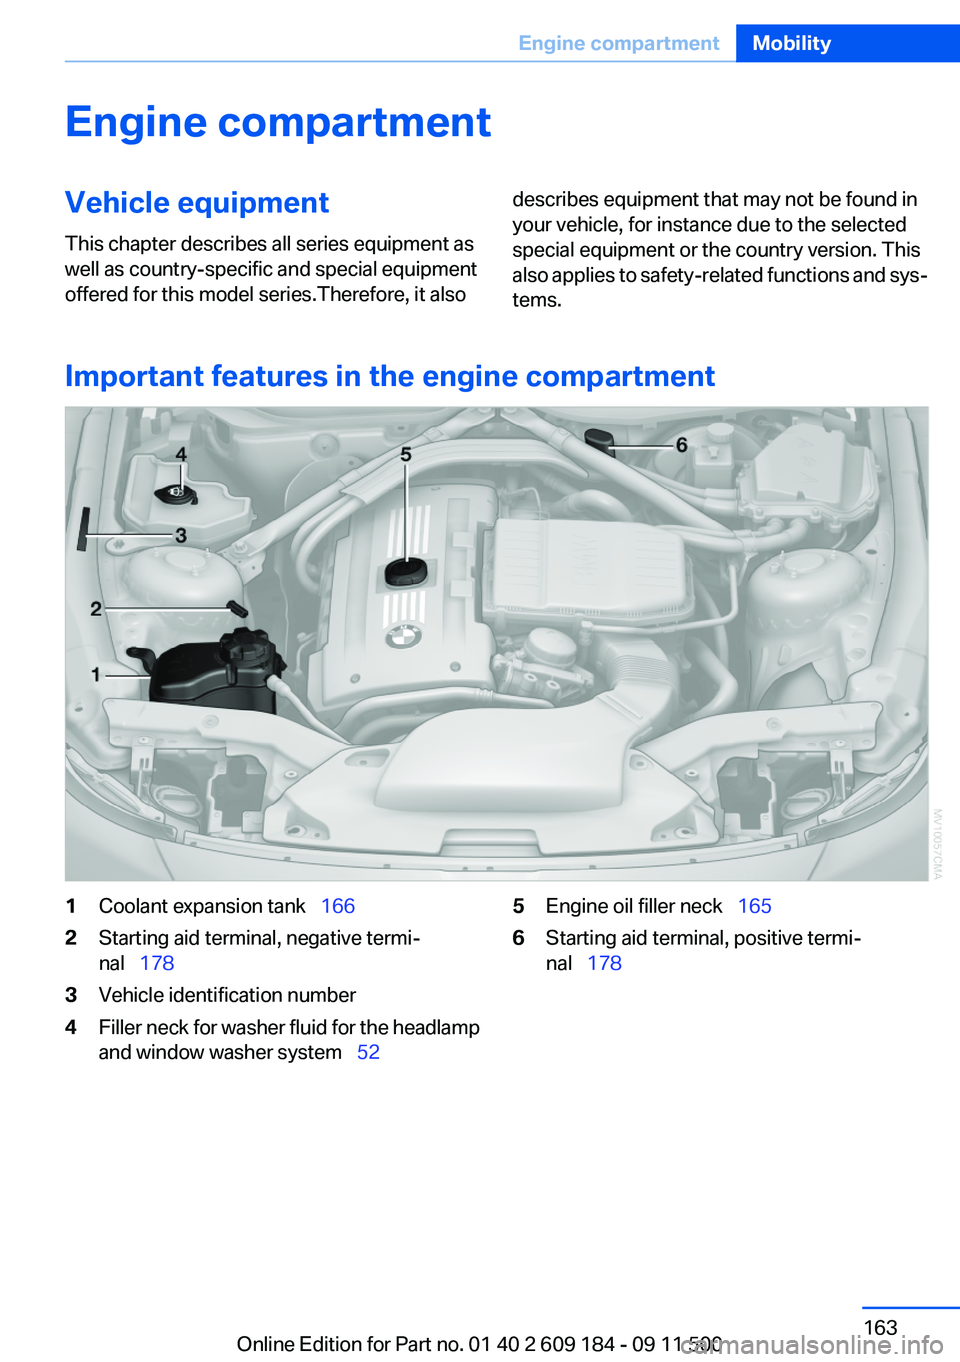
Important features in the engine compartment
1Coolant expansion tank 1662Starting aid terminal, negative termi‐
nal 1783Vehicle identification number4Filler neck for washer fluid for the headlamp
and window washer system 525Engine oil filler neck 1656Starting aid terminal, positive termi‐
nal 178Seite 163Engine compartmentMobility163
Online Edition for Part no. 01 40 2 609 184 - 09 11 500
Page 164 of 220
Hood
Opening the hood Working in the engine compartment
Never attempt to perform any service or
repair operations on your vehicle without the
necessary professional technical training.
If you are unfamiliar with the statutory guide‐
lines, have any work on the vehicle performed
only by a service center.
If this work is not carried out properly, there is
the danger of subsequent damage and related
safety hazards.◀
To avoid damage, make sure that the
wiper arms are resting against the wind‐
shield before you open the engine compart‐
ment. Do not open the engine hood before the
engine has cooled down; otherwise, injuries may
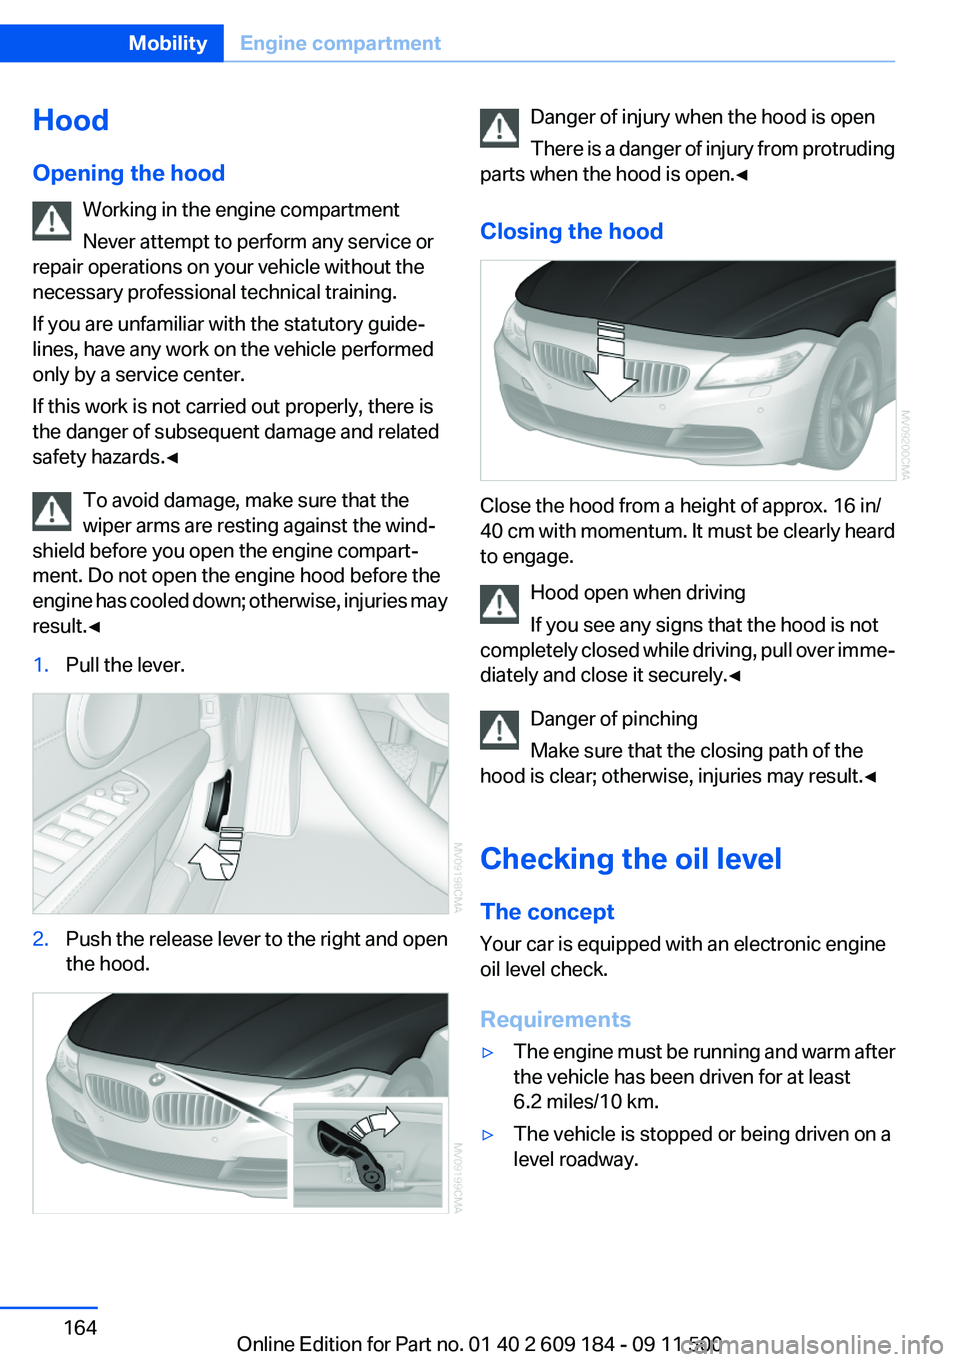
result.◀1.Pull the lever.2.Push the release lever to the right and open
the hood.Danger of injury when the hood is open
There is a danger of injury from protruding
parts when the hood is open.◀
Closing the hood
Close the hood from a height of approx. 16 in/
40 cm with momentum. It must be clearly heard
to engage.
Hood open when driving
If you see any signs that the hood is not
completely closed while driving, pull over imme‐
diately and close it securely.◀
Danger of pinching
Make sure that the closing path of the
hood is clear; otherwise, injuries may result.◀
Checking the oil level
The concept
Your car is equipped with an electronic engine
oil level check.
Requirements
▷The engine must be running and warm after
the vehicle has been driven for at least
6.2 miles/10 km.▷The vehicle is stopped or being driven on a
level roadway.Seite 164MobilityEngine compartment164
Online Edition for Part no. 01 40 2 609 184 - 09 11 500