2012 BMW ACTIVEHYBRID 5 buttons
[x] Cancel search: buttonsPage 195 of 319

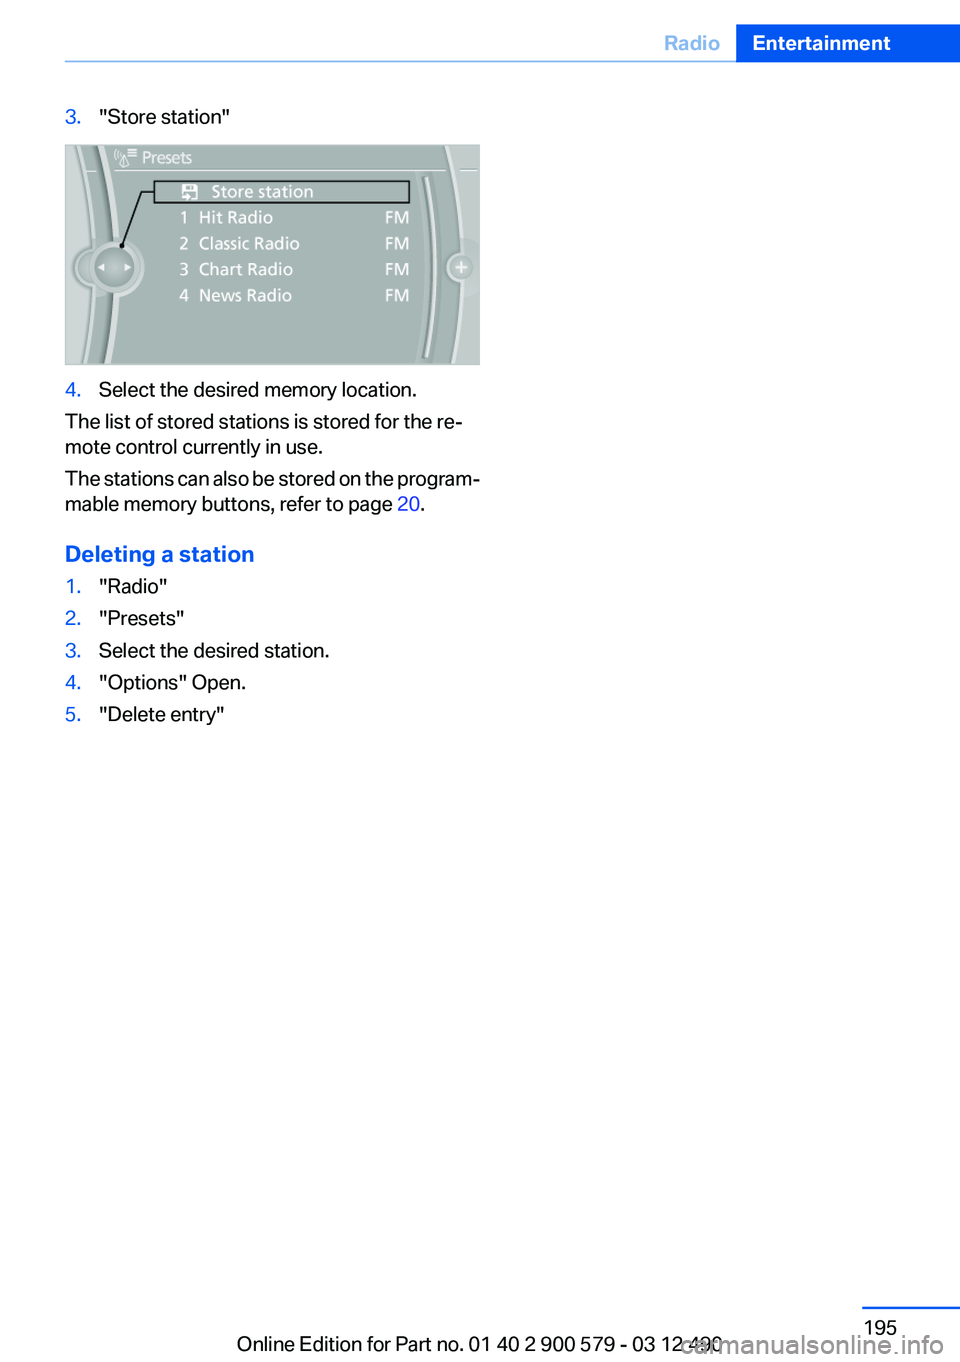
3."Store station"4.Select the desired memory location.
The list of stored stations is stored for the re‐
mote control currently in use.
The stations can also be stored on the program‐
mable memory buttons, refer to page 20.
Deleting a station
1."Radio"2."Presets"3.Select the desired station.4."Options" Open.5."Delete entry"Seite 195RadioEntertainment195
Online Edition for Part no. 01 40 2 900 579 - 03 12 490
Page 196 of 319

CD/multimediaVehicle equipment
All standard, country-specific and optional
equipment that is offered in the model series is
described in this chapter. Therefore, equipment
is also described that is not available in a vehicle,
e. g., because of the selected optional equip‐
ment or country variant. This also applies for
safety-related functions and systems.
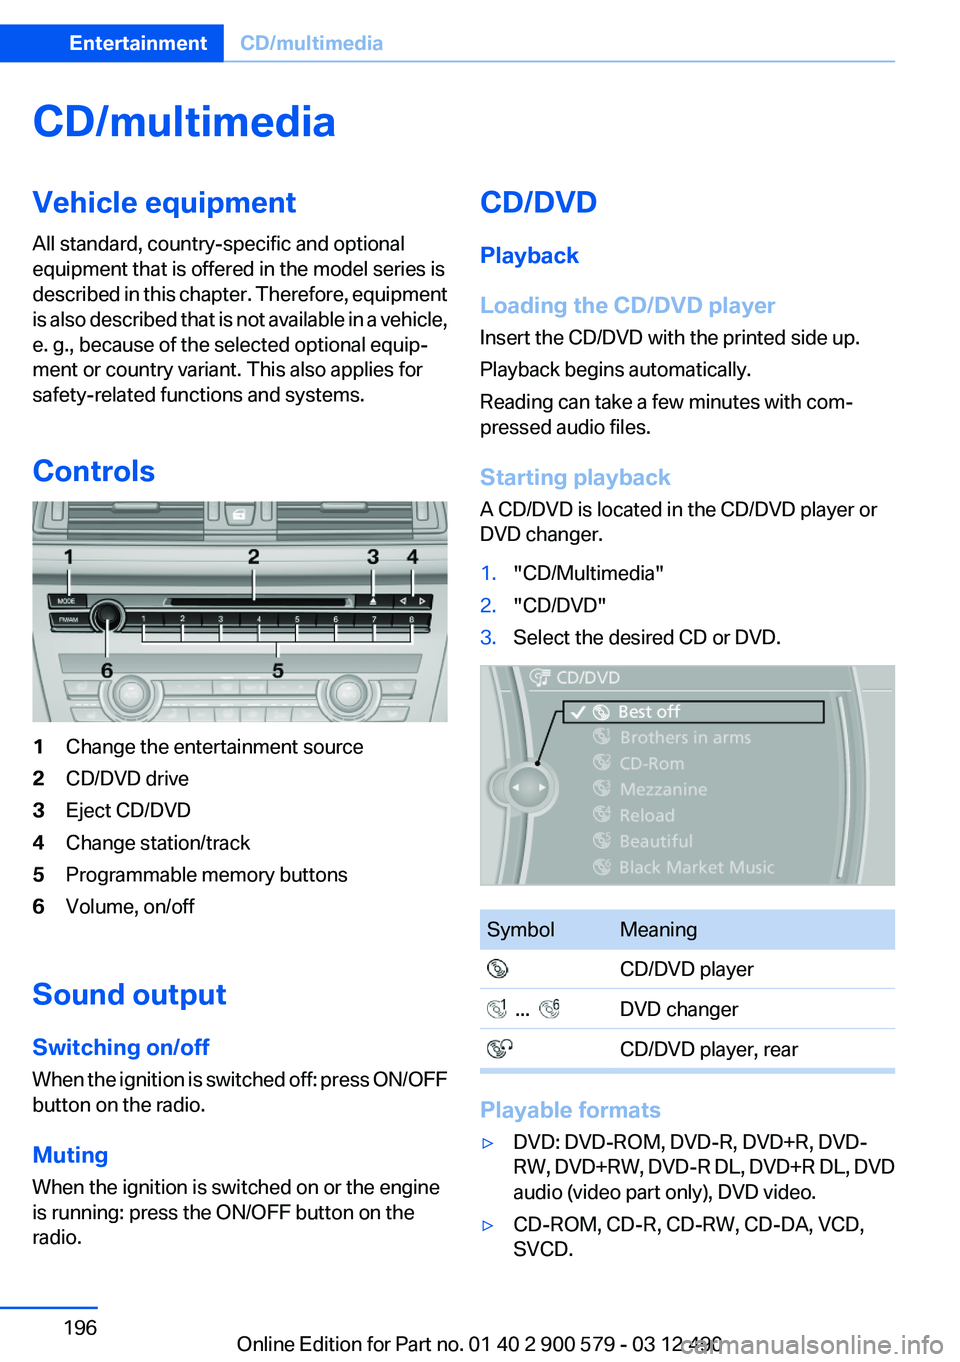
Controls1Change the entertainment source2CD/DVD drive3Eject CD/DVD4Change station/track5Programmable memory buttons6Volume, on/off
Sound output
Switching on/off
When the ignition is switched off: press ON/OFF
button on the radio.
Muting
When the ignition is switched on or the engine
is running: press the ON/OFF button on the
radio.
CD/DVD
Playback
Loading the CD/DVD player
Insert the CD/DVD with the printed side up.
Playback begins automatically.
Reading can take a few minutes with com‐
pressed audio files.
Starting playback
A CD/DVD is located in the CD/DVD player or
DVD changer.1."CD/Multimedia"2."CD/DVD"3.Select the desired CD or DVD.SymbolMeaning CD/DVD player ... DVD changer CD/DVD player, rear
Playable formats
▷DVD: DVD-ROM, DVD-R, DVD+R, DVD-
RW, DVD+RW, DVD-R DL, DVD+R DL, DVD
audio (video part only), DVD video.▷CD-ROM, CD-R, CD-RW, CD-DA, VCD,
SVCD.Seite 196EntertainmentCD/multimedia196
Online Edition for Part no. 01 40 2 900 579 - 03 12 490
Page 200 of 319

3."Additional options"4."Zoom mode"
Selecting a track
DVD video:
1.Turn the controller when the DVD menu is
displayed.2.Open "Options".3."Additional options"4."Select title"5.Select the desired track.
VCD/SVCD:
1. "Select track"2.Select the desired track.
Selecting the camera angle
The availability of a different camera angle de‐
pends on the DVD and the current DVD track.
1.Turn the controller during playback.2.Open "Options".3."Additional options"4."Viewing angle"5.Select the desired camera angle.
Opening the main menu, back
These functions are not contained on every
DVD. Therefore, they may not be available for
use.
DVD changer
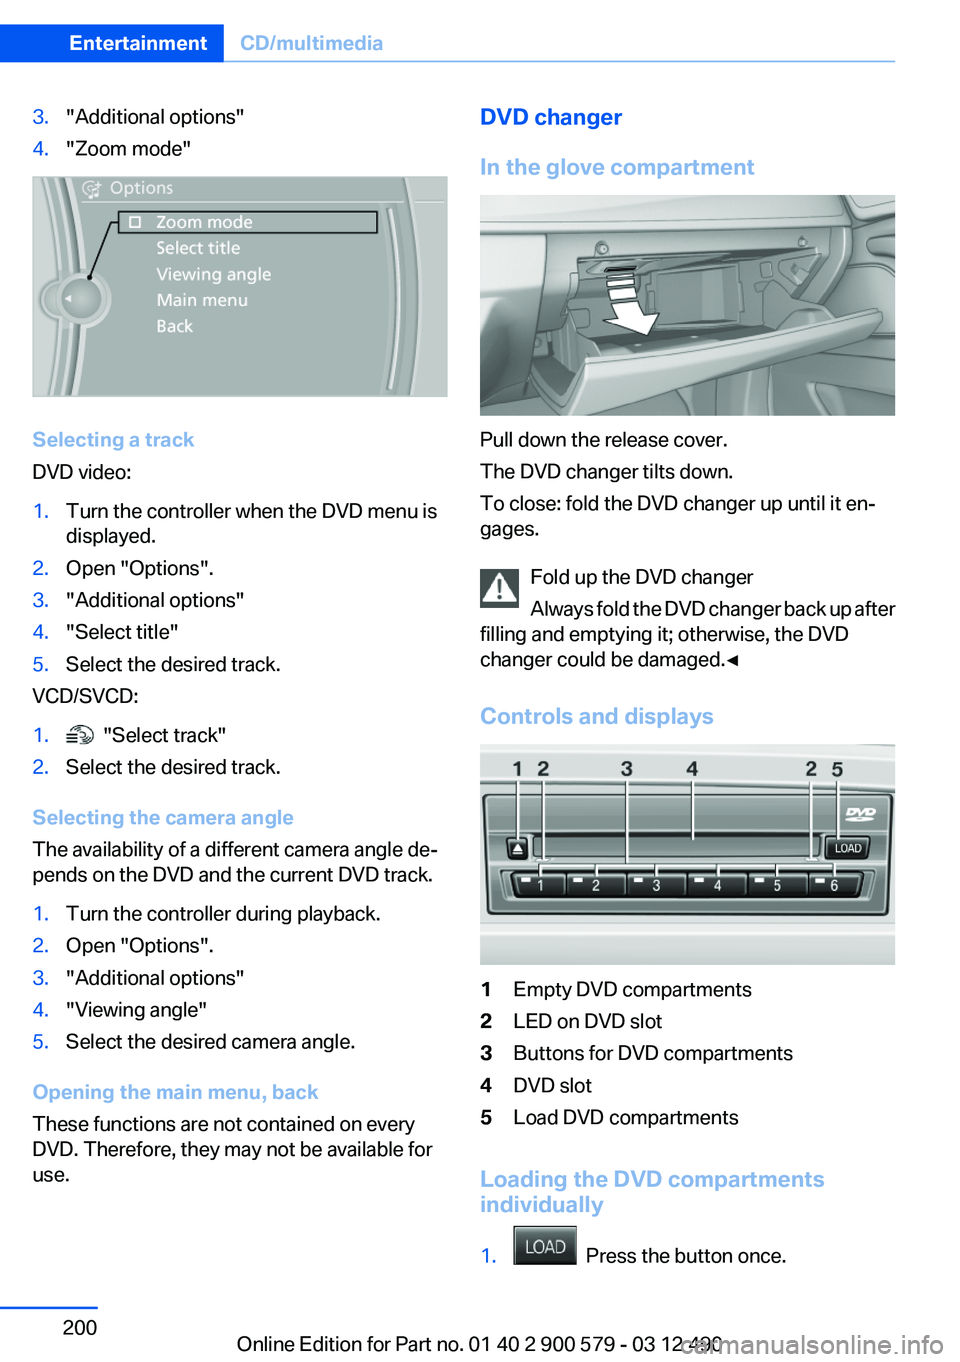
In the glove compartment
Pull down the release cover.
The DVD changer tilts down.
To close: fold the DVD changer up until it en‐
gages.
Fold up the DVD changer
Always fold the DVD changer back up after
filling and emptying it; otherwise, the DVD
changer could be damaged.◀
Controls and displays
1Empty DVD compartments2LED on DVD slot3Buttons for DVD compartments4DVD slot5Load DVD compartments
Loading the DVD compartments
individually
1. Press the button once.
Seite 200EntertainmentCD/multimedia200
Online Edition for Part no. 01 40 2 900 579 - 03 12 490
Page 201 of 319

The LED on the first empty compartment
flashes.2.Select another compartment if necessary.3.Wait for the LEDs on the DVD slot to flash.4.Insert a single CD or DVD in the middle.
The CD/DVD is drawn in automatically and
placed into the selected compartment.
Sliding in CDs/DVDs
Do not insert the CD/DVD until the LEDs
on the DVD slot are flashing; otherwise, the CD/
DVD or the DVD changer could be damaged.
Do not continue to push on the CD/DVD; this
may cause it to jam and prevent it from being
able to eject again.◀
Loading all empty DVD compartments
1. Press the button once and hold it
down.
The LEDs on the empty CD compartments
flash.2.Wait for the LEDs on the DVD slot to begin
flashing and then insert each CD or DVD into
the center of the slot.
The CDs/DVDs are drawn in automatically
and placed into the empty compartments.
Sliding in CDs/DVDs
Do not insert the CD/DVD until the LEDs
on the DVD slot are flashing; otherwise, the CD/
DVD or the DVD changer could be damaged.
Do not continue to push on the CD/DVD; this
may cause it to jam and prevent it from being
able to eject again.◀
After they are inserted, it may take several mi‐
nutes for the CDs/DVDs to be read in.
Removing a single CD/DVD
1. Press the button once.2.Select the DVD compartment.
The CD/DVD is partially ejected.3.Remove the CD/DVD.
Removing all CDs/DVDs
1. Press the button once and hold it down.2.Remove the CDs/DVDs.
Cancelling a function
Filling the DVD compartments or removing CDs/
DVDs can be canceled.
Press the corresponding button.
▷▷
Malfunctions
If the LEDs on the DVD slot and on the com‐
partments are flashing rapidly, a malfunction has
occurred.
To eliminate the malfunction:
1.Press one of the following buttons:▷▷
The CD/DVD last inserted is ejected.
2.Remove the CD/DVD.
The DVD changer is functional again after the
LEDs stop flashing rapidly.
Audio playback
The audio track of a DVD can be played back
even if video playback is not possible in the ve‐
hicle.
Only the main film without the previews or extras
can be played back.
Starting playback
A DVD is located in the DVD changer.
1."CD/Multimedia"Seite 201CD/multimediaEntertainment201
Online Edition for Part no. 01 40 2 900 579 - 03 12 490
Page 215 of 319

5."Configure phone"6."Audio"7."OK"
Unpairing a device
1."CD/Multimedia"2."Bluetooth® (audio)"3.If necessary, "Bluetooth® audio".4.Highlight the device that is to be unpaired.5.Open "Options".6."Remove phone from list"
What to do if...
Information on suitable devices can be found at
www.bmwusa.com/bluetooth.
Suitable mobile phones, refer to page 226.
The device is not supported by the vehicle.
▷Perform a software update, refer to
page 215, if needed.
The device could not be paired or connected.
▷Do the Bluetooth passkeys on the device
and the vehicle match? Enter the same
passkey on the device and via iDrive.▷Did it take longer than 30 seconds to enter
the passkey? Repeat the pairing procedure.▷Are too many Bluetooth devices connected
to the device or vehicle? Delete connections
with other devices if necessary.▷Is the mobile phone in power-save mode or
does it have only a limited remaining battery
life? Charge the mobile phone in the snap-
in adapter or via the charging cable.▷Depending on the mobile phone, it is possi‐
ble that only one device can be connected
to the vehicle. Unpair the connected device
from the vehicle and pair and connect only
one device.▷The device no longer reacts? Switch the de‐
vice off and on again.▷Repeat the pairing procedure.
Music cannot be played back.
▷Start the program for playing back music
data on the device and select a track on the
device if necessary.▷Switch the radio off and on again.
Music files can only be played back softly.
▷Adjust the volume settings on the device.
Playback is disturbed when buttons are pressed
or by other messages on the device.
▷Switch off the button tones and other signal
tones on the device.
Playback is interrupted by a telephone call or
traffic bulletin and is not resumed automatically.
▷Switch the radio off and on again.
Playback is not possible if the mobile phone is
connected both via Bluetooth Audio and via the
extended connectivity of the music player in the
mobile phone.
▷Disconnect one of the two connections; for
example, disconnect the audio connection,
refer to page 214, and restart playback.
If all points in this list have been checked and the
required function is still not available, contact
the hotline or service center.
Software Update
The vehicle supports various external devices
depending on the current software version. With
a software update, the vehicle can support new
cell phones or new external device, for example.
The updating of the software is done via:
▷USB.Seite 215CD/multimediaEntertainment215
Online Edition for Part no. 01 40 2 900 579 - 03 12 490
Page 226 of 319

TelephoneVehicle equipment
All standard, country-specific and optional
equipment that is offered in the model series is
described in this chapter. Therefore, equipment
is also described that is not available in a vehicle,
e. g., because of the selected optional equip‐
ment or country variant. This also applies for
safety-related functions and systems.
At a glance
The concept
Mobile phones or other external devices such as
audio players can be connected to the vehicle
via Bluetooth.
After these devices are paired once, they are
recognized automatically when the ignition is
switched on as soon as they are inside the ve‐
hicle and can be operated via iDrive, the buttons
on the steering wheel, and via voice activation.
Depending on their functionality, external devi‐
ces can be used via the vehicle as a telephone
or as an audio source. The telephone functions
are described in the following.
Up to four external devices can be paired.
Certain functions may need to be enabled by the
mobile phone provider or service provider.
Using the mobile phone while driving
Make entries only when traffic and road
conditions allow. Do not hold the mobile phone
in your hand while you are driving; use the
hands-free system instead. If you do not ob‐
serve this precaution, you can endanger the ve‐
hicle occupants and other road users.◀
Snap-in adapter
The snap-in adapter is used to:▷Hold the mobile phone.▷Recharge the battery.▷Connect the mobile phone to an outside an‐
tenna of the vehicle.
This provides for better network reception
and consistent sound quality.
Approved mobile phones
Details on which mobile phones and external
devices with a Bluetooth interface are sup‐
ported by the mobile phone preparation pack‐
age can be obtained at www.bmwusa.com/blue‐
tooth.
Displaying the vehicle identification
number and software part number
The vehicle identification number and software
part number are needed to determine which mo‐
bile phones are supported by the mobile phone
preparation package. The software version of
the mobile phone may also be required.
1."Telephone"2.Open "Options".3."Bluetooth® info"4."Display system information"
These approved mobile phones with a certain
software version, support the vehicle functions
described below.
Malfunctions may occur with other mobile
phones or software versions.
Do not operate a mobile phone that is connected
to the vehicle on the mobile phone keypad, as
this may lead to a malfunction.
A software update can be performed if neces‐
sary.
Notes
At high temperatures, the charge function of the
mobile phone can be limited where appropriate
and the functions are no longer executed.
Seite 226CommunicationTelephone226
Online Edition for Part no. 01 40 2 900 579 - 03 12 490
Page 237 of 319

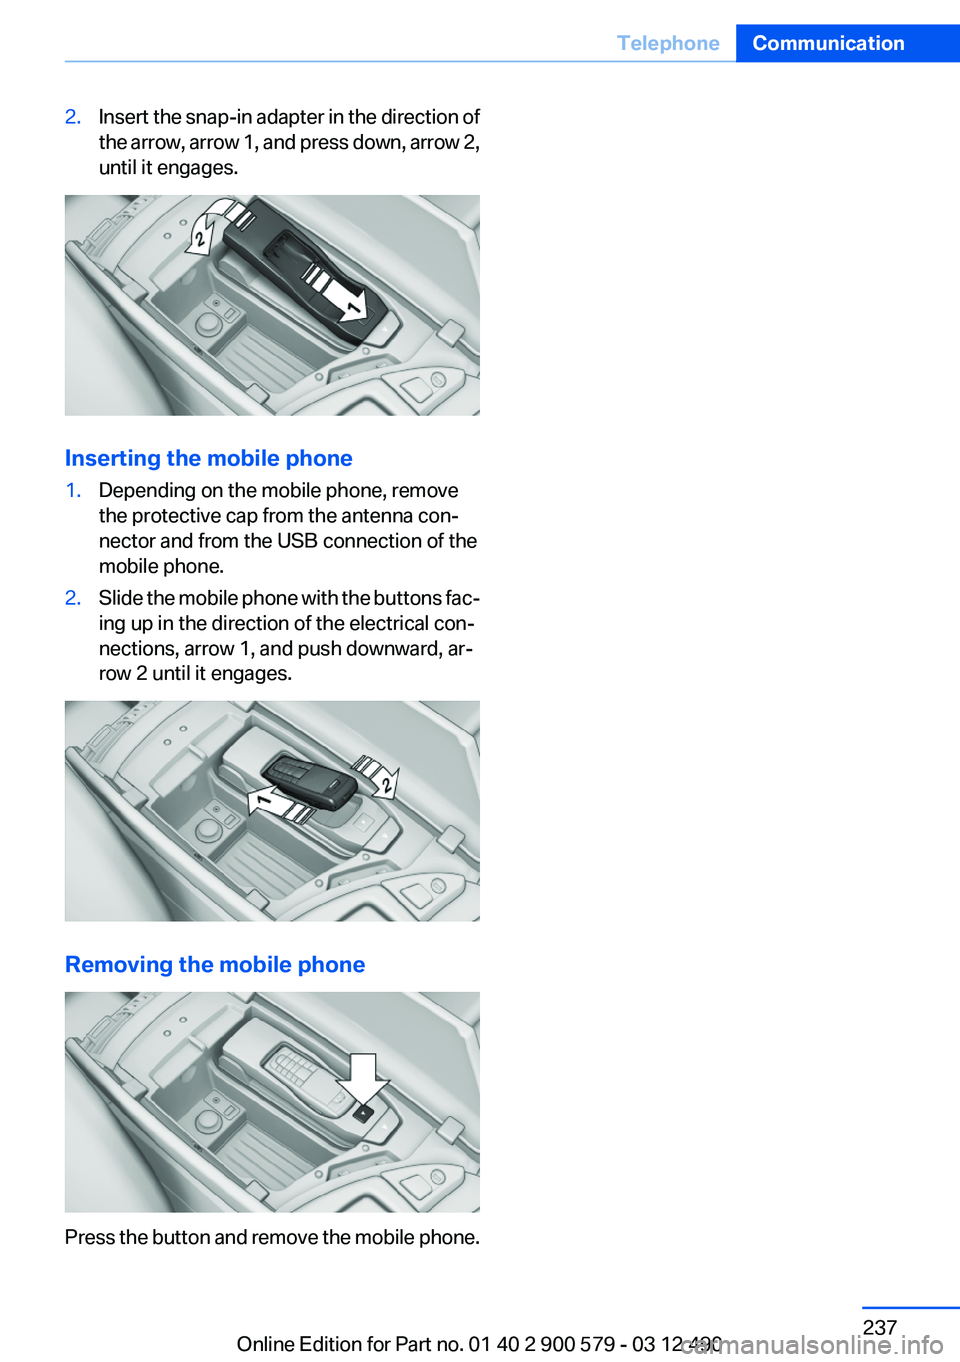
2.Insert the snap-in adapter in the direction of
the arrow, arrow 1, and press down, arrow 2,
until it engages.
Inserting the mobile phone
1.Depending on the mobile phone, remove
the protective cap from the antenna con‐
nector and from the USB connection of the
mobile phone.2.Slide the mobile phone with the buttons fac‐
ing up in the direction of the electrical con‐
nections, arrow 1, and push downward, ar‐
row 2 until it engages.
Removing the mobile phone
Press the button and remove the mobile phone.
Seite 237TelephoneCommunication237
Online Edition for Part no. 01 40 2 900 579 - 03 12 490
Page 313 of 319

Light-emitting diodes,LEDs 276
Lighter, front 143
Lighter, rear 144
Lighting 89
Lighting via remote control 37
Light switch 89
Load 158
Loading 158
Lock, door 38
Locking/unlocking from in‐ side 39
Locking/unlocking via door lock 38
Locking/unlocking with re‐ mote control 36
Locking, automatic 39
Locking, central 35
Locking via trunk lid 40
Lock, power window 46
Locks, doors, and win‐ dows 63
Low beams 89
Low beams, automatic, refer to High-beam Assistant 91
Lower back support 51
Luggage rack, refer to Roof- mounted luggage rack 159
Lumbar support 51
M
Maintenance 273
Maintenance require‐ ments 273
Maintenance, service require‐ ments 82
Maintenance system, BMW 273
Malfunction displays, refer to Check Control 77
Manual air distribution 131
Manual air volume 131
Manual brake, refer to Parking brake 68 Manual mode, transmis‐
sion 74
Manual operation, backup camera 117
Manual operation, door lock 39
Manual operation, exterior mir‐ rors 58
Manual operation, fuel filler flap 258
Manual operation, Park Dis‐ tance Control PDC 115
Manual operation, Side View 121
Manual operation, Top View 119
Map, destination entry 171
Map in split screen 178
Map view 176
Marking on approved tires 266
Marking, run-flat tires 267
Massage seat, front 51
Master key, refer to Remote control 32
Maximum cooling 131
Maximum speed, winter tires 266
Measure, units of 87
Medical kit 284
Memory for seat, mirrors, steering wheel 56
Menu in instrument cluster 83
Menus, operating, iDrive 16
Menus, refer to iDrive operat‐ ing concept 17
Message list, traffic bulle‐ tins 178
Messages 241
Messages, refer to Check Control 77
Microfilter 133
Minimum tread, tires 265
Mirror 57
Mirror memory 56 Mobile communication devi‐
ces in the vehicle 156
Mobile phone 226
Mode, ECO PRO 162
Modifications, technical, refer to Safety 7
Moisture in headlamp 276
Monitor, refer to Control Dis‐ play 16
Mounting of child restraint fix‐ ing systems 60
MP3 player 208
Multifunction steering wheel, buttons 12
Multimedia 196
Music collection 203
Music search 205
Music, storing 203
N
Navigation 166
Navigation data 181
Neck restraints, front, refer to Head restraints 54
Neck restraints, rear, refer to Head restraints 55
New wheels and tires 265
Night Vision with pedestrian detection 125
Notes 244
Nylon rope for tow-starting/ towing 286
O
OBD Onboard Diagnos‐ tics 274
Obstacle marking, backup camera 118
Odometer 80
Office 238
Oil 270
Oil, adding 270
Oil additives 271
Oil change 271 Seite 313Everything from A to ZReference313
Online Edition for Part no. 01 40 2 900 579 - 03 12 490