2012 BMW 650I key battery
[x] Cancel search: key batteryPage 32 of 282

Opening and closing
Remote control/key
Buttons on the remote control
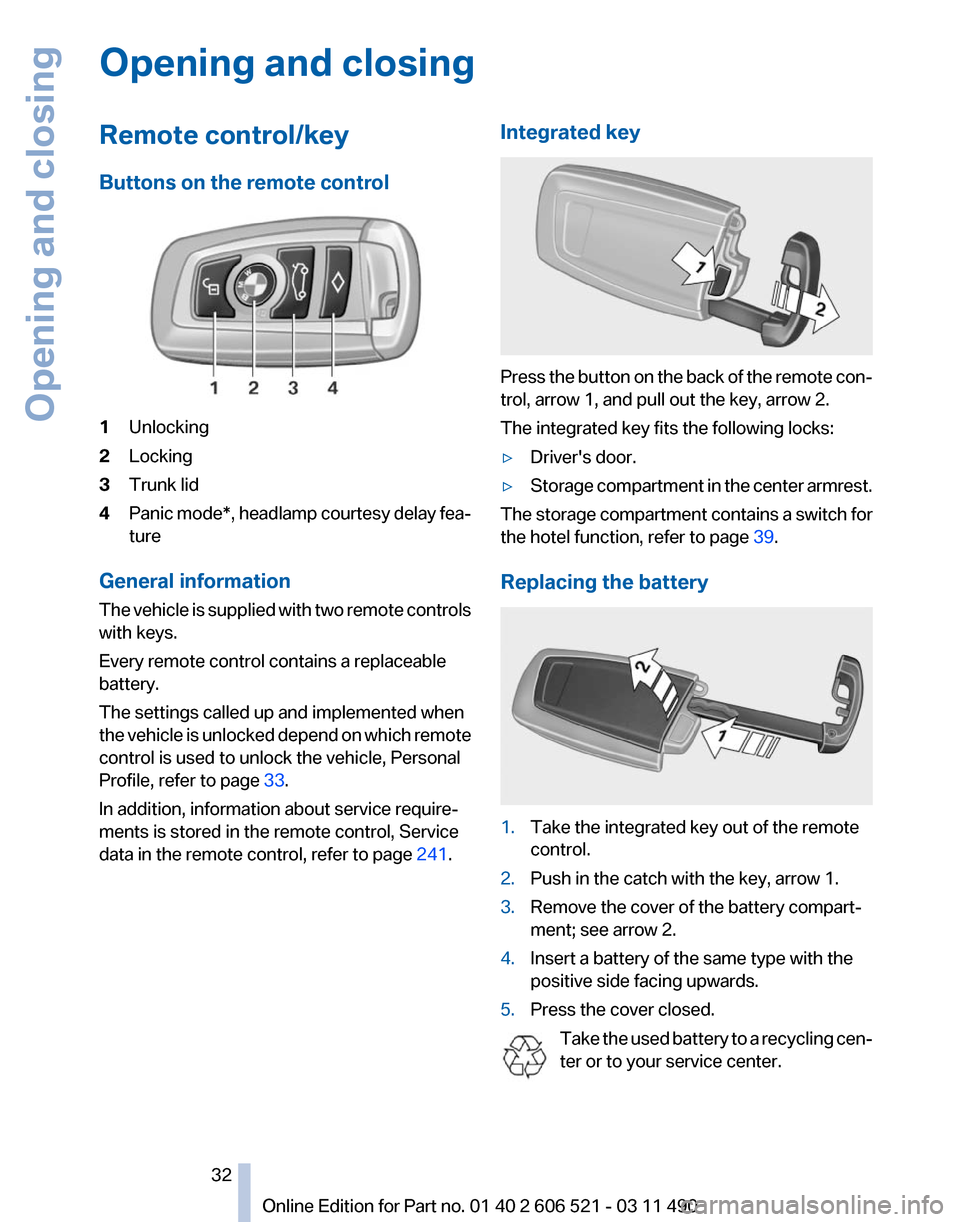
1
Unlocking
2 Locking
3 Trunk lid
4 Panic mode*, headlamp courtesy delay fea‐
ture
General information
The vehicle is supplied with two remote controls
with keys.
Every remote control contains a replaceable
battery.
The settings called up and implemented when
the vehicle is unlocked depend on which remote
control is used to unlock the vehicle, Personal
Profile, refer to page 33.
In addition, information about service require‐
ments is stored in the remote control, Service
data in the remote control, refer to page 241.Integrated key Press the button on the back of the remote con‐
trol, arrow 1, and pull out the key, arrow 2.
The integrated key fits the following locks:
▷
Driver's door.
▷ Storage compartment in the center armrest.
The storage compartment contains a switch for
the hotel function, refer to page 39.
Replacing the battery 1.
Take the integrated key out of the remote
control.
2. Push in the catch with the key, arrow 1.
3. Remove the cover of the battery compart‐
ment; see arrow 2.
4. Insert a battery of the same type with the
positive side facing upwards.
5. Press the cover closed.
Take the used battery to a recycling cen‐
ter or to your service center. Seite 32
32 Online Edition for Part no. 01 40 2 606 521 - 03 11 490
Opening and closing
Page 38 of 282

Pinch hazard when moving back the seat
If
this function is used, first make sure that
the footwell behind the driver's seat is empty.
Otherwise, people can be injured or objects
damaged when the seat is moved back.◀
The adjustment procedure is interrupted:
▷ When a seat position switch is pressed.
▷ When a button of the seat, mirror, and steer‐
ing wheel memory is pressed briefly.
Activating the setting
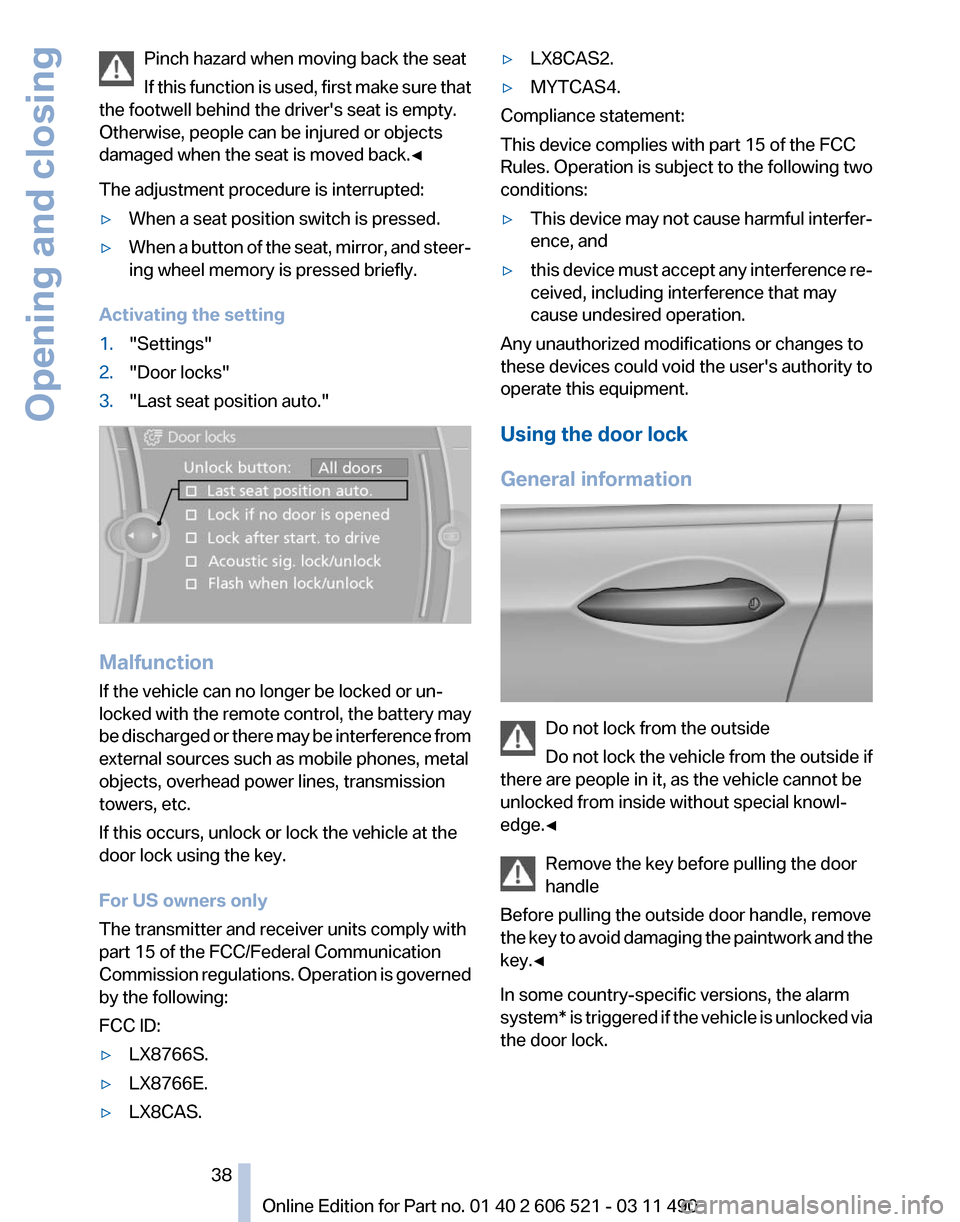
1. "Settings"
2. "Door locks"
3. "Last seat position auto." Malfunction
If the vehicle can no longer be locked or un‐
locked
with the remote control, the battery may
be discharged or there may be interference from
external sources such as mobile phones, metal
objects, overhead power lines, transmission
towers, etc.
If this occurs, unlock or lock the vehicle at the
door lock using the key.
For US owners only
The transmitter and receiver units comply with
part 15 of the FCC/Federal Communication
Commission regulations. Operation is governed
by the following:
FCC ID:
▷ LX8766S.
▷ LX8766E.
▷ LX8CAS. ▷
LX8CAS2.
▷ MYTCAS4.
Compliance statement:
This device complies with part 15 of the FCC
Rules. Operation is subject to the following two
conditions:
▷ This device may not cause harmful interfer‐
ence, and
▷ this device must accept any interference re‐
ceived, including interference that may
cause undesired operation.
Any unauthorized modifications or changes to
these devices could void the user's authority to
operate this equipment.
Using the door lock
General information Do not lock from the outside
Do
not lock the vehicle from the outside if
there are people in it, as the vehicle cannot be
unlocked from inside without special knowl‐
edge.◀
Remove the key before pulling the door
handle
Before pulling the outside door handle, remove
the key to avoid damaging the paintwork and the
key.◀
In some country-specific versions, the alarm
system* is triggered if the vehicle is unlocked via
the door lock. Seite 38
38 Online Edition for Part no. 01 40 2 606 521 - 03 11 490
Opening and closing
Page 42 of 282

sumers are switched off before locking the ve‐
hicle.
Convenient closing
Press the area, arrow 2, with your finger and
hold.
In addition to locking, the convertible top, the
side
windows, and the rear window close as well.
Press the area, arrow 2, and hold until the con‐
vertible top is fully closed.
Monitor the closing process
Monitor the closing process to ensure that
no one becomes trapped.◀
Releasing the area, arrow 2, stops the motion.
After a short period, the convertible top and the
convertible top well storage cover are lowered
slowly. The convertible top and the convertible
top well storage cover are not locked. Press the
area, arrow 2, again until the convertible top op‐
eration is completed.
Unlocking the trunk lid separately
Press on the top half of the BMW emblem on the
trunk lid.
This corresponds to pressing the button.
Do not place the remote control in the
cargo area
Take the remote control with you and do not
leave
it in the cargo area; otherwise, the remote
control may be locked inside the vehicle when
the trunk lid is closed.◀
Malfunction
Comfort Access may not function properly if it
experiences interference from external sources
such as mobile phones, metal objects, overhead
power lines, transmission towers, etc.
If this occurs, open or close the vehicle using the
buttons on the remote control or use a key in the
door lock.
To subsequently start the engine, hold the re‐
mote control against the marked area on the
steering column, refer to page 33. Alarm system*
The concept
The vehicle alarm system responds to:
▷
Opening of a door, the hood or the trunk lid.
▷ Movements in the vehicle: interior motion
sensor, refer to page 43.
▷ Changes in the vehicle tilt, e.g., during at‐
tempts to steal a wheel or when towing the
car.
▷ Interruptions in battery voltage.
The alarm system briefly indicates tampering:
▷ By sounding an acoustic alarm.
▷ By switching on the hazard warning system.
▷ By flashing the high beams.
Arming and disarming the alarm
system
General information
When
you lock or unlock the vehicle, either with
the remote control or at the door lock*, the alarm
system is armed or disarmed at the same time.
Door lock and armed alarm system
Unlocking via the door lock will trigger the alarm
on some country-specific versions.
Trunk lid and armed alarm system
The trunk lid can be opened using the remote
control, even if the alarm system is armed.
Press the button on the remote control
for approx. 1 second and release.
After the trunk lid is closed, it is locked and
monitored again by the alarm system. The haz‐
ard warning system flashes once.
In some vehicle equipment variants, the trunk lid
can only be opened using the remote control if
the vehicle was unlocked first.
Panic mode* Press the button on the remote control
for at least 3 seconds. Seite 42
42 Online Edition for Part no. 01 40 2 606 521 - 03 11 490
Opening and closing
Page 190 of 282

4. Select the symbol.
5.
Select the desired track from the list, if nec‐
essary.
Playback menu*
Depending on the particular device, some of the
functions may not be available. Symbol Function
Next track
Fast forward: press and hold the
symbol. Previous music track
Reverse: press and hold the symbol. Disconnecting the audio connection
1.
"CD/Multimedia"
2. "Bluetooth® (audio)"
3. Highlight the desired device.
4. Open "Options".
5. "Configure phone" 6.
"Audio"
7. "OK" Unpairing a device
1.
"CD/Multimedia"
2. "Bluetooth® (audio)"
3. If necessary, "Bluetooth® audio".
4. Highlight the device that is to be unpaired.
5. Open "Options".
6. "Remove phone from list"
What to do if...
Information
on suitable devices can be found at
www.bmwusa.com/bluetooth.
Suitable mobile phones, refer to page 196.
The device is not supported by the vehicle.
▷ Perform a software update*, refer to
page 191, if needed.
The device could not be paired or connected.
▷ Do the Bluetooth passkeys on the device
and the vehicle match? Enter the same
passkey on the device and via iDrive.
▷ Did it take longer than 30 seconds to enter
the
passkey? Repeat the pairing procedure.
▷ Are too many Bluetooth devices connected
to
the device or vehicle? Delete connections
with other devices if necessary.
▷ Is the mobile phone in power-save mode or
does
it have only a limited remaining battery
life? Charge the mobile phone in the snap-
in adapter or via the charging cable.
▷ Depending on the mobile phone, it is possi‐
ble that only one device can be connected
to the vehicle. Unpair the connected device
from the vehicle and pair and connect only
one device.
▷ The device no longer reacts? Switch the de‐
vice off and on again.
▷ Repeat the pairing procedure.
Music cannot be played back.
▷ Start the program for playing back music
data on the device and select a track on the
device if necessary.
▷ Switch the radio off and on again.
Music files can only be played back softly.
Seite 190
190 Online Edition for Part no. 01 40 2 606 521 - 03 11 490
CD/multimedia
Page 196 of 282

Telephone*
At a glance
The concept
Mobile
phones or other external devices such as
audio players can be connected to the vehicle
via Bluetooth.
After these devices are paired once, they are
recognized automatically when the ignition is
switched on as soon as they are inside the ve‐
hicle and can be operated via iDrive, the buttons
on the steering wheel, and via voice activation*.
Depending on their functionality, external devi‐
ces can be used via the vehicle as a telephone
or as an audio source.
The telephone functions are described in the
following. Operating the audio functions, refer to
page 188.
Up to four external devices can be paired.
Certain functions may need to be enabled by the
mobile phone provider or service provider.
Using the mobile phone while driving
Make entries only when traffic and road
conditions allow. Do not hold the mobile phone
in your hand while you are driving; use the
hands-free system instead. If you do not ob‐
serve this precaution, you can endanger the ve‐
hicle occupants and other road users.◀
Snap-in adapter*
The snap-in adapter is used to:
▷ Hold the mobile phone.
▷ Recharge the battery.
▷ Connect the mobile phone to an outside an‐
tenna of the vehicle.
This provides for better network reception
and consistent sound quality.
Approved mobile phones
Details on which mobile phones and external
devices with a Bluetooth interface are sup‐
ported by the mobile phone preparation pack‐ age can be obtained at www.bmwusa.com/blue‐
tooth.
Displaying the vehicle identification
number and software part number
The vehicle identification number and software
part
number are needed to determine which mo‐
bile phones are supported by the mobile phone
preparation package. The software version of
the mobile phone may also be required.
1. "Telephone"
2. Open "Options".
3. "Bluetooth® info"
4. "Display system information"
These approved mobile phones with a certain
software version, support the vehicle functions
described below.
Malfunctions may occur with other mobile
phones or software versions.
Do
not operate a mobile phone that is connected
to the vehicle on the mobile phone keypad, as
this may lead to a malfunction.
A software update can be performed if neces‐
sary.
Pairing/unpairing the mobile
phone
General information
The following functions are available:
▷ Use of a mobile phone as a telephone.
▷ Use of a mobile phone as an additional tele‐
phone.
▷ Use of a mobile phone as an audio source.
▷ Use of an audio device as an audio source,
refer to page 188.
Requirements
▷ The mobile phone is suitable.
Seite 196
196 Online Edition for Part no. 01 40 2 606 521 - 03 11 490
Telephone
Page 199 of 282

▷
Is Bluetooth activated in the vehicle and on
the
mobile phone? Activate Bluetooth in the
vehicle and on the mobile phone.
▷ Do the Bluetooth passkeys on the mobile
phone and the vehicle match? Enter the
same passkey on the mobile phone and via
iDrive.
▷ Did it take longer than 30 seconds to enter
the
passkey? Repeat the pairing procedure.
▷ Are too many Bluetooth devices connected
to
the mobile phone or vehicle? Delete con‐
nections with other devices if necessary.
▷ Is the audio connection activated? Deacti‐
vate the audio connection.
▷ Is the mobile phone in power-save mode or
does
it have only a limited remaining battery
life? Charge the mobile phone in the snap-
in adapter* or via the charging cable.
▷ Depending on the mobile phone, it is possi‐
ble that only one device can be connected
to the vehicle. Unpair the connected device
from the vehicle and pair and connect only
one device.
▷ The mobile phone no longer reacts? Switch
the mobile phone off and on again. Repeat
the pairing procedure.
The telephone functions are not available.
▷ Is the mobile phone paired as an additional
telephone and is the additional telephone
function
deactivated? Activate the function.
▷ Is an outgoing call not possible? Connect
the mobile phone as a telephone.
No or not all phone book entries are displayed,
or they are incomplete.
▷ Transmission of the phone book entries is
not yet complete.
▷ It is possible that only the phone book en‐
tries of the mobile phone or the
SIM card*
are transmitted.
▷ It may not be possible to display phone book
entries with special characters.
▷ The number of phone book entries being
stored is too high. ▷
Is the data volume of the contact too large,
e.g., due to stored information such as
notes? Reduce the data volume of the con‐
tact.
▷ Is the mobile phone connected as an audio
source
or additional telephone? The mobile
phone must be connected as a telephone.
The phone connection quality is poor.
▷ The strength of the Bluetooth signal on the
mobile phone can be adjusted, depending
on the mobile phone.
▷ Insert the mobile phone into the snap-in
adapter* or place it in the area of the center
console.
▷ Adjust the volume of the microphone and
loudspeakers separately.
If all points in this list have been checked and the
required function is still not available, please
contact the hotline or service center.
Controls
Adjusting the volume
Turn the knob until the desired volume is se‐
lected.
The setting is stored for the remote con‐
trol currently in use.
The vehicle automatically adjusts the volume of
the microphone on the telephone and the vol‐
ume of the called party. Depending on the mo‐
bile phone, the volumes may need to be ad‐
justed. The settings can only be created during
a call and must be adjusted separately for each
telephone. The settings are deleted when the
telephone is unpaired.
1. "Settings"
2. "Tone"
3. "Volume settings"
4. Select the desired setting: "Microphone" or
"Loudspeak."
5. To adjust: turn the controller.
6. To store: press the controller.
Seite 199
199Online Edition for Part no. 01 40 2 606 521 - 03 11 490
Reference Mobility
Communication Entertainment Navigation Driving tips Controls At a glance
Page 273 of 282

BMW Internet page
6
BMW Maintenance Sys‐ tem 241
BMW Online 220
Bottle holder, refer to Cu‐ pholder 133
Brake assistant 101
Brake discs, breaking in 138
Brake force display 100
Brake lamps, brake force dis‐ play 100
Brake lamps, bulb replace‐ ment 245
Brake lights, adaptive 100
Brake pads, breaking in 138
Braking, notes 139
Breakdown assis‐ tance 248, 249
Breaking in 138
Brightness of Control Dis‐ play 80
Bulb replacement 243
Bulb replacement, front 244
Bulb replacement, rear 245
Bulbs and lamps 243
Button, Start/Stop 65
Bypassing, refer to starting aid 249
C
Calendar 212
California Proposition 65 Warning 7
Camera, backup camera 112
Camera, care 257
Camera, Side View 115
Camera, Top View 114
Can holder, refer to Cu‐ pholder 133
Car battery 247
Car care products 255
Care, displays 257
Care, vehicle 255
Cargo 140
Cargo area, cargo area parti‐ tion 47
Cargo area lid 40 Cargo area partition
47
Cargo area, storage compart‐ ments 134
Cargo straps, securing cargo 141
Car key, refer to Remote con‐ trol 32
Carpet, care 256
Car wash 254
Catalytic converter, refer to Hot exhaust system 138
CBS Condition Based Serv‐ ice 241
CD/DVD 173
CDs, storing 180
Cell phone 196
Center armrest 132
Center console 17
Central locking system 35
Central
screen, refer to Control
Display 19
Changes, technical, refer to Safety 7
Changing parts 243
Changing wheels/tires 233
Check Control 82
Children, seating position 62
Children, transporting safely 62
Child restraint fixing sys‐ tem 62
Child restraint fixing system LATCH 63
Child restraint fixing systems, mounting 62
Child seat, mounting 62
Child seats 62
Chrome parts, care 256
Cigarette lighter 129
Cleaning, displays 257
Climate control 123
Climate control wind‐ shield 139
Clock 76
Closing/opening from in‐ side 39
Closing/opening via door lock 38 Closing/opening with remote
control 36
Combination instrument 14
Combination
instrument, elec‐
tronic displays 16
Combination switch, refer to Turn signals 69
Combination switch, refer to Wiper system 69
Comfort Access 41
COMFORT program, Dynamic Driving Control 105
Computer 76
Concierge service 219
Condensation on win‐ dows 124
Condensation under the vehi‐ cle 140
Condition Based Service CBS 241
Confirmation signal 37
Contacts 207, 216
Control Display 19
Control Display, settings 79
Controller 19
Control systems, driving sta‐ bility 101
Convenient closing 37
Convenient opening 36
Convertible, convertible top 45
Convertible mode, automatic climate control 124
Convertible program, auto‐ matic climate control 124
Convertible top 45
Convertible top, care 255
Convertible top, cargo area partition 47
Convertible top, emergency operation 47
Convertible top, rollover pro‐ tection system 91
Convertible top tool 47
Coolant 239
Coolant temperature 75
Cooling function 125
Cooling, maximum 124
Seite 273
273Online Edition for Part no. 01 40 2 606 521 - 03 11 490
Reference Mobility Communication Entertainment Navigation Driving tips Controls At a glance