2012 BMW 650I battery
[x] Cancel search: batteryPage 196 of 282

Telephone*
At a glance
The concept
Mobile
phones or other external devices such as
audio players can be connected to the vehicle
via Bluetooth.
After these devices are paired once, they are
recognized automatically when the ignition is
switched on as soon as they are inside the ve‐
hicle and can be operated via iDrive, the buttons
on the steering wheel, and via voice activation*.
Depending on their functionality, external devi‐
ces can be used via the vehicle as a telephone
or as an audio source.
The telephone functions are described in the
following. Operating the audio functions, refer to
page 188.
Up to four external devices can be paired.
Certain functions may need to be enabled by the
mobile phone provider or service provider.
Using the mobile phone while driving
Make entries only when traffic and road
conditions allow. Do not hold the mobile phone
in your hand while you are driving; use the
hands-free system instead. If you do not ob‐
serve this precaution, you can endanger the ve‐
hicle occupants and other road users.◀
Snap-in adapter*
The snap-in adapter is used to:
▷ Hold the mobile phone.
▷ Recharge the battery.
▷ Connect the mobile phone to an outside an‐
tenna of the vehicle.
This provides for better network reception
and consistent sound quality.
Approved mobile phones
Details on which mobile phones and external
devices with a Bluetooth interface are sup‐
ported by the mobile phone preparation pack‐ age can be obtained at www.bmwusa.com/blue‐
tooth.
Displaying the vehicle identification
number and software part number
The vehicle identification number and software
part
number are needed to determine which mo‐
bile phones are supported by the mobile phone
preparation package. The software version of
the mobile phone may also be required.
1. "Telephone"
2. Open "Options".
3. "Bluetooth® info"
4. "Display system information"
These approved mobile phones with a certain
software version, support the vehicle functions
described below.
Malfunctions may occur with other mobile
phones or software versions.
Do
not operate a mobile phone that is connected
to the vehicle on the mobile phone keypad, as
this may lead to a malfunction.
A software update can be performed if neces‐
sary.
Pairing/unpairing the mobile
phone
General information
The following functions are available:
▷ Use of a mobile phone as a telephone.
▷ Use of a mobile phone as an additional tele‐
phone.
▷ Use of a mobile phone as an audio source.
▷ Use of an audio device as an audio source,
refer to page 188.
Requirements
▷ The mobile phone is suitable.
Seite 196
196 Online Edition for Part no. 01 40 2 606 521 - 03 11 490
Telephone
Page 199 of 282
▷
Is Bluetooth activated in the vehicle and on
the
mobile phone? Activate Bluetooth in the
vehicle and on the mobile phone.
▷ Do the Bluetooth passkeys on the mobile
phone and the vehicle match? Enter the
same passkey on the mobile phone and via
iDrive.
▷ Did it take longer than 30 seconds to enter
the
passkey? Repeat the pairing procedure.
▷ Are too many Bluetooth devices connected
to
the mobile phone or vehicle? Delete con‐
nections with other devices if necessary.
▷ Is the audio connection activated? Deacti‐
vate the audio connection.
▷ Is the mobile phone in power-save mode or
does
it have only a limited remaining battery
life? Charge the mobile phone in the snap-
in adapter* or via the charging cable.
▷ Depending on the mobile phone, it is possi‐
ble that only one device can be connected
to the vehicle. Unpair the connected device
from the vehicle and pair and connect only
one device.
▷ The mobile phone no longer reacts? Switch
the mobile phone off and on again. Repeat
the pairing procedure.
The telephone functions are not available.
▷ Is the mobile phone paired as an additional
telephone and is the additional telephone
function
deactivated? Activate the function.
▷ Is an outgoing call not possible? Connect
the mobile phone as a telephone.
No or not all phone book entries are displayed,
or they are incomplete.
▷ Transmission of the phone book entries is
not yet complete.
▷ It is possible that only the phone book en‐
tries of the mobile phone or the
SIM card*
are transmitted.
▷ It may not be possible to display phone book
entries with special characters.
▷ The number of phone book entries being
stored is too high. ▷
Is the data volume of the contact too large,
e.g., due to stored information such as
notes? Reduce the data volume of the con‐
tact.
▷ Is the mobile phone connected as an audio
source
or additional telephone? The mobile
phone must be connected as a telephone.
The phone connection quality is poor.
▷ The strength of the Bluetooth signal on the
mobile phone can be adjusted, depending
on the mobile phone.
▷ Insert the mobile phone into the snap-in
adapter* or place it in the area of the center
console.
▷ Adjust the volume of the microphone and
loudspeakers separately.
If all points in this list have been checked and the
required function is still not available, please
contact the hotline or service center.
Controls
Adjusting the volume
Turn the knob until the desired volume is se‐
lected.
The setting is stored for the remote con‐
trol currently in use.
The vehicle automatically adjusts the volume of
the microphone on the telephone and the vol‐
ume of the called party. Depending on the mo‐
bile phone, the volumes may need to be ad‐
justed. The settings can only be created during
a call and must be adjusted separately for each
telephone. The settings are deleted when the
telephone is unpaired.
1. "Settings"
2. "Tone"
3. "Volume settings"
4. Select the desired setting: "Microphone" or
"Loudspeak."
5. To adjust: turn the controller.
6. To store: press the controller.
Seite 199
199Online Edition for Part no. 01 40 2 606 521 - 03 11 490
Reference Mobility
Communication Entertainment Navigation Driving tips Controls At a glance
Page 247 of 282
Vehicle battery
Maintenance
The battery is maintenance-free, i.e., the elec‐
trolyte will last for the life of the battery.
Your
service center will be glad to advise you on
questions regarding the battery.
Battery replacement
Use approved vehicle batteries only.
Only use vehicle batteries that have been
approved for your vehicle by the manufacturer;
otherwise, the vehicle could be damaged and
systems or functions may not be fully availa‐
ble.◀
After a battery replacement, have the battery
registered on the vehicle by your service center
to ensure that all comfort functions are fully
available.
Charging the battery
In the vehicle, only charge the battery via the
terminals, refer to page 250, in the engine com‐
partment with the engine off.
Power failure
After a temporary power loss, some equipment
needs to be reinitialized.
Individual settings need to be reprogrammed:
▷ Seat, mirror, and steering wheel memory:
store the positions again.
▷ Time: update.
▷ Date: update.
▷ Radio station: save again.
▷ Navigation system: wait for the operability of
the navigation.
Disposing of old batteries Have old batteries disposed of by your
service center or bring them to a recy‐
cling center.
Maintain the battery in an upright position for
transport and storage. Secure the battery so
that it does not tip over during transport. Fuses
Notes
Replacing fuses
Never attempt to repair a blown fuse and
do
not replace a defective fuse with a substitute
of another color or amperage rating; this could
lead to a circuit overload, ultimately resulting in
a fire in the vehicle.◀
Plastic tweezers and information on the fuse
types and locations are stored in the fuse box in
the cargo area.
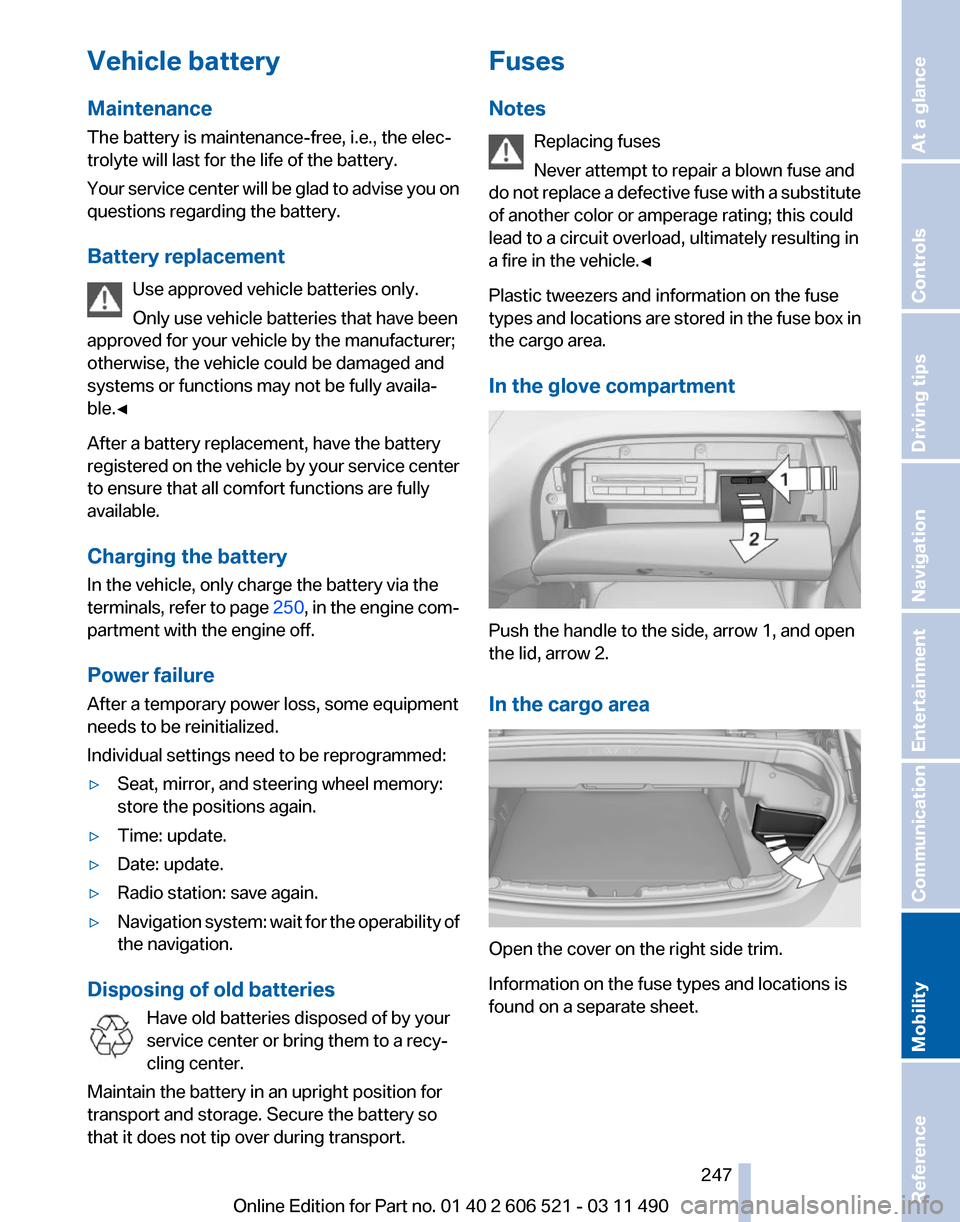
In the glove compartment Push the handle to the side, arrow 1, and open
the lid, arrow 2.
In the cargo area
Open the cover on the right side trim.
Information on the fuse types and locations is
found on a separate sheet. Seite 247
247Online Edition for Part no. 01 40 2 606 521 - 03 11 490
Reference
Mobility Communication Entertainment Navigation Driving tips Controls At a glance
Page 249 of 282
Assist Response Center may still be able to
hear you.
Initiating an Emergency Request
automatically
Under certain conditions, an Emergency Re‐
quest is automatically initiated immediately after
a severe accident. Automatic Collision Notifica‐
tion is not affected by pressing the SOS button.
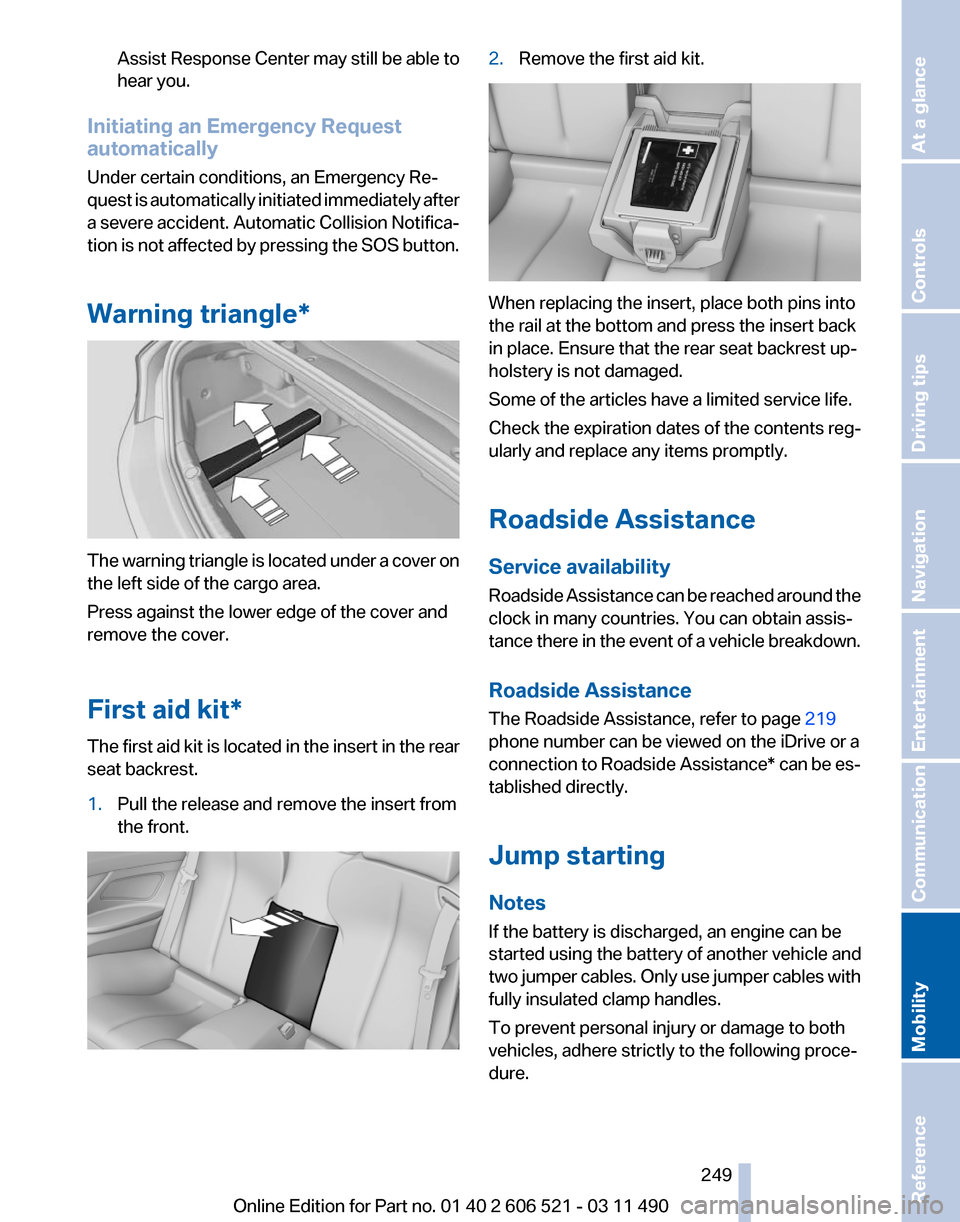
Warning triangle* The warning triangle is located under a cover on
the left side of the cargo area.
Press against the lower edge of the cover and
remove the cover.
First aid kit*
The first aid kit is located in the insert in the rear
seat backrest.
1.
Pull the release and remove the insert from
the front. 2.
Remove the first aid kit. When replacing the insert, place both pins into
the rail at the bottom and press the insert back
in place. Ensure that the rear seat backrest up‐
holstery is not damaged.
Some of the articles have a limited service life.
Check the expiration dates of the contents reg‐
ularly and replace any items promptly.
Roadside Assistance
Service availability
Roadside Assistance can be reached around the
clock in many countries. You can obtain assis‐
tance there in the event of a vehicle breakdown.
Roadside Assistance
The Roadside Assistance, refer to page
219
phone number can be viewed on the iDrive or a
connection to Roadside Assistance* can be es‐
tablished directly.
Jump starting
Notes
If the battery is discharged, an engine can be
started using the battery of another vehicle and
two jumper cables. Only use jumper cables with
fully insulated clamp handles.
To prevent personal injury or damage to both
vehicles, adhere strictly to the following proce‐
dure.
Seite 249
249Online Edition for Part no. 01 40 2 606 521 - 03 11 490
Reference
Mobility Communication Entertainment Navigation Driving tips Controls At a glance
Page 250 of 282
Do not touch live parts
To avoid the risk of potentially fatal injury,
always avoid all contact with electrical compo‐
nents while the engine is running.◀
Preparation
1. Check whether the battery of the other ve‐
hicle
has a voltage of 12 volts. This informa‐
tion can be found on the battery.
2. Switch off the engine of the assisting vehi‐
cle.
3. Switch off any electronic systems/power
consumers in both vehicles.
Bodywork contact between vehicles
Make sure that there is no contact be‐
tween the bodywork of the two vehicles; other‐
wise, there is the danger of short circuits.◀
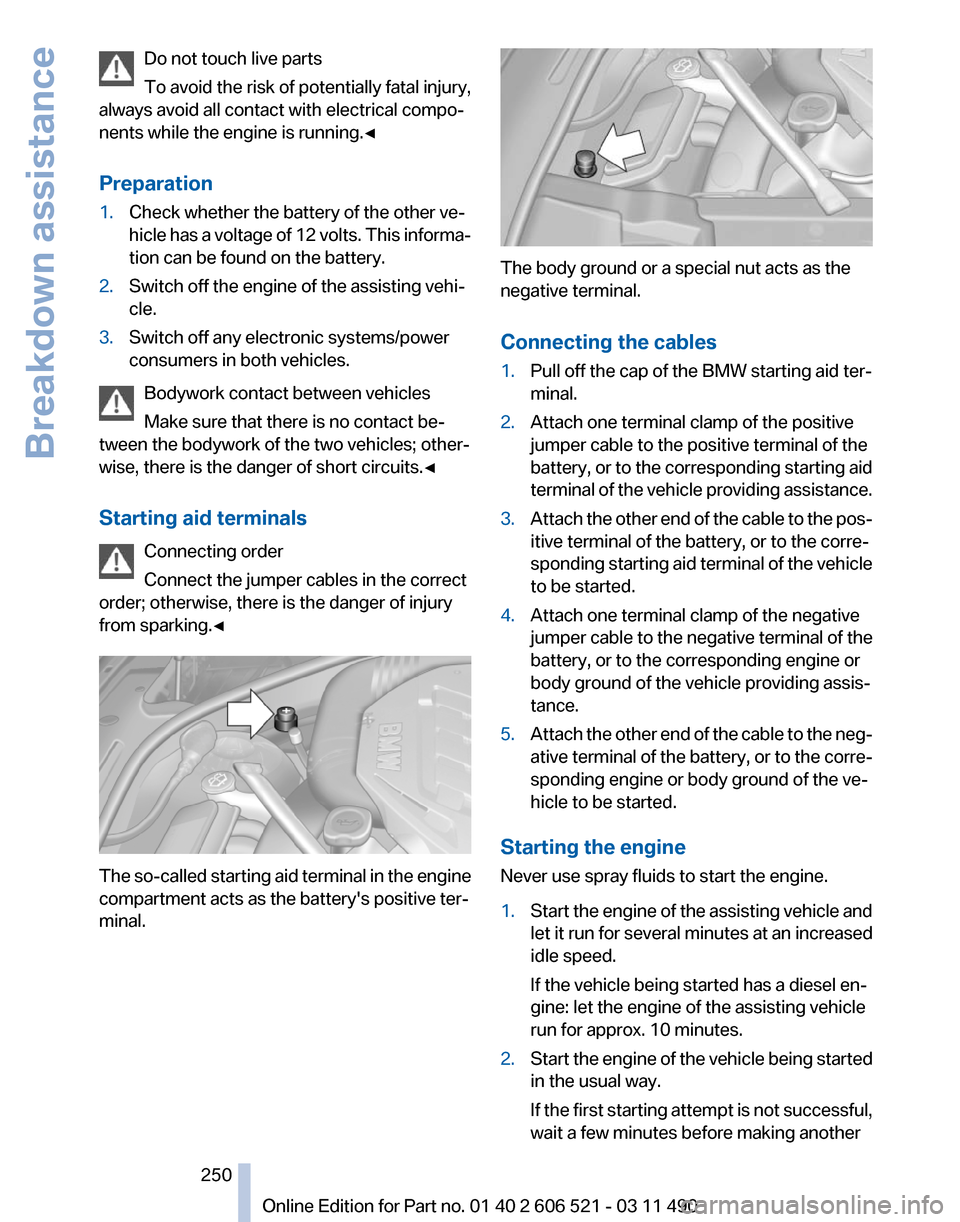
Starting aid terminals
Connecting order
Connect the jumper cables in the correct
order; otherwise, there is the danger of injury
from sparking.◀ The so-called starting aid terminal in the engine
compartment acts as the battery's positive ter‐
minal. The body ground or a special nut acts as the
negative terminal.
Connecting the cables
1.
Pull off the cap of the BMW starting aid ter‐
minal.
2. Attach one terminal clamp of the positive
jumper cable to the positive terminal of the
battery,
or to the corresponding starting aid
terminal of the vehicle providing assistance.
3. Attach the other end of the cable to the pos‐
itive terminal of the battery, or to the corre‐
sponding
starting aid terminal of the vehicle
to be started.
4. Attach one terminal clamp of the negative
jumper
cable to the negative terminal of the
battery, or to the corresponding engine or
body ground of the vehicle providing assis‐
tance.
5. Attach the other end of the cable to the neg‐
ative
terminal of the battery, or to the corre‐
sponding engine or body ground of the ve‐
hicle to be started.
Starting the engine
Never use spray fluids to start the engine.
1. Start the engine of the assisting vehicle and
let
it run for several minutes at an increased
idle speed.
If the vehicle being started has a diesel en‐
gine: let the engine of the assisting vehicle
run for approx. 10 minutes.
2. Start the engine of the vehicle being started
in the usual way.
If
the first starting attempt is not successful,
wait a few minutes before making another
Seite 250
250 Online Edition for Part no. 01 40 2 606 521 - 03 11 490
Breakdown assistance
Page 251 of 282
attempt in order to allow the discharged bat‐
tery to recharge.
3. Let both engines run for several minutes.
4. Disconnect the jumper cables in the reverse
order.
Check the battery and recharge if necessary.
Tow-starting and towing
Manual transmission
Observe before towing your vehicle
The parking brake is blocked
The parking brake cannot be released
manually.
When the parking brake is blocked, do not tow
with the front axle lifted or the vehicle can be
damaged.
Contact your service center.◀
Gearshift lever in neutral position.
Towing
Follow the towing instructions
Follow all towing instructions; otherwise,
vehicle damage or accidents may occur.◀
▷ Make sure that the ignition is switched on;
otherwise, the low beams, tail lamps, turn
signals, and windshield wipers may be un‐
available.
▷ Do not tow the vehicle with the rear axle
tilted, as the front wheels could turn.
▷ When the engine is stopped, there is no
power assist. Consequently, more force
needs
to be applied when braking and steer‐
ing.
▷ Larger steering wheel movements are re‐
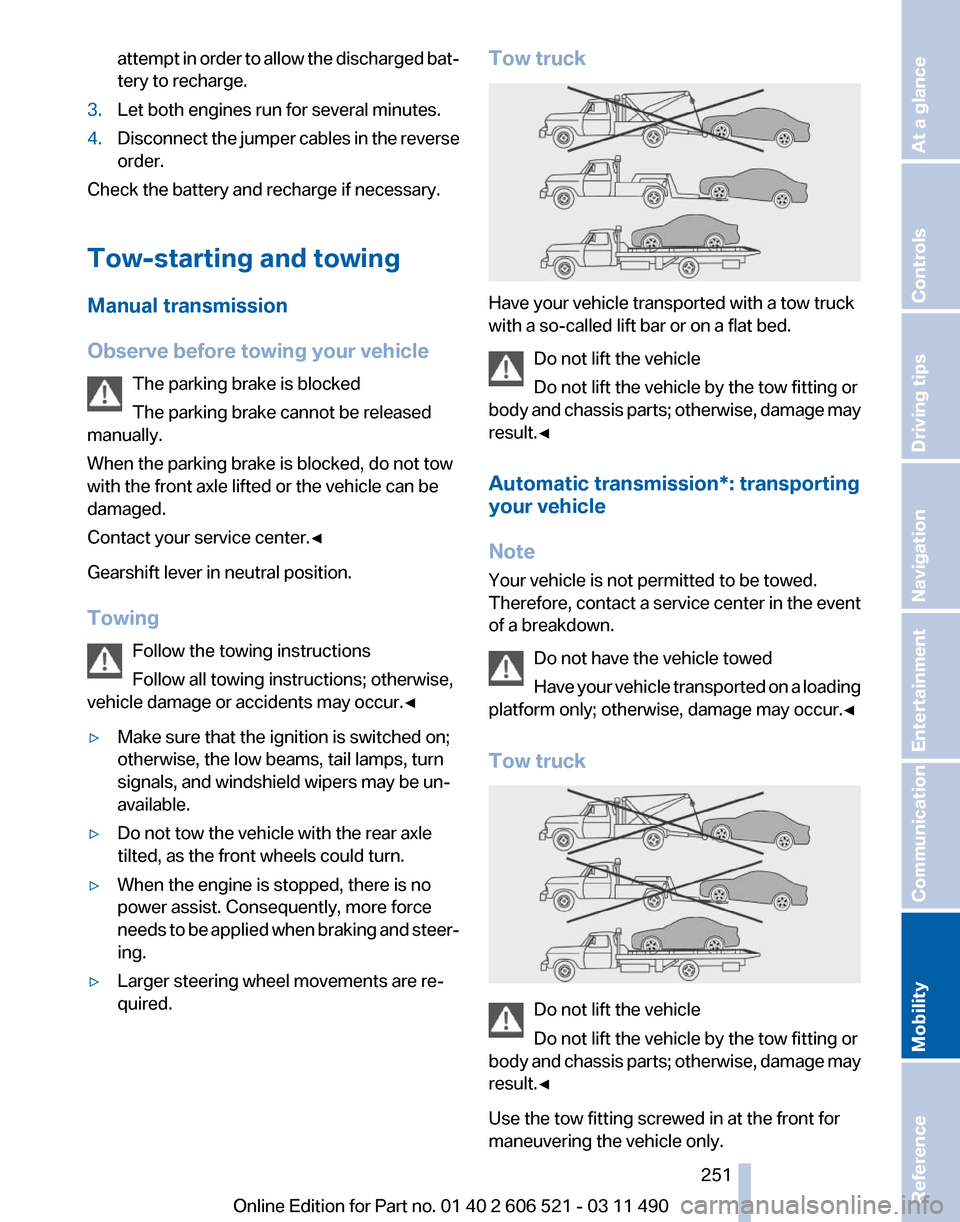
quired. Tow truck
Have your vehicle transported with a tow truck
with a so-called lift bar or on a flat bed.
Do not lift the vehicle
Do not lift the vehicle by the tow fitting or
body
and chassis parts; otherwise, damage may
result.◀
Automatic transmission*: transporting
your vehicle
Note
Your vehicle is not permitted to be towed.
Therefore, contact a service center in the event
of a breakdown.
Do not have the vehicle towed
Have your vehicle transported on a loading
platform only; otherwise, damage may occur.◀
Tow truck Do not lift the vehicle
Do not lift the vehicle by the tow fitting or
body
and chassis parts; otherwise, damage may
result.◀
Use the tow fitting screwed in at the front for
maneuvering the vehicle only. Seite 251
251Online Edition for Part no. 01 40 2 606 521 - 03 11 490
Reference
Mobility Communication Entertainment Navigation Driving tips Controls At a glance
Page 272 of 282
Everything from A to Z
Index
A
ABS, Antilock Brake Sys‐
tem 101
Activated-charcoal filter 126
Active Blind Spot Detec‐ tion 98
Active seat, front 55
Active seat ventilation, front 55
Active Steering, integral 102
Adaptive brake lights, refer to Brake force display 100
Adaptive drive 102
Adaptive light control 85
Additional telephone 196
Additives, oil 239
Adjustments, seats/head re‐ straints 53
Airbags 88
Airbags, indicator/warning light 89
Air circulation, refer to Recir‐ culated-air mode 125
Air distribution, manual 123
Air drying, refer to Cooling function 125
Air pressure, tires 229
Air vents, refer to Ventila‐ tion 126
Air volume, automatic climate control 124
Alarm system 42
Alarm, unintentional 43
All around the center con‐ sole 17
All
around the interior rearview
mirror 18
All around the steering wheel 12
ALL program, automatic cli‐ mate control 125 All-season tires, refer to Win‐
ter tires 233
Alternating-code hand-held transmitter 129
Alternative oil types 239
AM/FM station 166
Announcement, navigation, refer to Spoken instruc‐
tions 155
Antifreeze, washer fluid 71
Antilock Brake System, ABS 101
Anti-slip control, refer to DSC 101
Appointments 212
Approved engine oils 239
Apps 222
Armrest, refer to Center arm‐ rest 132
Arrival time 78
Ashtray 129
Assist 218
Assistance, Roadside Assis‐ tance 249
Assistance when driving off 101
Audio playback 173
Audio playback, Blue‐ tooth 188
AUTO intensity 124
Automatic car wash 254
Automatic Curb Monitor 59
Automatic deactivation, front passenger airbags 89
Automatic headlamp con‐ trol 85
Automatic Hold 67
Automatic locking 39
Automatic recirculated-air control 125
Automatic Soft Closing, doors 40 Automatic transmission with
Steptronic 72
AUTO program, automatic cli‐ mate control 124
AUTO program, intensity 124
AUX-IN port 184
Average fuel consumption 77
Average speed 77
Axle loads, weights 261
B
Backrest curvature, refer to Lumbar support 54
Backrest, seats 53
Backrest, width 54
Backup camera 110
Backup lamps, bulb replace‐ ment 245
Balance 164
Band-Aids, refer to First aid kit 249
Bar for tow-starting/tow‐ ing 252
Bass 164
Battery replacement, vehicle battery 247
Battery replacement, vehicle remote control 32
Battery, vehicle 247
Before entering the car wash 254
Belts, safety belts 56
Beverage holder, cu‐ pholder 133
Bluetooth audio 188
BMW Apps 222
BMW Apps, video play‐ back 187
BMW Assist 218
BMW EfficientDynamics, refer to Saving fuel 141
BMW homepage 6
Seite 272
272 Online Edition for Part no. 01 40 2 606 521 - 03 11 490
Everything from A to Z
Page 273 of 282

BMW Internet page
6
BMW Maintenance Sys‐ tem 241
BMW Online 220
Bottle holder, refer to Cu‐ pholder 133
Brake assistant 101
Brake discs, breaking in 138
Brake force display 100
Brake lamps, brake force dis‐ play 100
Brake lamps, bulb replace‐ ment 245
Brake lights, adaptive 100
Brake pads, breaking in 138
Braking, notes 139
Breakdown assis‐ tance 248, 249
Breaking in 138
Brightness of Control Dis‐ play 80
Bulb replacement 243
Bulb replacement, front 244
Bulb replacement, rear 245
Bulbs and lamps 243
Button, Start/Stop 65
Bypassing, refer to starting aid 249
C
Calendar 212
California Proposition 65 Warning 7
Camera, backup camera 112
Camera, care 257
Camera, Side View 115
Camera, Top View 114
Can holder, refer to Cu‐ pholder 133
Car battery 247
Car care products 255
Care, displays 257
Care, vehicle 255
Cargo 140
Cargo area, cargo area parti‐ tion 47
Cargo area lid 40 Cargo area partition
47
Cargo area, storage compart‐ ments 134
Cargo straps, securing cargo 141
Car key, refer to Remote con‐ trol 32
Carpet, care 256
Car wash 254
Catalytic converter, refer to Hot exhaust system 138
CBS Condition Based Serv‐ ice 241
CD/DVD 173
CDs, storing 180
Cell phone 196
Center armrest 132
Center console 17
Central locking system 35
Central
screen, refer to Control
Display 19
Changes, technical, refer to Safety 7
Changing parts 243
Changing wheels/tires 233
Check Control 82
Children, seating position 62
Children, transporting safely 62
Child restraint fixing sys‐ tem 62
Child restraint fixing system LATCH 63
Child restraint fixing systems, mounting 62
Child seat, mounting 62
Child seats 62
Chrome parts, care 256
Cigarette lighter 129
Cleaning, displays 257
Climate control 123
Climate control wind‐ shield 139
Clock 76
Closing/opening from in‐ side 39
Closing/opening via door lock 38 Closing/opening with remote
control 36
Combination instrument 14
Combination
instrument, elec‐
tronic displays 16
Combination switch, refer to Turn signals 69
Combination switch, refer to Wiper system 69
Comfort Access 41
COMFORT program, Dynamic Driving Control 105
Computer 76
Concierge service 219
Condensation on win‐ dows 124
Condensation under the vehi‐ cle 140
Condition Based Service CBS 241
Confirmation signal 37
Contacts 207, 216
Control Display 19
Control Display, settings 79
Controller 19
Control systems, driving sta‐ bility 101
Convenient closing 37
Convenient opening 36
Convertible, convertible top 45
Convertible mode, automatic climate control 124
Convertible program, auto‐ matic climate control 124
Convertible top 45
Convertible top, care 255
Convertible top, cargo area partition 47
Convertible top, emergency operation 47
Convertible top, rollover pro‐ tection system 91
Convertible top tool 47
Coolant 239
Coolant temperature 75
Cooling function 125
Cooling, maximum 124
Seite 273
273Online Edition for Part no. 01 40 2 606 521 - 03 11 490
Reference Mobility Communication Entertainment Navigation Driving tips Controls At a glance