2012 BMW 650I air vent
[x] Cancel search: air ventPage 17 of 282

All around the center console
1
All around the interior rearview mir‐
ror 18
2 Control Display 19
3 Glove compartment 132
4 Air vent 126
5 Hazard warning system 248
Central locking system 39
6 Radio 166
CD/multimedia 173
7 Automatic climate control 123
8 Controller with buttons 19
9 Parking brake
67 Automatic Hold*
67 10 Opening and closing the converti‐
ble top
46
11 PDC Park Distance Con‐
trol* 107
Top View* 112
Backup camera* 110
Parking assistant* 115
Side View* 114
12 Dynamic Driving Control* 103
DSC Dynamic Stability Con‐
trol 101
13 Transmission selector lever
Seite 17
17Online Edition for Part no. 01 40 2 606 521 - 03 11 490
Reference Mobility Communication Entertainment Navigation Driving tips Controls
At a glance
Page 45 of 282

wise, the closing action may not stop in certain
situations, e.g., if thin objects are present.
◀
Window accessories
Do not install any accessories in the range
of movement of the windows; otherwise, the
pinch protection system will be impaired.◀
Closing without the pinch protection
system
Danger of pinching
Monitor the closing process and make
sure that the closing path of the window is clear;
otherwise, injuries may result.◀
For example, if there is an external danger or if
ice on the windows prevents a window from
closing normally, proceed as follows:
1. Pull the switch past the resistance point and
hold it there.
Pinch protection is limited and the window
reopens
slightly if the closing force exceeds
a certain value.
2. Pull the switch past the resistance point
again within approx. 4 seconds and hold it
there.
The window closes without pinch protec‐
tion.
Convertible top
General information
The convertible top can be opened or closed at
speeds up to approx. 25 mph/40 km/h.
If the vehicle is accelerated above a speed of
approx. 30 mph/50 km/h while the convertible
top is being moved, the convertible top move‐
ment stops.
Tips about the convertible top:
▷ If possible, close the convertible top when
the vehicle is parked. A closed convertible
top protects it from weather-related dam‐
age and to some extent from theft. ▷
Event when the convertible top is closed,
only
store valuables in the locked cargo area.
▷ At higher speeds, vacuum produced in the
passenger compartment cause the conver‐
tible top to begin to flatten. Increase the
amount
of air via the automatic climate con‐
trol so that no vacuum is produced in the ve‐
hicle.
Notes
The
trunk lid cannot be opened if the convertible
top is not fully opened or closed.
Safety information about the convertible
top
▷ With temperatures below +14 ℉/-10 ℃ do
not open the convertible top; otherwise
damages could result.
▷ Do not leave the open convertible top in the
convertible top well longer than one day
while the top is still wet; otherwise, damage
could result due to moisture.
▷ The convertible top pivots up during open‐
ing
and closing. When the top is moved, e.g.
in garages, make sure that there is a mini‐
mum height of 79 inches/2 meters; other‐
wise, it damages may result.
▷ Do not place any objects on the convertible
top, otherwise, they could fall and cause
damage or injuries.
▷ When the rollover protection system is ex‐
tended, do not under any circumstances
move the convertible top.
▷ Always open or close the convertible top
completely.
Convertible top and convertible
top well storage cover are locked in the final
positions. Driving with the convertible tope
or convertible top well storage cover un‐
locked can result in damage.
▷ Do not reach into the convertible top mech‐
anism
during the opening and closing oper‐
ation. Keep children away from the opening
path of the convertible top, otherwise, there
is a risk of injury. Seite 45
45Online Edition for Part no. 01 40 2 606 521 - 03 11 490
Reference Mobility Communication Entertainment Navigation Driving tips
Controls At a glance
Page 46 of 282

▷
When the convertible top is opened during
driving, be alert to traffic; otherwise, it may
result
in an accident. If possible, do not move
the convertible top while driving in reverse
because rearward vision is severely im‐
paired while the convertible top is in motion.
During windy conditions, do not operate the
convertible top while driving. Do not drive
faster than 30 mph/50 km/h; otherwise, ve‐
hicle damage may occur.
▷ Do not attach any roof carrier systems; oth‐
erwise, an accident may occur.◀
Functional requirements
The ignition or radio ready state must be
switched on.
It
is not possible to start the engine and operate
the convertible top simultaneously. When the
engine is started, the convertible top movement
is briefly interrupted.
Under the following conditions, the convertible
top movement cannot be moved and a Check
Control message is displayed.
▷ Cargo area partition is flipped up.
▷ Trunk lid is open.
▷ External temperature is too low.
▷ Vehicle system too low.
▷ Convertible top drive is overheating.
▷ Movement of the convertible top not al‐
lowed because of national regulations.
▷ Vehicle speed is too high.
Before opening and closing
▷ Follow the safety instructions for the con‐
vertible top.
▷ Make sure that the cargo area partition in the
cargo area is folded down.
▷ Make sure that the cargo does not push
against the cargo area partition from below.
▷ Make sure that the trunk lid is closed. Convertible top switch
1
Switch
2 LEDs
Opening and closing from the inside
In order to protect the battery, move the con‐
vertible top only when the engine is running if
possible.
Before closing the convertible top, remove any
foreign objects from the windshield frame; oth‐
erwise, closing may be prevented.
▷ Press and hold the switch. The con‐
vertible top opens while the switch
is being pressed. ▷
Pull the switch and hold it. The con‐
vertible top closes while the switch
is being pulled. Push or pull switch until the convertible top is
completely open or closed and the end of the
procedure is indicated by a corresponding
Check
Control message. Always make sure that
the convertible top well storage cover is com‐
pletely closed. If the convertible top is com‐
pletely open or closed, convertible top and con‐
vertible top well storage cover are latched.
The side windows and the rear window go down
when the convertible top control switch is pulled
or pushed.
LEDs
▷ Left LED lights up green: convertible top is
opened or closed. If the operation is com‐
pleted,
the LED goes out and a correspond‐
ing Check Control message is displayed.
Seite 46
46 Online Edition for Part no. 01 40 2 606 521 - 03 11 490
Opening and closing
Page 56 of 282

Safety belts
Seats with safety belt
The vehicle has four seats, each of which is
equipped with a safety belt.
Notes
Always make sure that safety belts are being
worn by all occupants before driving away.
Although airbags enhance safety by providing
added protection, they are not a substitute for
safety belts.
One person per safety belt
Never
allow more than one person to wear
a single safety belt. Never allow infants or small
children to ride on a passenger's lap.◀
Putting on the belt
Lay the belt, without twisting, snugly
across the lap and shoulders, as close to the
body as possible. Make sure that the belt lies low
around the hips in the lap area and does not
press on the abdomen. Otherwise, the belt can
slip over the hips in the lap area in a frontal im‐
pact and injure the abdomen.
The safety belt must not lie across the neck, rub
on sharp edges, be routed over solid or breaka‐
ble objects, or be pinched.◀
Reduction of restraining effect
Avoid wearing clothing that prevents the
belt from fitting properly, and pull the shoulder
belt periodically to readjust the tension across
your lap; otherwise, the retention effect of the
safety belt may be reduced.◀ Buckling the belt
Make sure you hear the latch plate engage in the
belt buckle.
Unbuckling the belt
1.
Hold the belt firmly.
2. Press the red button in the belt buckle.
3. Guide the belt back into its reel.
Safety belt reminder for the driver's and
front passenger seat The indicator lamp flashes or lights up
and a signal sounds. Make sure that the
safety belts are positioned correctly.
The safety belt reminder is active at speeds
above approx. 5 mph/8 km/h. It can also be ac‐
tivated if objects are placed on the front pas‐
senger seat.
Damage to safety belts
In the case of strain caused by accidents or
damage:
Have the safety belts, including the safety belt
tensioners, replaced and have the belt anchors
checked.
Checking and replacing safety belts
Have the work performed only by your
service center; otherwise, it cannot be ensured
that this safety feature will function properly.◀ Seite 56
56 Online Edition for Part no. 01 40 2 606 521 - 03 11 490
Adjusting
Page 57 of 282

Front head restraints
Correctly adjusted head restraint
A correctly adjusted head restraint reduces the
risk
of injury to cervical vertebrae in the event of
an accident.
Adjusting the head restraint
Correctly adjust the head restraints of all
occupied seats; otherwise, there is an increased
risk of injury in an accident.◀
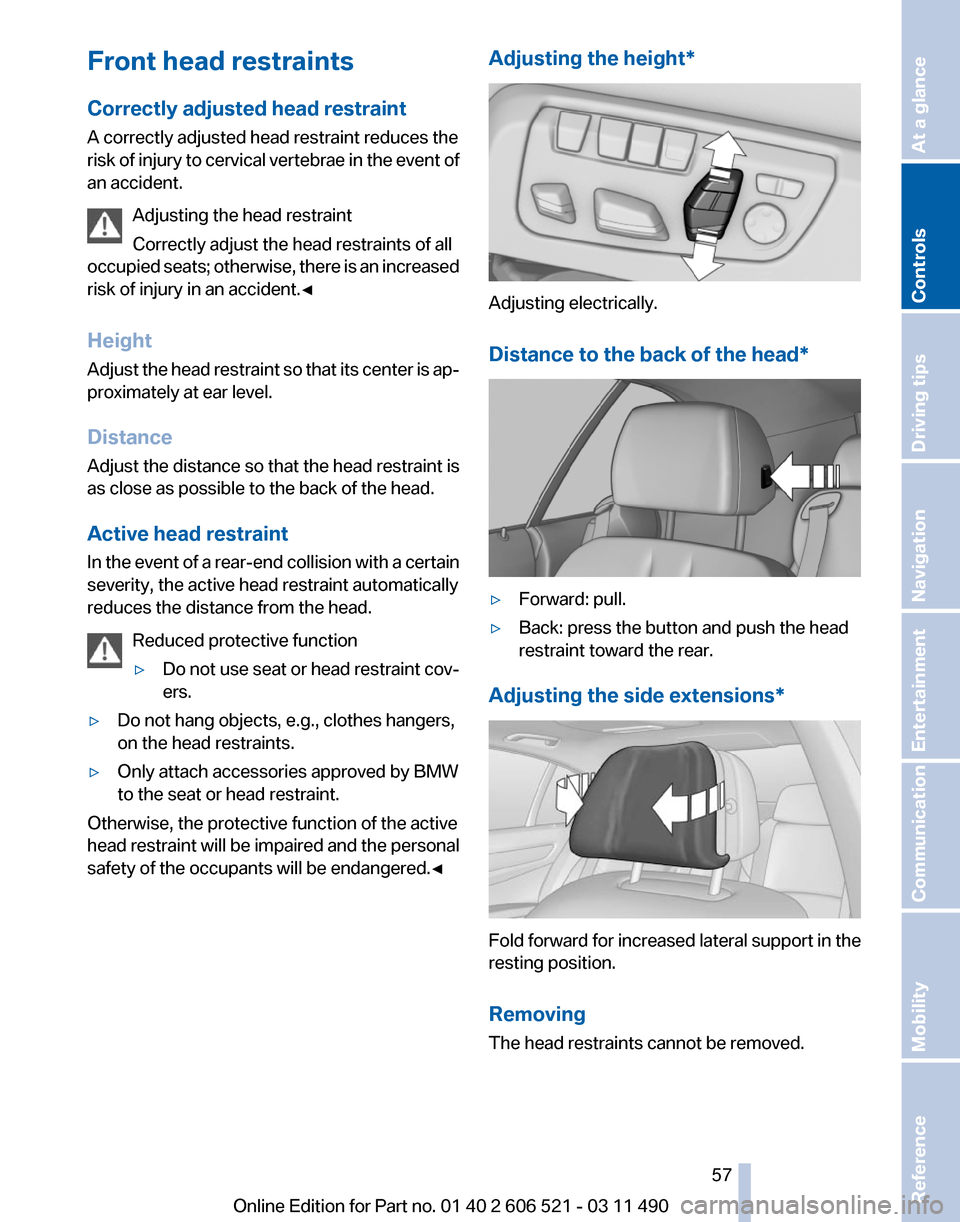
Height
Adjust the head restraint so that its center is ap‐
proximately at ear level.
Distance
Adjust the distance so that the head restraint is
as close as possible to the back of the head.
Active head restraint
In the event of a rear-end collision with a certain
severity, the active head restraint automatically
reduces the distance from the head.
Reduced protective function
▷Do not use seat or head restraint cov‐
ers.
▷ Do not hang objects, e.g., clothes hangers,
on the head restraints.
▷ Only attach accessories approved by BMW
to the seat or head restraint.
Otherwise, the protective function of the active
head
restraint will be impaired and the personal
safety of the occupants will be endangered.◀ Adjusting the height*
Adjusting electrically.
Distance to the back of the head
* ▷
Forward: pull.
▷ Back: press the button and push the head
restraint toward the rear.
Adjusting the side extensions* Fold forward for increased lateral support in the
resting position.
Removing
The head restraints cannot be removed.
Seite 57
57Online Edition for Part no. 01 40 2 606 521 - 03 11 490
Reference Mobility Communication Entertainment Navigation Driving tips
Controls At a glance
Page 62 of 282

Transporting children safely
The right place for children
Note
Children in the vehicle
Do not leave children unattended in the
vehicle; otherwise, they could endanger them‐
selves and other persons, e.g., by opening the
doors.◀
Children should always be in the rear
Accident research shows that the safest place
for children is in the back seat.
Transporting children in the rear
Only transport children younger than
13
years of age or shorter than 5 ft/150 cm in the
rear in child restraint fixing systems provided in
accordance with the age, weight and size of the
child; otherwise, there is an increased risk of in‐
jury in an accident.
Children 13 years of age or older must wear a
safety belt as soon as a suitable child restraint
fixing system can no longer be used, due to their
age, weight and size.◀
Children on the front passenger seat
Should it ever be necessary to use a child re‐
straint fixing system in the front passenger seat,
make sure that the front, knee and side airbags
on the front passenger side are deactivated. Au‐
tomatic deactivation of front passenger airbags,
refer to page 89.
Deactivating the front passenger airbags
If a child restraint fixing system is used in
the front passenger seat, the front passenger
airbags must be deactivated; otherwise, there is
an increased risk of injury to the child when the
airbags are triggered, even with a child restraint
fixing system.◀ Installing child restraint fixing
systems
Notes
Manufacturer's information for child re‐
straint fixing systems
To select, mount and use child restraint fixing
systems, observe the information provided by
the system manufacturer; otherwise, the pro‐
tective effect can be impaired.
◀
On the front passenger seat
After installing a child restraint fixing system in
the front passenger seat, make sure that the
front, knee and side airbags on the front pas‐
senger side are deactivated.
Deactivate the front passenger airbags auto‐
matically, refer to page 89.
Deactivating the front passenger airbags
If a child restraint fixing system is used in
the front passenger seat, the front passenger
airbags must be deactivated; otherwise, there is
an increased risk of injury to the child when the
airbags are triggered, even with a child restraint
fixing system.◀
Seat position and height
Before installing a child restraint fixing system,
move the front passenger seat as far back as
possible and adjust its height to the highest po‐
sition to obtain the best possible position for the
belt and to offer optimal protection in the event
of an accident.
Do not change the seat position and height after
this.
Backrest width*
Before installing a child restraint fixing system in
the front passenger seat, open the backrest
width completely. Do not change the backrest Seite 62
62 Online Edition for Part no. 01 40 2 606 521 - 03 11 490
Transporting children safely
Page 89 of 282

▷
Make sure that the front passenger is sitting
correctly, i.e., keeps his or her feet and legs
in the footwell; otherwise, leg injuries can
occur if the front airbag is triggered.
▷ Do not place slip covers, seat cushions or
other objects on the front passenger seat
that are not approved specifically for seats
with integrated side airbags.
▷ Do not hang pieces of clothing, such as jack‐
ets, over the backrests.
▷ Make sure that occupants keep their heads
away from the side airbag; otherwise, inju‐
ries can occur if the airbags are deployed.
▷ Do not remove the airbag restraint system.
▷ Do not remove the steering wheel.
▷ Do not apply adhesive materials to the air‐
bag cover panels, cover them or modify
them in any way.
▷ Never modify either the individual compo‐
nents
or the wiring in the airbag system. This
also applies to steering wheel covers, the
dashboard, and the seats.◀
Even when all instructions are followed closely,
injury from contact with the airbags cannot be
ruled out in certain situations.
The ignition and inflation noise may lead to
short-term
and, in most cases, temporary hear‐
ing impairment in sensitive individuals.
In the case of a malfunction, deactivation
and after triggering of the airbags
Do not touch the individual components imme‐
diately after the system has been triggered; oth‐
erwise, there is the danger of burns.
Only have the airbags checked, repaired or dis‐
mantled and the airbag generator scrapped by
your service center or a workshop that has the
necessary authorization for handling explosives.
Non-professional attempts to service the sys‐
tem could lead to failure in an emergency or un‐
desired triggering of the airbag, either of which
could result in injury.◀
Warnings and information on the airbags are
also found on the sun visors. Functional readiness of the airbag
system
When
the ignition is switch on, the warn‐
ing lamp in the instrument cluster lights
up briefly and thereby indicates the op‐
erational readiness of the entire airbag system
and the belt tensioner.
Airbag system malfunctioning
▷ In radio ready state, the warning lamp does
not come on.
▷ The warning lamp lights up continuously.
When there is a malfunction, have the air‐
bag system checked immediately
When there is a malfunction, have the airbag
system checked immediately; otherwise, there
is
a risk that the system does not function as ex‐
pected in the event of an accident despite cor‐
responding severity of the accident.◀
Automatic deactivation of the front
passenger airbags
The system determines whether the front pas‐
senger seat is occupied by measuring the re‐
sistance of the human body.
The front, knee, and side airbag on the front
passenger side are activated or deactivated ac‐
cordingly.
Leave feet in the footwell
Make sure that the front passenger keeps
his or her feet in the footwell; otherwise, the front
passenger airbags may not function properly.◀
Child restraint fixing system in the front
passenger seat
Before transporting a child on the front passen‐
ger seat, see the safety notes and instructions
under Children on the front passenger seat.◀
Malfunction of the automatic
deactivation system
When transporting older children and adults, the
front passenger airbags may be deactivated in
certain sitting positions. In this case, the indica‐ Seite 89
89Online Edition for Part no. 01 40 2 606 521 - 03 11 490
Reference Mobility Communication Entertainment Navigation Driving tips
Controls At a glance
Page 91 of 282

Rollover protection system
The concept
The
rollover protection system is activated dur‐
ing an accident or a critical driving situation,
when there is extreme tilt with respect to the
longitudinal axis or when there is loss of ground
contact. The safety frames located behind the
rear headrests extend within fractions of a sec‐
ond.
In addition to the rollover bracket integrated in
the front windshield frame, the rollover protec‐
tion system guarantees the required head clear‐
ance of all vehicle occupants.
Maintaining movement space
Always keep the movement space of the
rollover protection system clear. Otherwise,
there may be damage or injuries when the roll‐
over protection system is triggered.◀
In less severe accidents, the secured safety belt
and, depending on the severity of the accident,
the belt tensioner and airbag restraint system
provide protection.
Triggered rollover protection system
After deployment or damage
After deployment of the rollover protec‐
tion system or in the event of damage, have the
system checked and replaced.
Have this work performed only by your service
center; otherwise, it cannot be ensured that this
safety feature will function properly.◀
Do not move convertible top
When the rollover protection system is ex‐
tended, do not move the convertible top. Oth‐
erwise, damages or injuries may result.◀
If the rollover protection system was not placed
under any stress after an automatic triggering, it
can be pushed back by hand, e.g. to close the
convertible top. Three people are necessary for
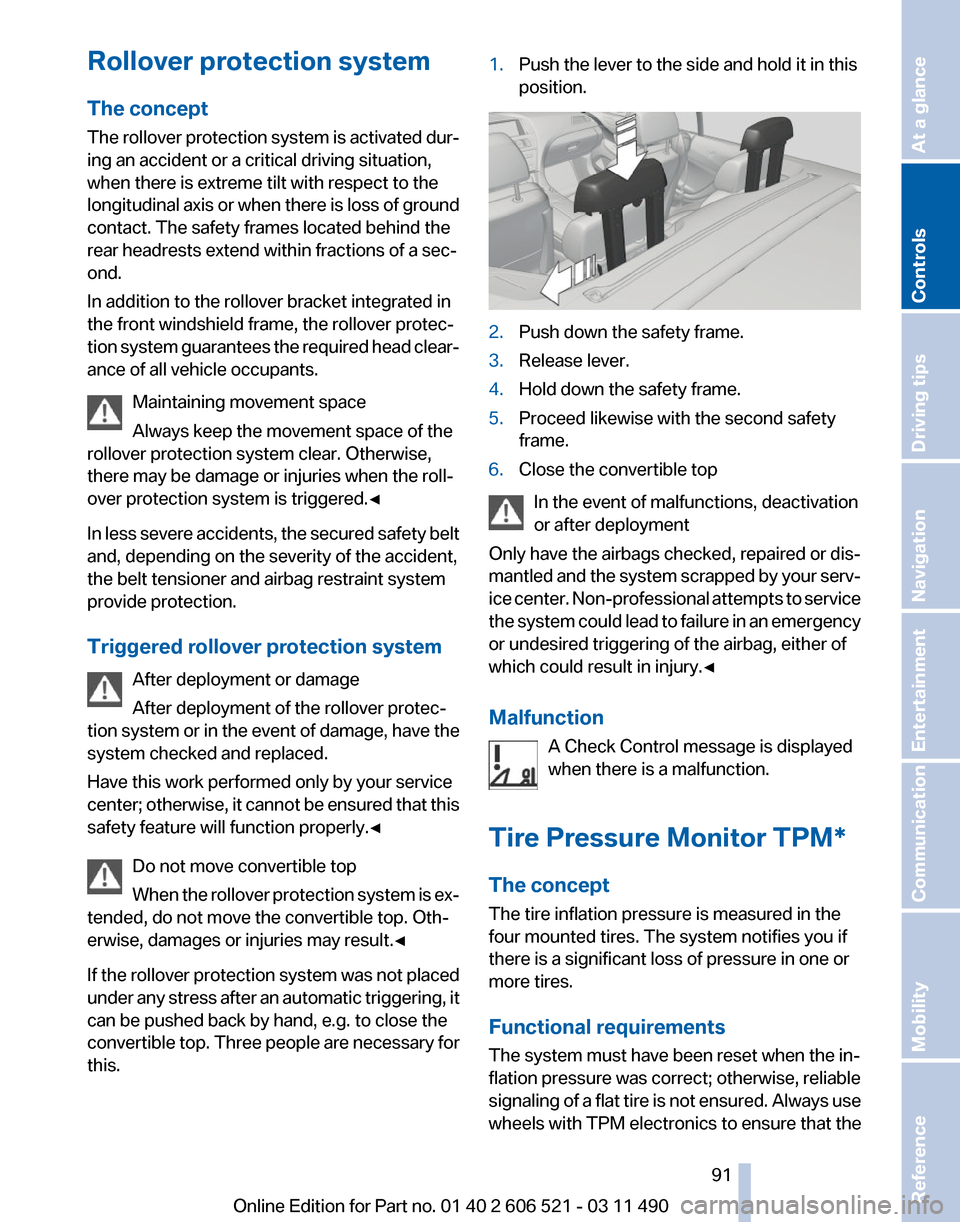
this. 1.
Push the lever to the side and hold it in this
position. 2.
Push down the safety frame.
3. Release lever.
4. Hold down the safety frame.
5. Proceed likewise with the second safety
frame.
6. Close the convertible top
In the event of malfunctions, deactivation
or after deployment
Only have the airbags checked, repaired or dis‐
mantled
and the system scrapped by your serv‐
ice center. Non-professional attempts to service
the system could lead to failure in an emergency
or undesired triggering of the airbag, either of
which could result in injury.◀
Malfunction
A Check Control message is displayed
when there is a malfunction.
Tire Pressure Monitor TPM*
The concept
The tire inflation pressure is measured in the
four mounted tires. The system notifies you if
there is a significant loss of pressure in one or
more tires.
Functional requirements
The system must have been reset when the in‐
flation pressure was correct; otherwise, reliable
signaling of a flat tire is not ensured. Always use
wheels with TPM electronics to ensure that the Seite 91
91Online Edition for Part no. 01 40 2 606 521 - 03 11 490
Reference Mobility Communication Entertainment Navigation Driving tips
Controls At a glance