Page 161 of 650

�µ
�µ
CONT INUED
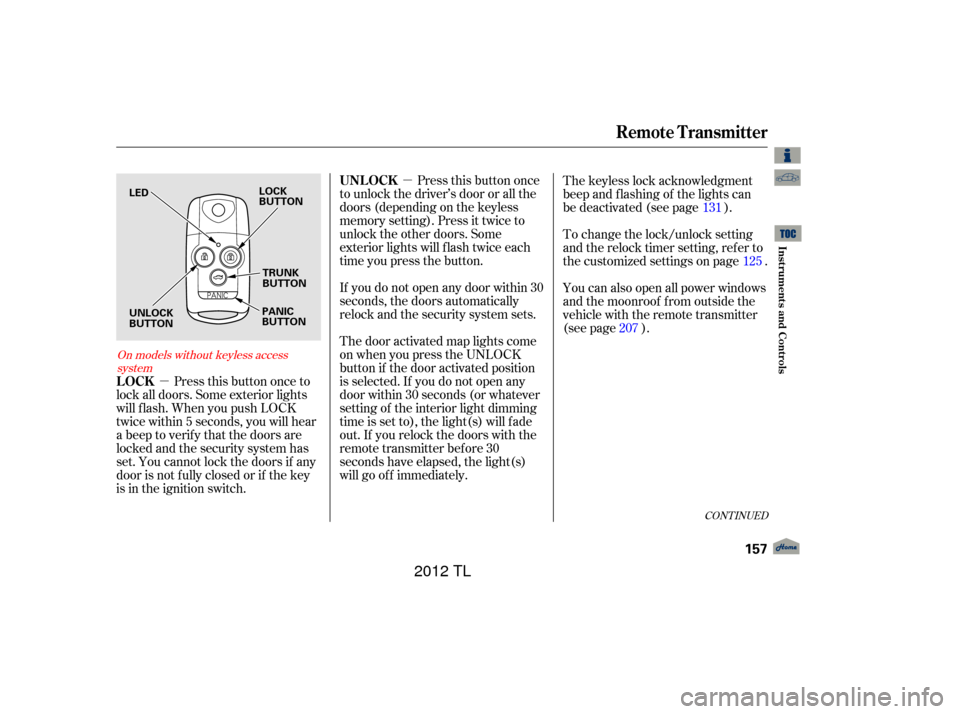
Press this button once
to unlock the driver’s door or all the
doors (depending on the keyless
memory setting). Press it twice to
unlock the other doors. Some
exterior lights will f lash twice each
time you press the button.
Press this button once to
lock all doors. Some exterior lights
will f lash. When you push LOCK
twice within 5 seconds, you will hear
a beep to verify that the doors are
locked and the security system has
set. You cannot lock the doors if any
door is not f ully closed or if the key
is in the ignition switch. If you do not open any door within 30
seconds, the doors automatically
relock and the security system sets.
The keyless lock acknowledgment
beep and f lashing of the lights can
be deactivated (see page ).
The door activated map lights come
on when you press the UNLOCK
button if the door activated position
is selected. If you do not open any
door within 30 seconds (or whatever
setting of the interior light dimming
time is set to), the light(s) will f ade
out. If you relock the doors with the
remote transmitter before 30
seconds have elapsed, the light(s)
will go of f immediately. To change the lock/unlock setting
and the relock timer setting, refer to
the customized settings on page .
You can also open all power windows
and the moonroof f rom outside the
vehicle with the remote transmitter
(see page ).
125
131
207
On models without keyless access system
Remote Transmitter
UNL OCK
LOCK
Inst rument s and Cont rols
157
LOCK
BUTTON PANIC
BUTTONTRUNK
BUTTON
LED
UNLOCK
BUTTON
11/01/14 18:20:46 31TK4630_162
2012 TL
Page 162 of 650

�µ
�µ
Be caref ul when removing
this screw as the head of the screw
can strip out.
Separate the keypad from the
transmitter by pushing any button
f rom outside.
If it takes several pushes on the
button to lock or unlock the doors,
replace the battery as soon as
possible.
Battery type: CR1616
On models with keyless access
system, see page f or how to
replace the battery on the keyless
access remote.
To replace the battery:
Remove the screw at the base of
the transmitter with a small
Phillips-head screwdriver.
Press and hold this
button f or about 1 second to open
the trunk. You cannot open the trunk
if the key is in the ignition switch.
If you lose a transmitter, the
replacement needs to be
reprogrammed by your dealer. Do not immerse the transmitter in
any liquid. Protect the transmitter from
extreme temperatures. Avoid dropping or throwing the
transmitter. Pressthisbuttonfor
about 2 seconds to attract attention:
the horn will sound, and the exterior
lights will f lash f or about 30 seconds.
To cancel panic mode, press any
other button on the remote
transmitter, or turn the ignition
switch to the ON (II) position.
1.2.
181
Remote Transmitter
Replacing the Transmitter
Battery
TRUNK
PA NIC
Remote Transmitter Care
158
NOTE:
KEYPAD
SCREW
11/01/14 18:21:02 31TK4630_163
Inst rument s and Cont rols
2012 TL
Page 163 of 650

�µ
Remove the old battery and note
the polarity. Make sure the
polarity of the new battery is the
same ( side f acing up), then
insert it in the keypad.
Place a cloth on the edge of the
keypad to prevent scratches, and
remove the upper half by carefully
prying on the edge with a small
f lat-tip screwdriver or coin. An improperly disposed of battery
can hurt the environment.
Always conf irm local regulations f or
battery disposal.
Snap the two halves of the keypad,
then install the parts in reverse
order.
4.
5.
3.
As required by the FCC: This device complies with Part 15 of theFCC rules. Operation is subject to thef ollowing two conditions: (1) This devicemay not cause harmf ul interf erence, and(2) this device must accept anyinterf erence received, includinginterf erence that may cause undesiredoperation.
Changes or modif ications not expresslyapproved by the party responsible f orcompliance could void the user’sauthority to operate the equipment.
This device complies with IndustryCanada Standard RSS-210.Operation is subject to the f ollowing twoconditions: (1) this device may not causeinterf erence, and (2) this device mustaccept any interf erence that may causeundesired operation of the device.
Remote Transmitter
Inst rument s and Cont rols
159
BATTERY
11/01/14 18:21:12 31TK4630_164
2012 TL
Page 165 of 650

�µ
�Î
CONT INUED
See pages f or important saf etyinf ormation and warnings about how toproperly position the seats and seat-backs.
Driver’s seat only:
1513
The passenger seat has the same
adjustments as the driver’s seat but
without any lumbar adjustment.
Raises or lowers the seat.Moves the whole seat up
and f orward, or down
and backward. The front
of the seat also tilts up or
down at the same time.
Adjusts the seat-back
angle f orward or
backward.
The controls f or the power
adjustable front seats are on the
outside edge of each seat bottom.
You can adjust the seats with the
ignition switch in any position.
Make all seat adjustments bef ore
you start driving.
Moves the seat forward
and backward.
Moves the f ront of the
seat up or down.Increases or decreases
the lumbar support.
Seats
Front Seat Power A djustments
Inst rument s and Cont rols
161
Driver’s seat
11/01/14 18:21:42 31TK4630_166
�Î
Models equipped with the keyless access
system have an engine start/stop button instead of
an ignition switch. VEHICLE OFF (LOCK) Mode
is the equivalent of LOCK (0), ACCESSORY Mode
is the equivalent of ACCESSORY (I), and ON
Mode is the equivalent of ON (II). For more
information, see pages
:
184 and 187.
2012 TL
Page 171 of 650

Make sure all items in the trunk and
those extending through the pass-
through are secured.Keeptheinsideandoutsidemirrors
clean and adjusted f or best visibility.
Be sure to adjust the mirrors bef ore
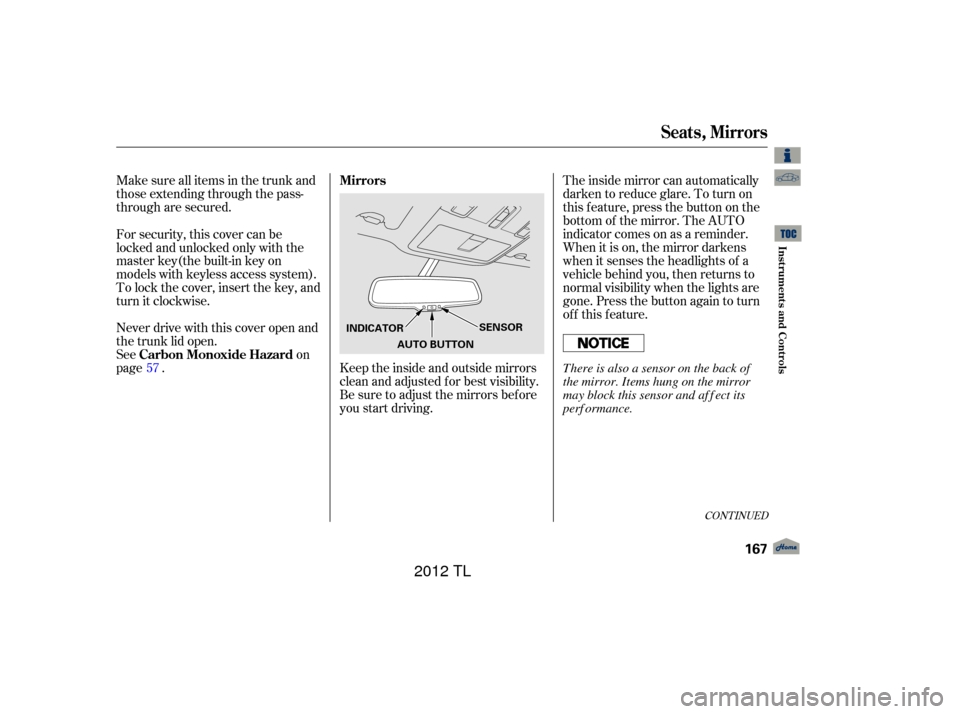
you start driving.Theinsidemirrorcanautomatically
darken to reduce glare. To turn on
this feature, press the button on the
bottom of the mirror. The AUTO
indicator comes on as a reminder.
When it is on, the mirror darkens
when it senses the headlights of a
vehicle behind you, then returns to
normal visibility when the lights are
gone. Press the button again to turn
of f this f eature.
For security, this cover can be
locked and unlocked only with the
master key(the built-in key on
models with keyless access system).
To lock the cover, insert the key, and
turn it clockwise.
Never drive with this cover open and
the trunk lid open.
See
on
page . 57
CONT INUED
Mirrors
Carbon Monoxide Hazard
Seats, Mirrors
Inst rument s and Cont rols
167
AUTO BUTTON SENSOR
INDICATOR
There is also a sensor on the back of
the mirror. Items hung on the mirror
may block this sensor and af f ect its
perf ormance.
11/01/14 18:22:41 31TK4630_172
2012 TL
Page 172 of 650

�Î
Both outside door mirrors have a
reverse tilt f eature. When in
reverse, the selected mirror will
tilt down slightly to improve your
view as you parallel park. Shifting
out of reverse will return the
mirror to its original position.To tilt the driver’s mirror, place
the selector switch in the left
position.
To tilt the passenger’s mirror,
place the switch in the right
position.
To turn the feature off, place the
switch in the center position.
When you f inish, move the
selector switch to the center (off)
position. This turns the
adjustment switch of f to keep your
settings.
Push the appropriate edge of the
adjustment switch to move the
mirrorright,left,up,ordown. With the ignition switch in the
ON (II) position, move the
selector switch to the L (driver’s
side), or R (passenger’s side). Outside mirror positions can be
stored in the driving position
memory system (see page ). 3.
1.
2. 170
Adjusting the Power Mirrors
Reverse Tilt Door Mirror
Mirrors
168
ADJUSTMENT SWITCH
SELECTOR SWITCH
11/01/14 18:22:53 31TK4630_173
Inst rument s and Cont rols
�Î
Models equipped with the keyless access
system have an engine start/stop button
instead of an ignition switch. ON Mode
is the equivalent of ON (II). For more
information, see
page s 184 and 187.
:
2012 TL
Page 173 of 650
�Î�Î
This heated mirror f unction has a
timer (see page ).
The outside mirrors are heated to
remove fog and frost. With the
ignition switch in the ON (II)
position, or the power mode ON,
turn on the heaters by pressing the
button. The indicator in the button
comesonasareminder.Pressthe
button again to turn the heaters off.
Pressing this button also turns the
rear window def ogger on and of f . If the outside temperature is below
41°F (5°C), the heated mirror
function will come on automatically
f or 10 minutes when you turn the
ignition switch to the ON (II)
position.
145
Mirrors
Power Mirror Heaters
Inst rument s and Cont rols
169
HEATED MIRROR BUTTON
11/01/14 18:23:02 31TK4630_174
�Î
Models equipped with the keyless access
system have an engine start/stop button
instead of an ignition switch. ON Mode
is the equivalent of ON (II). For more
information, see
page s 184 and 187.
:
2012 TL
Page 174 of 650

�Î
Store a driving position only when
the vehicle is parked.
Your vehicle has a memory feature
f or the driver’s seat and outside
mirror positions.
Seat, except f or power lumbar, and
outside mirror positions can be
stored in separate memories. You
select a memorized position by
pushing the appropriate button or
using the appropriate remote
transmitter or the keyless access
remote (Driver 1 or Driver 2).
Adjust the seat to a comfortable
position (see page ).
Adjust the outside mirrors f or best
visibility (see page ).Press and release the SET button
on the control panel. You will hear
a beep. Immediately press and
hold one of the memory buttons (1
or 2) until you hear two beeps.
The indicator in the memory
button will come on. The current
positions of the driver’s seat and
outside mirrors are now stored.
Turn the ignition switch to the
ON (II) position. You cannot add a
new driving position to the
memory unless the ignition switch
is in the ON (II) position. You can
recall a memorized position with
the ignition switch in any position.
3.
1.
2.
168
161
Storing a Driving Position in
Memory
Driving Position Memory System
170
MEMORY BUTTONS
SET BUTTON
11/01/14 18:23:14 31TK4630_175
Inst rument s and Cont rols
�ΠModels equipped with the keyless access
system have an engine start/stop button
instead of an ignition switch. ON Mode
is the equivalent of ON (II). For more
information, see
page s 184 and 187.
:
2012 TL