Page 177 of 621

To stop the system's automatic
adjustment, do any of these actions:●
Press any button on the control
panel: MEMO, 1, or 2.
●
Push any of the adjustment
switches for the seat.
●
Shift out of Park.
●
Adjust the outside mirrors.
If desired, you can use the
adjustment switches to change the
positions of the seat, steering wheel
or outside mirrors after they are in
their memorized position. If you
change the memorized position, the
indicator in the memory button will
go out. To keep this driving position
for later use, you must store it in the
driving position memory.Light Control Buttons
Your vehicle has the light control
buttons on the front ceiling. With
these buttons, you can select three
positions: OFF, Door (door activated
position), and ON. To select a
position, press the appropriate
button.
When you press the DOOR button,
the green indicator in the button
comes on as a reminder.To turn off the setting, press the OFF
button.
OFF position:●
The front individual map lights can
be turned on and off by pressing
each map light button (
).
●
The second and third row
individual map lights cannot be
turned on.
Front
ON
DOOR ACTIVATE
OFF
Second and Third row Front
MAP LIGHT BUTTONS
Driving Position Memory System, Interior Lights170
Page 309 of 621

Turn the dial to select a sound setup
mode, then press ENTER to set your
selection. See page 222 for more
sound setting information.To switch to HFL modeIf you receive a call when theBluetooth
®Audio is playing, press
the PICK-UP button on the steering
wheel. The screen and the center
display switch to the HFL mode (see
page 384).
After ending the call, press the
HANG-UP button to go back to the
Bluetooth
®Audio mode.
To turn off the Bluetooth
®Audio
mode
Select any other audio mode by
pressing a button; AM/FM,DISC, or HDD on the audio control
panel, or press the MODE button on
the steering wheel to select another
audio mode.
Switching to another mode pauses
the music playing from your phone.
As required by the FCC:
This device complies with Part 15 of the
FCC rules. Operation is subject to the
following two conditions: (1) This device
may not cause harmful interference, and
(2) this device must accept any
interference received, including
interference that may cause undesired
operation.
Changes or modifications not expressly
approved by the party responsible for
compliance could void the user's
authority to operate the equipment.
This device complies with Industry
Canada Standard RSS-210.
Operation is subject to the following two
conditions: (1) this device may not cause
interference, and (2) this device must
accept any interference that may cause
undesired operation of the device.
Bluetooth
®
Audio System (Models with navigation system)
302
Page 312 of 621

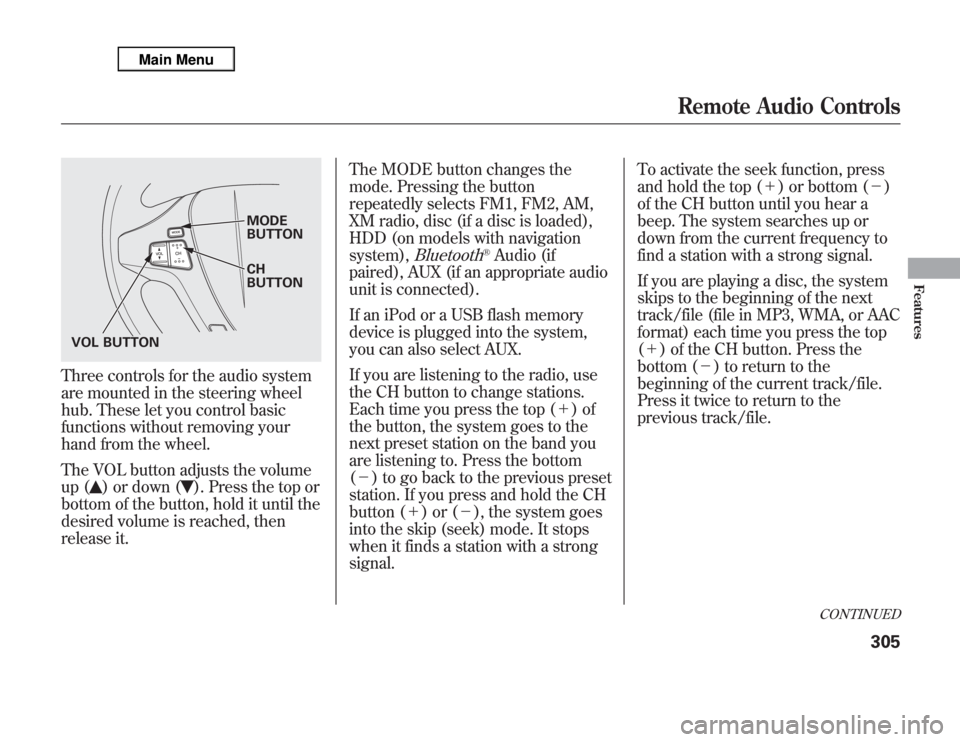
Three controls for the audio system
are mounted in the steering wheel
hub. These let you control basic
functions without removing your
hand from the wheel.
The VOL button adjusts the volume
up (
) or down (
). Press the top or
bottom of the button, hold it until the
desired volume is reached, then
release it.The MODE button changes the
mode. Pressing the button
repeatedly selects FM1, FM2, AM,
XM radio, disc (if a disc is loaded),
HDD (on models with navigation
system),
Bluetooth
®Audio (if
paired), AUX (if an appropriate audio
unit is connected).
If an iPod or a USB flash memory
device is plugged into the system,
you can also select AUX.
If you are listening to the radio, use
the CH button to change stations.
Each time you press the top (+)of
the button, the system goes to the
next preset station on the band you
are listening to. Press the bottom
(-) to go back to the previous preset
station. If you press and hold the CH
button (+)or(-), the system goes
into the skip (seek) mode. It stops
when it finds a station with a strong
signal.To activate the seek function, press
and hold the top (+) or bottom (-)
of the CH button until you hear a
beep. The system searches up or
down from the current frequency to
find a station with a strong signal.
If you are playing a disc, the system
skips to the beginning of the next
track/file (file in MP3, WMA, or AAC
format) each time you press the top
(+) of the CH button. Press the
bottom (-) to return to the
beginning of the current track/file.
Press it twice to return to the
previous track/file.
MODE
BUTTON
CH
BUTTON
VOL BUTTON
CONTINUED
Remote Audio Controls
305
Features
Page 374 of 621
●
To change the volume level of
HFL, use the audio system volume
knob or the steering wheel volume
controls.
Help Features●
To hear general HFL information,
including help on pairing a phone
or setting up the system, say
‘‘Tutorial.’’
●
For help at any time, including a
list of available commands, say
‘‘Hands free help.’’
Information DisplayAs an incoming call notification, you
will see the following display:SIGNAL
STRENGTHHFL
MODEBATTERY
LEVEL STATUS
PHONE DIALING ROAM STATUS
CONTINUED
Bluetooth
®
HandsFreeLink
®
(Models without navigation system)
367
Features
Page 391 of 621

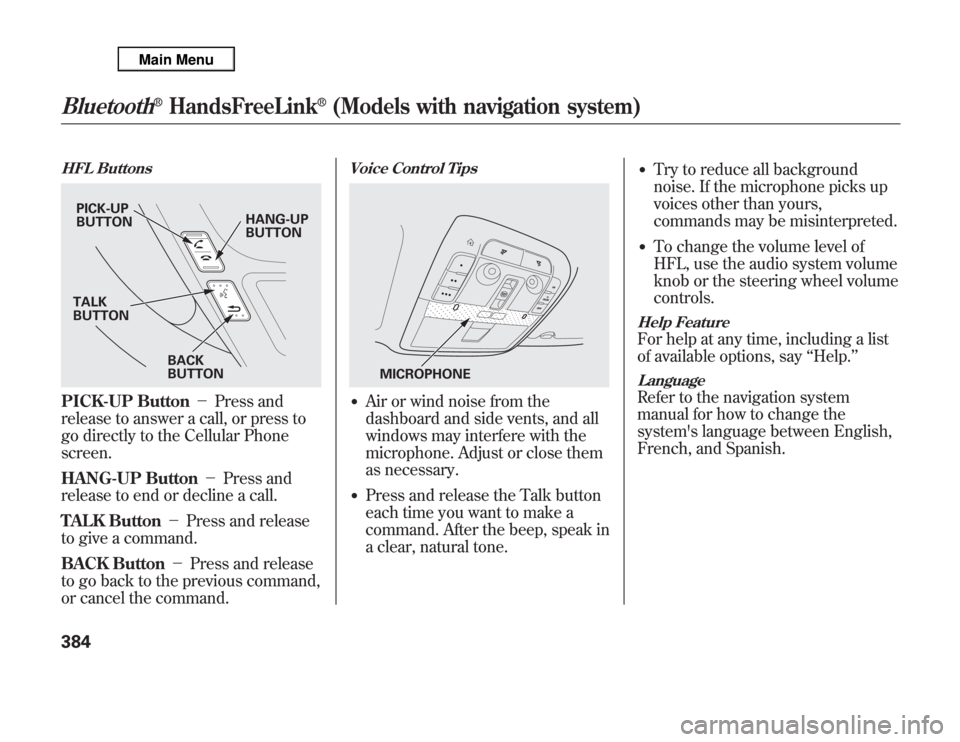
HFL ButtonsPICK-UP Button-Press and
release to answer a call, or press to
go directly to the Cellular Phone
screen.
HANG-UP Button-Press and
release to end or decline a call.
TALK Button-Press and release
to give a command.
BACK Button-Press and release
to go back to the previous command,
or cancel the command.
Voice Control Tips●
Air or wind noise from the
dashboard and side vents, and all
windows may interfere with the
microphone. Adjust or close them
as necessary.
●
Press and release the Talk button
each time you want to make a
command. After the beep, speak in
a clear, natural tone.
●
Try to reduce all background
noise. If the microphone picks up
voices other than yours,
commands may be misinterpreted.
●
To change the volume level of
HFL, use the audio system volume
knob or the steering wheel volume
controls.
Help FeatureFor help at any time, including a list
of available options, say‘‘Help.’’LanguageRefer to the navigation system
manual for how to change the
system's language between English,
French, and Spanish.
PICK-UP
BUTTONHANG-UP
BUTTON
BACK
BUTTON TALK
BUTTON
MICROPHONE
Bluetooth
®
HandsFreeLink
®
(Models with navigation system)
384
Page 459 of 621

The super handling-all wheel drive
(SH-AWD) system is a full time all-
wheel-drive system that
automatically controls and transfers
varying amounts of engine torque to
all wheels independently, according
to the driving conditions.
While the SH-AWD system helps to
enhance the vehicle's driving
stability in all situations, it is still
your responsibility to drive and
corner at reasonable speeds and to
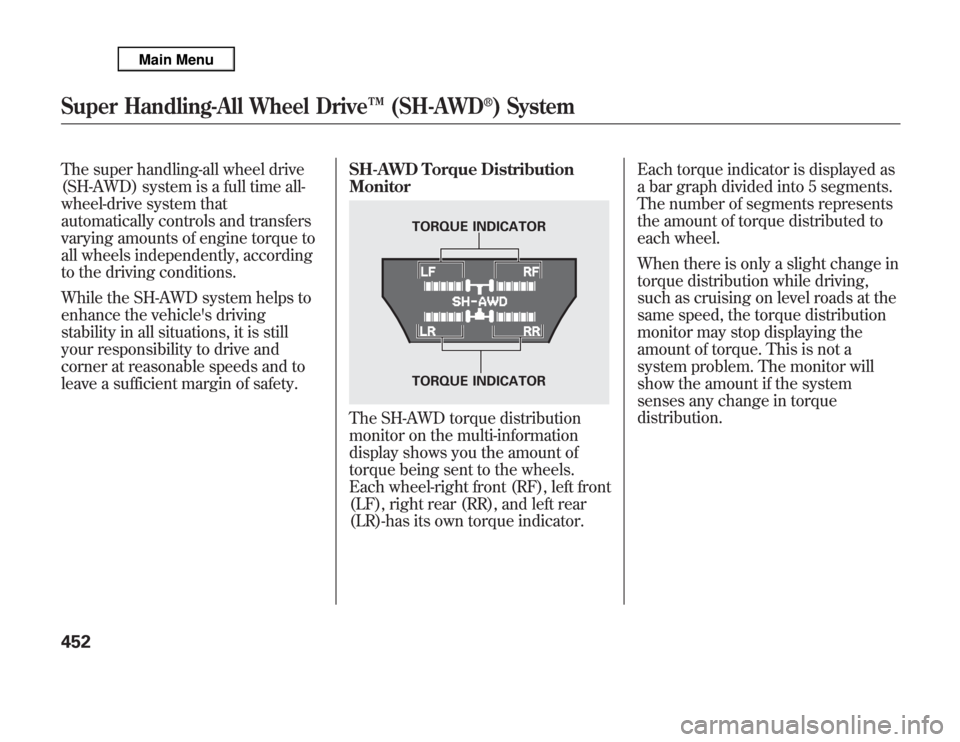
leave a sufficient margin of safety.SH-AWD Torque Distribution
Monitor
The SH-AWD torque distribution
monitor on the multi-information
display shows you the amount of
torque being sent to the wheels.
Each wheel-right front (RF), left front
(LF), right rear (RR), and left rear
(LR)-has its own torque indicator.Each torque indicator is displayed as
a bar graph divided into 5 segments.
The number of segments represents
the amount of torque distributed to
each wheel.
When there is only a slight change in
torque distribution while driving,
such as cruising on level roads at the
same speed, the torque distribution
monitor may stop displaying the
amount of torque. This is not a
system problem. The monitor will
show the amount if the system
senses any change in torque
distribution.
TORQUE INDICATOR
TORQUE INDICATOR
Super Handling-All Wheel Drive™(SH-AWD
®) System
452
Page 467 of 621

As required by the FCC:
This device complies with Part 15 of the
FCC rules. Operation is subject to the
following two conditions: (1) This device
may not cause harmful interference, and
(2) this device must accept any
interference received, including
interference that may cause undesired
operation.
Changes or modifications not expressly
approved by the party responsible for
compliance could void the user's
authority to operate the equipment.
This device complies with Industry
Canada Standard RSS-210.
Operation is subject to the following two
conditions: (1) this device may not cause
interference, and (2) this device must
accept any interference that may cause
undesired operation of the device.
Braking System
Your vehicle is equipped with disc
brakes at all four wheels. A power
assist helps reduce the effort needed
on the brake pedal. The emergency
brake assist system increases the
stopping force when you depress the
brake pedal hard in an emergency
situation. The anti-lock brake system
(ABS) helps you retain steering
control when braking very hard.
Resting your foot on the pedal keeps
the brakes applied lightly, builds up
heat, and reduces their effectiveness
and reduces brake pad life. In
addition, fuel economy can be
reduced. It also keeps your brake
lights on all the time, confusing
drivers behind you.Constant application of the brakes
when going down a long hill builds
up heat and reduces their
effectiveness. Use the engine to
assist the brakes by taking your foot
off the accelerator and downshifting
to a lower gear.
Check the brakes after driving
through deep water. Apply the
brakes moderately to see if they feel
normal. If not, apply them gently and
frequently until they do. Be extra
cautious in your driving.
Tire Pressure Monitoring System (TPMS), Braking System460
Page 469 of 621

ABS Indicator
If this indicator comes on, the anti-
lock function of the braking system
has shut down. The brakes still work
like a conventional system, but
without anti-lock. You should have
your dealer inspect your vehicle as
soon as possible.
You will also see a‘‘CHECK ABS
SYSTEM’’message on the multi-
information display (see page 88).
If the indicator comes on while
driving, test the brakes as instructed
on page 564.If the ABS indicator and the brake
system indicator come on together,
and the parking brake is fully
released, the EBD system may also
be shut down.
Test your brakes as instructed on
page 564. If the brakes feel normal,
drive slowly and have your vehicle
repaired by your dealer as soon as
possible. Avoid sudden hard braking
which could cause the rear wheels to
lock up and possibly lead to a loss of
control.Important Safety Reminders
ABS does not reduce the time or
distance it takes to stop the
vehicle.It only helps with steering
control during braking.
ABS will not prevent a skid that
results from changing direction
abruptly,such as trying to take a
corner too fast or making a sudden
lane change. Always drive at a safe
speed for the road and weather
conditions.
ABS cannot prevent a loss of
stability.Always steer moderately
when you are braking hard. Severe
or sharp steering wheel movement
can still cause your vehicle to veer
into oncoming traffic or off the road.
A vehicle with ABS may require a
longer distance to stopon loose or
uneven surfaces, such as gravel or
snow, than a vehicle without anti-
lock.
Anti-lock Brakes (ABS)462