Page 50 of 166

3-9
CHASSIS
c. Inspect the gasket (oil check bolt),
replace if damaged.
d. Tighten the oil check bolt.
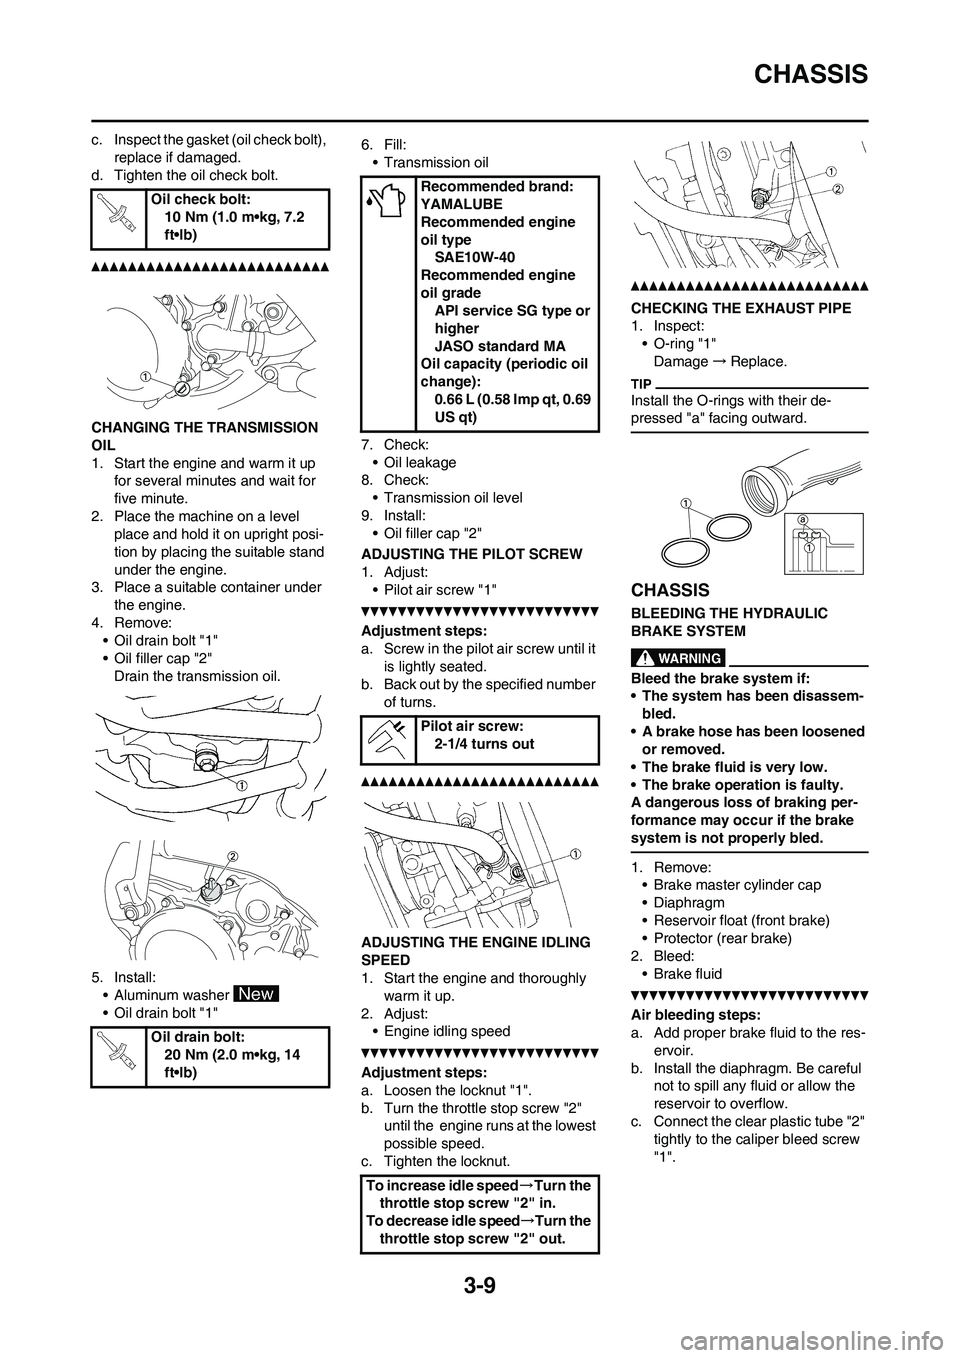
CHANGING THE TRANSMISSION
OIL
1. Start the engine and warm it up
for several minutes and wait for
five minute.
2. Place the machine on a level
place and hold it on upright posi-
tion by placing the suitable stand
under the engine.
3. Place a suitable container under
the engine.
4. Remove:
• Oil drain bolt "1"
• Oil filler cap "2"
Drain the transmission oil.
5. Install:
• Aluminum washer
• Oil drain bolt "1"6. Fill:
• Transmission oil
7. Check:
• Oil leakage
8. Check:
• Transmission oil level
9. Install:
• Oil filler cap "2"
ADJUSTING THE PILOT SCREW
1. Adjust:
• Pilot air screw "1"
Adjustment steps:
a. Screw in the pilot air screw until it
is lightly seated.
b. Back out by the specified number
of turns.
ADJUSTING THE ENGINE IDLING
SPEED
1. Start the engine and thoroughly
warm it up.
2. Adjust:
• Engine idling speed
Adjustment steps:
a. Loosen the locknut "1".
b. Turn the throttle stop screw "2"
until the engine runs at the lowest
possible speed.
c. Tighten the locknut.
CHECKING THE EXHAUST PIPE
1. Inspect:
• O-ring "1"
Damage→Replace.
Install the O-rings with their de-
pressed "a" facing outward.
CHASSIS
BLEEDING THE HYDRAULIC
BRAKE SYSTEM
Bleed the brake system if:
• The system has been disassem-
bled.
• A brake hose has been loosened
or removed.
• The brake fluid is very low.
• The brake operation is faulty.
A dangerous loss of braking per-
formance may occur if the brake
system is not properly bled.
1. Remove:
• Brake master cylinder cap
• Diaphragm
• Reservoir float (front brake)
• Protector (rear brake)
2. Bleed:
• Brake fluid
Air bleeding steps:
a. Add proper brake fluid to the res-
ervoir.
b. Install the diaphragm. Be careful
not to spill any fluid or allow the
reservoir to overflow.
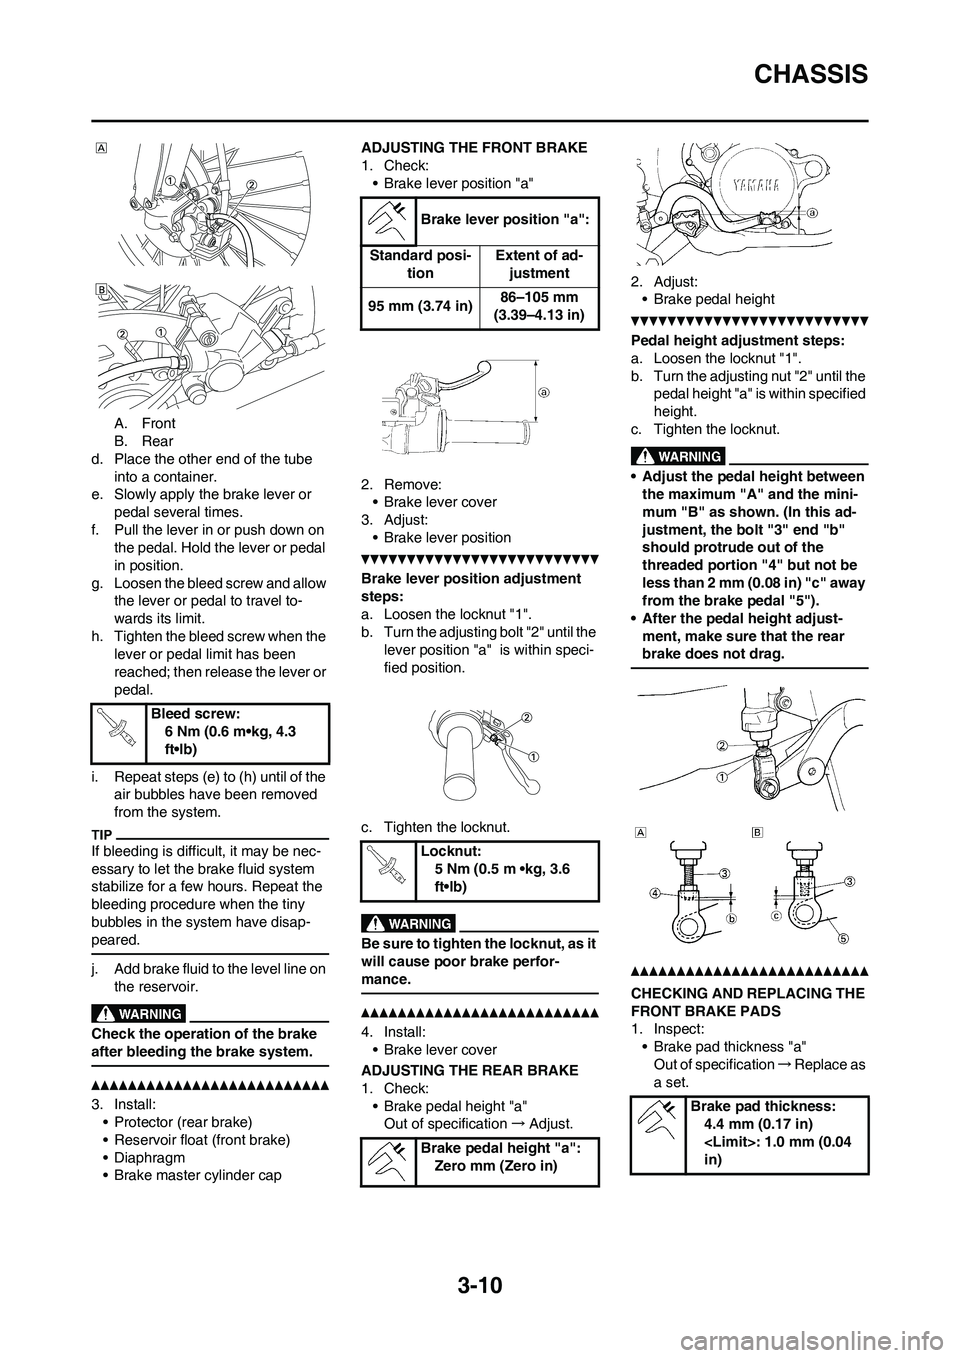
c. Connect the clear plastic tube "2"
tightly to the caliper bleed screw
"1". Oil check bolt:
10 Nm (1.0 m•kg, 7.2
ft•lb)
Oil drain bolt:
20 Nm (2.0 m•kg, 14
ft•lb)
Recommended brand:
YAMALUBE
Recommended engine
oil type
SAE10W-40
Recommended engine
oil grade
API service SG type or
higher
JASO standard MA
Oil capacity (periodic oil
change):
0.66 L (0.58 Imp qt, 0.69
US qt)
Pilot air screw:
2-1/4 turns out
To increase idle speed→Turn the
throttle stop screw "2" in.
To decrease idle speed→Turn the
throttle stop screw "2" out.
Page 51 of 166

3-10
CHASSIS
A. Front
B. Rear
d. Place the other end of the tube
into a container.
e. Slowly apply the brake lever or
pedal several times.
f. Pull the lever in or push down on
the pedal. Hold the lever or pedal
in position.
g. Loosen the bleed screw and allow
the lever or pedal to travel to-
wards its limit.
h. Tighten the bleed screw when the
lever or pedal limit has been
reached; then release the lever or
pedal.
i. Repeat steps (e) to (h) until of the
air bubbles have been removed
from the system.
If bleeding is difficult, it may be nec-
essary to let the brake fluid system
stabilize for a few hours. Repeat the
bleeding procedure when the tiny
bubbles in the system have disap-
peared.
j. Add brake fluid to the level line on
the reservoir.
Check the operation of the brake
after bleeding the brake system.
3. Install:
• Protector (rear brake)
• Reservoir float (front brake)
• Diaphragm
• Brake master cylinder capADJUSTING THE FRONT BRAKE
1. Check:
• Brake lever position "a"
2. Remove:
• Brake lever cover
3. Adjust:
• Brake lever position
Brake lever position adjustment
steps:
a. Loosen the locknut "1".
b. Turn the adjusting bolt "2" until the
lever position "a" is within speci-
fied position.
c. Tighten the locknut.
Be sure to tighten the locknut, as it
will cause poor brake perfor-
mance.
4. Install:
• Brake lever cover
ADJUSTING THE REAR BRAKE
1. Check:
• Brake pedal height "a"
Out of specification→Adjust.2. Adjust:
• Brake pedal height
Pedal height adjustment steps:
a. Loosen the locknut "1".
b. Turn the adjusting nut "2" until the
pedal height "a" is within specified
height.
c. Tighten the locknut.
• Adjust the pedal height between
the maximum "A" and the mini-
mum "B" as shown. (In this ad-
justment, the bolt "3" end "b"
should protrude out of the
threaded portion "4" but not be
less than 2 mm (0.08 in) "c" away
from the brake pedal "5").
• After the pedal height adjust-
ment, make sure that the rear
brake does not drag.
CHECKING AND REPLACING THE
FRONT BRAKE PADS
1. Inspect:
• Brake pad thickness "a"
Out of specification→Replace as
a set. Bleed screw:
6 Nm (0.6 m•kg, 4.3
ft•lb)
Brake lever position "a":
Standard posi-
tionExtent of ad-
justment
95 mm (3.74 in)86–105 mm
(3.39–4.13 in)
Locknut:
5 Nm (0.5 m •kg, 3.6
ft•lb)
Brake pedal height "a":
Zero mm (Zero in)
Brake pad thickness:
4.4 mm (0.17 in)
: 1.0 mm (0.04
in)
Page 120 of 166

5-14
FRONT BRAKE AND REAR BRAKE
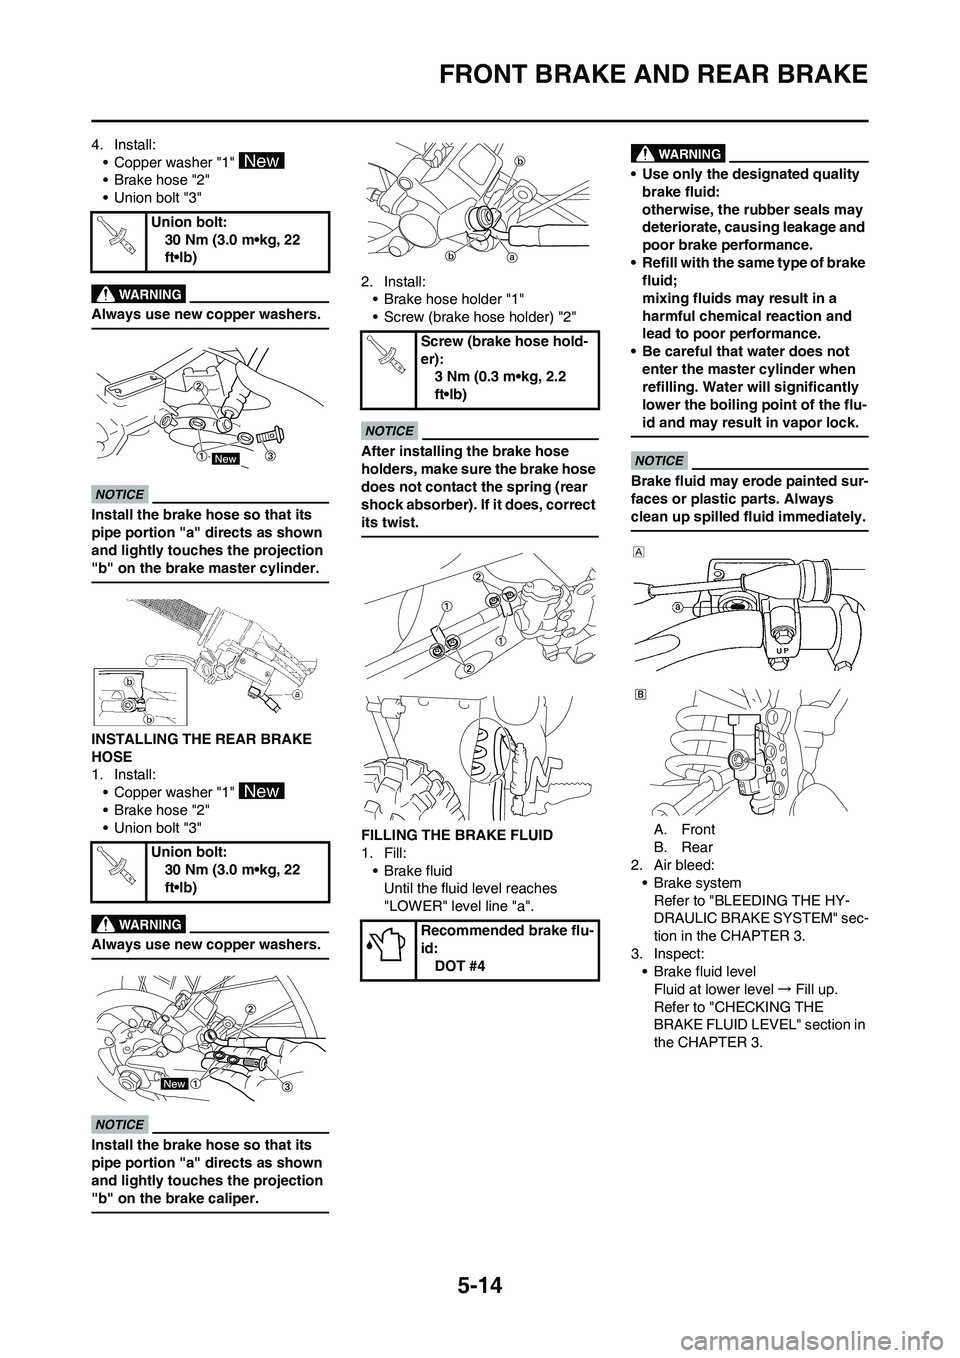
4. Install:
• Copper washer "1"
• Brake hose "2"
• Union bolt "3"
Always use new copper washers.
Install the brake hose so that its
pipe portion "a" directs as shown
and lightly touches the projection
"b" on the brake master cylinder.
INSTALLING THE REAR BRAKE
HOSE
1. Install:
• Copper washer "1"
• Brake hose "2"
• Union bolt "3"
Always use new copper washers.
Install the brake hose so that its
pipe portion "a" directs as shown
and lightly touches the projection
"b" on the brake caliper.
2. Install:
• Brake hose holder "1"
• Screw (brake hose holder) "2"
After installing the brake hose
holders, make sure the brake hose
does not contact the spring (rear
shock absorber). If it does, correct
its twist.
FILLING THE BRAKE FLUID
1. Fill:
•Brake fluid
Until the fluid level reaches
"LOWER" level line "a".
• Use only the designated quality
brake fluid:
otherwise, the rubber seals may
deteriorate, causing leakage and
poor brake performance.
• Refill with the same type of brake
fluid;
mixing fluids may result in a
harmful chemical reaction and
lead to poor performance.
• Be careful that water does not
enter the master cylinder when
refilling. Water will significantly
lower the boiling point of the flu-
id and may result in vapor lock.
Brake fluid may erode painted sur-
faces or plastic parts. Always
clean up spilled fluid immediately.
A. Front
B. Rear
2. Air bleed:
• Brake system
Refer to "BLEEDING THE HY-
DRAULIC BRAKE SYSTEM" sec-
tion in the CHAPTER 3.
3. Inspect:
• Brake fluid level
Fluid at lower level→Fill up.
Refer to "CHECKING THE
BRAKE FLUID LEVEL" section in
the CHAPTER 3. Union bolt:
30 Nm (3.0 m•kg, 22
ft•lb)
Union bolt:
30 Nm (3.0 m•kg, 22
ft•lb)
Screw (brake hose hold-
er):
3 Nm (0.3 m•kg, 2.2
ft•lb)
Recommended brake flu-
id:
DOT #4