Page 29 of 100

EAU12820
Clutch lever
1. Clutch lever
The clutch lever is located at the left
handlebar grip. To disengage the
clutch, pull the lever toward the hand-
lebar grip. To engage the clutch, rele-
ase the lever. The lever should be
pulled rapidly and released slowly for
smooth clutch operation.
The clutch lever is equipped with a
clutch switch, which is part of the
ignition circuit cut-off system. (See
page 3-20).
EAU12871
Shift pedal
1. Shift pedal
The shift pedal is located on the left
side of the motorcycle and is used in
combination with the clutch lever
when shifting the gears of the 5-spe-
ed constant-mesh transmission
equipped on this motorcycle.
EAU26823
Brake lever
1. Brake lever
2. Position adjusting dial
3. Arrow mark
4. Distance between brake lever and handle-
bar grip
The brake lever is located at the right
handlebar grip. To apply the front bra-
ke, pull the lever toward the handle-
bar grip.
The brake lever is equipped with a
brake lever position adjusting dial. To
adjust the distance between the bra-
ke lever and the handlebar grip, turn
the adjusting dial while holding the
lever pushed away from the handle-
bar grip. Make sure that the appro-
priate setting on the adjusting dial is
INSTRUMENT AND CONTROL FUNCTIONS
3-11
3
56P-F8199-E0 30/6/10 09:24 Página 29
Page 30 of 100
aligned with the “ ” mark on the
brake lever.EAU12941
Brake pedal
1. Brake pedal
The brake pedal is on the right side of
the motorcycle. To apply the rear bra-
ke, press down on the brake pedal.
EAU26794
ABS (for ABS models)
The Yamaha ABS (Anti-lock Brake
System) features a dual electronic
control system, which acts on the
front and rear brakes independently.
The ABS is monitored by an ECU,
which will have recourse to manual
braking if a malfunction occurs.
EWA10090
�The ABS performs best on long
braking distances.
�On certain (rough or gravel)
roads, the braking distance
may be longer with than wit-
hout the ABS. Therefore,
always keep a sufficient distan-
ce to the vehicle ahead to
match the riding speed.
TIP
�When the ABS is activated, the
brakes are operated in the usual
way. A pulsating action may be
felt at the brake lever or brake
pedal, but this does not indicate
a malfunction.
WARNING
INSTRUMENT AND CONTROL FUNCTIONS
3-12
3
56P-F8199-E0 30/6/10 09:24 Página 30
Page 31 of 100

�This ABS has a test mode which
allows the owner to experience
the pulsating at the brake lever or
brake pedal when the ABS is
operating. However, special tools
are required, so please consult
your Yamaha dealer when perfor-
ming this test.
ECA16120
Keep any type of magnets (inclu-
ding magnetic pick-up tools, mag-
netic screwdrivers, etc.) away from
the front and rear wheel hubs,
otherwise the magnetic rotors
equipped in the wheel hubs may be
damaged, resulting in improper
performance of the ABS system.
1. Front wheel hub
1. Rear wheel hub
EAU13074
Fuel tank cap
1. Lock cover
2. Open
To open the fuel tank cap
Open the fuel tank cap lock cover,
insert the key into the lock, and then
turn it 1/4 turn clockwise. The lock will
be released and the fuel tank cap can
be opened.
To close the fuel tank cap
1. Push the fuel tank cap into posi-
tion with the key inserted in the
lock.
2. Turn the key counterclockwise to
the original position, remove it,
and then close the lock cover.
NOTICE
INSTRUMENT AND CONTROL FUNCTIONS
3-13
3
56P-F8199-E0 30/6/10 09:24 Página 31
Page 40 of 100

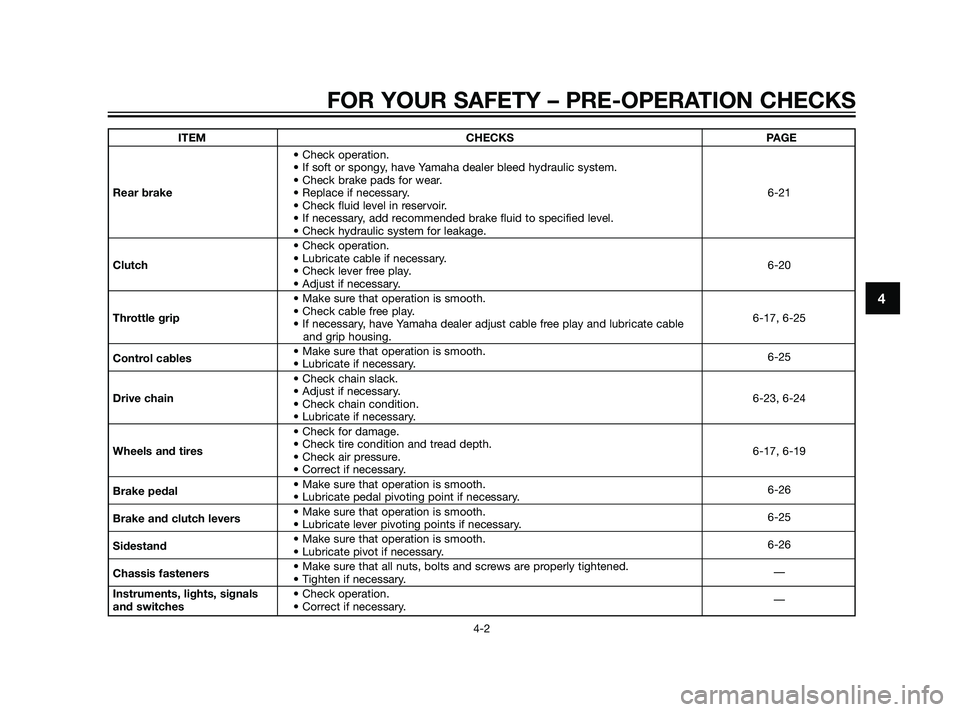
FOR YOUR SAFETY – PRE-OPERATION CHECKS
4-1
4
EAU15596
Inspect your vehicle each time you use it to make sure the vehicle is in safe operating condition. Always follow the ins-
pection and maintenance procedures and schedules described in the Owner’s Manual.
EWA11151
Failure to inspect or maintain the vehicle properly increases the possibility of an accident or equipment dama-
ge. Do not operate the vehicle if you find any problem. If a problem cannot be corrected by the procedures pro-
vided in this manual, have the vehicle inspected by a Yamaha dealer.
Before using this vehicle, check the following points:
WARNING
ITEM CHECKS PAGE
• Check fuel level in fuel tank.
• Refuel if necessary.
Fuel• Check fuel line for leakage. 3-14
• Check the fuel tank breather/overflow hose for obstructions, cracks or
damage, and check the hose connection.
• Check oil level in oil tank.
Engine oil• If necessary, add recommended oil to specified level. 6-11
• Check vehicle for oil leakage.
• Check coolant level in reservoir.
Coolant• If necessary, add recommended coolant to specified level. 6-14
• Check cooling system for leakage.
• Check operation.
• If soft or spongy, have Yamaha dealer bleed hydraulic system.
• Check lever free play.
• Adjust if necessary.
Front brake• Check brake pads for wear. 6-21
• Replace if necessary.
• Check fluid level in reservoir.
• If necessary, add recommended brake fluid to specified level.
• Check hydraulic system for leakage.
56P-F8199-E0 30/6/10 09:24 Página 40
Page 41 of 100

ITEM CHECKS PAGE
• Check operation.
• If soft or spongy, have Yamaha dealer bleed hydraulic system.
• Check brake pads for wear.
Rear brake• Replace if necessary. 6-21
• Check fluid level in reservoir.
• If necessary, add recommended brake fluid to specified level.
• Check hydraulic system for leakage.
• Check operation.
Clutch• Lubricate cable if necessary.
6-20
• Check lever free play.
• Adjust if necessary.
• Make sure that operation is smooth.
Throttle grip• Check cable free play.
6-17, 6-25
• If necessary, have Yamaha dealer adjust cable free play and lubricate cable
and grip housing.
Control cables• Make sure that operation is smooth.
• Lubricate if necessary.6-25
• Check chain slack.
Drive chain• Adjust if necessary.
6-23, 6-24
• Check chain condition.
• Lubricate if necessary.
• Check for damage.
Wheels and tires• Check tire condition and tread depth.
6-17, 6-19
• Check air pressure.
• Correct if necessary.
Brake pedal• Make sure that operation is smooth.
• Lubricate pedal pivoting point if necessary.6-26
Brake and clutch levers• Make sure that operation is smooth.
• Lubricate lever pivoting points if necessary.6-25
Sidestand• Make sure that operation is smooth.
• Lubricate pivot if necessary.6-26
Chassis fasteners• Make sure that all nuts, bolts and screws are properly tightened.
• Tighten if necessary.—
Instruments, lights, signals • Check operation.
and switches• Correct if necessary.—
FOR YOUR SAFETY – PRE-OPERATION CHECKS
4-2
4
56P-F8199-E0 30/6/10 09:24 Página 41
Page 47 of 100

PERIODIC MAINTENANCE AND ADJUSTMENT
6-1
6
EAU17243
Periodic inspection, adjustment, and
lubrication will keep your vehicle in
the safest and most efficient condi-
tion possible. Safety is an obligation
of the vehicle owner/operator. The
most important points of vehicle ins-
pection, adjustment, and lubrication
are explained on the following pages.
The intervals given in the periodic
maintenance charts should be simply
considered as a general guide under
normal riding conditions. However,
depending on the weather, terrain,
geographical location, and individual
use, the maintenance intervals may
need to be shortened.
EWA10321
Failure to properly maintain the
vehicle or performing maintenance
activities incorrectly may increase
your risk of injury or death during
service or while using the vehicle. If
you are not familiar with vehicle
service, have a Yamaha dealer per-
form service.
EWA15121
Turn off the engine when perfor-
ming maintenance unless otherwi-
se specified.
�A running engine has moving
parts that can catch on body
parts or clothing and electrical
parts that can cause shocks or
fires.
�Running the engine while servi-
cing can lead to eye injury,
burns, fire, or carbon monoxide
poisoning – possibly leading to
death. See page 1-1 for more
information about carbon
monoxide.
EWA15460
Brake discs, calipers, drums, and
linings can become very hot during
use. To avoid possible burns, let
brake components cool before tou-
ching them.
EAU17381
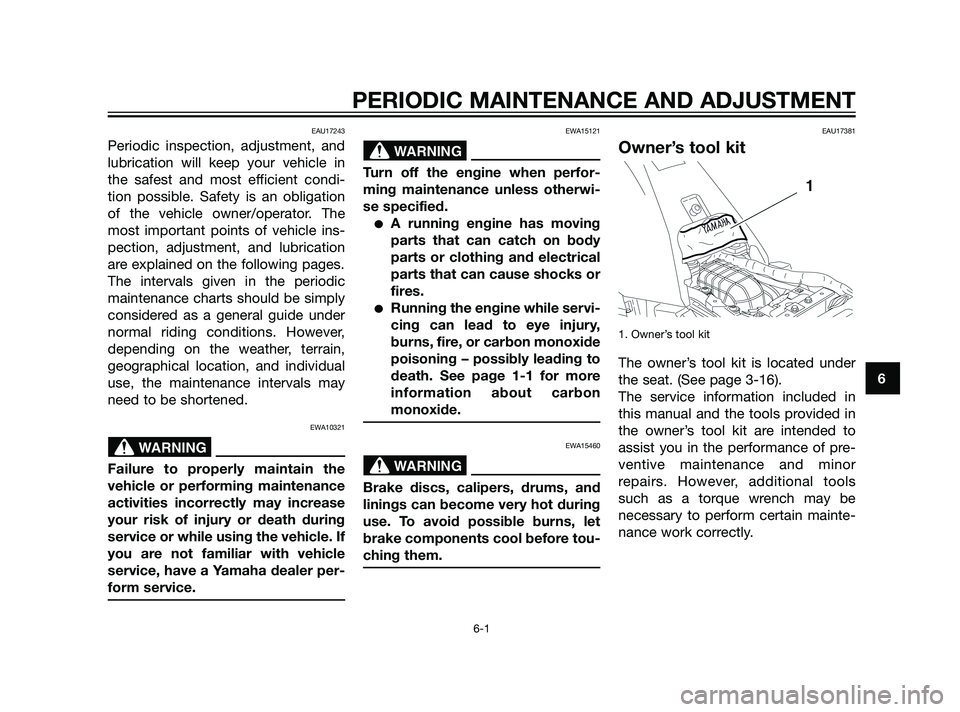
Owner’s tool kit
1. Owner’s tool kit
The owner’s tool kit is located under
the seat. (See page 3-16).
The service information included in
this manual and the tools provided in
the owner’s tool kit are intended to
assist you in the performance of pre-
ventive maintenance and minor
repairs. However, additional tools
such as a torque wrench may be
necessary to perform certain mainte-
nance work correctly.
WARNING
WARNING
WARNING
56P-F8199-E0 30/6/10 09:24 Página 47
Page 50 of 100
PERIODIC MAINTENANCE AND ADJUSTMENT
6-4
6
EAU1770C
General maintenance and lubrication chart
ODOMETER READING
NO. ITEM CHECK OR MAINTENANCE JOBANNUAL
1000 km 10000 km 20000 km 30000 km 40000 kmCHECK
(600 mi) (6000 mi) (12000 mi) (18000 mi) (24000 mi)
1Air filter element• Replace.√√
2Clutch• Check operation.
• Adjust.√√ √ √ √
3*Front brake• Check operation, fluid level and
vehicle for fluid leakage.√√ √ √ √ √
• Replace brake pads. Whenever worn to the limit
4*Rear brake• Check operation, fluid level and
vehicle for fluid leakage.√√ √ √ √ √
• Replace brake pads. Whenever worn to the limit
5*Brake hoses• Check for cracks or damage.√√√ √√• Replace. Every 4 years
• Check runout, spoke tightness
6*Wheelsand for damage.√√ √ √ √
• Tighten spokes if necessary.
• Check tread depth and for
damage.
7*Tires• Replace if necessary.√√√ √√
• Check air pressure.
• Correct if necessary.
8*Wheel bearings• Check bearing for looseness or
damage.√√√ √
56P-F8199-E0 30/6/10 09:24 Página 50
Page 51 of 100

PERIODIC MAINTENANCE AND ADJUSTMENT
6-5
6
ODOMETER READING
NO. ITEM CHECK OR MAINTENANCE JOBANNUAL
1000 km 10000 km 20000 km 30000 km 40000 kmCHECK
(600 mi) (6000 mi) (12000 mi) (18000 mi) (24000 mi)
9*Swingarm• Check operation and for
excessive play.√√√ √
• Lubricate with lithium-soap-
based grease.Every 50000 km (30000 mi)
• Check chain slack, alignment
and condition.
Every 500 km (300 mi) and after washing the motorcycle,
10Drive chain• Adjust and lubricate chain with a
special O-ring chain lubricant riding in the rain or riding in wet areas
thoroughly.
• Check bearing play and steering
11 *Steering bearingsfor roughness.√√ √ √ √
• Lubricate with lithium-soap-
based grease.Every 20000 km (12000 mi)
12 *Chassis fasteners• Make sure that all nuts, bolts and
screws are properly tightened.√√√ √√
13Brake lever pivot
shaft• Lubricate with silicone grease.√√√ √√
14Brake pedal pivot
shaft• Lubricate with silicone grease.√√√ √√
15Clutch lever pivot • Lubricate with lithium-soap-
shaftbased grease.√√√ √√
• Check operation.
16Sidestand• Lubricate with lithium-soap-√√√ √√
based grease.
17 *Sidestand switch• Check operation.√√ √ √ √ √
56P-F8199-E0 30/6/10 09:24 Página 51