Page 41 of 140

5-1
5
EBU19201
PRE-OPERATION CHECKS
EBU19224Inspect your vehicle each time you use it to make sure the vehicle is in safe operating condition. Always
follow the inspection and maintenance procedures and schedules described in the Owner’s Manual.
WARNING
EWB00481Failure to inspect or maintain the vehicle properly increases the possibility of an accident or equip-
ment damage. Do not operate the vehicle if you find any problem. If a problem cannot be corrected
by the procedures provided in this manual, have the vehicle inspected by a Yamaha dealer.Before using this vehicle, check the following points:
ITEM ROUTINE PAGE
FuelCheck fuel level in fuel tank, and add recommended fuel if neces-
sary.
Check fuel line for leakage. Correct if necessary.4-8, 5-3
Engine oilCheck oil level in engine, and add recommended oil to specified lev-
el if necessary.
Check ATV for oil leakage. Correct if necessary.5-3, 8-11
Final gear oilCheck ATV for oil leakage. Correct if necessary. 5-3, 8-18
Front brakeCheck operation. If soft or spongy, have Yamaha dealer bleed hy-
draulic system.
Check brake pads for wear, and replace if necessary.
Check brake fluid level in reservoir, and add recommended brake
fluid to specified level if necessary.
Check hydraulic system for leakage. Correct if necessary.5-3, 8-28, 8-29, 8-30
U1P066E0.book Page 1 Thursday, August 5, 2010 4:15 PM
Page 43 of 140

5-3
5
EBU19541Fuel Make sure that there is sufficient fuel in the tank.
(See page 4-8.)EBU19560Engine oil Make sure that the engine oil is at the specified lev-
el. Add oil as necessary. (See page 8-11.)EBU19590Final gear oil Make sure that the final gear oil is at the specified
level. Add oil as necessary. (See page 8-18.)EBU27671Front and rear brakes Brake levers and brake pedal�Check that there is no free play in the front brake
lever. If there is free play, have a Yamaha dealer
check the brake system.�Check for correct free play in the rear brake lever
and brake pedal. If the free play is incorrect, ad-
just it. (See page 8-31.)
�Check operation of the levers and pedal. They
should move smoothly and there should be a
firm feeling when the brake is applied. If not,
have a Yamaha dealer check them.
Brake fluid level (front brake)
Check the brake fluid level. Add fluid if necessary.
(See page 8-29.)
Brake fluid leakage (front brake)
Check to see if any brake fluid is leaking out of the
hose, joint or brake fluid reservoir of the front
brake. Apply the brake firmly for one minute. If the
lever moves slowly inward, there may be a leak in
the brake system. If there is any leakage, the brake
system should be checked by a Yamaha dealer.
Brake operation
Test the brakes at slow speed after starting out to
make sure they are working properly. If the brakes
do not provide proper braking performance, check
the brake pads and shoes for wear. (See page
8-28.)Recommended brake fluid:
DOT 4
U1P066E0.book Page 3 Thursday, August 5, 2010 4:15 PM
Page 95 of 140

8-16
8 13. Apply a thin coat of clean engine oil to a new
O-ring.
14. Install the oil strainer, the compression spring,
the new O-ring and the engine oil drain bolt,
and then tighten the engine oil drain bolt to the
specified torque. NOTICE: Before installing
the engine oil drain bolt, be sure to install
the O-ring, compression spring and oil
strainer.
[ECB00321]
15. Refill with the specified amount of the recom-
mended engine oil, and then install and tight-
en the engine oil filler cap.TIPBe sure to wipe off spilled oil on any parts after the
engine and exhaust system have cooled down.NOTICEECB00300�In order to prevent clutch slippage (since the
engine oil also lubricates the clutch), do not
mix any chemical additives. Do not use oils
with a diesel specification of “CD” or oils of
1. Engine oil drain bolt
2. O-ring
3. Compression spring
4. Oil strainer
Tightening torque:
Engine oil drain bolt:
43 Nm (4.3 m·kgf, 31 ft·lbf)
Recommended oil:
See page 10-1.
Oil quantity:
Without oil filter element removal:
1.50 L (1.59 US qt, 1.32 Imp.qt)
With oil filter element removal:
1.60 L (1.69 US qt, 1.41 Imp.qt)
U1P066E0.book Page 16 Thursday, August 5, 2010 4:15 PM
Page 97 of 140
8-18
8
EBU23386Final gear oil The final gear case must be checked for oil leak-
age before each ride. If any leakage is found, have
a Yamaha dealer check and repair the ATV. In ad-
dition, the final gear oil level must be checked and
the oil changed as follows at the intervals specified
in the periodic maintenance and lubrication chart.
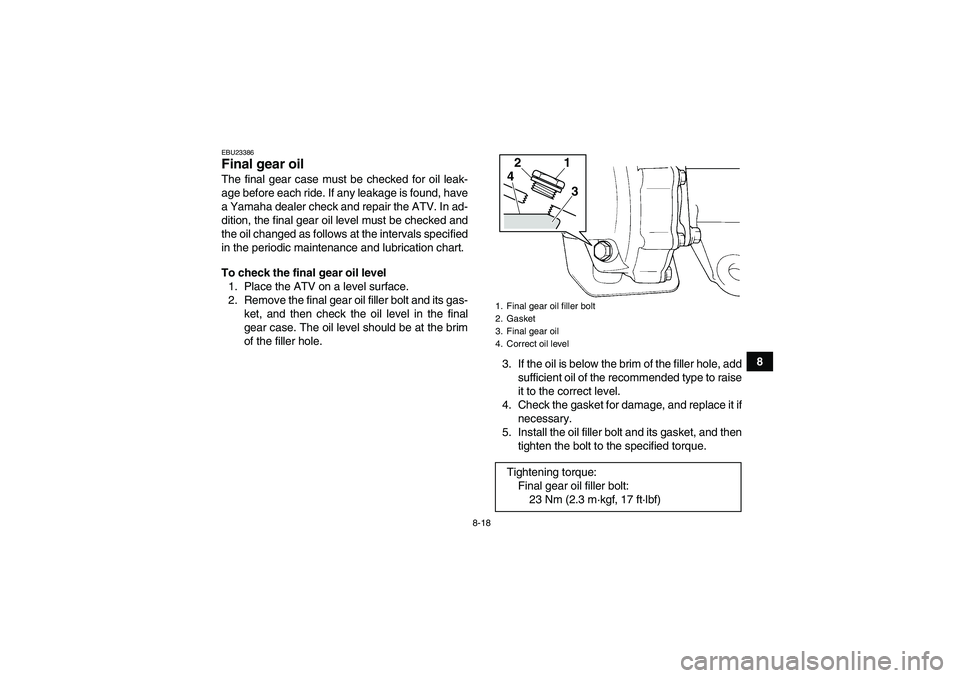
To check the final gear oil level
1. Place the ATV on a level surface.
2. Remove the final gear oil filler bolt and its gas-
ket, and then check the oil level in the final
gear case. The oil level should be at the brim
of the filler hole.
3. If the oil is below the brim of the filler hole, add
sufficient oil of the recommended type to raise
it to the correct level.
4. Check the gasket for damage, and replace it if
necessary.
5. Install the oil filler bolt and its gasket, and then
tighten the bolt to the specified torque.
1. Final gear oil filler bolt
2. Gasket
3. Final gear oil
4. Correct oil levelTightening torque:
Final gear oil filler bolt:
23 Nm (2.3 m·kgf, 17 ft·lbf)
1
2
4
3
U1P066E0.book Page 18 Thursday, August 5, 2010 4:15 PM
Page 98 of 140
8-19
8To change the final gear oil
1. Place the ATV on a level surface.
2. Remove the final gear case guard by remov-
ing the bolts.
3. Place an oil pan under the final gear case to
collect the used oil.
4. Remove the final gear oil filler bolt, the final
gear oil drain bolt, and their gasket to drain the
oil from the final gear case.5. Install the drain bolt and its new gasket, and
then tighten the bolt to the specified torque.
6. Refill with the recommended final gear oil to
the brim of the filler hole as shown. NOTICE:
Be sure no foreign material enters the final
gear case.
[ECB00421]
1. Final gear case guard
2. Bolt
1. Final gear oil drain bolt
2. GasketTightening torque:
Final gear oil drain bolt:
23 Nm (2.3 m·kgf, 17 ft·lbf)
1
1
2
U1P066E0.book Page 19 Thursday, August 5, 2010 4:15 PM
Page 99 of 140
8-20
8
7. Check the oil filler bolt gasket for damage, and
replace it if necessary.
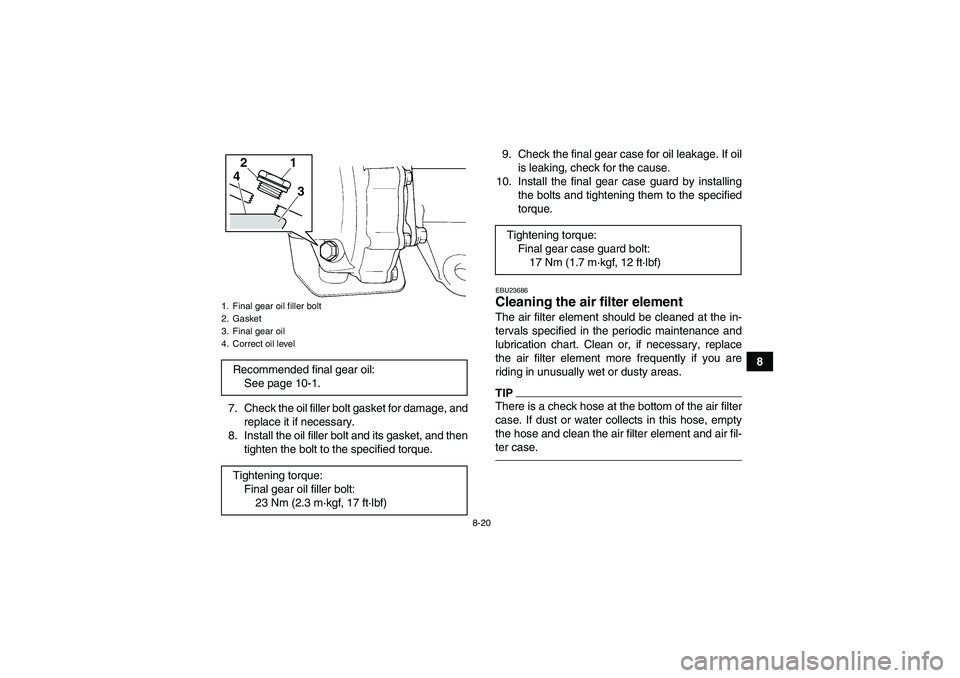
8. Install the oil filler bolt and its gasket, and then
tighten the bolt to the specified torque.9. Check the final gear case for oil leakage. If oil
is leaking, check for the cause.
10. Install the final gear case guard by installing
the bolts and tightening them to the specified
torque.
EBU23686Cleaning the air filter element The air filter element should be cleaned at the in-
tervals specified in the periodic maintenance and
lubrication chart. Clean or, if necessary, replace
the air filter element more frequently if you are
riding in unusually wet or dusty areas.TIPThere is a check hose at the bottom of the air filter
case. If dust or water collects in this hose, empty
the hose and clean the air filter element and air fil-
ter case.
1. Final gear oil filler bolt
2. Gasket
3. Final gear oil
4. Correct oil levelRecommended final gear oil:
See page 10-1.
Tightening torque:
Final gear oil filler bolt:
23 Nm (2.3 m·kgf, 17 ft·lbf)
1
2
4
3
Tightening torque:
Final gear case guard bolt:
17 Nm (1.7 m·kgf, 12 ft·lbf)
U1P066E0.book Page 20 Thursday, August 5, 2010 4:15 PM
Page 109 of 140
8-30
8
�Use only the recommended quality brake fluid,
otherwise the rubber seals may deteriorate,
causing leakage and poor braking performance.�Refill with the same type of brake fluid. Mixing
fluids may result in a harmful chemical reaction
and lead to poor braking performance.�Be careful that water does not enter the brake
fluid reservoir when refilling. Water will signifi-
cantly lower the boiling point of the fluid and may
result in vapor lock.�Brake fluid may deteriorate painted surfaces or
plastic parts. Always clean up spilled fluid imme-
diately.�As the brake pads wear, it is normal for the brake
fluid level to gradually go down. However, if the
brake fluid level goes down suddenly, have a
Yamaha dealer check the cause.EBU24281Changing the brake fluid Have a Yamaha dealer change the brake fluid at
the intervals specified in the TIP after the periodic
maintenance and lubrication chart. In addition,have the oil seals of the brake master cylinder and
calipers as well as the brake hoses replaced at the
intervals listed below or whenever they are dam-
aged or leaking.
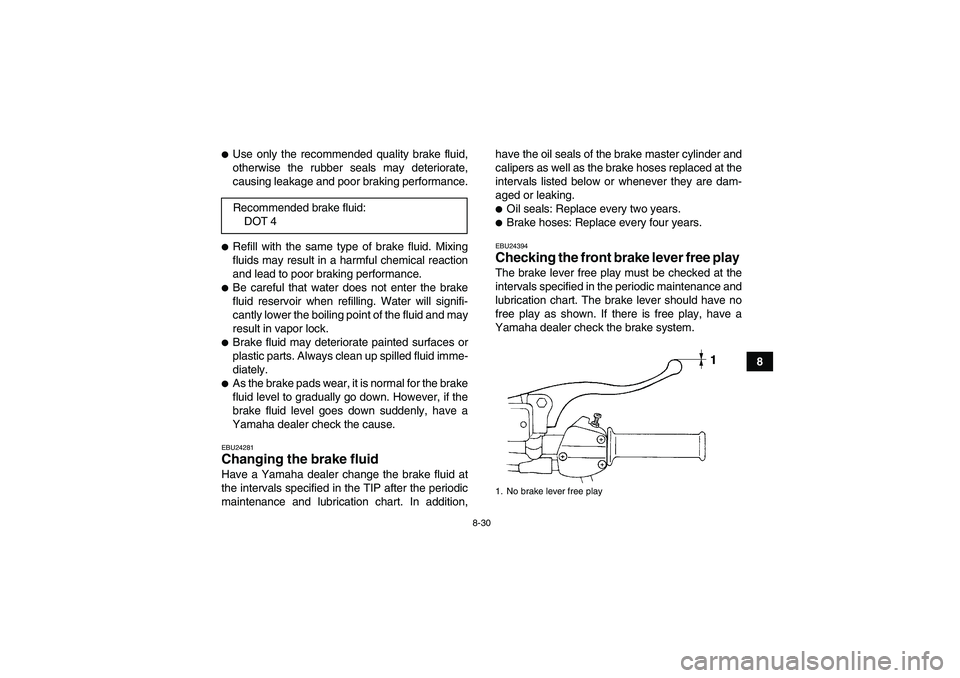
�Oil seals: Replace every two years.�Brake hoses: Replace every four years.EBU24394Checking the front brake lever free play The brake lever free play must be checked at the
intervals specified in the periodic maintenance and
lubrication chart. The brake lever should have no
free play as shown. If there is free play, have a
Yamaha dealer check the brake system. Recommended brake fluid:
DOT 41. No brake lever free play
U1P066E0.book Page 30 Thursday, August 5, 2010 4:15 PM
Page 115 of 140
8-36
8
WARNING
EWB02581�Inspect cables frequently and replace if dam-
aged. Corrosion can result when the cable
sheaths become damaged, and cables can
also become frayed or kinked, which could
restrict the operation of controls and lead to
an accident or injury.�Always make sure all control cables work
smoothly before you begin riding in cold
weather. If the control cables are frozen or do
not work smoothly, you could be unable to
control the ATV, which could lead to an acci-
dent or collision.EBU28711Checking and lubricating the front and
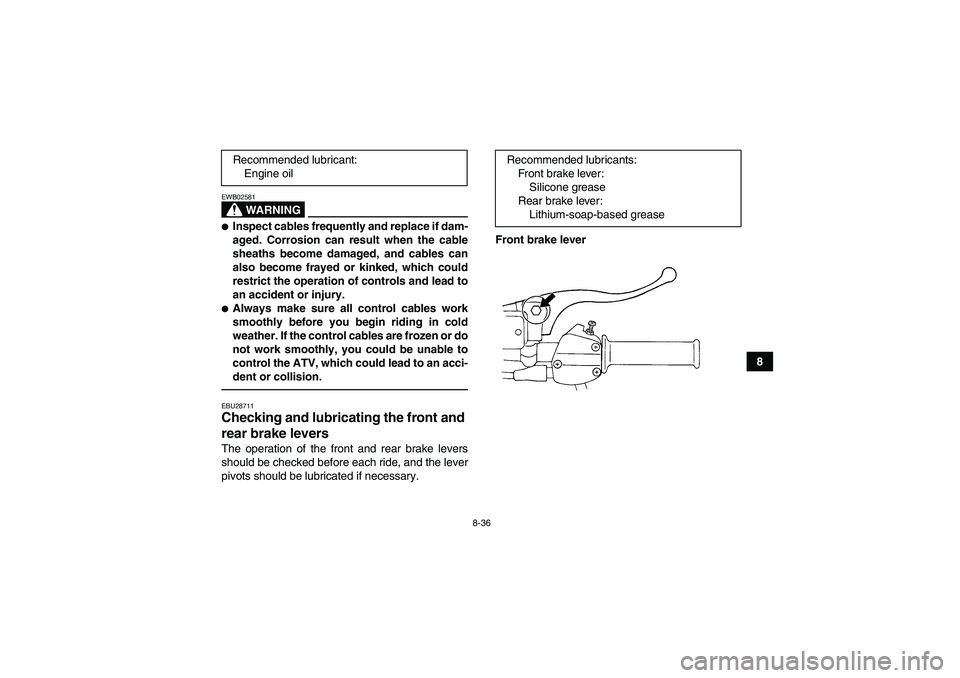
rear brake levers The operation of the front and rear brake levers
should be checked before each ride, and the lever
pivots should be lubricated if necessary.Front brake lever Recommended lubricant:
Engine oil
Recommended lubricants:
Front brake lever:
Silicone grease
Rear brake lever:
Lithium-soap-based grease
U1P066E0.book Page 36 Thursday, August 5, 2010 4:15 PM