Page 107 of 140

8-28
8
EBU24071Adjusting the drive select lever safety
system cable The drive select lever safety system cable stretch-
es with use, which can result in improper function.
Therefore, the safety system cable should be
checked and adjusted by a Yamaha dealer at the
intervals specified in the periodic maintenance and
lubrication chart.EBU29601Brakes Replacement of brake components requires pro-
fessional knowledge. Brake service should be per-
formed by a Yamaha dealer.
WARNING
EWB02571Operating with improperly serviced or adjust-
ed brakes could lead to a loss in braking ability
and an accident.EBU24120Checking the front brake pads and rear
brake shoes The front brake pads and the rear brake shoes
must be checked for wear at the intervals specified
in the periodic maintenance and lubrication chart.
EBU24171Front brake pads
Check each front brake pad for damage and mea-
sure the lining thickness. If a brake pad is dam-
aged or if the lining thickness is less than 1.0 mm
(0.04 in), have a Yamaha dealer replace the brake
pads as a set.TIPThe wheels need to be removed to check the
brake pads. (See page 8-46.)1. Brake pad
2. Lining thickness
U1P066E0.book Page 28 Thursday, August 5, 2010 4:15 PM
Page 115 of 140
8-36
8
WARNING
EWB02581�Inspect cables frequently and replace if dam-
aged. Corrosion can result when the cable
sheaths become damaged, and cables can
also become frayed or kinked, which could
restrict the operation of controls and lead to
an accident or injury.�Always make sure all control cables work
smoothly before you begin riding in cold
weather. If the control cables are frozen or do
not work smoothly, you could be unable to
control the ATV, which could lead to an acci-
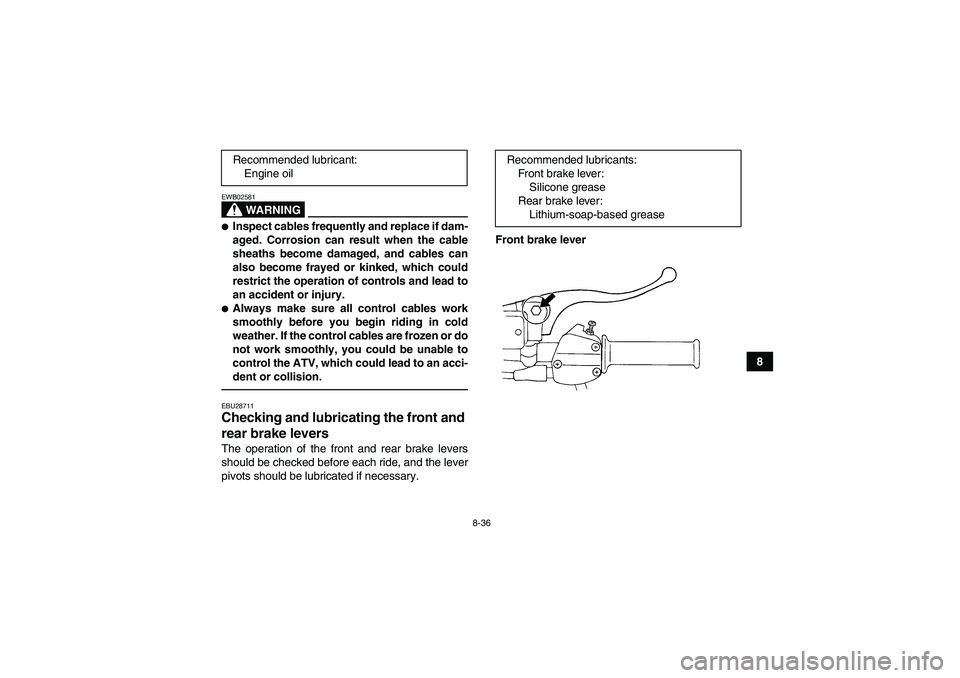
dent or collision.EBU28711Checking and lubricating the front and
rear brake levers The operation of the front and rear brake levers
should be checked before each ride, and the lever
pivots should be lubricated if necessary.Front brake lever Recommended lubricant:
Engine oil
Recommended lubricants:
Front brake lever:
Silicone grease
Rear brake lever:
Lithium-soap-based grease
U1P066E0.book Page 36 Thursday, August 5, 2010 4:15 PM
Page 118 of 140

8-39
8
EBU30350Battery The battery is located behind the seat.
A poorly maintained battery will corrode and dis-
charge quickly. The electrolyte level, battery lead
connections and breather hose routing should be
checked before each ride and at the intervals
specified in the periodic maintenance and lubrica-
tion chart.
WARNING
EWB02160Battery electrolyte is poisonous and danger-
ous, as it contains sulfuric acid, which can
cause severe burns. Avoid contact with skin,
eyes or clothing. Always shield your eyes
when working near batteries.
Antidote:
EXTERNAL: Flush with water.
INTERNAL: Drink large quantities of water or
milk. Follow with milk of magnesia, beaten egg
or vegetable oil. Call a physician immediately.
EYES: Flush with water for 15 minutes and get
prompt medical attention.
Batteries produce explosive gases. Keep
sparks, flame, cigarettes or other sources of ig-
nition away. Ventilate when charging or using
in an enclosed space.KEEP OUT OF REACH OF CHILDREN.
To check the electrolyte level
1. Place the ATV on a level surface.
2. Remove the battery cover by pulling it upward.
3. Check the electrolyte level in the battery.1. Battery cover
U1P066E0.book Page 39 Thursday, August 5, 2010 4:15 PM
Page 122 of 140
8-43
82. Remove the blown fuse, and then install a
new fuse of the specified amperage.
WARNING! Always use a fuse of the spec-
ified rating, and never use a substitute ob-
ject in place of the proper fuse. An
improper fuse or a substitute object can
cause damage to the electrical system,
which could lead to a fire.
[EWB02172]
3. Turn the key to “ON” and turn on the electrical
circuits to check if the devices operate.
4. If the fuse immediately blows again, have a
Yamaha dealer check the electrical system.EBU25481Replacing a headlight bulb If a headlight bulb burns out, replace it as follows.
1. Remove the cover at the rear of the headlight
by pulling it off.2. Remove the headlight bulb holder cover by
pulling it off. Specified fuse:
20.0 A
1. Cover at the rear of the headlight
1. Headlight bulb holder cover
U1P066E0.book Page 43 Thursday, August 5, 2010 4:15 PM
Page 127 of 140

8-48
8
EBU25720Troubleshooting Although Yamaha ATVs receive a thorough in-
spection before shipment from the factory, trouble
may occur during operation. Any problem in the fu-
el, compression, or ignition systems, for example,
can cause poor starting and loss of power.
The following troubleshooting chart represents a
quick and easy procedure for checking these vital
systems yourself. However, should your ATV re-
quire any repair, take it to a Yamaha dealer, whose
skilled technicians have the necessary tools, expe-
rience, and know-how to service the ATV properly.
Use only genuine Yamaha replacement parts. Im-
itation parts may look like Yamaha parts, but they
are often inferior, have a shorter service life and
can lead to expensive repair bills.
WARNING
EWB02280Do not smoke when checking the fuel system.
Fuel can ignite or explode, causing severe inju-
ry or property damage. Make sure there are no
open flames or sparks in the area, including pi-
lot lights from water heaters or furnaces.U1P066E0.book Page 48 Thursday, August 5, 2010 4:15 PM
Page 129 of 140

9-1
9
EBU25860
CLEANING AND STORAGE
EBU25881Cleaning Frequent, thorough cleaning of your ATV will not
only enhance its appearance but will improve its
general performance and extend the useful life of
many components.
1. Before cleaning the ATV:
a. Block off the end of the exhaust pipe to
prevent water entry. A plastic bag and
strong rubber band may be used.
b. Make sure the spark plug and all filler caps
are properly installed.
2. If the engine case is excessively greasy, apply
degreaser with a paint brush. Do not apply de-
greaser to the wheel axles.
3. Rinse the dirt and degreaser off with a garden
hose. Use only enough pressure to do the job.
WARNING! Wet brakes may have reduced
stopping ability, increasing the chance of
an accident. Test the brakes after washing.
Apply the brakes several times at slow
speeds to let friction dry out the linings.
[EWB02311]
NOTICE: Excessive water pressure
may cause water seepage and deteriora-tion of wheel bearings, brakes, transmis-
sion seals and electrical devices. Many
expensive repair bills have resulted from
improper high-pressure detergent applica-
tions such as those available in coin-oper-
ated car washers.
[ECB00711]
4. Once most of the dirt has been hosed off,
wash all surfaces with warm water and mild,
detergent-type soap. An old toothbrush or bot-
tle brush is handy for hard-to-reach places.
5. Rinse the ATV off immediately with clean wa-
ter and dry all surfaces with a chamois, clean
towel or soft absorbing cloth.
6. Clean the seat with a vinyl upholstery cleaner
to keep the cover pliable and glossy.
7. Automotive type wax may be applied to all
painted and chrome plated surfaces. Avoid
combination cleaner-waxes. Many contain
abrasives which may mar the paint or protec-
tive finish. When finished cleaning, start the
engine and let it idle for several minutes.
U1P066E0.book Page 1 Thursday, August 5, 2010 4:15 PM