Page 99 of 140

8-20
8
7. Check the oil filler bolt gasket for damage, and
replace it if necessary.
8. Install the oil filler bolt and its gasket, and then
tighten the bolt to the specified torque.9. Check the final gear case for oil leakage. If oil
is leaking, check for the cause.
10. Install the final gear case guard by installing
the bolts and tightening them to the specified
torque.
EBU23686Cleaning the air filter element The air filter element should be cleaned at the in-
tervals specified in the periodic maintenance and
lubrication chart. Clean or, if necessary, replace
the air filter element more frequently if you are
riding in unusually wet or dusty areas.TIPThere is a check hose at the bottom of the air filter
case. If dust or water collects in this hose, empty
the hose and clean the air filter element and air fil-
ter case.
1. Final gear oil filler bolt
2. Gasket
3. Final gear oil
4. Correct oil levelRecommended final gear oil:
See page 10-1.
Tightening torque:
Final gear oil filler bolt:
23 Nm (2.3 m·kgf, 17 ft·lbf)
1
2
4
3
Tightening torque:
Final gear case guard bolt:
17 Nm (1.7 m·kgf, 12 ft·lbf)
U1P066E0.book Page 20 Thursday, August 5, 2010 4:15 PM
Page 104 of 140

8-25
84. Insert the tailpipe into the muffler and align the
bolt holes.
5. Install the tailpipe bolts and tighten them to the
specified torque.
WARNING
EWB02340Do not start the engine when cleaning the
spark arrester, otherwise it could cause injury
to the eyes, burns, carbon monoxide poison-
ing, possibly leading to death, and start a fire.
Always let the exhaust system cool prior to
touching exhaust components.EBU23940Adjusting the carburetor The carburetor should be checked and, if neces-
sary, adjusted at the intervals specified in the peri-
odic maintenance and lubrication chart. The
carburetor is an important part of the engine and
requires very sophisticated adjustment. Therefore,
most carburetor adjustments should be left to a
Yamaha dealer, who has the necessary profes-
sional knowledge and experience. The adjustment
described in the following section, however, may
be performed by the owner as part of routine main-
tenance.
1. Tailpipe
2. Spark arresterTightening torque:
Tailpipe bolt:
10 Nm (1.0 m·kgf, 7.2 ft·lbf)
U1P066E0.book Page 25 Thursday, August 5, 2010 4:15 PM
Page 114 of 140

8-35
8
EBU24803Adjusting the clutch free play The clutch free play must be adjusted periodically.
Adjust the free play as follows.
1. Remove the footboard. (See “Engine oil” on
page 8-11 for removal and installation proce-
dures.)
2. Loosen the locknut.
3. Slowly turn the clutch adjusting screw in direc-
tion (a) until resistance is felt, and then turn it
1/8 turn in direction (b).
TIPTurning the clutch adjusting screw in direction (a)
decreases clutch free play and turning it in direc-
tion (b) increases clutch free play.4. Tighten the locknut to the specified torque.TIPWhen tightening the locknut, hold the clutch ad-
justing screw with a screwdriver so that it does not
turn together with the locknut.5. Install the footboard.EBU24901Checking and lubricating the cables The operation and the condition of all control ca-
bles should be checked before each ride, and the
cables and cable ends should be lubricated if nec-
essary. If a cable is damaged or does not move
smoothly, have a Yamaha dealer check or replace
it.
1. Locknut
2. Clutch adjusting screw
Tightening torque:
Locknut:
15 Nm (1.5 m·kgf, 11 ft·lbf)
U1P066E0.book Page 35 Thursday, August 5, 2010 4:15 PM
Page 126 of 140
8-47
8
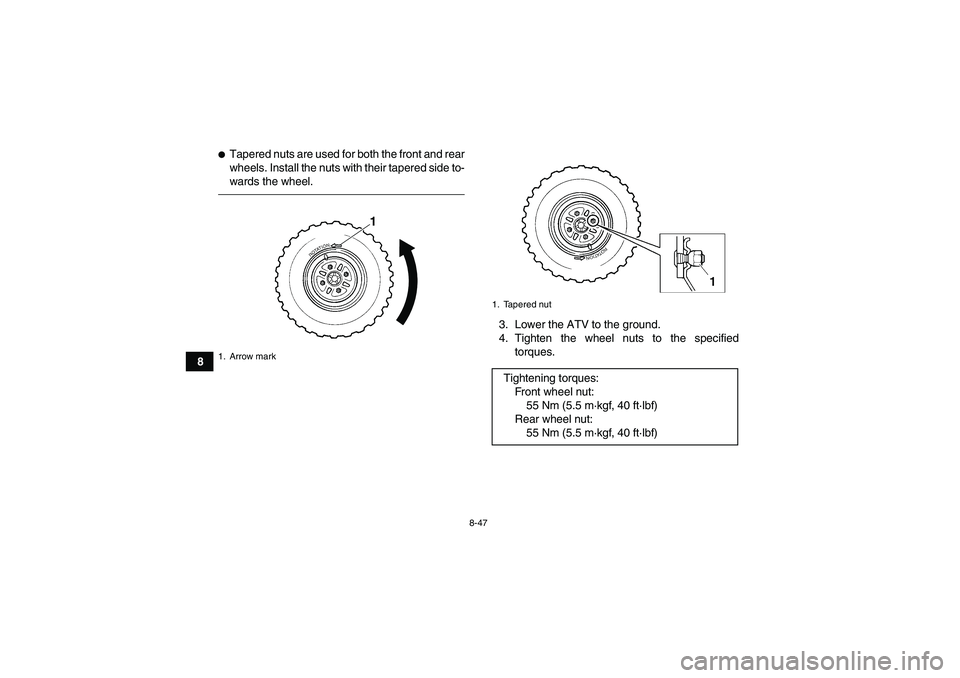
�Tapered nuts are used for both the front and rear
wheels. Install the nuts with their tapered side to-
wards the wheel.
3. Lower the ATV to the ground.
4. Tighten the wheel nuts to the specified
torques.
1. Arrow mark
1
1. Tapered nutTightening torques:
Fro nt wh ee l nu t:
55 Nm (5.5 m·kgf, 40 ft·lbf)
Rear wheel nut:
55 Nm (5.5 m·kgf, 40 ft·lbf)
U1P066E0.book Page 47 Thursday, August 5, 2010 4:15 PM