Page 28 of 148

4-3
1
2
34
5
6
7
8
9
10
11
Before starting the engine, check the throttle to be
sure it is operating smoothly. Make sure it returns
to the idle position as soon as the lever is released.
EBU18300
Throttle OverRide System
If during operation, the carburetor or the throttle ca-
ble should malfunction and will not close fully, take
your thumb off the throttle lever.
The throttle override system immediately cuts off
the ignition.
WARNING
EWB00260
Riding with a malfunction increases the
chance for an accident and injury. Make sure
that the cause of the malfunction is corrected
before restarting the engine or have the ATV in-
spected by a Yamaha dealer.
EBU18323
Speed limiter
Your ATV is equipped with an adjustable speed
limiter. The speed limiter keeps the throttle from
fully opening, even when the throttle lever is
pushed to the maximum.
1. Loosen the locknut.
2. To increase the maximum engine power avail-
able and the maximum speed of the ATV, turn
the adjusting screw in direction (a). To de-
crease the maximum engine power available
and the maximum speed of the ATV, turn the
adjusting screw in direction (b). Do not turn
the adjusting screw out more than 12 mm
(0.47 in) or the throttle cable could be dam-
aged. Always make sure the throttle lever free
play is adjusted to 4.0–6.0 mm (0.16–0.24 in).
(See page 8-34.)
WARNING! Improper ad-
1. Throttle lever
1
Page 31 of 148
4-6
1
2
34
5
6
7
8
9
10
11
wise, the engine will misfire, preventing normal op-
eration.
WARNING
EWB00220
�
Always set the parking brake before starting
the engine. The ATV could start moving un-
expectedly if the parking brake is not ap-
plied. This could cause loss of control or a
collision.
�
Always be sure you have released the park-
ing brake before you begin to ride. The brake
could overheat if you ride the ATV without re-
leasing the parking brake. You could lose
braking performance which could cause an
accident. You could also wear out the brakes
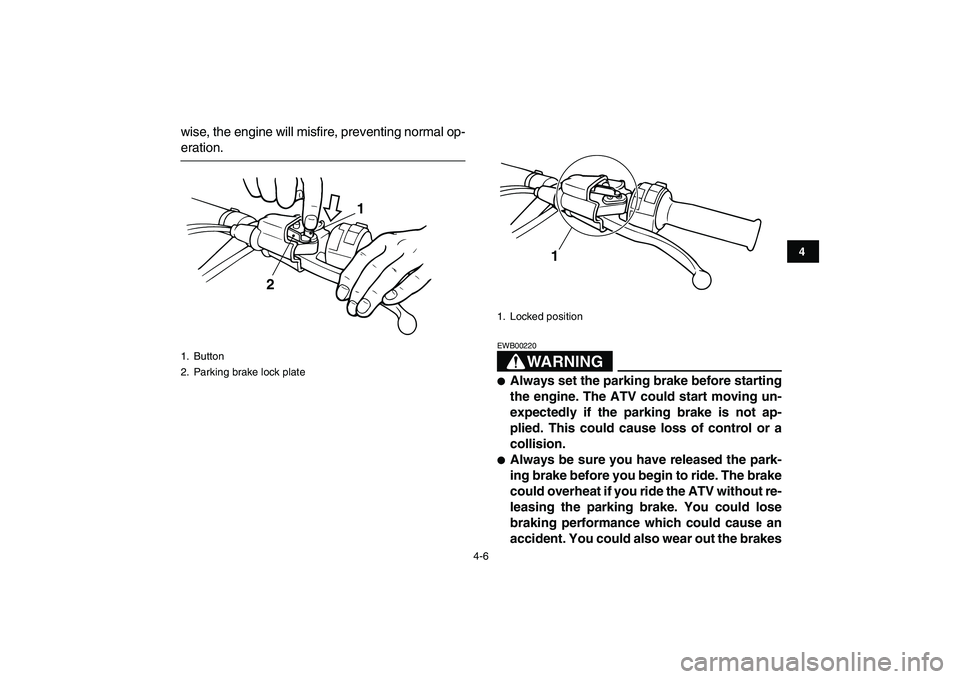
1. Button
2. Parking brake lock plate
1
2
1. Locked position
1
Page 33 of 148
4-8
1
2
34
5
6
7
8
9
10
11
EBU18774
Fuel
Make sure there is sufficient gasoline in the tank.
WARNING
EWB02521
Gasoline and gasoline vapors are extremely
flammable. To avoid fires and explosions and
to reduce the risk of injury when refueling, fol-
low these instructions.
1. Before refueling, turn off the engine and be
sure that no one is sitting on the vehicle. Nev-
er refuel while smoking, or while in the vicinity
of sparks, open flames, or other sources of ig-nition such as the pilot lights of water heaters
and clothes dryers.
2. Do not overfill the fuel tank. When refueling,
be sure to insert the pump nozzle into the fuel
tank filler hole. Stop filling when the fuel reach-
es the bottom of the filler tube. Because fuel
expands when it heats up, heat from the en-
gine or the sun can cause fuel to spill out of
the fuel tank.
1. Fuel tank cap
1
1. Maximum fuel level
2. Filler tube
Page 34 of 148

4-9
1
2
34
5
6
7
8
9
10
11
3. Wipe up any spilled fuel immediately.
NOTICE:
Immediately wipe off spilled fuel
with a clean, dry, soft cloth, since fuel may
deteriorate painted surfaces or plastic
parts.
[ECB00981]
4. Turn the fuel tank cap fully clockwise to make
sure it is securely closed.
WARNING
EWB02531
Gasoline is poisonous and can cause injury or
death. Handle gasoline with care. Never siphon
gasoline by mouth. If you should swallow
some gasoline or inhale a lot of gasoline vapor,
or get some gasoline in your eyes, see your
doctor immediately. If gasoline spills on your
skin, wash with soap and water. If gasoline
spills on your clothing, change your clothes.
NOTICE
ECB00060
Use only unleaded gasoline. The use of leaded
gasoline will cause severe damage to internal
engine parts, such as the piston rings, as well
as to the exhaust system.
Your Yamaha engine has been designed to use
premium unleaded gasoline with a research oc-
tane number of 95 or higher. If knocking (or ping-
ing) occurs, use a gasoline of a different brand.
Use of unleaded fuel will extend spark plug life and
reduce maintenance costs.
EBU18830
Fuel cock
The fuel cock supplies fuel from the tank to the car-
buretors while also filtering it.
The fuel cock lever positions are explained as fol-
lows and shown in the illustrations. Recommended fuel:
PREMIUM UNLEADED GASOLINE ONLY
For Europe: PREMIUM UNLEADED GASO-
LINE ONLY with a research octane number
of 95 or higher.
Fuel tank capacity:
12.0 L (3.17 US gal, 2.64 Imp.gal)
Fuel reserve amount:
2.5 L (0.66 US gal, 0.55 Imp.gal)
Page 37 of 148
4-12
1
2
34
5
6
7
8
9
10
11
To install the seat
Insert the projection on the front of the seat into the
seat holder and push down on the seat at the rear.
Make sure that the seat is securely fitted.
EBU18992
Adjusting the front shock absorber
assemblies
The spring preload can be adjusted to suit the rid-
er’s weight and the riding conditions.
WARNING
EWB00400
Always adjust the shock absorber assemblies
on the left and right side to the same setting.
Uneven adjustment can cause poor handling
and loss of stability, which could lead to an ac-
1. Seat lock lever
1
1. Projection
2. Seat holder
1
2
Page 38 of 148
 to increase the spring preload and thereby
harden the suspension")
4-13
1
2
34
5
6
7
8
9
10
11
cident.
Adjust the spring preload as follows.
Turn the spring preload adjusting ring in direction
(a) to increase the spring preload and thereby
harden the suspension, and in direction (b) to de-
crease the spring preload and thereby soften the
suspension.
TIP
A special wrench can be obtained at a Yamaha
dealer to make this adjustment.
EBU19102
Adjusting the rear shock absorber
assembly
The spring preload, rebound damping and com-
pression damping forces of the rear shock absorb-
er assembly can be adjusted to suit the rider’s
weight and the riding conditions.WARNING
EWB00460
Suspension components become hot during
operation. Never touch the compression
damping force adjusting knob, the rebound
damping force adjusting dial or the oil reser-
voir with your bare hand or skin until suspen-
sion components have cooled.
1. Spring preload adjusting ring
2. Position indicator
1
2
3
4
5
12
(a)
(b)
Spring preload setting:
Minimum (soft):
1
Standard:
3
Maximum (hard):
5
Page 41 of 148
 to increase the compression
damping force and thereby harden the damping,
and in direction (b) to decrease the compression
damping force and ther")
4-16
1
2
34
5
6
7
8
9
10
11
knob in direction (a) to increase the compression
damping force and thereby harden the damping,
and in direction (b) to decrease the compression
damping force and thereby soften the damping.TIP
Although the total number of clicks of a damping
force adjusting mechanism may not exactly match
the above specifications due to small differences in
production, the actual number of clicks always rep-
resents the entire adjusting range. To obtain a pre-
cise adjustment, it would be advisable to check the
number of clicks of each damping force adjusting
mechanism and to modify the specifications as
necessary.
WARNING
EWB00430
This shock absorber assembly contains highly
pressurized nitrogen gas. Read and under-
stand the following information before han-
dling the shock absorber assembly.
1. Compression damping force adjusting knob
1(a) (b)
Compression damping setting:
Minimum (soft):
1 click(s) in direction (a)*
Standard:
11 click(s) in direction (a)*
Maximum (hard):
15 click(s) in direction (a)*
* With the adjusting knob fully turned in direc-
tion (b)
Page 43 of 148

5-1
1
2
3
45
6
7
8
9
10
11
EBU19201
PRE-OPERATION CHECKS
EBU19224
Inspect your vehicle each time you use it to make sure the vehicle is in safe operating condition. Always
follow the inspection and maintenance procedures and schedules described in the Owner’s Manual.
WARNING
EWB00481
Failure to inspect or maintain the vehicle properly increases the possibility of an accident or equip-
ment damage. Do not operate the vehicle if you find any problem. If a problem cannot be corrected
by the procedures provided in this manual, have the vehicle inspected by a Yamaha dealer.
Before using this vehicle, check the following points:
ITEM ROUTINE PAGE
Fuel
�
Check fuel level in fuel tank, and add recommended fuel if neces-
sary.
�
Check fuel line for leakage. Correct if necessary.4-8, 5-3
Transmission oil
�
Check oil level in transmission case, and add recommended oil to
specified level if necessary.
�
Check ATV for oil leakage. Correct if necessary.5-3, 8-10
Coolant
�
Check coolant level in reservoir, and add recommended coolant to
specified level if necessary.
�
Check cooling system for leakage. Correct if necessary.5-3, 8-13
Front brake
�
Check operation. If soft or spongy, have Yamaha dealer bleed
hydraulic system.
�
Check brake pads for wear, and replace if necessary.
�
Check brake fluid level in reservoir, and add recommended brake
fluid to specified level if necessary.
�
Check hydraulic system for leakage. Correct if necessary.5-3, 8-35, 8-36, 8-38