2011 VOLKSWAGEN TRANSPORTER window
[x] Cancel search: windowPage 382 of 486

Washing the vehicle with a high-pressure cleaner
I""""'T'n First read and observe the Introductory L.-lo:oJ.I information and safety warnings & on page 380.
Follow the instructions provided by the manufactur-er when cleaning your vehicle using a high-pres-sure cleaner. This applies in particular to the pres-sure and the spraying distance=>&.
Maintain sufficient distance to soft materials such as rubber hoses, insulation, and the ParkPilot sen-sors. The ParkPilot sensors are located in the front bumper, and in some cases also in the rear bump-er =>
A WARNING
The incorrect use of a high-pressure cleaner can cause visible and invisible long-term damage to tyres and other materials. This can cause accidents and serious injuries.
• Maintain sufficient distance between the washer jet and the tyres.
• Never clean the tyres with concentrated jet nozzles (dirt blasters). The tyres may incur visible and invisible damage even if cleaned briefly with the spray at a distance.
A WARNING
After the car has been washed, the braking effect could set in later than normal and ex-tend the braking distance as the brake discs and brake pads will be wet, or iced up in win-ter.
• You can "dry and de-ice" the brakes by performing careful braking manoeuvres. Make sure that you do not endanger any oth-er road users or violate any legal regulations when doing so.
CD
• The water may be no warmer than +so·c (+140.FJ.
• Do not wash the vehicle In direct sunlight In order to avoid damage to the vehicle palntwork.
• The ParkPilot sensors In the bumpers must be kept clean and free of Ice. When cleaning with pressure hoses or steam cleaners, the sensors should only be sprayed briefly and the steam/hose nozzle must be kept more than 10 cm away.
• Do not clean windows that are iced over or covered In snow with a high-pressure cleaner.
• Washing the vehicle in cold weather: If the vehicle is rinsed with a hose, do not direct the water Into the lock cylinders or the gaps round the doors, boot, or bonnet. The locks and seals could freeze.
I""""'T'n First read and observe the introductory L.-lo:oJ.I information and safety warnings & on page 380.
Cleaning windows and exterior mirrors
Moisten the windows and exterior mirrors with commercially available, alcohol-based glass clean-er.
382 Cleaning and maintenance
Dry the glass surfaces with a clean chamois leath-er or a lint-free cloth. Chamois leathers that have been used on painted surfaces are not suitable for use on glass surfaces. They will be soiled with wax deposits which could smear the surfaces.
Use window cleaner or a silicone remover to clean off rubber, oil, grease and silicone deposits =>
Page 383 of 486
Removing wax
Car washes and care products could leave wax deposits on the glass surfaces. Wax residue can only be removed using a special cleaning product or cleaning cloths. Wax deposits on the wind-screen can cause the wiper blades to rub. Volks-wagen Commercial Vehicles recommends that a glass cleaning cloth G 052 522 A1 be used to re-move wax deposits from the windows and exterior mirrors each time the vehicle is washed.
A window cleaning agent specifically for removing wax will stop the blades rubbing if added to the windscreen wash water. Dilute the cleaner as in-structed. Grease-removing cleaners will not re-move wax deposits =-CD.
Special cleaners, glass cleaners and glass clean-ing cloths are available from Volkswagen Commer-cial Vehicles dealerships.
Removing snow
Use a small brush to remove snow from the win-dows and exterior mirrors.
Removing ice
The best method for removing ice is to use a de-icer spray. If you use an ice scraper, do not move it to and fro, but push it in one direction only. Mov-ing the ice scraper backwards can cause dirt to scratch the window.
Cleaning and changing wiper blades
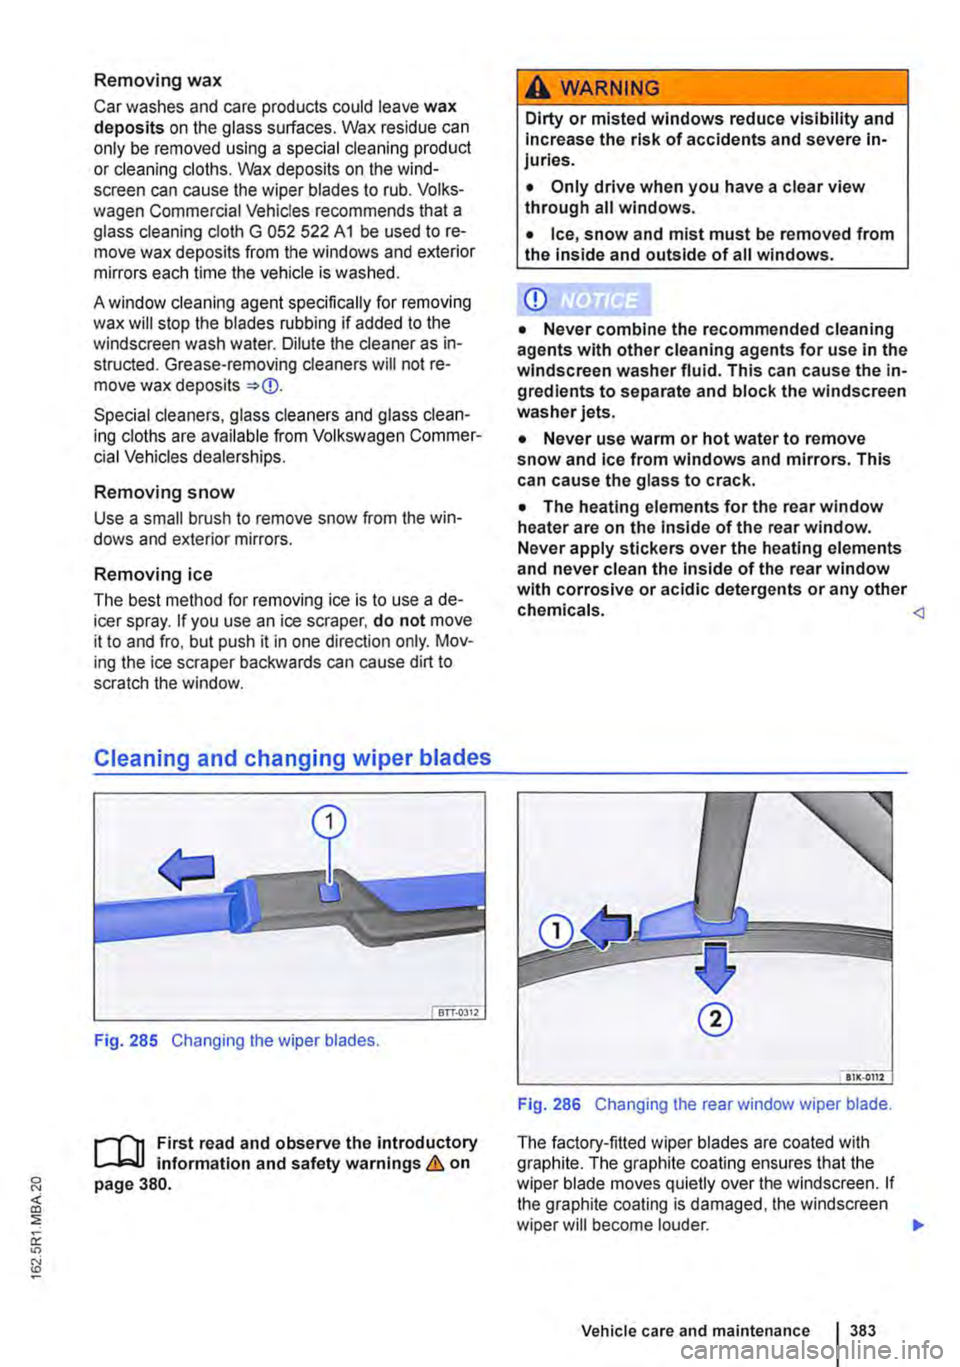
Fig. 285 Changing the wiper blades.
1"'111 First read and observe the introductory l..-J,:.U information and safety warnings & on page 380.
A WARNING
Dirty or misted windows reduce visibility and Increase the risk of accidents and severe in-juries.
• Only drive when you have a clear view through all windows.
• Ice, snow and mist must be removed from the inside and outside of all windows.
CD
• Never combine the recommended cleaning agents with other cleaning agents for use in the windscreen washer fluid. This can cause the in-gredients to separate and block the windscreen washer jets.
• Never use warm or hot water to remove snow and Ice from windows and mirrors. This can cause the glass to crack.
• The heating elements for the rear window heater are on the Inside of the rear window. Never apply stickers over the heating elements and never clean the inside of the rear window with corrosive or acidic detergents or any other chemicals.
The factory-fitted wiper blades are coated with graphite. The graphite coating ensures that the wiper blade moves quietly over the windscreen. If the graphite coating is damaged, the windscreen wiper will become louder. .,..
Vehicle care and maintenance 383
Page 384 of 486
Check the condition of the wiper blades on a regu-lar basis. Rubbing wiper blades should be changed if damaged or cleaned if dirty
Damaged wiper blades should be replaced imme-diately. Wiper blades can be bought from a quali-fied workshop.
Cleaning wiper blades
Note for the front wipers: move the wiper arms to the service position before lifting them 116.
• When lifting the wiper arm hold it only by the wiper blade mounting.
• Clean the wiper blade carefully using a damp cloth
• Place the wiper arm back onto the windscreen.
Changing the wiper blades
• Move the wiper arms to the service position be-fore lifting 116.
• When lifting the wiper arm hold it only by the wiper blade mounting.
• Press and hold the release button 285 G) and simultaneously pull off the wiper blade in the direction of the arrow.
• Insert a new wiper blade with the same length and design onto the wiper arm. Push it on until it engages.
• Place the wiper arm back onto the windscreen.
Changing the wiper blade for the rear window
• When lifting the wiper arm hold it only by the wiper blade mounting.
• Lift and fold back the wiper arm.
Waxing and polishing the vehicle
r--f"n First read and observe the Introductory L-J,::,JJ Information and safety warnings & on page 380.
Waxing
waxing protects the paintwork. You will need to re-wax the vehicle with a good hard wax if water no longer clearly forms small drops and runs off the paintwork when it is clean.
Even if a wax solution is used regularly in the car wash, Volkswagen Commercial Vehicles recom-mends protecting the paint with a coat of hard wax at least twice a year.
384 I Cleaning and maintenance
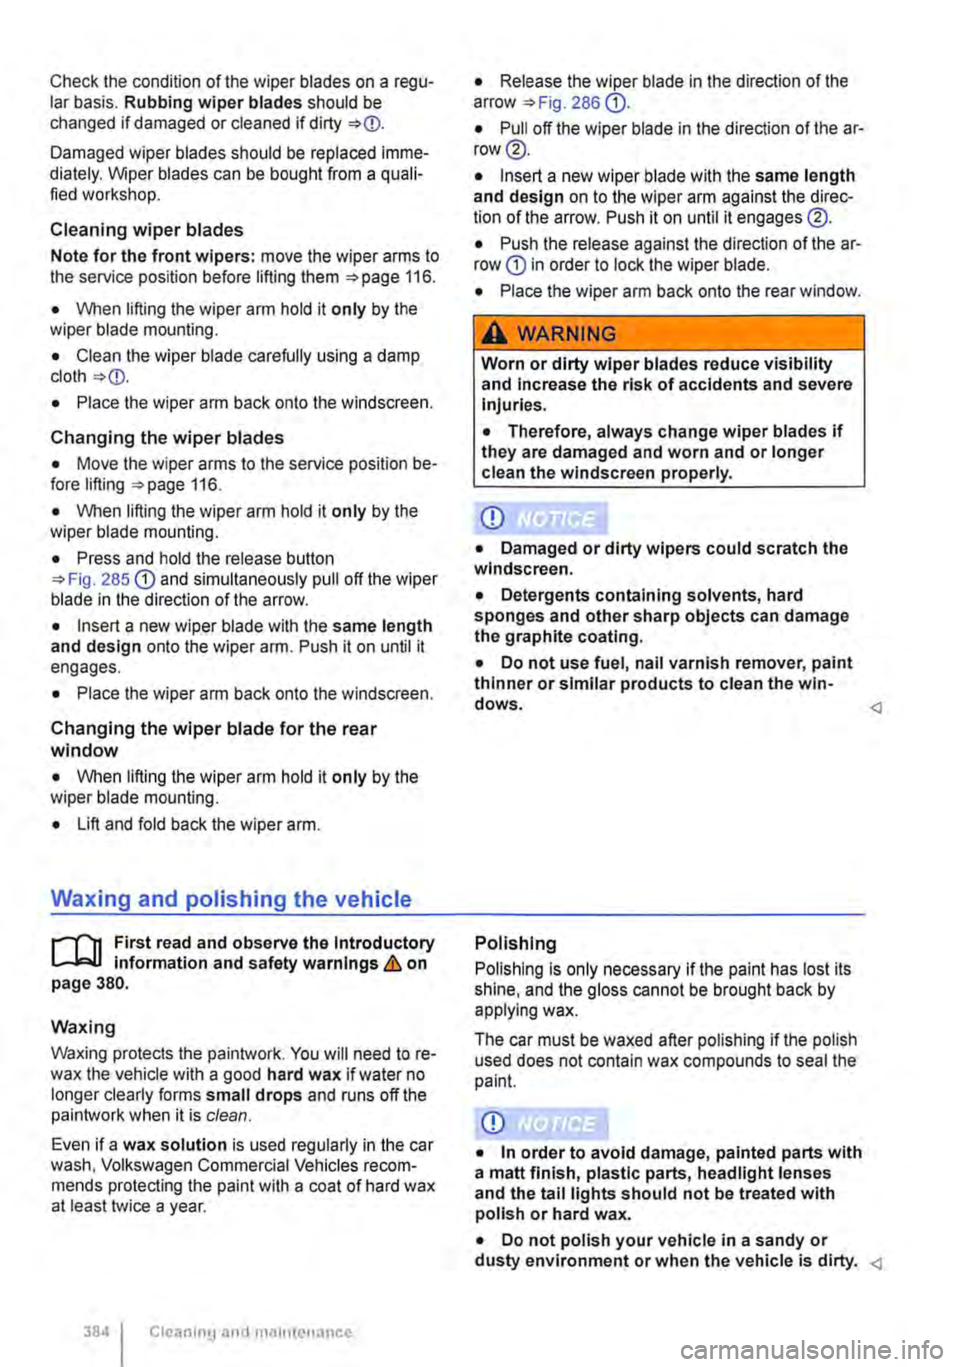
• Release the wiper blade in the direction of the arrow 286 G).
• Pull off the wiper blade in the direction of the ar-row®.
• Insert a new wiper blade with the same length and design on to the wiper arm against the direc-tion of the arrow. Push it on until it engages®.
• Push the release against the direction of the ar-row G) in order to lock the wiper blade.
• Place the wiper arm back onto the rear window.
A WARNING
Worn or dirty wiper blades reduce visibility and Increase the risk of accidents and severe Injuries.
• Therefore, always change wiper blades If they are damaged and worn and or longer clean the windscreen properly.
CD
• Damaged or dirty wipers could scratch the windscreen.
• Detergents containing solvents, hard sponges and other sharp objects can damage the graphite coating.
• Do not use fuel, nail varnish remover, paint thinner or similar products to clean the win-dows.
Polishing Is only necessary If the paint has lost its shine, and the gloss cannot be brought back by applying wax.
The car must be waxed after polishing if the polish used does not contain wax compounds to seal the paint.
CD
• In order to avoid damage, painted parts with a matt finish, plastic parts, headlight lenses and the tail lights should not be treated with polish or hard wax.
• Do not polish your vehicle in a sandy or dusty environment or when the vehicle is dirty.
Page 386 of 486
Remove stubborn impurities carefully using white spirits. and then rinse using warm water. Do not use any aggressive substances such as petrol, thinner or solvents.
Care of the decorative film
Basically, the same care instructions for vehicle paint apply =>page 384.
Treat the decorative film regularly, every 3 months (no longer) with liquid hot wax. Hot wax smooths the surface and has a dirt-repellent effect.
Only use soft microfibre clothes to apply it.
Volkswagen Commercial Vehicles recommends that you seek advice from a Volkswagen Commer-cial Vehicles partner or workshop as to a suitable care product.
Cleaning wheels
rill First read and observe the introductory information and safety warnings & on page 380.
Cleaning steel wheels
An industrial cleaner is needed to remove accumu-lated brake dust. Steel wheels should therefore be cleaned regularly with a separate sponge.
Any damage to the paint on steel wheels should be touched up before the metal starts to rust.
Caring for and cleaning alloy wheels
Wash grit and brake dust from alloy wheels ap-proximately every 2 weeks. Then use an acid-free detergent to clean the wheels. Volkswagen Corn-
Care of rubber seals
rill First read and observe the Introductory Information and safety warnings & on page 380.
The rubber seals on the doors, windows etc. will seal better, remain flexible and last longer if they are treated at regular intervals with a suitable care product.
386 Cleanmg and maintenance
• Depending on the condition of the brushes and car wash, fine scratches may appear In the decorative film.
• Remove impurities on the decorative film as soon as possible using suitable cleaning agents in order to avoid long-term damage to the film.
r::l If the surface of the decorative film is dam-L!.J aged, e.g. by the impact of gravel, the dam-age can only be rectified by replacing the whole decorative film element. Volkswagen Commercial Vehicles recommends having the work carried out by a qualified workshop.
it is important to remove road salt and brake dust by washing the wheels at regular intervals, to deter corrosion to the alloy.
Always use an acid-free detergent for alloy wheels. Car polish or other abrasive agents should not be used on the wheels.
If the protective coating is damaged, e.g. by stone impact, the damaged area should be repaired im-mediately.
Page 410 of 486
If and when
Practical tips
Frequently asked questions
If you suspect that a vehicle fault has arisen or your vehicle has been damaged, read and observe the following information before contacting a Volkswagen Commercial Vehicles dealership or
qualified workshop. You may also find useful infor-mation in the index under the headings "Things to note" or "Checklist".
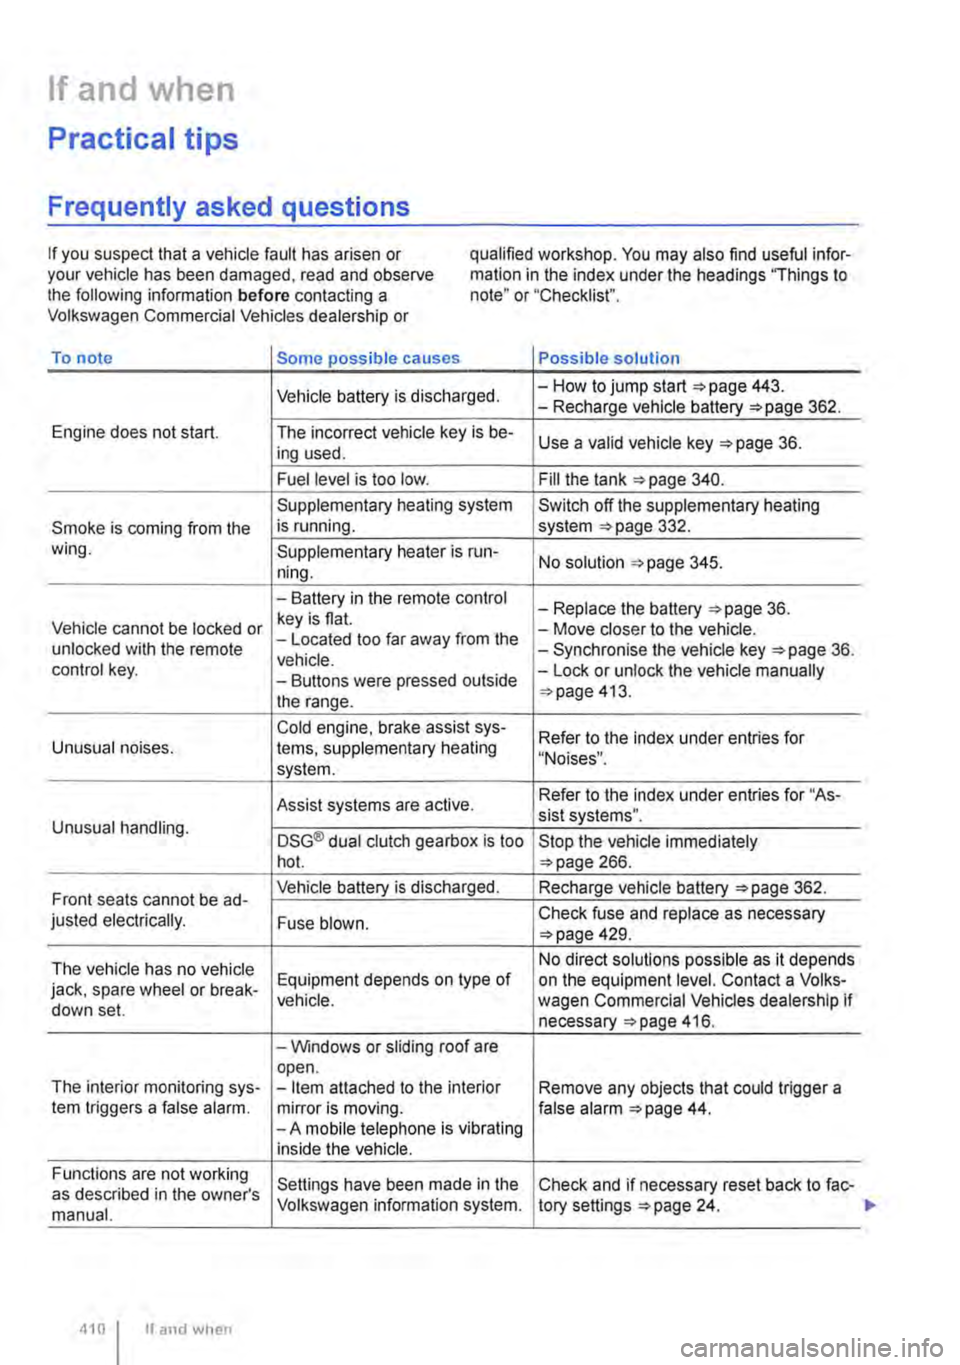
To note Some possible causes Possible solution
Vehicle battery is discharged. -How to jump start =>page 443. -Recharge vehicle battery 362.
Engine does not start. The incorrect vehicle key is be-Use a valid vehicle key 36. ing used.
Fuel level is too low. Fill the tank 340.
Supplementary heating system Switch off the supplementary heating
Smoke is coming from the is running. system 332. wing. Supplementary heater is run-No solution 345. ning.
-Battery in the remote control -Replace the battery 36. Vehicle cannot be locked or key is flat. -Move closer to the vehicle. unlocked with the remote -Located too far away from the -Synchronise the vehicle key =>page 36. vehicle. control key. -Buttons were pressed outside -Lock or unlock the vehicle manually
the range. 413.
Cold engine. brake assist sys-Refer to the index under entries for Unusual noises. tems, supplementary heating "Noises". system.
Assist systems are active. Refer to the index under entries for "As-sist systems". Unusual handling. DSG® dual clutch gearbox is too Stop the vehicle immediately hot. 266.
Front seats cannot be ad-Vehicle battery is discharged. Recharge vehicle battery 362.
justed electrically. Fuse blown. Check fuse and replace as necessary 429.
The vehicle has no vehicle No direct solutions possible as it depends
jack, spare wheel or break-Equipment depends on type of on the equipment level. Contact a Volks-vehicle. wagen Commercial Vehicles dealership if down set. necessary 416.
-Windows or sliding roof are open. The interior monitoring sys--Item attached to the interior Remove any objects that could trigger a tem triggers a false alarm. mirror is moving. false alarm 44. -A mobile telephone is vibrating inside the vehicle.
Functions are not working Settings have been made in the Check and if necessary reset back to fac-as described in the owner's manual. Volkswagen information system. tory settings 24.
410 I If and when
Page 413 of 486

First aid kit, warning triangle, high-visibility waistcoat and fire
extinguisher
l"'""'('n First read and observe the introductory L.-J,::,JI Information and safety warnings & on page 411.
High-visibility waistcoat
In some vehicles there is a stowage compartment for a high-visibility waistcoat in the driver door 9.
Warning triangle
The warning triangle must comply with legal re-quirements.
First aid kit
The first aid kit must comply with legal require-ments. Comply with the expiry dates of the con-tents.
In some vehicles, there is a bag containing the warning triangle and first aid kit next to the vehicle toolkit.
To remove the bag, pull it inwards by the long end at the front while turning it downwards slightly.
Manual opening and closing
COl Introduction
This chapter contains information on the following subjects:
Unlocking the driver door manually . . . . . . . . . 414 Unlocking the tailgate manually ............ 414
Closing the sliding/tilting roof manually . . . . . 415
Unlocking the selector lever lock manually . . . 415
Should the radio signal of the remote control key or the central locking system fails, the doors, tailgate and sliding/tilting roof can be locked and, with some exceptions, unlocked manually.
Additional information and warnings:
• Vehicle key set 36
• Central locking system 39
• Doors 45
• Tailgate 49
• Sliding/tilting roof 58
• Closing the electric pop-up roof manually, Cali-fornia 192
In vehicles with a kitchenette, the first aid kit is lo-cated on the rear panel of the left stowage com-partment in the kitchen unit.
Fire extinguisher
Before using the fire extinguisher, make sure you are familiar with its operation. If an operating man-ual is supplied with the fire extinguisher, place it in the vehicle wallet.
The fire extinguisher must comply with the valid legal requirements. lt must be fully functional and checked regularly. See the test certificate on the fire extinguisher.
A WARNING
In the event of a sudden driving or braking manoeuvre or accident, loose objects could be flung though the vehicle and cause severe Injuries.
• Always secure the fire extinguisher, high-visibility waistcoat, first aid kit and warning triangle safely In the holders.
• In an emergency 411
A WARNING
Careless manual opening and closing can cause serious Injury.
• If the vehicle Is locked from the outside, the doors and windows cannot be opened from the inside.
• Never leave children or people requiring assistance alone In the vehicle. They could become trapped In the vehicle In an emergen-cy and may not be able to get themselves to safety.
• Temperatures Inside a locked vehicle may reach extremes of heat or cold, according to season. This can cause serious Injuries and Illness or fatalities, especially to small chil-dren. .,.
Practical tips 413
Page 443 of 486
Changing the side turn signal bulbs
BSG-0013
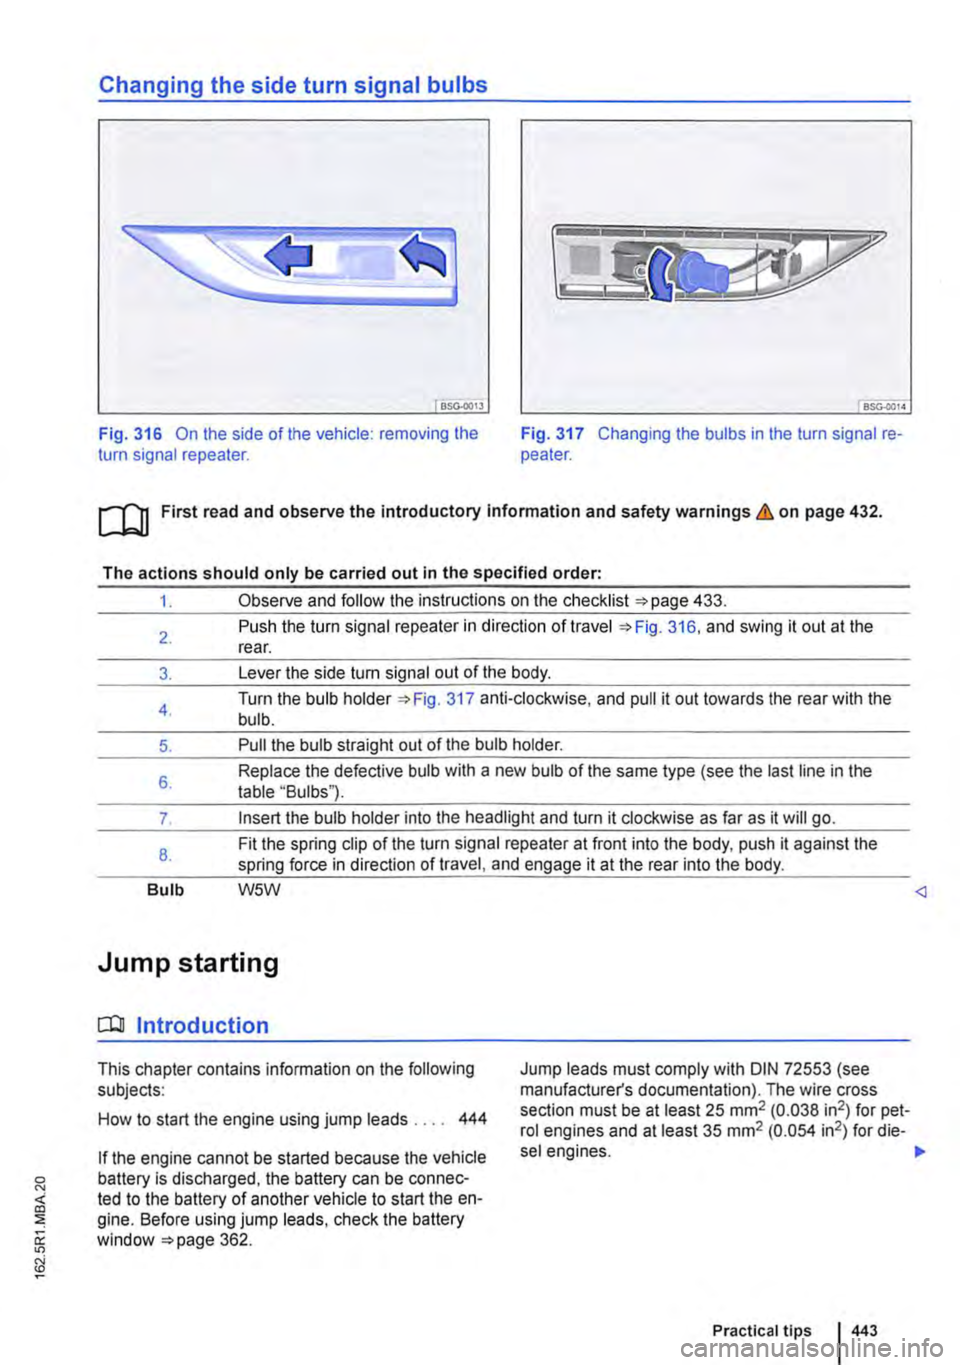
Fig. 316 On the side of the vehicle: removing the turn signal repeater. Fig. 317 Changing the bulbs in the turn signal re-peater.
ro First read and observe the introductory Information and safety warnings & on page 432.
The actions should only be carried out in the specified order:
1. Observe and follow the instructions on the checklist 433.
2.
3.
4.
5.
6.
7.
8.
Bulb
Push the turn signal repeater in direction of travel 316, and swing it out at the rear.
Lever the side turn signal out of the body.
Turn the bulb holder 317 anti-clockwise, and pull it out towards the rear with the bulb.
Pull the bulb straight out of the bulb holder.
Replace the defective bulb with a new bulb of the same type (see the last line in the table "Bulbs").
Insert the bulb holder into the headlight and turn it clockwise as far as it will go.
Fit the spring clip of the turn signal repeater at front into the body, push it against the spring force in direction of travel, and engage it at the rear into the body.
W5W
Jump starting
CQJ Introduction
This chapter contains information on the following subjects:
How to start the engine using jump leads . . . . 444
Jump leads must comply with DIN 72553 (see manufacturer's documentation). The wire cross section must be at least 25 mm2 (0.038 in2) for pet-rol engines and at least 35 mm2 (0.054 in2) for die-
sel engines. ,..
Practical tips 443
Page 445 of 486
r'l11 First read and observe the Introductory L-J,:.,U Information and safety warnings & on page 443.
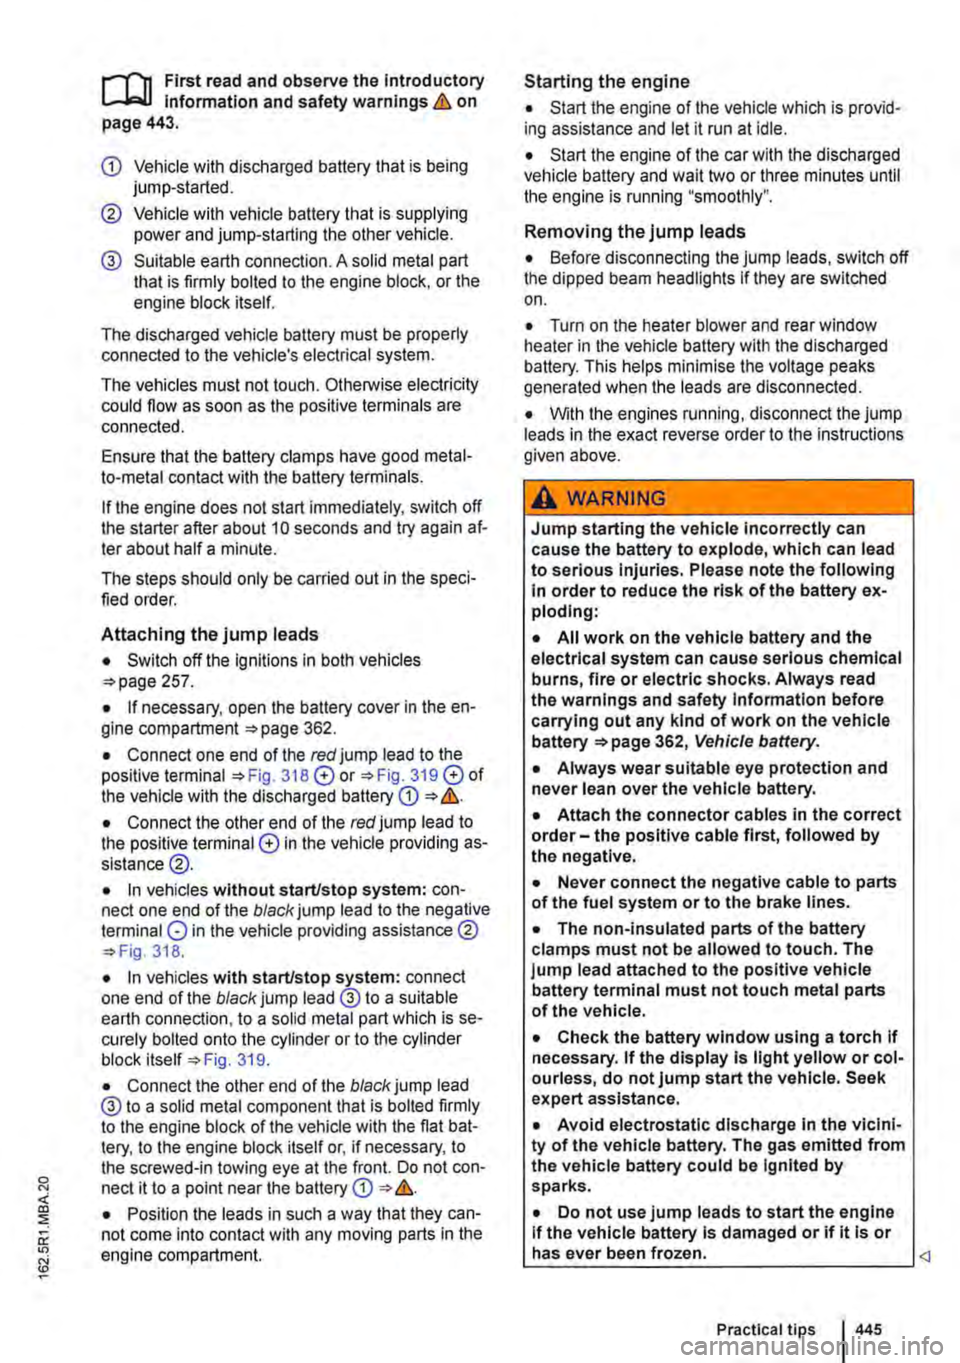
CD Vehicle with discharged battery that is being jump-started.
@ Vehicle with vehicle battery that is supplying power and jump-starting the other vehicle.
@ Suitable earth connection. A solid metal part that is firmly bolted to the engine block, or the engine block itself.
The discharged vehicle battery must be properly connected to the vehicle's electrical system.
The vehicles must not touch. Otherwise electricity could flow as soon as the positive terminals are connected.
Ensure that the battery clamps have good metal-to-metal contact with the battery terminals.
If the engine does not start immediately, switch off the starter after about 10 seconds and try again af-ter about half a minute.
The steps should only be carried out in the speci-fied order.
Attaching the jump leads
• Switch off the ignitions In both vehicles 257.
• If necessary, open the battery cover in the en-gine compartment 362.
• Connect one end of the red jump lead to the positive terminal 318 E) or 319 E) of the vehicle with the discharged battery CD &.
• Connect the other end of the red jump lead to the positive terminal E) In the vehicle providing as-sistance@.
• In vehicles without start/stop system: con-nect one end of the black jump lead to the negative terminal 0 in the vehicle providing assistance @ 318.
• In vehicles with start/stop system: connect one end of the black jump lead @to a suitable earth connection, to a solid metal part which is se-curely bolted onto the cylinder or to the cylinder block itself =:-Fig. 319.
• Connect the other end of the black jump lead @ to a solid metal component that is bolted firmly to the engine block of the vehicle with the flat bat-tery, to the engine block itself or, if necessary, to the screwed-in towing eye at the front. Do not con-nect it to a point near the battery CD &.
• Position the leads in such a way that they can-not come into contact with any moving parts in the engine compartment.
Starting the engine
• Start the engine of the vehicle which is provid-ing assistance and let it run at idle.
• Start the engine of the car with the discharged vehicle battery and wait two or three minutes until the engine is running "smoothly".
Removing the jump leads
• Before disconnecting the jump leads, switch off the dipped beam headlights If they are switched on.
• Turn on the heater blower and rear window heater in the vehicle battery with the discharged battery. This helps minimise the voltage peaks generated when the leads are disconnected.
• With the engines running, disconnect the jump leads in the exact reverse order to the instructions given above.
A WARNING
Jump starting the vehicle Incorrectly can cause the battery to explode, which can lead to serious injuries. Please note the following In order to reduce the risk of the battery ex-ploding:
• All work on the vehicle battery and the electrical system can cause serious chemical burns, fire or electric shocks. Always read the warnings and safety Information before carrying out any kind of work on the vehicle battery 362, Vehicle battery.
• Always wear suitable eye protection and never lean over the vehicle battery.
• Attach the connector cables In the correct order-the positive cable first, followed by the negative.
• Never connect the negative cable to parts of the fuel system or to the brake lines.
• The non-insulated parts of the battery clamps must not be allowed to touch. The jump lead attached to the positive vehicle battery terminal must not touch metal parts of the vehicle.
• Check the battery window using a torch If necessary. If the display Is light yellow or col-ourless, do not jump start the vehicle. Seek expert assistance.
• Avoid electrostatic discharge In the vicini-ty of the vehicle battery. The gas emitted from the vehicle battery could be Ignited by sparks.
• Do not use jump leads to start the engine If the vehicle battery Is damaged or if it is or has ever been frozen.