Page 65 of 138
 -------
1
2
3
Fron t seats occupied and luggage
compa rtment
empty.")
Downloaded from www.Manualslib.com manuals search engine To adjust, turn the control CD to:
-Set~ng I Vehicle load lev~la) -------
1
2
3
Fron t seats occupied and luggage
compa rtment
empty.
All seats occupied and luggage com
partment empty.
All sea ts occ upi ed and luggage com
partm ent fully loaded . Towing a trai le r
wit h a
lo w drawbar load .
Only the driver sea t occupi ed and lug
ga ge compartm ent fully load ed . Tow
ing a trai le r w ith maximum drawbar
l
oad.
a) If you have diff ere nt loads. you can select a positi on be
tween th e settings.
Dynamic headlight range control
Th ere is no control CD for headlight range if the ve
hicle
has dynamic headli ght control. The head light
r ange is
automatically adapted to suit the ve hicle
load level as soon as the headli ghts are switched
on~&.
Instrument and switch lighting
The brightness of the in strument and switch li gh t
ing can be adjusted using the @ill button and the
~and !Ltght] function buttons in the infot ainm ent
system
~page 31 .
Depending on the vehicle equipment level, it may
be possible to adjust the brightness of the instru
ment and switch lighting to suit your requirements
by turning control® when the headlights are
switched on.
Interior and reading lights
Instrument cluster lighting
The instrumen t cl uste r ligh ting sw it c hes off auto
mati cally
in darkness and at other times, e.g . when
driving through a tunnel. This is in tended to prompt
the driver to switch on the dipped beam so that the
v e hi cle' s rea r l
ights are swit c hed on ~page 109.
.A WARNING
-
Heavy objects in the vehicle can cause the
headlights to dazzle and distract other road
users. This can lead to accidents and serious
injuries.
• The light cone should always be adjusted
to the load level of the vehicle to ensure that
other road users are not dazzled.
A WARNING
A failure or malfunction in the dynamic head
light range control can cause the headlights
to dazzle or distract other road users. This
can lead to accidents and serious injuries.
• Proceed to a qualified workshop to have
the headlight range control checked immedi
I
ately. ~--------------- --------------------~
ClJ] First read and observe the introductory information and safety warnings & on page 105.
Button
~REAR
Function
Switches the front interior lights on or off.
Switches the rear interior lights on or off.
Switches the door contact switch on or off.
The interior lights are switche d on automatically when the vehicle is unlocked , a door
is opened, or the ve hicle key is removed from the ignition lock.
The light will go out a few seconds after all doors are closed, the vehicle is locked, or
the ignition is switched on.
/q'j/
---------j Switches the reading lights on or off.
Lights and vision 113
I
Page 66 of 138
Downloaded from www.Manualslib.com manuals search engine e ts a d
=-_...._ -- -·· l C --'-• Cl- GJ
-.',t-e-::-e _ CE ~, ·qec ea::"'i;-:s c:s S'!11'~ ed
. :co:r _ 'i _ n:: '; ·r; · c-;::: t:e eo . ::a e 'e-
.-~ r ::-e xcr-3 =-:r c= ,s _
L_
e f or. e lf m ay also be ill um in ated .
e b ·g tness of th e ambient li ght in g can be ad
j s :ed s i g th e @) button a nd th e ~and (L'9"Y
=on b ons in th e infot ainment sys tem
::!>page 3 .
rn
Th e rea ding lig ht s switch off wh en the vehicle '
is locked or a fter a dela y of a fe w minutes
w en e ve hicl e key is removed from the ig nition
rock. This prevents th e ba ttery from disc harging. (
Page 67 of 138

Downloaded from www.Manualslib.com manuals search engine ..,
Windscr n wiper and washer
illlr t,lt 1pl11t t;OIII tlt H il.f orrn tllon nn ll tfl followln~J
\Id !jOt .I :
l t
Hih;r tl n t ltntp ... o o •• ,,,.,,, 0,,., 0
0,,... 117
Wll t(h <:r,
W lt H in <;t l n n wlpnr ftm c; tlo n, .... , , ......... 119
fltVI<;Il ponltlon fm l!H l front wind · ,ro n
wl1 )()I~ I I I I I I f I I I f f I I I I I I I f t o 1 1 1 1 1 1 1 o 1 o o 119
Hnln 1 lltuo r ... , , • , •. , .... , • . • . . . • . . . . . . 120
Cl10c:klng ntKJ r()fllll nn lllc wlnd scroc n wa her
fllt ld lo vo l ........ , .... , ................ 12 1
Additio na l Information and w arnings:
• xto rlor vlo w ~~ p:-~ge 6
• Chnnoino o or ~ pnf:Jo 1 9
• Hoo ting , v ntil n ting , O()ling ~page 256
• ropr:m1tlon fo r w orkin g In th e e ng in e compart -
m ont -, p ago 2 77
• C l anl ng a nd carin g fo r th e ve hi cle ex te rio r
~ Pi1QO 29 4
A WARNING
Without adequate frost protection, the wash
er fluid c a n freeze on the windscreen and ob
scure your view of the road.
Indicator lamp
A W AR NIN G (Co ntinue d) 7 ~--· -cc . I
·~
• In winte r t emperatures, the windscree n
w as h er yste m s
hould only be used when ad
equate fro, t protection has been adde d .
• N evo r use the windscreen wash er system
a t winter t emperatures b efore the windscreen
has boo n h eate d by the ventilation s y ste m .
T he
anti-free ze mixture may otherwis e freeze
on tho windscree n and restrict vision.
A WARNING
.. · ._,
Worn or dirty windscreen wiper blades re
duce visibility and increas e the ris k of acci
d ents and severe Injuries.
-
• Windscreen wiper blades should therefore
always be changed if they are damaged or
worn and no longer clean the windscreen
properly.
In icy conditions, always check that the wiper
blades are not frozen to the glass before using
the wipers. When parking the vehicle in cold
weather, it may be helpful to leave the front
windscreen wipers in the service position
~page119.
[D First read and observe the introductory information and safety warnings & on page 117 .
Lit up Possible cause
Windscreen washe r fluid le ve l too lo w .
Seve ra l w arn in g and indica to r lamps ~ill lig ht ~ p
brie fly a s a fun cttonal c heck when th e 1gnttto n IS
s wi tched on. The y will sw it c h off afte r a fe w sec-
o nd s.
Solution
F ill up t he washe r fluid r ese rvoi r as soon a s
p oss ible
~page 12 1.
Failure to observe illuminated indicator lamps
and text messages can lead to your vehicle be-
ing damaged.
Lights and vision 111
Page 68 of 138

Downloaded from www.Manualslib.com manuals search engine Windscreen wiper lever
@
c©
c@
C@
~®
B5K ~18
Fig. 87 Operating the rear window wiper
Fig. 86 Operating the front windscreen wiper
[Q] First read and observe the introductory information and safety warnings£ on page 117.
Move the lever into the required position ~CD:
® OFF Switches off the windscreen wiper.
® INT Interval wipe for the windscreen.
© LOW Slow wipe .
@ HIGH Fast wipe.
® 1x Flick wipe - wipes briefly. Push and hold the lever down for longer to wipe more quickly .
®
............. Pulling the lever activates the wash and wipe system for cleaning the windscreen . \V
© [\J
Interval wipe for the rear window. The windscreen wiper will wipe the window approxi-
mately every 6 seconds .
®
............
Pushing the lever activates the wash and wipe system for cleaning the rear window . ~ -
G)
.. ''
Set the interval lengths with the switch (vehicles without rain sensor) or adjust the sensi-
tivity of the rain sensor.
If the ignition is switched off while the wind
screen wiper is switched on, the windscreen
wiper will continue to wipe on the same setting
when the ignition is switched on again. Frost,
snow and other obstructions on the wind
screen can cause damage to the windscreen
wipers and wiper motor.
• Remove any snow and ice from the wipers
before setting off.
• Carefully detach wiper blades that have be
come frozen onto the windscreen. Volkswagen
recommends using a de-icer spray for this.
118 f Before the journey
Do not switch on the windscreen wipers when
the window is dry. Using the wiper blades when
the rear windscreen is dry could cause damage
to the rear windscreen .
r:l The windscreen wipers will only function
lJJ when the ignition is switched on and the bon·
net and tailgate are closed.
r:l The interval wipe for the windscreen depe.nds
l!:J on the speed of the vehicle . The wipers will , ;
· taster. · w1pe more frequently as the vehicle moves
i I
Page 69 of 138

Downloaded from www.Manualslib.com manuals search engine -~
....,
m
.u \ 1n j w v ip r 1 switched on auto
.1t1 ',111 if the front -.. ind creen wipers are
<::' t ' ' r ~ rse gear i eng ged.
m The automatic switch-on function when in. re
W verse gear can be switched on and off us1ng
the@] button and the G and (Mirror and wipers ) func
tion buttons in the infotainment system ~page 31.
Windscreen wiper functions
ro Fi tread and observe the introductory information and safety warnings & on page 117.
iper response in various situat ions:
\.._e t e e d~ sat na•y
Healed a her jet
Headlight
hen sw1tched on , the wipers will temporarily be switched to the
ext setting down.
T e C hmatromc w1ll sw1tch to air recirculation mode for approxits ru -n a e l 30 seconds to prevent the smell of the windscreen wash-
a s t
er utd from entering the vehicle interior.
T e
rper in tervals are adjusted depending on the vehicle
speed. The faster the vehicle is travelling, the shorter the inter
a!
nses on
ward s the steering wheel when the dipped beam
headlights or main beam are switched on. Clean
off stubborn dirt (msects, etc.) from the headl ights
at regular intervals, for instance when filling the
tank .
In winter, you should remove any snow from the
headligh t w as her nozzles in the
bumper to keep
the headligh t washer system in work ing order. Re
move any ice with a de-icer spray.
r:l The w1per will try to wipe away any obstacles
L!J that are on the wind screen . The w 1per will
sop moving 1f the obstacle blocks its path . Re-
mo e the obstacle and swttch the wiper back on
agam
Service position for the front windscreen wipers
F ig . 88
2 -!.
r-T'n ~lr t rea~ and observe the introductory
L-Jr:J.J mformat1on and safety warnings on
page 117 .
Tt>e .vtndscreen Wlper arms can be h fted off the
ndsaeen when 10 the serv1ce pos1t1on ~ Ftg. 88.
Carry out e followtng s eps to move the w rnd
screen w1pers
t o the servtce pos1t1on
• The bonnet must be closed ~page 277.
• Swrtch the 1gntlton on and then off aga
1n
•
B ne y press down the wtndsc reen w1per le er
~F1g. 86 @.
Lights and vision 119
I 3£
Page 70 of 138

Downloaded from www.Manualslib.com manuals search engine Place the windscreen wiper arms back onto the
winds creen before driving away. With the ignition
swit ched on, briefly press the windscreen wiper
lever
down to bring the windscreen wiper arms
ba ck
to the original position.
Lifting the windscreen wiper blades
• Move the wiper arms to the service position be
fore lifting ~CD.
• When lifting a wiper arm hold it only by the wip
er blade mounting .
Rain sensor
1}®
c®
85K ·0419
Fig. 89 Windscreen wiper lever: setting rain sen
sor G)
r-('n First read and observe the introductory
L-J,::JJ information and safety warnings & on
page
117.
When the rain sensor is activated , it automatically
controls the frequency
of the wiper intervals, de
pending on the amount of rain ~ ,&. The sensitivity
of the rain sensor can be adjusted manually. Man
ual
wipe ~page 118 .
The automatic wipe function can be switched on
and off using the
(ill) button and the 0 and
[Mirror and wipers ] function buttons in the infotainment
system
~page 31.
Push the lever to the desired position ~Fig. 89:
® Deactivat es the rain sensor.
@ Rain sensor is active -automatic wipe when
necessary .
G) Adjusting the sensitivity of the rain sensor :
-
Switch to the right -high sensitivity.
-
Switch to the left -low sensitivity .
The rain sensor
will remain active after the ignition
is switched off and back on again and
will function
again
if the windscreen wiper lever is in position @
and if the vehicle is travelling at speeds higher
than 4 km/h
(2 mph).
• In order to prevent damage to the bonnet
and the windscreen
wiper arms, the wind
screen wiper arms should only be lifted when
in the service position.
• Always return the windscreen wiper arms to
the windscreen before starting your journey.
Fig. 90 Sensitive surface of the rain sensor
Changes to the functioning of the rain
sensor
Possible causes for faults and misinterpretations
concerning the sensitive surface~ Fig. 90 of the
rain sensor include:
• Damaged wiper blades: a film of water or
smears caused by damaged wiper blades
can in
crease the length of time for which the wipers are
switched on, shorten the length of the intervals be
tween wipes, or cause the wipers to run continu
ously.
• Insects: insects hitting the surface can cause
the wipers to be activated.
• Salt deposits : in winter, salt deposits can cause
the wiper to continue to wipe the windscreen when
it is almost dry.
• Soiling : dry dust, wax, windscreen coatings (lo·
tus effect) or detergent deposits (automatic car
wash) can cause the rain sensor to become less
sensitive and react too slowly or even not at all.
• Crack
in the windscreen : when the windscree~
is impacted by a stone, a wash cycle is triggered If ....
~he rain sensor is on . The rain sensor will then reg-,. ~
1ster the reduction in sensitivity of the surface and ~
120 I Before the journey _,}
~----~------------------~~
Page 71 of 138

Downloaded from www.Manualslib.com manuals search engine Vehicle·specific weight ratings
r-f11 First r ea d and observe the introductory
L.J,:JJ information and safety warnings & on
paue 126.
ial vehicle document s tak e
prec
data. All data in this manu al ap
man model. T he veh ic le data
ted h
, f
ng ine is inst alled in
may d iffer if add it ional
d ifferent models
or for spe-
a
EC I Gearbox type I
90
% of its capacity and, if applicable , tool kit and
spare tyre
=> &. Addit ional equipment and retrofit
ted accessories increase the stated kerb
weight
and reduce the maximum permitted load accord-
ingly .
The load comprises the weights
of the following :
• Passengers
•
Al l luggage
• Roof load including roof carrier system
• Drawbar load when towing a trailer
Kerb Gross vehi-Gross axle Gross axle
weight cle weight weight rat-weight rat-
rating ing, front ing, rear
JZB I MG5 11 .29~ ~ 1 ,3 1 1 ,720 kg 910 kg I 860 kg
1 ,780 kg 940 kg I 890 kg
H I - -_r.~-I 1 ?P.R -1 Ll. I
1,8 00 kg I 960 kg 890 kg
1,780kg 940 kg 890 kg
I
"', , , 9
I
-ylimJc.:r DSG'0 11,290-1,4 rn ::m:;~~ '.J rn CJ nt 68 ka 1,800 kg 960 kg 890 k g
1 2;; I fr~rcJ tha jr> u rm. y
0 (\1
" 0 ~ ,.. ,...;
~
-<"')
-
Page 72 of 138

Downloaded from www.Manualslib.com manuals search engine . -~~~Q§@~~iC!~;a--................................................................ ~~~~--~--~~~~.a.-.. __ .... ~.c .. ~~~~ ~ .. ~h:;;;;;;..,-~= I n 70 a M= ,..._ ~;e,--~· ... - - -v· --.. iiA.ir ...
...
Stowage compartment on the driver side
Fig. 109 On the driver side: stowage compart
ment
To open, press the button ~Fig. 109 G) dow .
pull the grip in the direction of the arrow. n ana
To close, press the cover upwards until it e ngages
ffi A coin holder may be located on the inside of W the cover.
Stowage compartment in the roof console (glasses compartment)
Fig. 110 In the roof console : stowage compart
ment
r-('n First read and observe the introductory
~ information and safety warnings A on
page 151.
The stowage compartment can be used for storing
glasses or other objects.
To open, press and release the button ~Fig. 110
(arrow).
To close, press the cover upwards until it engages <
Stowage compartment in the front centre console _____.
Fig. 111 In the centre console: stowage compart
ment
1521
-----
B efore the journey
. troductorY
[Q] First read and observe the 1~ 5 & on . f ty warnm9 • information and sa e
page151.
f the stowage To open, briefly press the cover 0
compartment ~Fig. 111 (arrow). ver
artment eo To close, push the stowage comp
down as far as it will go. ·n tne • -y conta1 1 ?
rn
The stowage compartment m a AUX-IN . ( ~ th8 ' t factory -fitted USB socket ' Mr:DIA-IN) , • · ket ( ~ tefl'l· E socket '"'' or the multimedia soc ·g a tion s Y5
, •
~ Booklet Radio or ~Booklet N avt • ~
 1
1 2
2 3
3 4
4 5
5 6
6 7
7 8
8 9
9 10
10 11
11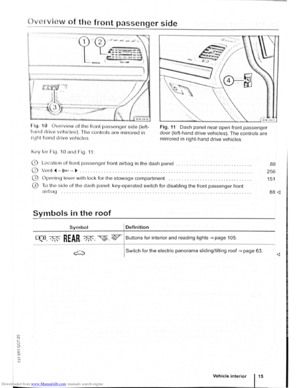 12
12 13
13 14
14 15
15 16
16 17
17 18
18 19
19 20
20 21
21 22
22 23
23 24
24 25
25 26
26 27
27 28
28 29
29 30
30 31
31 32
32 33
33 34
34 35
35 36
36 37
37 38
38 39
39 40
40 41
41 42
42 43
43 44
44 45
45 46
46 47
47 48
48 49
49 50
50 51
51 52
52 53
53 54
54 55
55 56
56 57
57 58
58 59
59 60
60 61
61 62
62 63
63 64
64 65
65 66
66 67
67 68
68 69
69 70
70 71
71 72
72 73
73 74
74 75
75 76
76 77
77 78
78 79
79 80
80 81
81 82
82 83
83 84
84 85
85 86
86 87
87 88
88 89
89 90
90 91
91 92
92 93
93 94
94 95
95 96
96 97
97 98
98 99
99 100
100 101
101 102
102 103
103 104
104 105
105 106
106 107
107 108
108 109
109 110
110 111
111 112
112 113
113 114
114 115
115 116
116 117
117 118
118 119
119 120
120 121
121 122
122 123
123 124
124 125
125 126
126 127
127 128
128 129
129 130
130 131
131 132
132 133
133 134
134 135
135 136
136 137
137