2011 TOYOTA VERSO S battery
[x] Cancel search: batteryPage 187 of 664

187
3 3-1. Instrument cluster
Vehicle status information and indicators
■ (Toyota parking assist-
sensor) (if equipped) (P.414)
Select to set up the following items.
Toyota parking assist-sensor
on/off
Select to enable/disable the Toyota
parking assist-sensor.
“Volume”
Select to set the volume of the buzzer
which sounds when the Toyota parking
assist-sensor is operated.
■RCTA (Rear Crossing Traffic
Alert) (if equipped) (P.393)
RCTA (Rear Crossing Traffic
Alert) on/off
Select to enable/disable the RCTA sys-
tem.
“Volume”
Select to change the RCTA buzzer vol-
ume.
■ PKSB (Parking Support
Brake System) (if equipped)
(P.420)
Select to enable/disable the Park-
ing Support Brake function.
■“HUD Main” (if equipped)
(P.191)
HUD on/off
Select to enable/disable the head-up
display.
“HUD Brightness/Position”
Select to adjust the brightness or verti-
cal position of the head-up display.
“HUD Driving Support”
Select to change the items displayed
on the head-up display.
“HUD Rotation”
Select to adjust the angle of the head-
up display.
■ RSA (Road Sign Assist)
(if equipped) (P.372)
Select to set up the following items.
Road Sign Assist on/off
Select to enable/disable the RSA sys-
tem.
“Notification Method”
Select to change each notification
method used to notify the driver when
the system recognizes excess speed,
no overtaking and no-entry sign.
“Notification Level”
Select to change each notification level
used to notify the driver when the sys-
tem recognizes a speed limit sign.
■DRCC (RSA) (if equipped)
(P.384)
Select to enable/disable the
Dynamic Radar Cruise Control with
Road Sign Assist.
■Vehicle Settings
“Charging Settings”
Select to set up the following items.
• “Charging Schedule”
Select to register or change the
charging schedule. (P.144)
• “Charging Current”
Select to change the charging current.
(P.125)
• “Battery Heater”
Select to enable/disable the battery
heater. (P.128)
• “Battery Cooler”
Page 188 of 664

1883-1. Instrument cluster
Select to enable/disable the battery
cooler. (P.129)
PBD (Power Back Door) (if
equipped) (P.213)
Select to set up the following items.
•System settings
Select to enable/disable the power
back door system.
•“Hands Free”
*
Select to enable/disable the Hands
Free Power Back Door.
• “Opening Adjustment”
Select the open position when power
back door is fully open.
•“Volume”
Select to set the volume of the buzzer
which sounds when the power back
door system operates.
*: Vehicles with Hands Free Power
Back Door
“TPWS” (Tire Pressure Warning
System) (P.511)
• “Setting Pressure”
Select to initialize the tire pressure
warning system.
• “Identifying Each Wheel & Position”
Select to register the ID codes of the
tire pressure sensors to the tire pres-
sure warning system.
•“Setting Unit”
Select to change the units of measure
displayed.
“Rear Seat Reminder” (P.207)
Select to enable/disable the rear seat
reminder.
■ Settings
“Language”
Select to change the language on the
multi-information display.
“Units”
Select to change the units of measure
displayed.
“Meter Type”
Select to change the speedometer dis-
play.
(EV indicator) (P.90)
Select to enable/disable the EV indica-
tor.
(Driving information display
settings)
Select to set up the following items.
•“Hybrid System”
Select to enable/disable the ECO
Accelerator Guidance (P.182).
• “Fuel Economy”
Select to change the display on Fuel
Economy (P.181).
• “Power Consumption”
Select to change the display on Power
Consumption (P.181).
(Audio settings)
Select to enable/disable screen.
(Vehicle information dis-
play settings)
• “Display Contents”
Select to set up the following items.
“Energy monitor”:
Select to enable/disable the Energy
monitor (P.195)
AWD:
Select to enable/disable the AWD sys-
tem display (P.185).
Page 189 of 664
189
3
3-1. Instrument cluster
Vehicle status information and indicators
• “Drive Info Type”
Select to change the drive information
type display between trip and total.
( P.185).
• “Drive Info Items”
Select to set the items on the upper and
lower side of the drive information
screen from three items, average
speed, distance and total time.
“Closing Display”
Select to set the items displayed when
the power switch is turned off.
“Pop-Up Display” (if equipped)
Select to enable/disable the following
pop-up displays, which may appear in
some situations.
• Intersection guidance display of the
navigation system-linked system (if
equipped)
• Incoming call display of the hands-
free phone system (if equipped)
• Audio operation
• Volume operation
• Voice control (if equipped)
“Calender”
Select to set up the calender.
This can only be set if GPS calibration
of clock is turned off in the multimedia
system settings.
“MID OFF”
A blank screen is displayed
“Default Settings”
Select to reset the meter display set-
tings.
■Suspension of the settings display
●In the following situations, operation of the settings display will be temporarily suspended.
• When a warning message appears on
the multi-information display
• When the vehicle begins to move
●Settings for functions not equipped to
the vehicle are not displayed.
●When a function is turned off, the
related settings for that function are not selectable.
Select to display warning mes-
sages and measures to be taken if
a malfunction is detected.
( P.578)
Displays suggestions to the driver
in the following situations. To select
a response to a displayed sugges-
tion, use the meter control
switches.
WARNING
■Cautions during setting up the
display
As the hybrid system needs to be operating during setting up the dis-
play, ensure that the vehicle is parked in a place with adequate ventilation. In a closed area such as a garage,
exhaust gases including harmful car- bon monoxide (CO) may collect and enter the vehicle. This may lead to
death or a serious health hazard.
NOTICE
■During setting up the display
To prevent 12-volt battery discharge, ensure that the hybrid system is oper-
ating while setting up the display fea- tures.
Warning message display
Suggestion function
Page 193 of 664
193
3
3-1. Instrument cluster
Vehicle status information and indicators
• Driving support system information
display
• Compass (if equipped)
• Audio system operation status
Display angle
Select to adjust the angle of the head-
up display.
■Enabling/disabling of the head-up display
If the head-up display is disabled, it will remain disabled when the power switch is turned off then back to ON.
■Display brightness
The brightness of the head-up display
can be adjusted on screen of the
multi-information display. Also, it is auto-
matically adjusted according to the ambient brightness.
■Driving support system infor-
mation display
Displays the operational status of
the following systems:
LTA (Lane Tracing Assist) (if
equipped) ( P.362)
Dynamic radar cruise control
with full-speed range (if
equipped) ( P.376)
Displayed content is the same as that
displayed on the multi-information dis-
play. For details, refer to the explana-
tions of each system.
■Navigation system-linked dis-
play area (if equipped)
Displays the following items which
are linked to the navigation system:
Street name
Route guidance to destination
Compass
Pop-up displays for the following
systems will be displayed when
necessary:
■Driving support systems
Displays a warning/sugges-
tion/advice message or the operat-
ing state of a relevant system.
PCS (Pre-Collision System) (if
equipped) ( P.355)
WARNING
■Caution for changing settings of the head-up display
If the hybrid system is operating when
changing the display settings, ensure that the vehicle is parked in a place with adequate ventilation. In a closed
area such as a garage, exhaust gases including harmful carbon mon-oxide (CO) may collect and enter the
vehicle. This may lead to death or a serious health hazard.
NOTICE
■When changing the settings of the head-up display
To prevent 12-volt battery discharge,
ensure that the hybrid system is oper- ating while changing the settings of the head-up display.
Driving support system
information/navigation sys-
tem-linked display area (if
equipped)
Pop-up display
Page 196 of 664
1963-1. Instrument cluster
and select , and then press
or to select the energy mon-
itor display.
Audio system screen (without
navigation function)
1Press the “MENU” button.
2Select “Info” on the “Menu”
screen.
If a screen other than “Energy monitor”
is displayed, select “Energy”.
Audio system screen (with navi-
gation function)
1Press the “MENU” button.
2Select “Info” on the “Menu”
screen.
3Select “ECO” on the “Informa-
tion” screen.
If a screen other than “Energy monitor”
is displayed, select “Energy”.
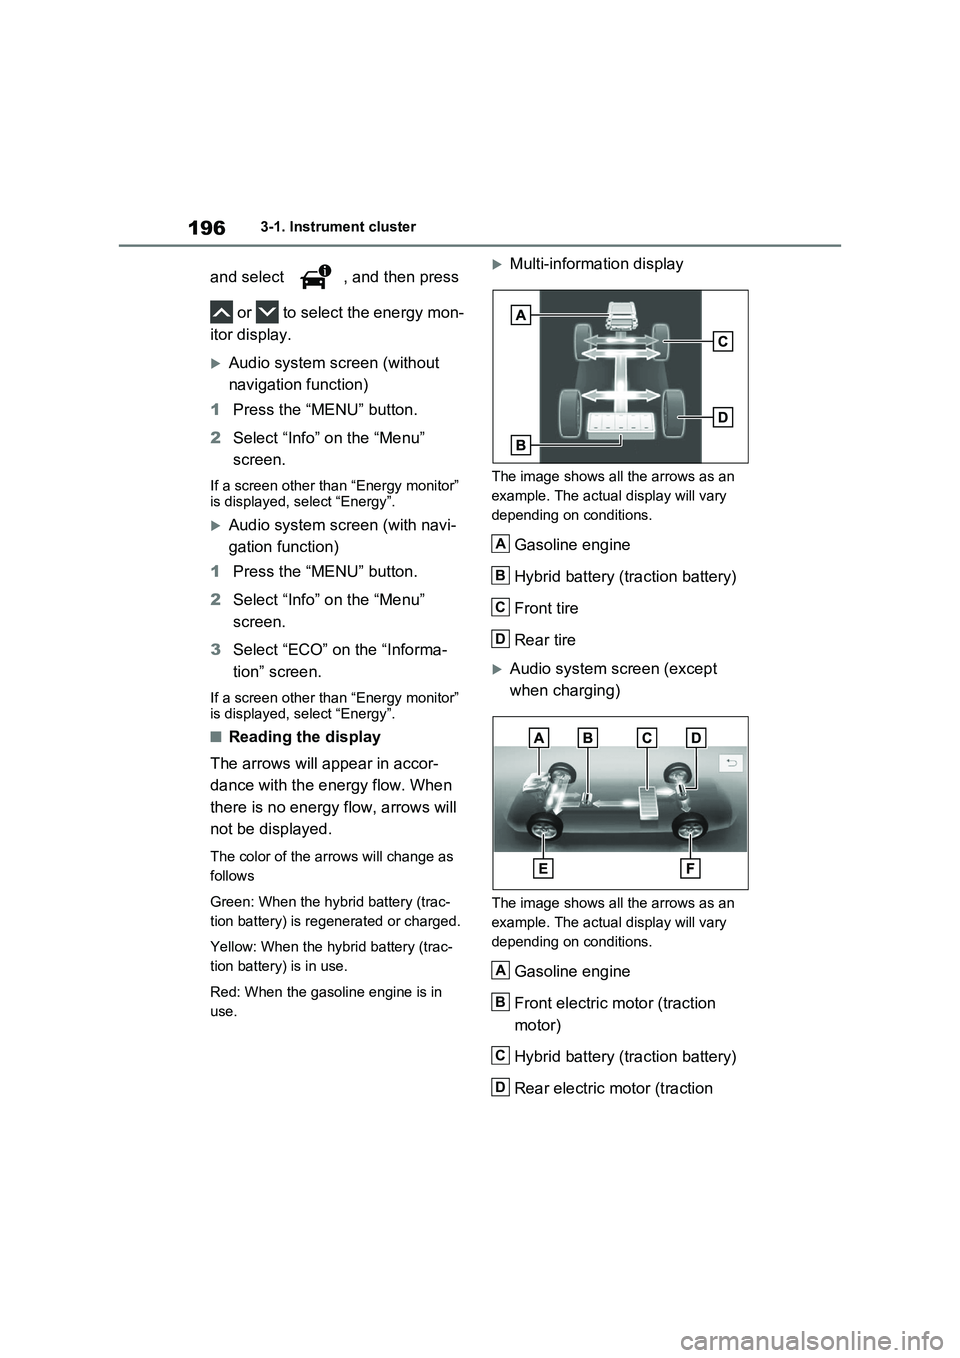
■Reading the display
The arrows will appear in accor-
dance with the energy flow. When
there is no energy flow, arrows will
not be displayed.
The color of the arrows will change as
follows
Green: When the hybrid battery (trac-
tion battery) is regenerated or charged.
Yellow: When the hybrid battery (trac-
tion battery) is in use.
Red: When the gasoline engine is in
use.
Multi-information display
The image shows all the arrows as an
example. The actual display will vary
depending on conditions.
Gasoline engine
Hybrid battery (traction battery)
Front tire
Rear tire
Audio system screen (except
when charging)
The image shows all the arrows as an
example. The actual display will vary
depending on conditions.
Gasoline engine
Front electric motor (traction
motor)
Hybrid battery (traction battery)
Rear electric motor (traction
A
B
C
D
A
B
C
D
Page 197 of 664
197
3 3-1. Instrument cluster
Vehicle status information and indicators
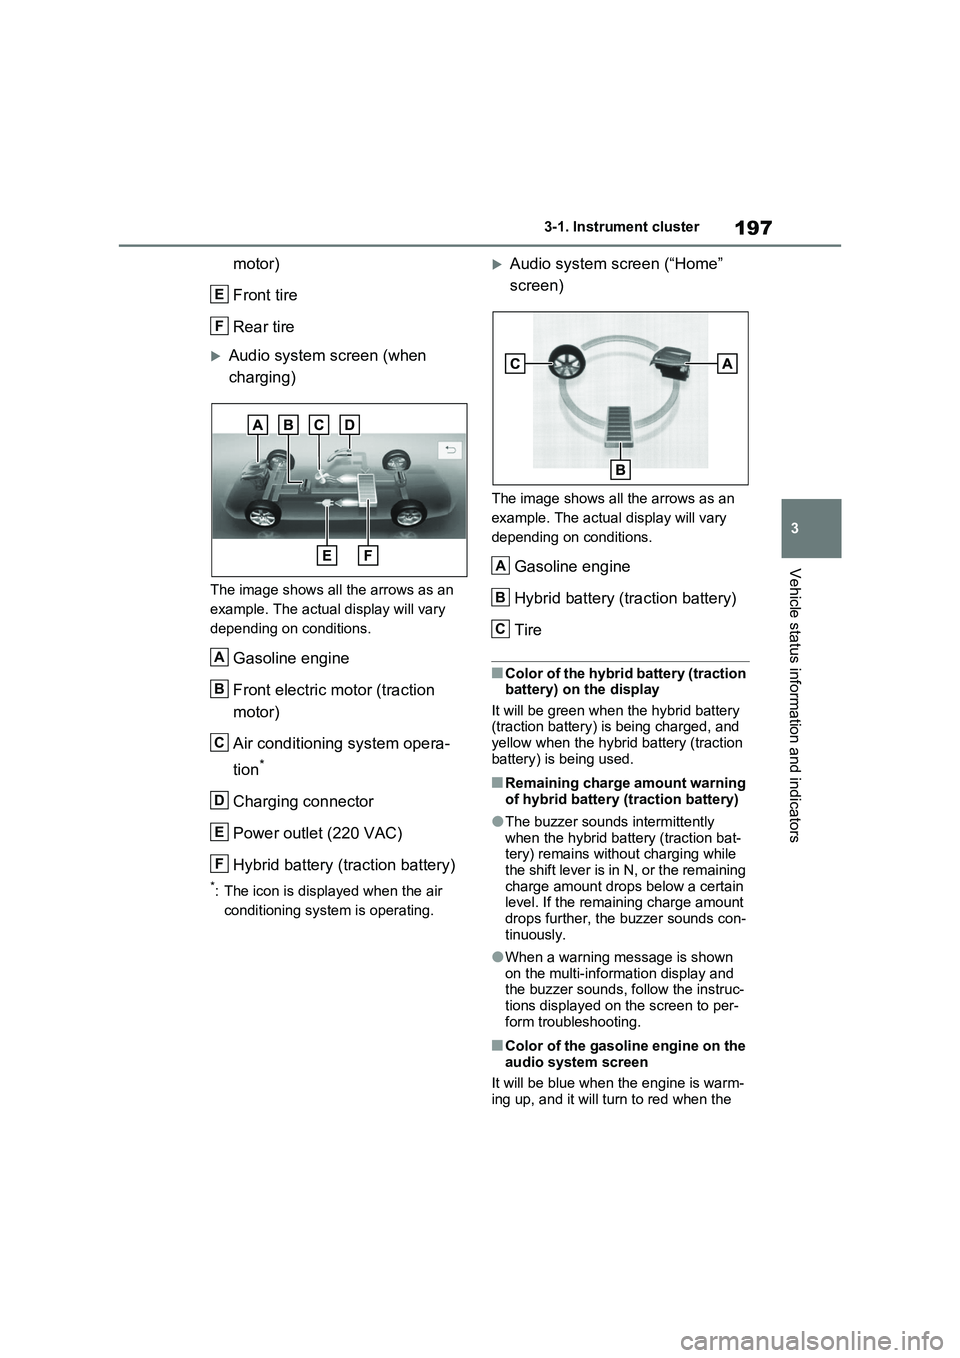
motor)
Front tire
Rear tire
Audio system screen (when
charging)
The image shows all the arrows as an
example. The actual display will vary
depending on conditions.
Gasoline engine
Front electric motor (traction
motor)
Air conditioning system opera-
tion
*
Charging connector
Power outlet (220 VAC)
Hybrid battery (traction battery)
*: The icon is displayed when the air
conditioning system is operating.
Audio system screen (“Home”
screen)
The image shows all the arrows as an
example. The actual display will vary
depending on conditions.
Gasoline engine
Hybrid battery (traction battery)
Tire
■Color of the hybrid battery (traction
battery) on the display
It will be green when the hybrid battery
(traction battery) is being charged, and
yellow when the hybrid battery (traction
battery) is being used.
■Remaining charge amount warning
of hybrid battery (traction battery)
●The buzzer sounds intermittently
when the hybrid battery (traction bat-
tery) remains without charging while
the shift lever is in N, or the remaining
charge amount drops below a certain
level. If the remaining charge amount
drops further, the buzzer sounds con-
tinuously.
●When a warning message is shown
on the multi-information display and
the buzzer sounds, follow the instruc-
tions displayed on the screen to per-
form troubleshooting.
■Color of the gasoline engine on the
audio system screen
It will be blue when the engine is warm-
ing up, and it will turn to red when the
E
F
A
B
C
D
E
F
A
B
C
Page 202 of 664
2024-1. Key information
4-1.Key info rmation
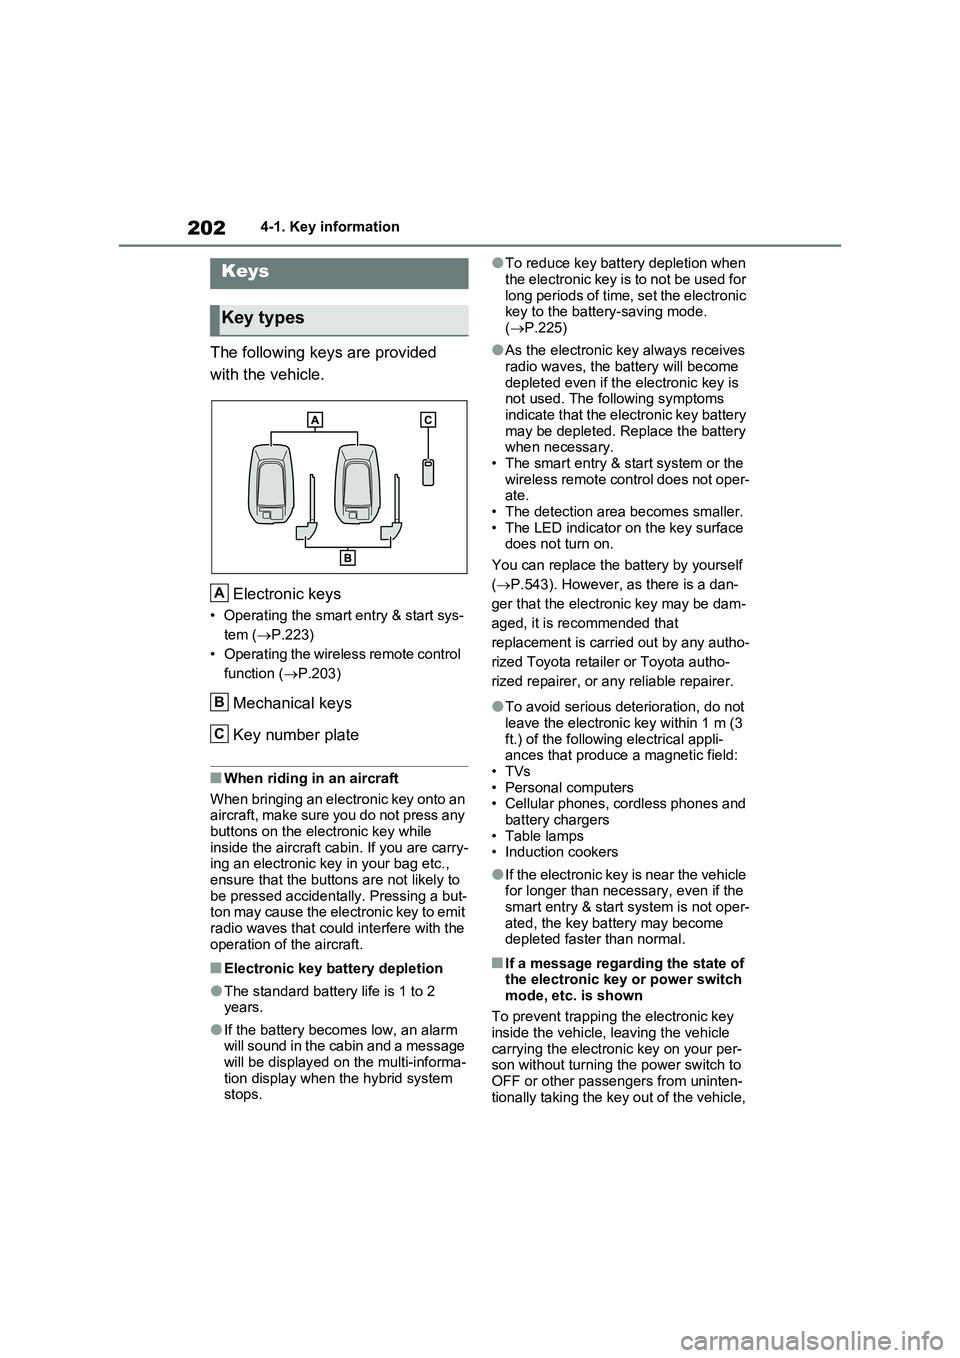
The following keys are provided
with the vehicle.
Electronic keys
• Operating the smart entry & start sys-
tem ( P.223)
• Operating the wireless remote control
function ( P.203)
Mechanical keys
Key number plate
■When riding in an aircraft
When bringing an electronic key onto an aircraft, make sure you do not press any
buttons on the electronic key while inside the aircraft cabin. If you are carry-ing an electronic key in your bag etc.,
ensure that the buttons are not likely to be pressed accidentally. Pressing a but-ton may cause the electronic key to emit
radio waves that could interfere with the operation of the aircraft.
■Electronic key battery depletion
●The standard battery life is 1 to 2 years.
●If the battery becomes low, an alarm will sound in the cabin and a message will be displayed on the multi-informa-
tion display when the hybrid system stops.
●To reduce key battery depletion when
the electronic key is to not be used for long periods of time, set the electronic key to the battery-saving mode.
( P.225)
●As the electronic key always receives
radio waves, the battery will become depleted even if the electronic key is not used. The following symptoms
indicate that the electronic key battery may be depleted. Replace the battery when necessary.
• The smart entry & start system or the wireless remote control does not oper-ate.
• The detection area becomes smaller. • The LED indicator on the key surface does not turn on.
You can replace the battery by yourself
( P.543). However, as there is a dan-
ger that the electronic key may be dam-
aged, it is recommended that
replacement is carried out by any autho-
rized Toyota retailer or Toyota autho-
rized repairer, or any reliable repairer.
●To avoid serious deterioration, do not leave the electronic key within 1 m (3
ft.) of the following electrical appli- ances that produce a magnetic field:•TVs
• Personal computers • Cellular phones, cordless phones and battery chargers
•Table lamps • Induction cookers
●If the electronic key is near the vehicle for longer than necessary, even if the smart entry & start system is not oper-
ated, the key battery may become depleted faster than normal.
■If a message regarding the state of the electronic key or power switch
mode, etc. is shown
To prevent trapping the electronic key inside the vehicle, leaving the vehicle
carrying the electronic key on your per- son without turning the power switch to OFF or other passengers from uninten-
tionally taking the key out of the vehicle,
Keys
Key types
A
B
C
Page 203 of 664
203
4
4-1. Key information
Before driving
etc., a message that prompts the user to
confirm the state of the electronic key or power switch mode may be shown on the multi-information display. In those
cases, follow the instructions on the dis- play immediately.
■If “Key Battery Low Replace Key Battery” is displayed on the multi-
information display
The electronic key has a low battery. Replace the electronic key battery.
( P.543)
■Replacing the battery
P.543
■Confirmation of the registered key number
The number of keys already registered to the vehicle can be confirmed. Ask any authorized Toyota retailer or Toyota
authorized repairer, or any reliable repairer for details.
■If “A New Key has been Registered Contact Your Dealer for Details” is
displayed on the multi-information display
This message will be displayed each
time the driver’s door is opened when the doors are unlocked from the outside for approximately 10 days after a new
electronic key has been registered. If this message is displayed but you have not had a new electronic key regis-
tered, ask any authorized Toyota retailer or Toyota authorized repairer, or any reliable repairer to check if an unknown
electronic key (other than those in your possession) has been registered.
The electronic keys are equipped
with the following wireless remote
control:
NOTICE
■To prevent key damage
●Do not drop the keys, subject them to strong shocks or bend them.
●Do not expose the keys to high temperatures for long periods of time.
●Do not get the keys wet or wash them in an ultrasonic washer, etc.
●Do not attach metallic or magnetic materials to the keys or place the keys close to such materials.
●Do not disassemble the keys.
●Do not attach a sticker or anything else to the surface of the electronic key.
●Do not place the keys near objects that produce magnetic fields, such
as TVs, audio systems and induc- tion cookers.
●Do not place the keys near medical electrical equipment such as low-frequency therapy equipment or
microwave therapy equipment, and do not receive medical attention with the keys on your person.
■Carrying the electronic key on your person
Carry the electronic key 10 cm (3.9 in.) or more away from electric appli-ances that are turned on. Radio
waves emitted from electric appli- ances within 10 cm (3.9 in.) of the electronic key may interfere with the
key, causing the key to not function properly.
■In case of a smart entry & start system malfunction or other key-related problems
P.604
■When an electronic key is lost
P.603
Wireless remote control