2011 TOYOTA VERSO S tires
[x] Cancel search: tiresPage 596 of 664
5968-2. Steps to take in an emergency
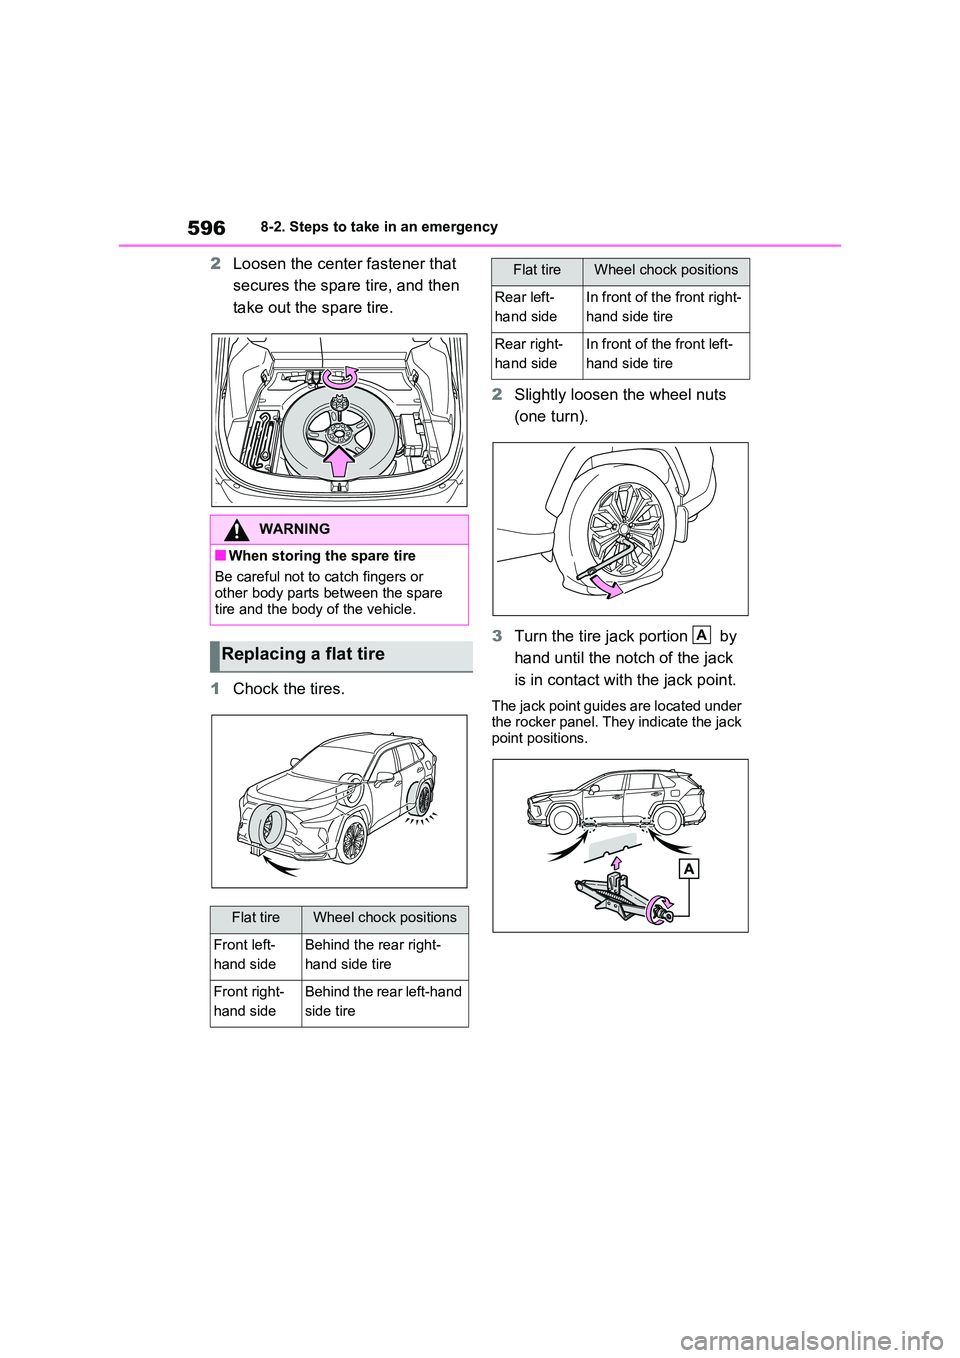
2Loosen the center fastener that
secures the spare tire, and then
take out the spare tire.
1 Chock the tires.
2 Slightly loosen the wheel nuts
(one turn).
3 Turn the tire jack portion by
hand until the notch of the jack
is in contact with the jack point.
The jack point guides are located under the rocker panel. They indicate the jack
point positions.
WARNING
■When storing the spare tire
Be careful not to catch fingers or
other body parts between the spare tire and the body of the vehicle.
Replacing a flat tire
Flat tireWheel chock positions
Front left-
hand side
Behind the rear right-
hand side tire
Front right-
hand side
Behind the rear left-hand
side tire
Rear left-
hand side
In front of the front right-
hand side tire
Rear right-
hand side
In front of the front left-
hand side tire
Flat tireWheel chock positions
A
Page 597 of 664
597
8
8-2. Steps to take in an emergency
When trouble arises
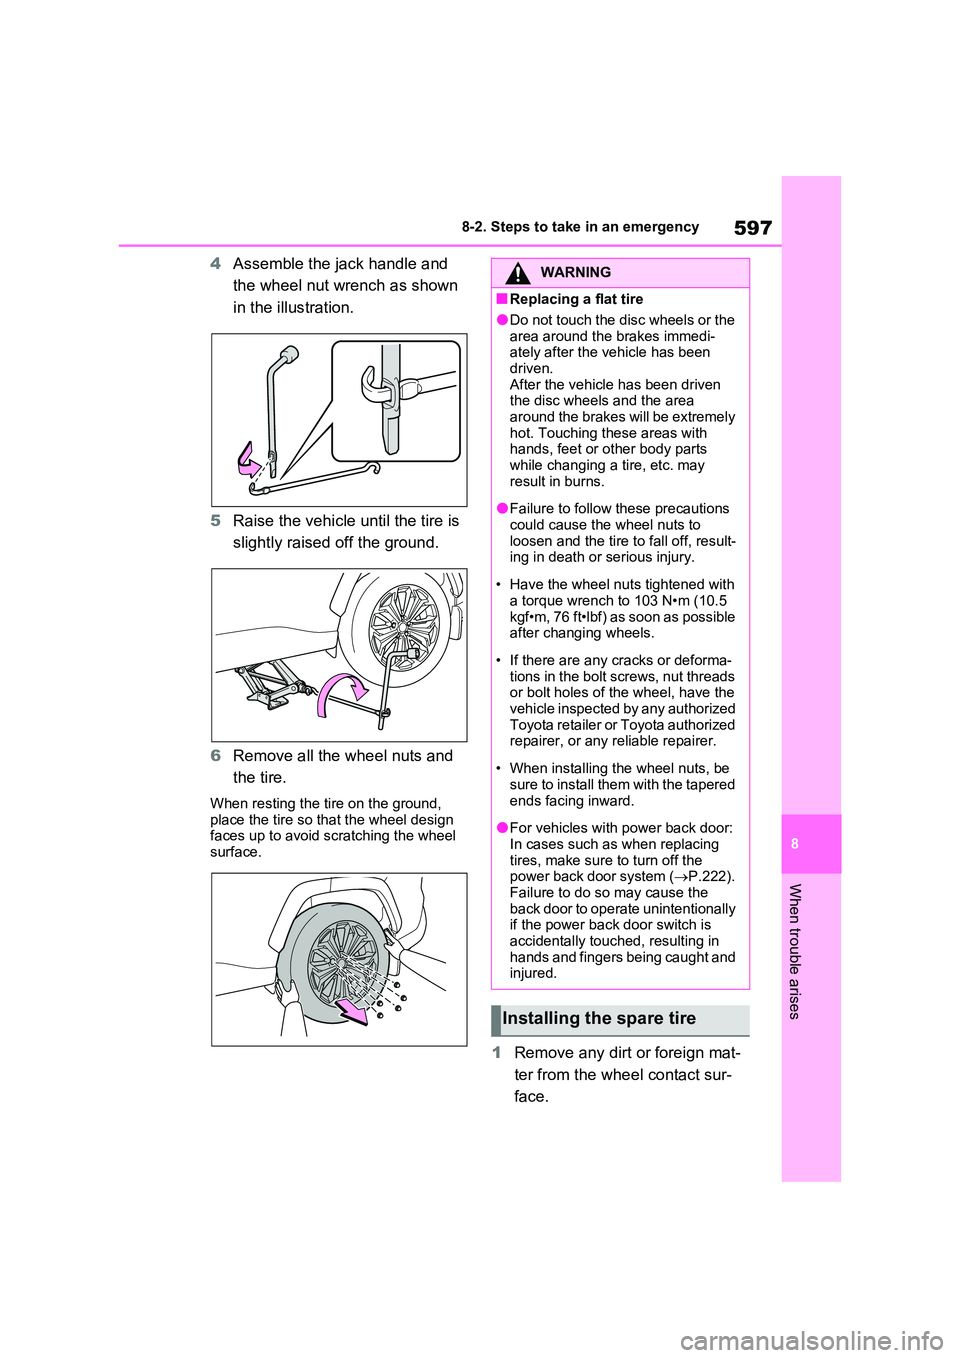
4 Assemble the jack handle and
the wheel nut wrench as shown
in the illustration.
5 Raise the vehicle until the tire is
slightly raised off the ground.
6 Remove all the wheel nuts and
the tire.
When resting the tire on the ground,
place the tire so that the wheel design faces up to avoid scratching the wheel surface.
1 Remove any dirt or foreign mat-
ter from the wheel contact sur-
face.
WARNING
■Replacing a flat tire
●Do not touch the disc wheels or the
area around the brakes immedi- ately after the vehicle has been driven.
After the vehicle has been driven the disc wheels and the area around the brakes will be extremely
hot. Touching these areas with hands, feet or other body parts while changing a tire, etc. may
result in burns.
●Failure to follow these precautions
could cause the wheel nuts to loosen and the tire to fall off, result-ing in death or serious injury.
• Have the wheel nuts tightened with a torque wrench to 103 N•m (10.5
kgf•m, 76 ft•lbf) as soon as possible after changing wheels.
• If there are any cracks or deforma- tions in the bolt screws, nut threads or bolt holes of the wheel, have the
vehicle inspected by any authorized Toyota retailer or Toyota authorized repairer, or any reliable repairer.
• When installing the wheel nuts, be sure to install them with the tapered
ends facing inward.
●For vehicles with power back door:
In cases such as when replacing tires, make sure to turn off the power back door system ( P.222).
Failure to do so may cause the back door to operate unintentionally if the power back door switch is
accidentally touched, resulting in hands and fingers being caught and injured.
Installing the spare tire
Page 598 of 664
5988-2. Steps to take in an emergency
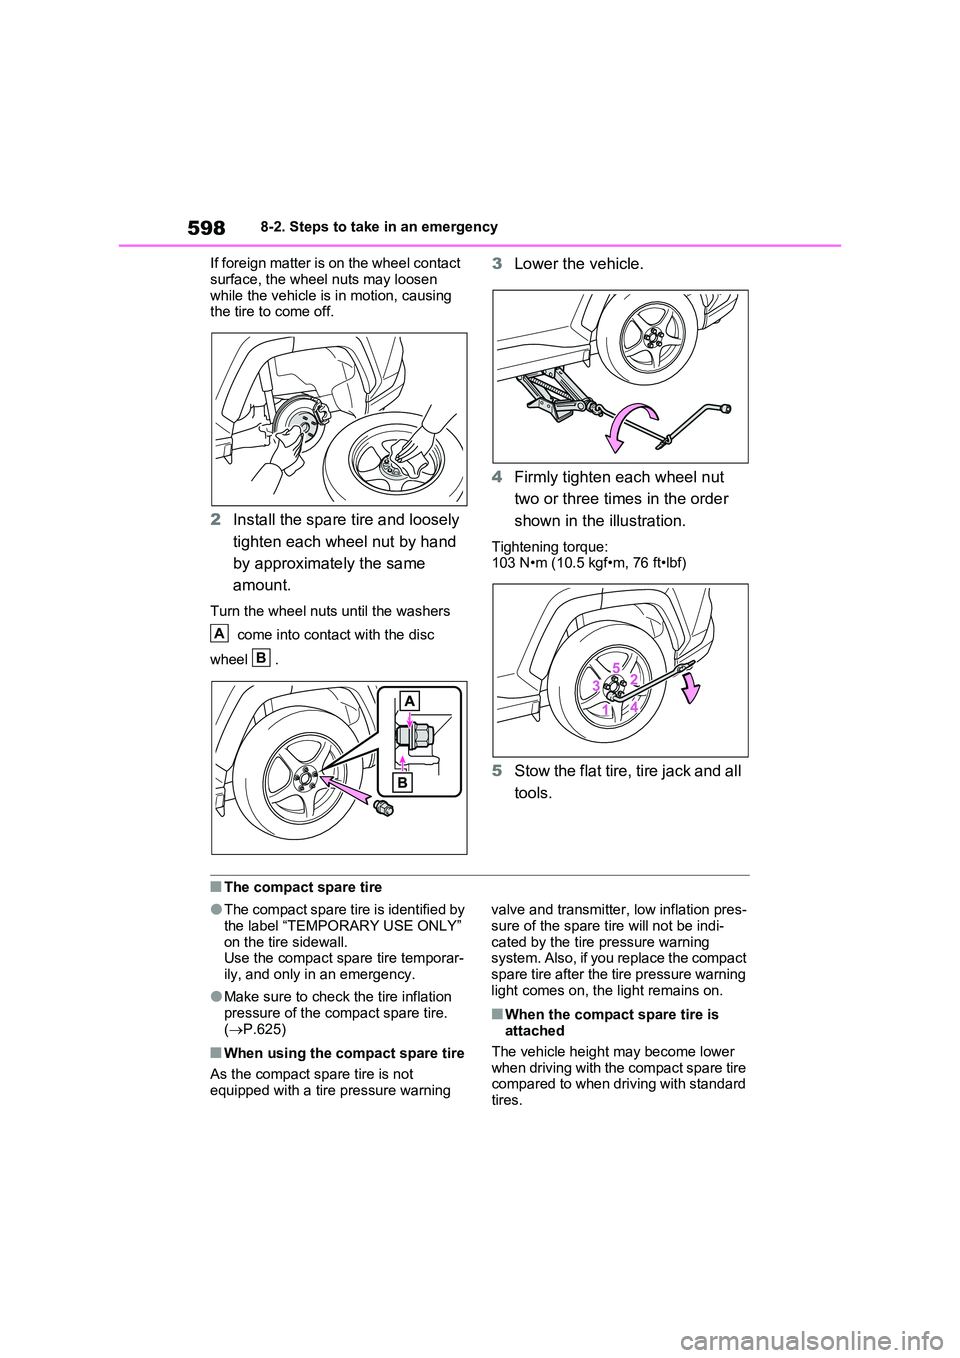
If foreign matter is on the wheel contact
surface, the wheel nuts may loosen while the vehicle is in motion, causing the tire to come off.
2 Install the spare tire and loosely
tighten each wheel nut by hand
by approximately the same
amount.
Turn the wheel nuts until the washers
come into contact with the disc
wheel .
3 Lower the vehicle.
4 Firmly tighten each wheel nut
two or three times in the order
shown in the illustration.
Tightening torque: 103 N•m (10.5 kgf•m, 76 ft•lbf)
5 Stow the flat tire, tire jack and all
tools.
■The compact spare tire
●The compact spare tire is identified by
the label “TEMPORARY USE ONLY” on the tire sidewall.Use the compact spare tire temporar-
ily, and only in an emergency.
●Make sure to check the tire inflation
pressure of the compact spare tire. ( P.625)
■When using the compact spare tire
As the compact spare tire is not
equipped with a tire pressure warning
valve and transmitter, low inflation pres-
sure of the spare tire will not be indi- cated by the tire pressure warning system. Also, if you replace the compact
spare tire after the tire pressure warning light comes on, the light remains on.
■When the compact spare tire is attached
The vehicle height may become lower when driving with the compact spare tire compared to when driving with standard
tires.
A
B
Page 599 of 664
599
8
8-2. Steps to take in an emergency
When trouble arises
■If you have a flat front tire on a road
covered with snow or ice (except 235/55R19 tires)
Install the compact spare tire on one of
the rear wheels of the vehicle. Perform
the following steps and fit tire chains to the front tires:
1 Replace a rear tire with the compact spare tire.
2 Replace the flat front tire with the tire removed from the rear of the vehicle.
3 Fit tire chains to the front tires.
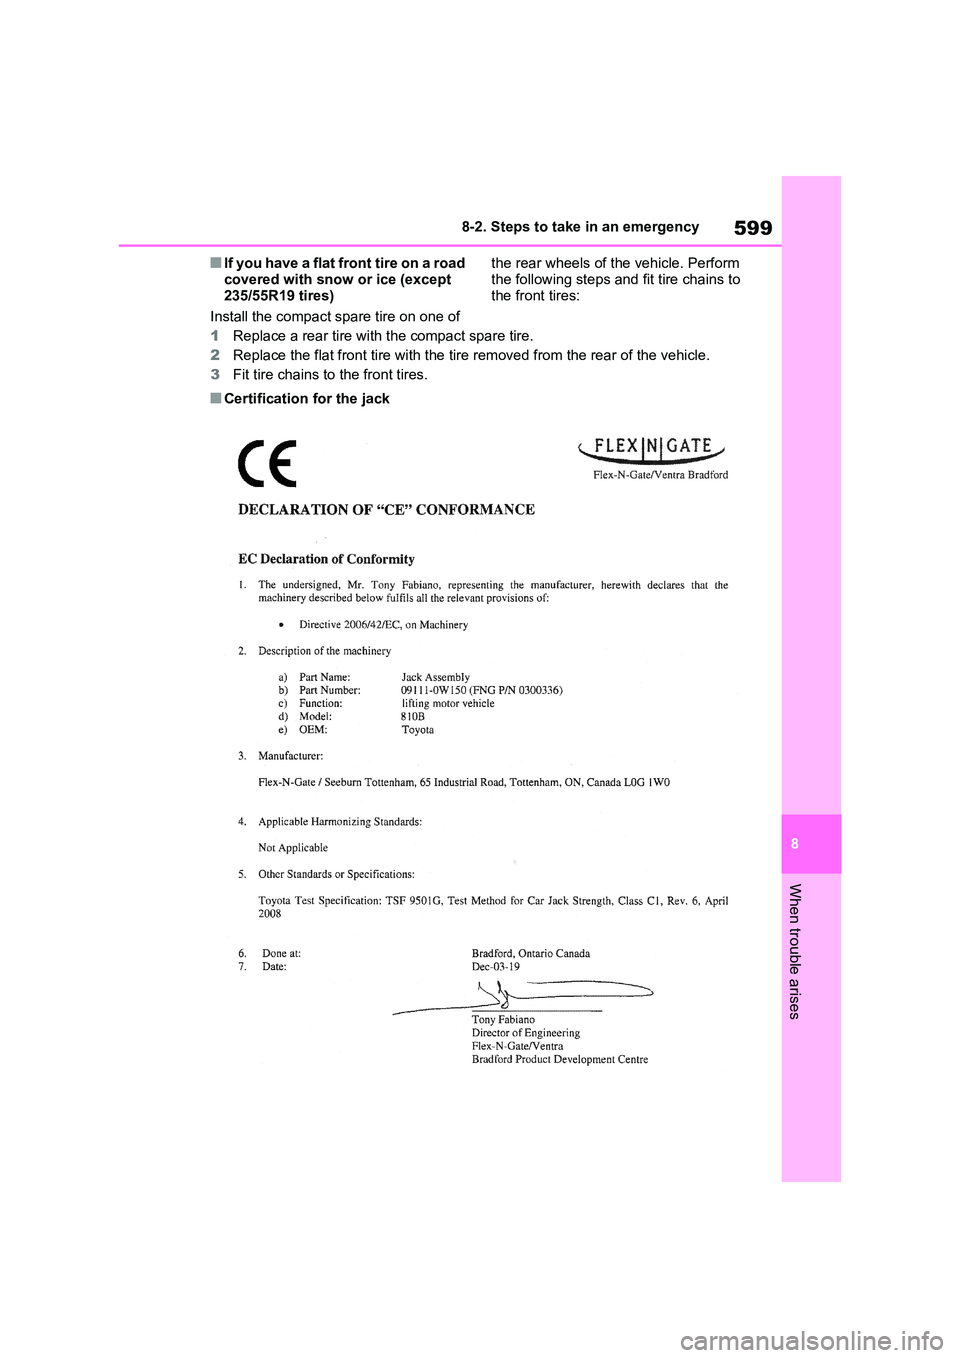
■Certification for the jack
Page 600 of 664

6008-2. Steps to take in an emergency
WARNING
■When using the compact spare tire
●Remember that the compact spare tire provided is specifically designed for use with your vehicle.
Do not use your compact spare tire on another vehicle.
●Do not use more than one compact spare tire simultaneously.
●Replace the compact spare tire with a standard tire as soon as possible.
●Avoid sudden acceleration, abrupt steering, sudden braking and shift-ing operations that cause sudden
engine braking.
■When the compact spare tire is
attached
The vehicle speed may not be cor- rectly detected, and the following sys-
tems may not operate correctly:
• ABS & Brake assist
• VSC/Trailer Sway Control
•TRC
• Cruise control (if equipped)
• Dynamic radar cruise control with full-speed range (if equipped)
• PCS (Pre-Collision System) (if equipped)
• EPS
• LTA (Lane Tracing Assist) (if
equipped)
• Tire pressure warning system
• AHB (Automatic High Beam) (if equipped)
• BSM (Blind Spot Monitor) (if equipped)
• Rear view monitor system (if equipped)
• Panoramic view monitor (if equipped)
• Toyota parking assist monitor (if equipped)
• Toyota parking assist-sensor (if equipped)
• PKSB (Parking Support Brake) (if equipped)
• Navigation system (if equipped)
Also, not only can the following sys-
tem not be utilized fully, but it may actually negatively affect the drive-train components:
• E-Four (Electronic On-Demand AWD system)
■Speed limit when using the com-pact spare tire
Do not drive at speeds in excess of 80
km/h (50 mph) when a compact spare tire is installed on the vehicle.
The compact spare tire is not
designed for driving at high speeds. Failure to observe this precaution may lead to an accident causing
death or serious injury.
■After using the tools and jack
Before driving, make sure all the tools and jack are securely in place in their storage location to reduce the possi-
bility of personal injury during a colli- sion or sudden braking.
NOTICE
■Be careful when driving over
bumps with the compact spare tire installed on the vehicle
The vehicle height may become lower
when driving with the compact spare tire compared to when driving with standard tires. Be careful when driv-
ing over uneven road surfaces.
Page 601 of 664
601
8
8-2. Steps to take in an emergency
When trouble arises
One of the following may be the
cause of the problem:
The AC charging cable may be
attached to the vehicle.
( P.135)
The electronic key may not be
functioning properly. ( P.604)
There may not be sufficient fuel
in the vehicle’s tank.
Refuel the vehicle. ( P.342)
There may be a malfunction in
the immobilizer system. ( P.76)
There may be a malfunction in
the steering lock system.
The hybrid system may be mal-
functioning due to an electrical
problem such as electronic key
battery depletion or a blown fuse.
However, depending on the type
of malfunction, an interim mea-
sure is available to start the
hybrid system. ( P.602)
There is a possibility that the
NOTICE
■Driving with tire chains and the compact spare tire
Do not fit tire chains to the compact spare tire.
Tire chains may damage the vehicle
body and adversely affect driving per- formance.
■When replacing the tires
When removing or fitting the wheels, tires or the tire pressure warning
valve and transmitter, contact any authorized Toyota retailer or Toyota authorized repairer, or any reliable
repairer as the tire pressure warning valve and transmitter may be dam-aged if not handled correctly.
If the hybrid system will
not start
Reasons for the hybrid system
not starting vary depending on
the situation. Check the follow-
ing and perform the appropri-
ate procedure:
The hybrid system will not
start even though the cor-
rect starting procedure is
being followed ( P.317)
Page 615 of 664
615
8
8-2. Steps to take in an emergency
When trouble arises
1 Stop the hybrid system. Set the
parking brake and shift the shift
lever to P.
2 Remove the mud, snow or sand
from around the stuck tire.
3 Place wood, stones or some
other material to help provide
traction under the tires.
4 Restart the hybrid system.
5 Shift the shift lever to D or R and
release the parking brake. Then,
while exercising caution,
depress the accelerator pedal.
■When it is difficult to free the vehi-
cle
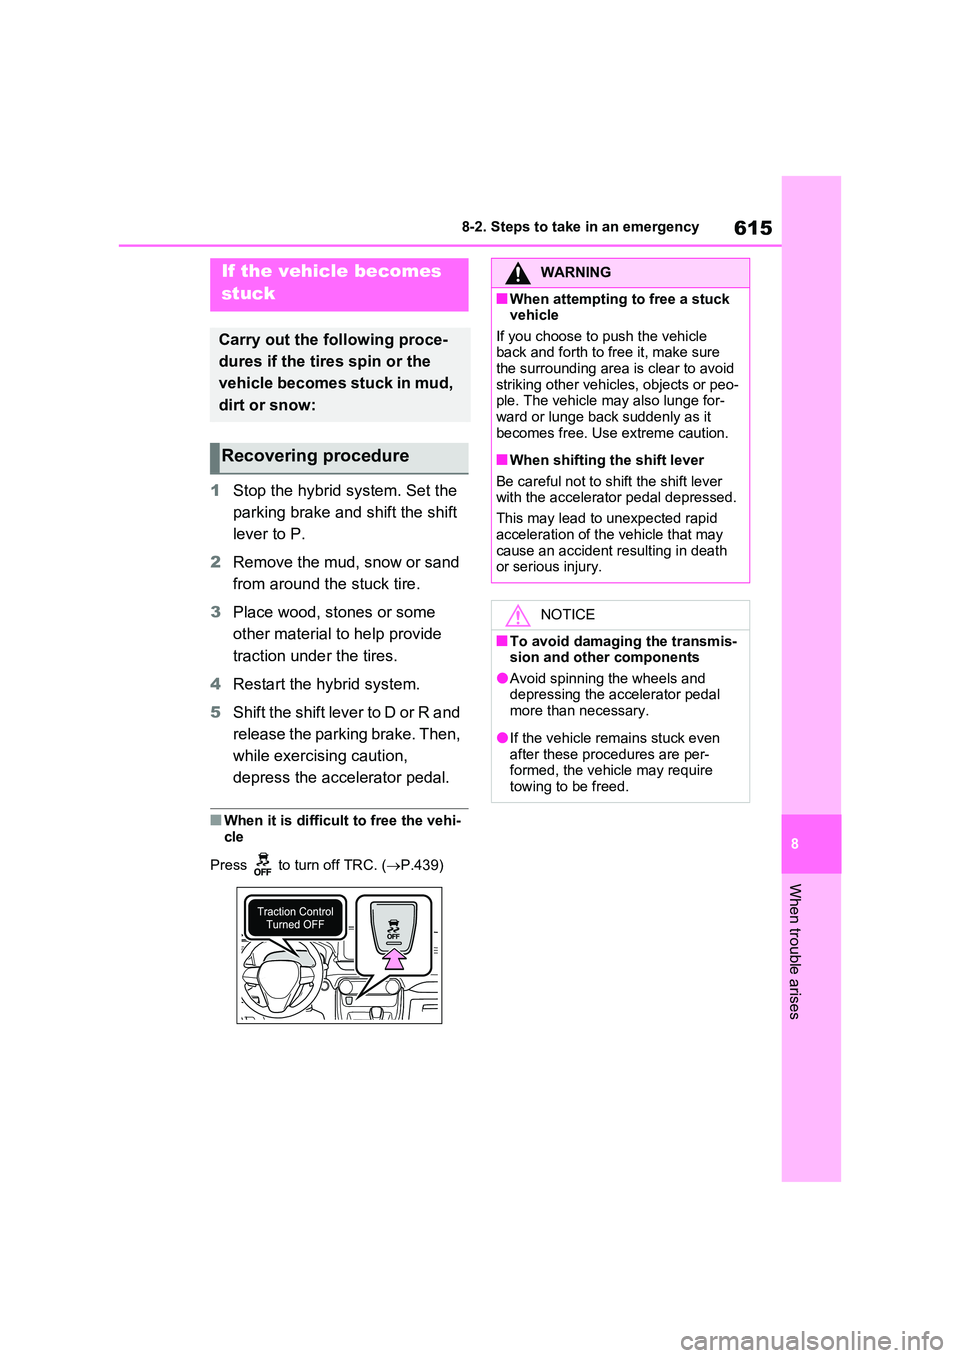
Press to turn off TRC. ( P.439)
If the vehicle becomes
stuck
Carry out the following proce-
dures if the tires spin or the
vehicle becomes stuck in mud,
dirt or snow:
Recovering procedure
WARNING
■When attempting to free a stuck vehicle
If you choose to push the vehicle back and forth to free it, make sure the surrounding area is clear to avoid
striking other vehicles, objects or peo- ple. The vehicle may also lunge for-ward or lunge back suddenly as it
becomes free. Use extreme caution.
■When shifting the shift lever
Be careful not to shift the shift lever with the accelerator pedal depressed.
This may lead to unexpected rapid
acceleration of the vehicle that may cause an accident resulting in death or serious injury.
NOTICE
■To avoid damaging the transmis-sion and other components
●Avoid spinning the wheels and depressing the accelerator pedal more than necessary.
●If the vehicle remains stuck even
after these procedures are per- formed, the vehicle may require towing to be freed.
Page 624 of 664
6249-1. Specifications
*: The fluid capacity is the quantity of reference.
If replacement is necessary, contact any authorized Toyota retailer or Toyota
authorized repairer, or any reliable repairer.
*: Minimum pedal clearance when depressed with a force of 300 N (30.5 kgf, 67.4
lbf) while the hybrid system is operating.
■Full-size tire
Type A
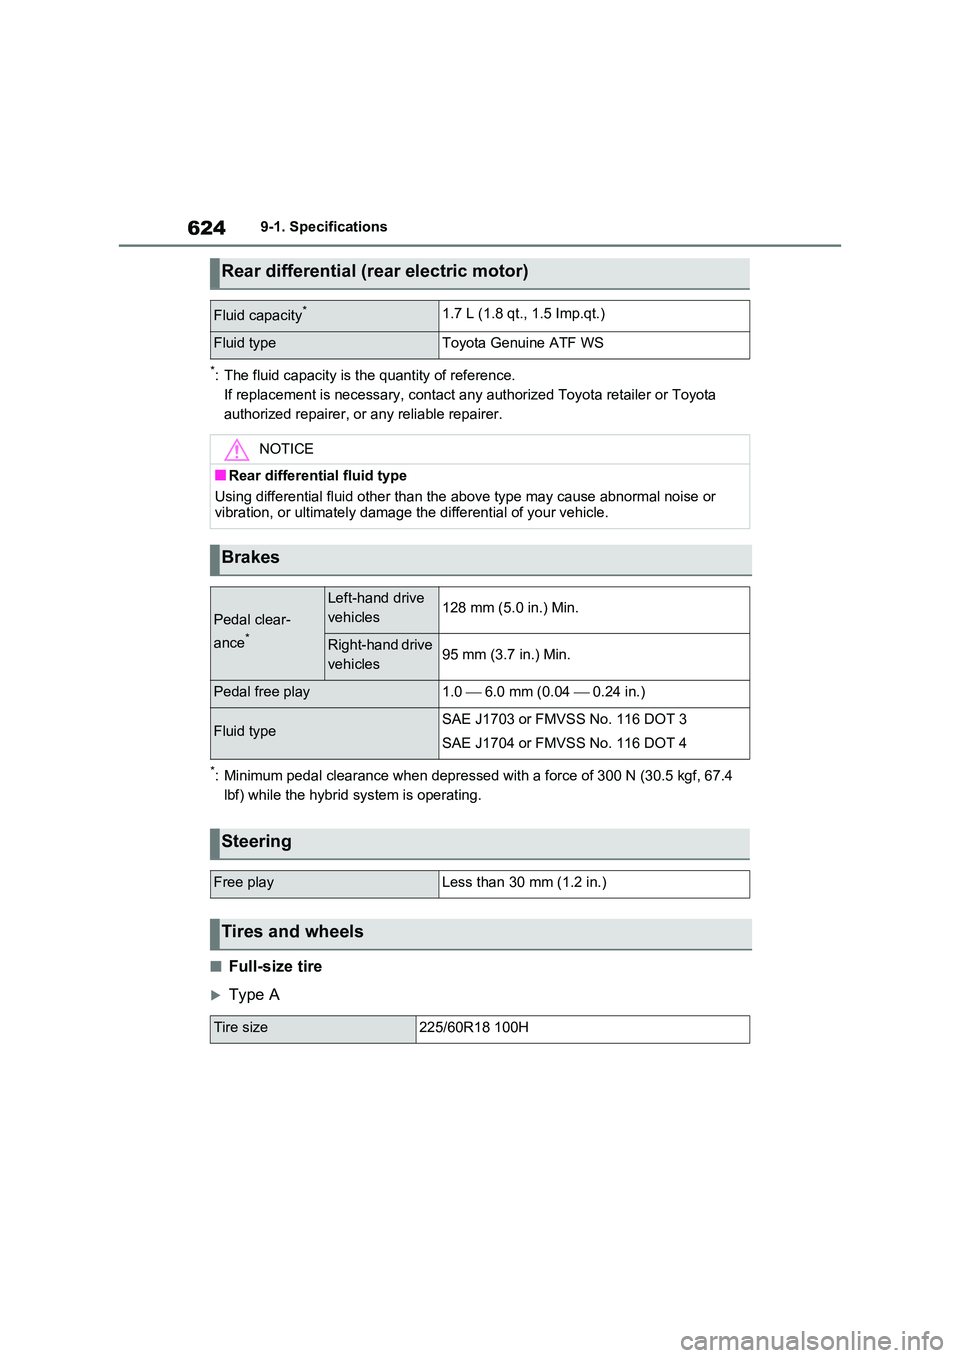
Rear differential (rear electric motor)
Fluid capacity*1.7 L (1.8 qt., 1.5 Imp.qt.)
Fluid typeToyota Genuine ATF WS
NOTICE
■Rear differential fluid type
Using differential fluid other than the above type may cause abnormal noise or vibration, or ultimately damage the differential of your vehicle.
Brakes
Pedal clear-
ance*
Left-hand drive
vehicles128 mm (5.0 in.) Min.
Right-hand drive
vehicles95 mm (3.7 in.) Min.
Pedal free play1.0 6.0 mm (0.04 0.24 in.)
Fluid typeSAE J1703 or FMVSS No. 116 DOT 3
SAE J1704 or FMVSS No. 116 DOT 4
Steering
Free playLess than 30 mm (1.2 in.)
Tires and wheels
Tire size225/60R18 100H